
From the daily archives: Friday, February 26, 2016
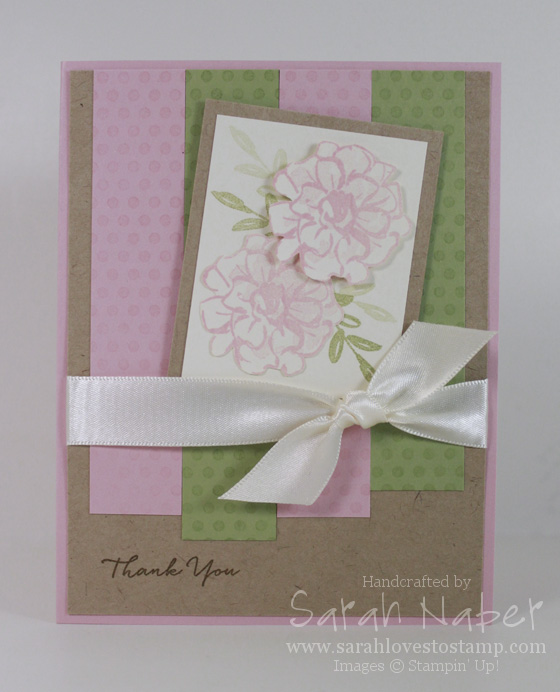
It’s no surprise that it’s pretty easy for me to make a feminine thank you card but I’m really loving the way this one came together. A “fill in the blank” challenge from As You See It (“Thank You” is my favorite sentiment to use), a color challenge from Color Throwdown, and a sketch challenge from Retro Sketches provided me with massive inspiration! I’m wild about this stamp set – What I Love – just one of the many Sale-A-Bration exclusive options this year FREE with a $50 purchase.
Today’s card uses a very basic stamping technique that never fails to delight me with it’s simplicity – 2nd generation stamping. It’s where you ink up the stamp and then stamp off onto scrap paper (I always use my grid paper since that’s what I work on) and then stamp it onto your project. The result is a lighter image and it works perfectly for two step stamp sets, although it’s a useful technique for many different things. I also love to use it when I am making a layered or collage stamped piece.
If you’re interested in seeing my first take on this card, as well as the two cards side by side, here’s a link to that post!
Cut List
Blushing Bride cardstock: 8-1/2″ x 5-1/2″, scored at 4-1/4″; 2 strips at 7/8″ x 4-1/4″
Pear Pizzazz cardstock: 7/8″ x 4-1/2″; 7/8″ x 4″
Kraft 12″x12″ cardstock: 4″ x 5-1/4″; 2-1/4″ x 2-3/4″
Very Vanilla cardstock: 2″ x 2-1/2″; scraps
How To
1. Stamp flower outline from What I Love twice onto Very Vanilla scrap in Blushing Bride ink. Stamp flower details (I used the stamp with less coverage but you could do either) lighter by stamping Blushing Bride inked stamp off onto scrap paper first.
2. Use Paper Snips to quickly fussy cut the two flowers.
3. Stamp leaf image (also from What I Love) onto Very Vanilla layer, stamping once full strength and then once without reinking to get a lighter image.
4. Adhere one flower directly to the layer and adhere one with Stampin’ Dimensionals.
5. Adhere Very Vanilla layer to Kraft mat.
6. Temporarily adhere strips onto a sheet of copy paper how they will appear on the card. Stamp the Dots for Days background on them in VersaMark ink. This will give them a seamless look.
7. Adhere strips onto larger Kraft layer.
8. Stamp “Thank You” sentiment from What I Love in Soft Suede ink onto the larger Kraft layer.
9. Tie Very Vanilla Satin Ribbon around the layer.
10. Adhere to Blushing Bride card base with Fast Fuse adhesive.
11. Adhere focal point with Stampin’ Dimensionals onto card.
I hope you enjoyed this feminine thank you card as much as I do! Check back tomorrow for an alternate take on these 3 challenges that is similar but different!
Leave a comment below and tell me what your crafty plans for the weekend are! Happy Friday!!!
