Beautiful Salted Background Technique
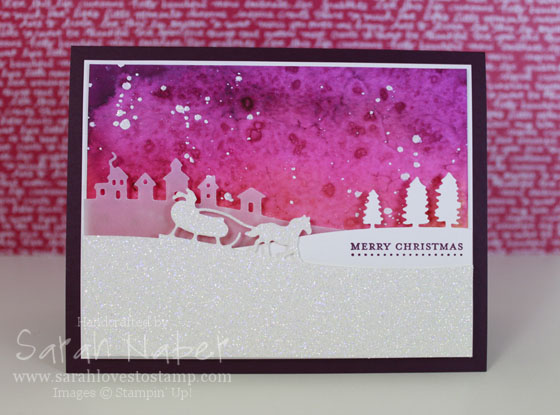
I fell in love with this technique when I saw my demo friend, Jen do it in shades of blue. I wanted to use this amazing edgelits set (RETIRING) as I’d just gotten it recently. The sketch was an As You See It Challenge a few weeks ago but I got sick so I just got around to editing the pictures and SURPRISE, a video too so I’m sharing those today! Check out the current challenge HERE!
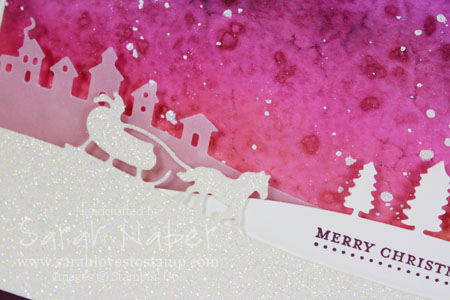
The best thing about this technique is that you can do it with items you already have! Can’t beat that. 🙂 I love the color combo here of Pumpkin Pie (you can’t really see it except for at the very bottom of the colored part), Melon Mambo, Rich Razzleberry and Blackberry Bliss. I find doing things like this just really make me feel like a true artist!
I layered all 3 of the framelits here with the village in Vellum Cardstock, the trees in regular Whisper White and the sleigh in Dazzling Diamonds Glitter Paper. EACH layer was popped up with Stampin’ Dimensionals so this is a VERY dimensional card. I would not recommend sending it in a regular envelope.
A note about the white splatters. I did them to tie all the white together with the technique piece. However, I would do them differently next time. I mixed a bit of Whisper White Craft Ink and water and splattered it on with a paintbrush. 14 hours later it wasn’t dry! So I tried to add White Stampin’ Emboss Powder to the wet splatters. When I heated it, it was almost like the powder went to the edges and melted normally while the wet ink bubbled up through the center of the splatter. Next, I tried 2 separate rounds of Iridescent Ice Embossing Powder. It still wasn’t perfect (I could touch the splatters and still had a tiny amount of ink transfer onto my fingers) but it was as close as I thought it would get. Next time, I plan to try splattering with a mixture of Multipurpose Liquid Glue and water and then embossing with either white or a mix of white and iridescent ice since I ended up loving the touch of sparkle in the sky. Anyway, that’s how crafting goes…sometimes it works, sometimes it doesn’t! Hopefully, you can learn from my mistake.
So here’s the video. I’ll also add the closeup picture, as well as the measurements and supplies below! 🙂
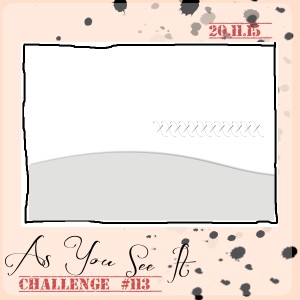
I used As You See It Challenge 113 for this card!
Cut List
Blackberry Bliss: 5-1/2″ x 8-1/2″, scored at 4-1/4″
Whisper White: 5-1/8″ x 4-7/8″
Watercolor piece (trimmed after technique was finished): 5″ x 4-3/4″
Village edge is 2″ from the bottom of the watercolor piece.
Built for Free Using: My Stampin Blog
Hi there! I’m LOVING the partnership of Becky Higgins and Stampin’ Up! to bring you Project Life in Stampin’ Up!’s exclusive colors! There are lots of great products to this line that you can purchase now! Here’s my unboxing and first impressions of the first part of my Project Life order (I’m totally going to have to make another to get those awesome dies).
I posted this video to YouTube last week and forgot that I hadn’t put it onto the blog so that’s why the date on the video is before this post! Don’t want that to happen again? Subscribe to my YouTube channel and get notified when I upload new videos!
Here are the Project Life products that are currently available! More will be available in the new catalog on June 2nd! Did you know? I’m sending out the brand new 2014-2015 Annual Catalog NOW to anyone who places a $50 order (before shipping and tax) in May! If you’re ordering under $150, please use the hostess code RGSHXDMM and you receive a free gift along with your brand new catalog! (If you’re ordering over $150, please don’t use the hostess code as you’re eligible for your own hostess benefits. OF COURSE, I will still send you a catalog and a free gift (or two)! 🙂 Ok, whoops! I’m excited about that info…back to the Project Life products! CLICK on any of the product photos to see them in my online store (you can also click on them in the store to see them larger)!

Variety Pack 12″ x 12″ Project Life Photo
Pocket Pages (135294) $6.95
12 pages: 2 ea. of 6 designs.

Everyday Adventure Project Life Card Collection (135298) $15.95
100 double-sided, color -coordinated cards in 3 sizes:
4″ x 6″, 4″ x 4″, and 3″ x 4″
Everyday Adventure Project Life Accessory Pack (135301) $9.95
4 3″ x 4″ specialty cards; 8 sticker sheets;
1 acetate accents sheet; 8 wood accents;
2 epoxy stickers; 4 arrow paperclips;
1 roll washi tape (5 yds.)
Project Life Journaling Pens (135304) $4.95
2 pens (01 and 05)
Project Life Corner Punch (135346) $7.95
Cards & Labels Project Life Framelits Dies (135707) $24.95
5 dies
Project Life Day to Day Photopolymer Stamp Set (135785) $25.95
42 stamps
Project Life Au jour le jour (Day to Day Set in French) (136706) $25.95
Project Life Point & Click Photopolymer Stamp Set (135787) $15.95
26 stamps
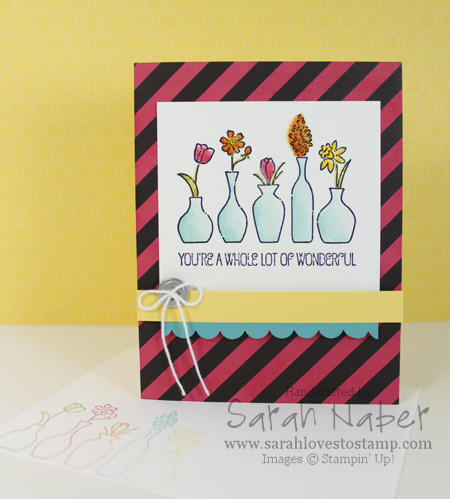
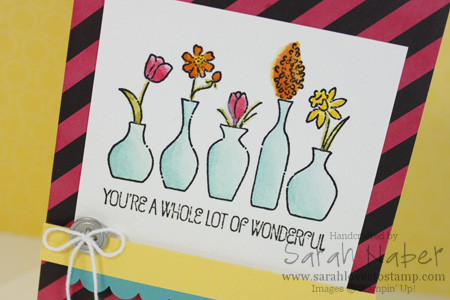
I LOVED this card made with the Vivid Vases single stamp! It was designed as one of our Make and Take projects for Stampin’ Up! Leadership 2014 this past January. This project is also what inspired me to make my video the other day about coloring black and white Designer Series Paper to custom match it to your project. (Check that out below.)
In particular, in this project, I thought coloring Designer Series Paper was a good solution as the Whisper White in the Designer Series Paper looked super bright next to the more muted white of the Watercolor Paper. It can also work well if your Designer Series Paper is Whisper White and your project features Very Vanilla or vice versa.
How To
1. Cut a piece of Daffodil Delight cardstock to 5-1/2″ x 8-1/2″. Score it at 4-1/4″ and crease with a Bone Folder.
2. Cut a piece of the black & white diagonal striped paper from the Kaleidoscope Designer Series Paper pack to 4-1/4″ x 5-1/2″. Color it with the Strawberry Slush Classic Stampin’ Pad using one of the techniques in the video below. Adhere it to the front of the card base with Multipurpose Liquid Glue.
3. Cut Watercolor Paper to 3-1/2″ x 3-1/4″. Stamp the Vivid Vases single stamp on it with the Jet Black StazOn Ink Pad. *TIP: For perfect placement, use the Stamp-a-ma-jig.
4. Watercolor the images with the fine tipped Aqua Painter and the Strawberry Slush, Pumpkin Pie, Daffodil Delight, Old Olive, and Bermuda Bay Classic Stampin’ Pads. (I’ll add my Watercoloring Basics Video below.) Adhere it to the card using Multipurpose Liquid Glue.
5. Cut a strip of Daffodil Delight cardstock to 4-1/4″ x 1/2″ and a piece of Bermuda Bay cardstock to 3-1/2″ x 3/4″. Punch the Bermuda Bay strip with the Scallop Edge punch, attach it to the Daffodil Delight strip and attach them both to the card with Stampin’ Dimensionals.
6. Thread a metal button with Whisper White Baker’s Twine, tie a bow and attach it to the card with a Glue Dot.
7. Use Stampin’ Write Markers to ink up each vase in a different color and stamp them onto the envelope. I used a Stamp-a-ma-jig for perfect placement (and to eliminate the sentiment on the envelope). You can see the stamped envelope in the first picture.
Related Videos
*Check out below the videos for the full supply list for this card.
Adding Color to Black & White Paper
Easy Watercolor Tips
Supply List
STAMPS:
Vivid Vases (Wood-Mount Only 133818)
PAPER:
8-1/2″ x 11″ Bermuda Bay Cardstock (131197)
8-1/2″ x 11″ Daffodil Delight Cardstock (119683)
Kaleidoscope Designer Series Paper (132995)
Watercolor Paper (122959)
INK:
Bermuda Bay Classic Stampin’ Pad (131171)
Daffodil Delight Classic Stampin’ Pad (126944)
Old Olive Classic Stampin’ Pad (126953)
Pumpkin Pie Classic Stampin’ Pad (126945)
Strawberry Slush Classic Stampin’ Pad (131178)
Jet Black StazOn Ink Pad (101406)
ACCESSORIES:
Basic Metal Buttons (133319)
Whisper White Baker’s Twine (124262)
Multipurpose Liquid Glue (110755)
Mini Glue Dots (103683)
Stampin’ Dimensionals (104430)
TOOLS:
Stampin’ Trimmer (126889)
Simply Scored Scoring Tool (122334)
Bone Folder (102300)
Craft Scissors (108360)
Aqua Painters (103954)
Stamp-a-ma-jig (101049)
Scallop Edge Border Punch (119882)
Grid Paper (102787)
Stampin’ Scrub (126200)
Stampin’ Mist (102394)
StazOn Cleaner (109196)
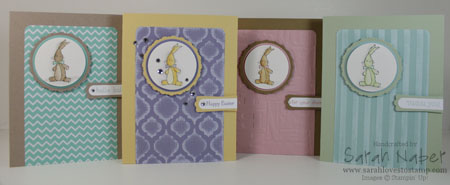
Baby, We’ve Grown Bunny Card
Hi there!
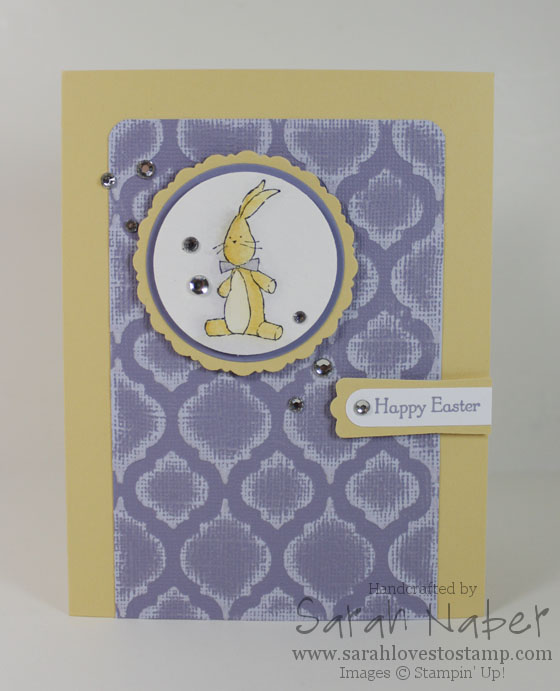
Combining my Design Team project from the As You See It Challenge today with a sketch from Freshly Made Sketches and the color combo from Dynamic Duos (last week’s) has resulted in the card you see above.
Come on over to the As You See It Challenge and play along with us this week! We’re switching it up with theme week this week…anything ANIMALS! 🙂 I chose to use this super cute bunny from the adorable Baby, We’ve Grown stamp set from the Occasions Catalog! Love this little guy!
I got a little excited about this sketch and made a whole bunch of these cards in different color combos. I also filmed a video for you on how to watercolor. The sentiments on all 4 cards are different, showing how versatile this little image can be. The main card above says “Happy Easter,” whereas the other 3 cards are baby themed with “for your shower,” “hello, baby,” and “thank you.” Think of what a great gift a set of the “thank you” ones would be for a new mom!
I also showed some variety in the backgrounds. One is Designer Series Paper, one is dry embossed cardstock and the other two are (surprise, surprise) my favorite, Core’dinations cardstock!!! (Seriously, can I even make a project without it?)
I’ll be back with the video as well as the How To and Supply List soon!
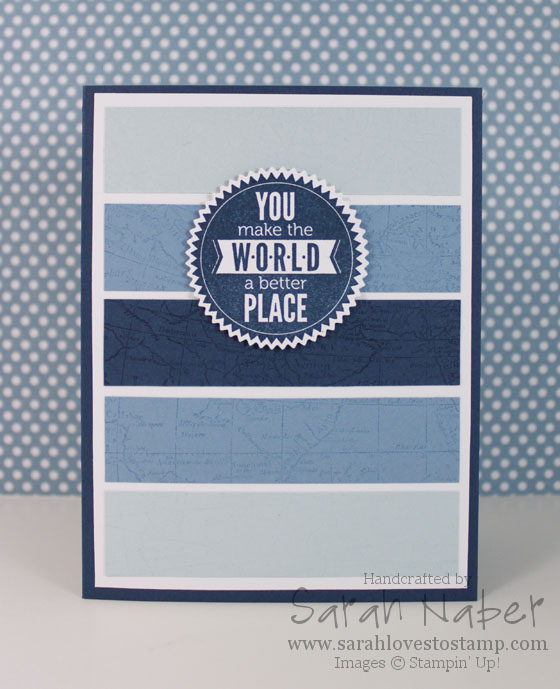
10 Minute Masculine Card
Our As You See It Challenge for the week is a double challenge. You must use shades of blue and try to finish your project in under 10 minutes!!! It’s a fun one and I really encourage you to give it a try! As inspiration, here’s a video of my process from start to finish (I did fast forward while I was at my Big Shot).
How To
1. Cut Midnight Muse cardstock to 5-1/2″ x 8-1/2″ and score at 4-1/4″. Cut Whisper White cardstock to 4″ x 5-1/4″. Cut 2 pieces of each of Soft Sky and Marina Mist cardstock and 1 piece of Midnight Muse all to 3-3/4″ x 15/16″.
2. Use Multipurpose Liquid Glue to adhere the cardstock strips in an ombre pattern. *TIP: Multipurpose Liquid Glue is essential when you want to have a minute or two to slide paper pieces exactly where you want them.
3. Stamp this piece with the World Map background stamp in VersaMark ink. Glue it onto the Midnight Muse cardstock.
4. Stamp the sentiment from Starburst Sayings onto Whisper White cardstock with Midnight Muse ink.
5. Cut the sentiment out with the matching Starburst Framelits Dies, using the Magnetic Platform to hold your framelit in place on your stamped sentiment. Attach it with Stampin’ Dimensionals.
Hi there! I wanted to show you my new system for storing my Framelits dies! I’m loving the magnetic sheets and how this streamlines the amount of items inside the folder so it is easier to take them out and put them away. You can also do this and then leave the magnetic sheets outside of the folders and put them into some sort of container that makes it easy to flip through. If I didn’t put all of mine in their folders, I bet I could fit all of them into one Littles Carry-All Caddy from thirty-one. This has helped me tremendously with storage and organization but also with my creative process as I can easily see and access all of my Framelits dies. Maybe this tip will help someone else too!
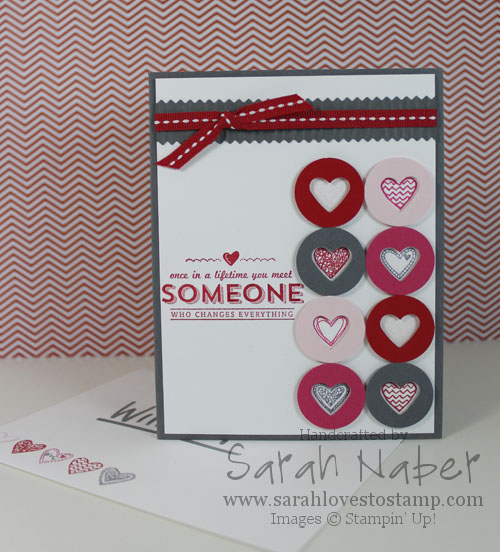
Hi there! Today I have my husband’s Valentine’s Day card to share with you! I combined a few great challenges to bring a fun, masculine card to you (at least my hubby says it is still masculine with the pink since it was for V-day and he says ribbon is ok too). Loving this lovey combo of colors from the Color Throwdown Challenge and the FABULOUS sketch from Freshly Made Sketches! I can tell you I will be using this layout again soon! LOVE!
I received the Language of Love stamp set (Wood-Mount 133074, Clear-Mount 133077) at Stampin’ Up! Leadership in Houston in January (FREE perk for attendees! Woohoo!) and had NO idea I’d fall in love with it (no pun intended…honestly) this much!!! I combined it with the perfect sentiment from the FREE Sale-A-Bration exclusive stamp set, See Ya Later (Wood-Mount 133533, Clear-Mount 133536)! LOVE IT! This sentiment is also GREAT for any love card: Valentine’s Day (obviously), weddings, anniversaries, best friends, and even for adopted parents/children too (I instantly thought of how much my parents changed my life when they adopted me).
One tiny detail you can’t see well from the picture? I used markers to ink up the 5 Heart Strip stamp from Language of Love in the 4 different colors I used and stamped it in the bottom left corner of my envelope. I used the Basic Gray Stampin’ Write Marker to put a tiny “W + S” in one of the open hearts on the envelope for a personalized touch for my hubby, William. I also used the Envelope Liners Framelits Dies (132172) to line the envelope with some Real Red patterned paper from the Brights Designer Series Paper Stack (130134).
You can earn See Ya Later, or any of the other 12 SAB exclusive choices, FREE with any $50 product order! Don’t miss out on this awesome opportunity! Click here, or any of the links below to visit my Online Store!
How To
1. Cut Basic Gray cardstock to 8-1/2″ x 5-1/2″ and score in half at 4-1/4″. Cut a strip of Basic Gray to 4-1/4″ x 1″. Cut Whisper White cardstock to 4″ x 5-1/4″.
2. Using Small Heart Punch, punch 2 hearts out of scraps of each of Basic Gray, Melon Mambo, Pink Pirouette, and Real Red cardstocks. Push the punch in as far as it will go and leave space between the 2 punched hearts for the next step! (Set aside the hearts you punched out, as you actually want the negative image for this project!)
3. Using the 1″ Circle Punch upside down (so you can see where you’re punching), center it around each of the punched hearts from Step 2. Punch all 8 of these out and decide on how you want to arrange them! 🙂
4. Stamp the 5 Heart Strip stamp from Language of Love on 1″ strips of Whisper White cardstock in each of the following colors: Basic Gray, Melon Mambo, Pink Pirouette and Real Red. Use the 3/4″ Circle Punch to punch out 2 hearts from each color. The hearts that look white above are actually Pink Pirouette. This color is VERY pale and hard to pick up in the photo. Sorry about that! *TIP: The hearts are close enough together that you will punch an edge of the heart next to it. This is not a big deal at all because you won’t see that through the little circle/heart windows we made in Step 3.
5. Use Stampin’ Dimensionals (cut apart) to adhere the circle/heart windows from Step 3 onto the stamped heart circles from Step 4. I put my dimensionals on the back of the circle/heart windows – a half dimensional at the top of the heart point and a quarter dimensional on each side of the bottom point of the heart. Then I lined it up over the top of the heart I wanted behind the window and pressed down.
6. Next I laid out where I wanted the circles to be and made a mark between the 2nd and 3rd set of circles so the sentiment could be right in the void between the circles. I then used my Stamp-a-ma-jig to position the “Someone” sentiment from the Sale-A-Bration choice See Ya Later stamp set in Real Red ink. Earn it FREE with a $50 purchase from now until March 31, 2014.
7. I used the Multipurpose Liquid Adhesive to adhere the circle hearts down to the white layer. *TIP: Use the Multipurpose Liquid Adhesive anytime you need a bit of time to move things around a titch. That’s the beauty of a liquid adhesive – it’s a total life saver for my perfectionist nature!
8. Run the strip of Basic Gray cardstock through the Big Shot Die-Cutting Machine with the pinked edge from the Finishing Touches Edgelits Dies. You’ll have to run it through once for one edge and a second time for the second edge.
9. Run the strip of Basic Gray through the Big Shot again using the Woodgrain Embossing Folder to give it a bit extra oomph and add some texture to the card! It is rare that I can make a card without these things!!! *TIP: Do all embossing LAST! If you have any cutting to do with the Big Shot, running an embossed piece through the machine will flatten the embossing a bit.
10. Glue the Basic Gray strip to the top of the card. Trim the excess off of the edges. *TIP: I shared this yesterday, but when I’m going to emboss and I need it to be a specific size (this strip needed to be 4″ wide), I cut it a bit bigger and trim it after embossing, either on my paper cutter or with Paper Snips if it is a strip that will overhang the edge like this one.
11. Finally, tie a knot of ribbon around the white layer and adhere the layer to the card base! 🙂 *TIP: Whisper White and Very Vanilla are a bit thinner than our other cardstocks and thus I have trouble with them buckling when I go to tie my ribbon around a single layer of these cardstocks, so I used my favorite ribbon tying trick on this card. Check out the video posted below for how I do this. On this project, as I mentioned in the video, I used a Glue Dot (Stampin’ Up!’s are mini sized) in the center of my knot to put it exactly where I wanted it. Also, in the video, I used our regular Stampin’ Mist bottle. Since the ribbon needed to span 4″ (plus some to tape on the back) on this card, I used the Stampin’ Mist Refill bottle as my cylinder (it is larger). I taped the edges to the back before adhering it to the card base.
*BONUS TIP: The ribbon tip in this video will also help you use a little less ribbon too – stretching your roll to make even more projects before it runs out! Just by a couple of inches of course so not huge but if you’re using a specific color tons or mass producing cards, you’ll notice a difference.
Supply List
STAMPS:
- Language of Love (Wood-Mount 133074, Clear-Mount 133077)
- See Ya Later (Wood-Mount 133533, Clear-Mount 133536) *Earn it FREE with a $50 product order during Stampin’ Up! Sale-A-Bration. Offer ends March 31, 2014.*
PAPER:
- 8-1/2″ x 11″ Whisper White Cardstock (100730)
- 8-1/2″ x 11″ Basic Gray Cardstock (121044)
- 8-1/2″ x 11″ Melon Mambo Cardstock (115320)
- 8-1/2″ x 11″ Pink Pirouette Cardstock (111351)
- 8-1/2″ x 11″ Real Red Cardstock (102482)
INK:
- Basic Gray Classic Stampin’ Pad (126981)
- Melon Mambo Classic Stampin’ Pad (126948)
- Pink Pirouette Classic Stampin’ Pad (126956)
- Real Red Classic Stampin’ Pad (126949)
ACCESSORIES:
- Real Red 1/4″ Stitched Grosgrain Ribbon (126875)
- SNAIL Adhesive (104332)
- Multipurpose Liquid Glue (110755)
- Mini Glue Dots (103683)
- Stampin’ Dimensionals (104430)
TOOLS:
- Stampin’ Trimmer (126889)
- Simply Scored Scoring Tool (122334)
- Bone Folder (102300)
- Paper Snips (103579)
- Craft Scissors (108360)
- Stamp-a-ma-jig (101049)
- Small Heart Punch (117193)
- 3/4″ Circle Punch (119873)
- 1″ Circle Punch (119868)
- Big Shot Die-Cutting Machine (113439)
- Big Shot Magnetic Platform (130658)
- Finishing Touches Edgelits Dies (127010)
- Woodgrain Textured Impressions Embossing Folders (127821)
- Grid Paper (102787)
- Stampin’ Scrub (126200)
- Stampin’ Mist (102394)
This card was entered into challenge at: Color Throwdown, Cupcake Inspirations, Freshly Made Sketches, Artistic Inspirations, Crafting from the Heart, Challenges 4 Everybody, Cuttin and Stampin, Digistamps4Joy, Lexi’s Creations, Lady Bug Crafts, Oldie But a Goodie (Woodgrain folder, Edgelits, Punches, Pink Pirouette), Paper Pretties, and Splitcoaststampers Ways to Use It (Red, Red, Red). 🙂
Here it is! My first new video for the New Year! Better late than never, right? I’m excited about LOTS of new things that will be coming your way! I hope you enjoy this video – it’s a bit different than my normal cardmaking or tool tips. I LOVE Post It Notes and am constantly reaching for them to jot something down so it’s pretty appropriate for me! 🙂 Thanks for your patience as I took time with family over the holidays and went on a much needed vacation with my hubby in early December! My New Year’s Resolution is to post regularly for you all on my blog and YouTube especially, adding in Facebook, Twitter and Pinterest more too!!! I also still need to blog my AWESOME trip to Houston last week for Stampin’ Up!’s Leadership Conference!!!
5 Ways to Use Core’dinations Cardstock: Quick Tip Tuesday #23
SU! Color Collection Core’dinations Cardstock
40 sheets of 12″ x 12″ Core’dinations Cardstock in SU!-exclusive colors (4 Sheets of each of 10 colors)
Normally $23.95, ONLY $16.77 until December 2, 2013!
Brights (129953)
Subtles (129954)
Regals (129955)
Neutrals (129956)
In Color Core’dinations Cardstock
20 sheets of 12″ x 12″ Core’dinations Cardstock in SU!-exclusive In Colors (4 sheets of each of 5 colors)
2012-2014 In Color (129957) Normally $11.95, ONLY $8.37 until Dec 2, 2013!
2013-2015 In Color (129958) Regular price NOT on sale $11.95
Clearance Rack Discontinued Core’dinations Cardstock
12 sheets of 12″ x 12″ Core’dinations Cardstock in SU!-exclusive
SINGLE color packs
Normally $6.95, ONLY $2.79 while supplies last!
Cherry Cobbler (127846)
Early Espresso (127848)
Gumball Green (127847)
Primrose Petals (129322)
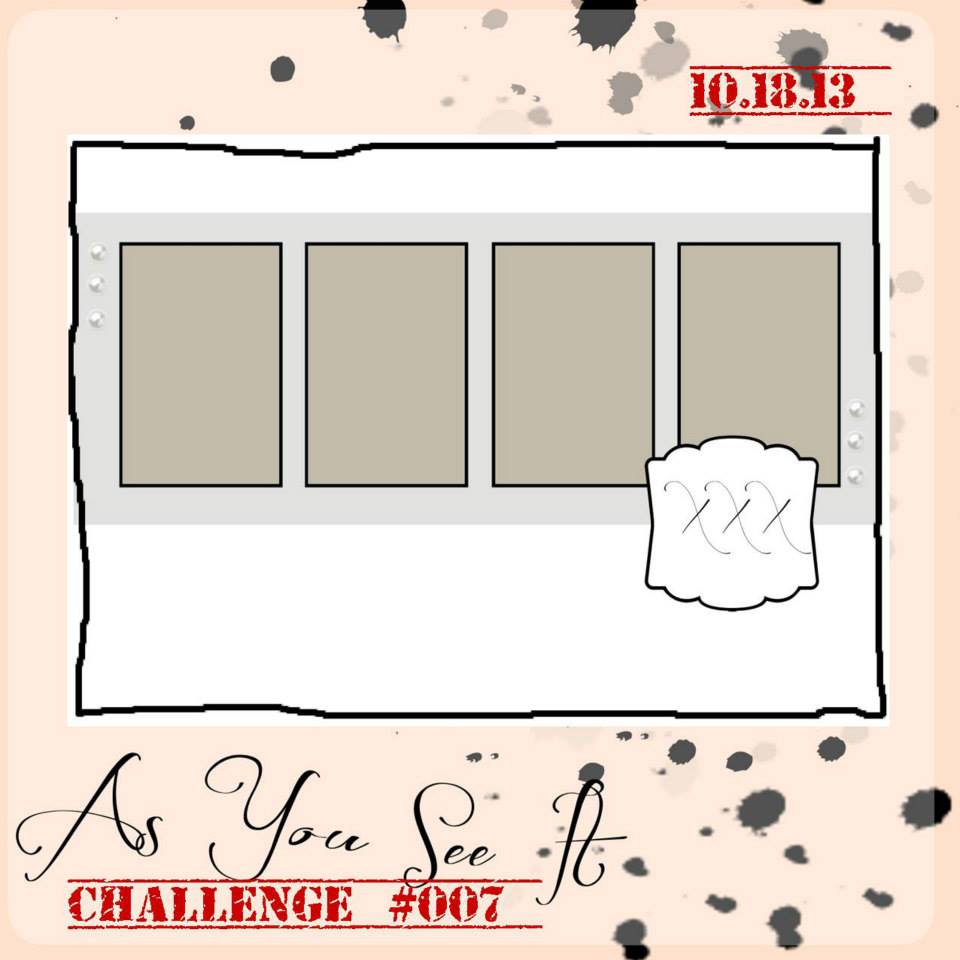
As You See It Challenge #007
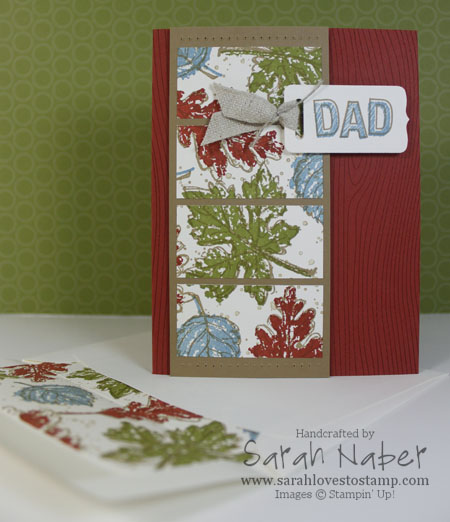
Hi there! A fun card today for the sketch challenge over at As You See It Challenges! I’m SO loving how this turned out for my dad’s birthday card! I also decorated the inside and the envelope so look below for that as well as a few videos for my Quick Tip Tuesday and Tool Time Thursday this week! (You can see both of them at the very end of this post!)
I used the Gently Falling Stamp Set, which is definitely one of the sets that I use frequently. It is SO simple to use. Either use the solid images alone, outline images alone, or use them together as I’ve done on this card! I stamped the solid images in Cajun Craze, Marina Mist, and Old Olive inks onto a 2-1/4″ x 5″ wide piece of Very Vanilla Cardstock. Then I stamped over them (I just eyeballed it – it’s fun for it not to be perfect) with the coordinating outline images in Baked Brown Sugar ink. I used my favorite Gorgeous Grunge Stamp Set and the small splatters with Baked Brown Sugar ink to add some depth, stamping off on scratch paper each time before stamping onto my panel so the ink was lighter. Finally, I cut them apart into four strips measuring 1-1/8″ x 2-1/4″ and mounted them onto the Baked Brown Sugar panel measuring 2-1/2″ x 5-1/2″. I then used the Essentials Paper Piercing Pack, Stampin’ Pierce Mat, and Piercing Tool to pierce the back of the panel. Flip it over and the front has the “wrong” side of the holes. I really like to do this technique on masculine cards as it is a little rougher looking than the regular way of piercing.
The Woodgrain Background Stamp is stamped in Cajun Craze ink straight onto the Cajun Craze card base. I attached the leaf stamped panel with Stampin’ Dimensionals. I stamped “Dad” with the Sketch and Outline alphabets (Marina Mist for the Sketch and Baked Brown Sugar for the Outline) and then used the Chalk Talk Framelits Dies to cut it out. Check out my video below on how I made this long die shorter to better fit my short “Dad” title. I slipped some Natural Trim through the slot, tied it off with Linen Thread, and attached it with Stampin’ Dimensionals. *TIP: Since I’d used Stampin’ Dimensionals under the main strip, I used one on the left of the “Dad” sentiment piece and stacked them 2 high on the right. 🙂
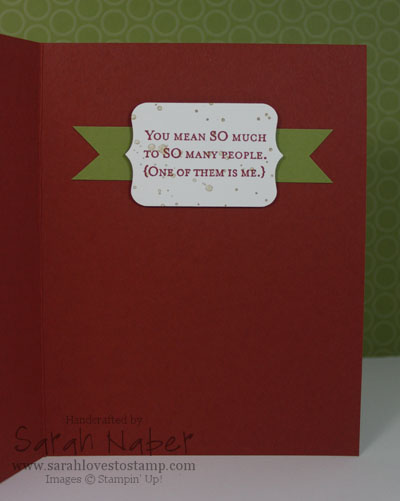
The inside is super simple. I used my Stamp-a-ma-jig to combine 2 sentiments from the One in a Million Stamp Set and die cut it out with the Chalk Talk Framelits Dies. I then took a strip of Old Olive Cardstock and flagged the end with my scissors.
My final step was to create a matching envelope with the Envelope Liner Die. I’ll be posting that video tomorrow but will link to it here (Edited: check it out below). I LOVE how the set turned out! Super professional and simple but special enough for my awesome dad’s birthday!!!
I encourage you to play along with us over at As You See It Challenges! I LOVE what we’ve done so far and hope you’ll join us for some amazing challenges. This week is a sketch challenge, but who knows what’s coming next?!?
This card was entered into challenges at: Papertake Weekly, Stamp-n-Doodle, Creative Craft Challenges 2, Eureka Stamps, The Sisterhood of Crafters, ABC Challenges, 4 Krafty Girlz, Creative Moments, My Craft Creations, and Stamping for the Weekend.
Partial Liner Cardstock Sizes
Medium Envelope: 3″ x 5-3/4″
Note Card Envelope: 2-1/2″ x 5-1/4″
Square Envelope: 2-1/4″ x 3-1/4″
Supply List
STAMPS:
Gently Falling (Wood-Mount 128430, Clear-Mount 123804)
Gorgeous Grunge (Wood-Mount 130514, Clear-Mount 130517)
ABC-123 Outline Alphabet & Numbers (Clear-Mount Only 130568)
ABC-123 Sketch Alphabet & Numbers (Clear-Mount Only 130565)
One in a Million – inside (Wood-Mount 132052, Clear-Mount 126382)
Woodgrain Background Stamp (Wood-Mount 128763, Clear-Mount 127808)
PAPER:
8-1/2″ x 11″ Very Vanilla Cardstock (101650)
8-1/2″ x 11″ Baked Brown Sugar Cardstock (131296)
8-1/2″ x 11″ Cajun Craze Cardstock (119684)
8-1/2″ x 11″ Old Olive Cardstock – inside (100702)
Very Vanilla Medium Envelopes (107300)
INK:
Baked Brown Sugar Classic Stampin’ Pad (131174)
Cajun Craze Classic Stampin’ Pad (126965)
Old Olive Classic Stampin’ Pad (126953)
Marina Mist Classic Stampin’ Pad (126962)
ACCESSORIES:
7/16″ Natural Trim (129287)
Linen Thread (104199)
SNAIL Adhesive (104332)
Multipurpose Liquid Glue (110755)
Stampin’ Dimensionals (104430)
TOOLS:
Stampin’ Trimmer (126889)
Simply Scored Scoring Tool (122334)
Bone Folder (102300)
Paper Snips (103579)
Craft Scissors (108360)
Stamp-a-ma-jig (101049)
Paper Piercing Tool (126189)
Stampin’ Pierce Mat (126199)
Essentials Paper-Piercing Pack (126187)
Big Shot Die-Cutting Machine (113439)
Magnetic Platform (130658)
Chalk Talk Framelits Dies (129983)
*Also comes in a bundle with the Chalk Talk Stamp Set at a 15% discount. Wood-Mount 132731, Clear-Mount 132730!*
Envelope Liners Framelits Dies (132172)
Grid Paper (102787)
Stampin’ Scrub (126200)
Stampin’ Mist (102394)
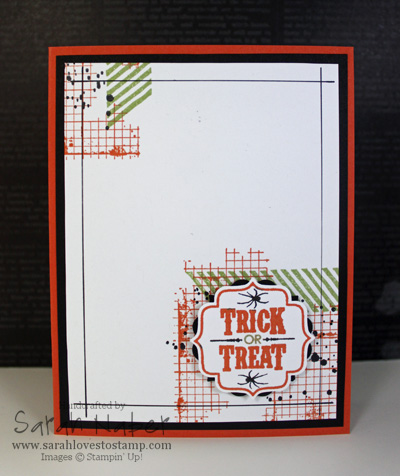
Hello! Today I have a super easy, quick card! 🙂 I participated in the 10 Minute Craft Dash and interpreted their colors for the challenge as Stampin’ Up!’s Tangerine Tango, Basic Black, and Wild Wasabi! I totally encourage anyone to play along with these challenges! They are truly that, a challenge!!! I LOVE that it forces me to make a quick and simple card, although I wish I had had more time to add some black rhinestones to this card.
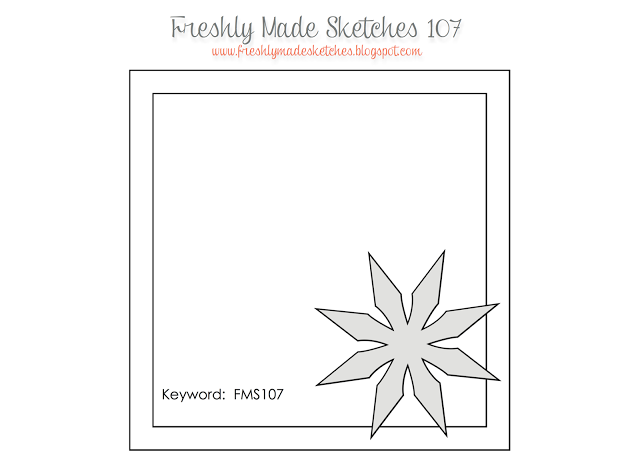
I also filmed a video as I was making this card so you could see the somewhat crazy process! 🙂 I’m proud to say it took me 9 minutes 45 seconds!!! Barely made it! I’ll embed the video here as soon as it uploads to YouTube. I also combined this challenge with the sketch over at Freshly Made Sketches, although I did take a tad bit of creative license and put something in the upper left corner. I also made the sketch into a regular card as I don’t make square cards, except once in a blue moon.
Below is the supply list! Click on any item to see it in my online store and order it now! 🙂 Or CLICK HERE for easy shopping 24/7!
Supply List
STAMPS:
Tags 4 You (Wood-Mount 131820, Clear-Mount 131823)
***Save 15% and buy the Tags 4 You Stamp Set and matching Label Bracket Punch as bundle! Wood-Mount 133293, Clear-Mount 133294***
Gorgeous Grunge (Wood-Mount 130514, Clear-Mount 130517)
Off the Grid (Wood-Mount Only 130736)
PAPER:
8-1/2″ x 11″ Whisper White Cardstock (100730)
8-1/2″ x 11″ Basic Black Cardstock (121045)
8-1/2″ x 11″ Tangerine Tango Cardstock (111349)
INK:
Tangerine Tango Classic Stampin’ Pad (126946)
Wild Wasabi Classic Stampin’ Pad (126959)
Jet Black StazOn Ink Pad (101406)
***Note: The Tangerine Tango & Wild Wasabi markers are not available individually.***
Basic Black Stampin’ Write Marker (100082)
Brights Collection Stampin’ Write Markers (131259) – Tangerine Tango
Subtles Collection Stampin’ Write Markers (131263) – Wild Wasabi
OR get ALL 38 Core Colors in our Color Collections (not Whisper White or Very Vanilla) in the Many Marvelous Markers (131264)
ACCESSORIES:
SNAIL Adhesive (104332)
Multipurpose Liquid Glue (110755)
Stampin’ Dimensionals (104430)
TOOLS:
Stampin’ Trimmer (126889)
Simply Scored Scoring Tool (122334)
Bone Folder (102300)
Blender Pens (102845)
Label Bracket Punch (132153)
***Save 15% and buy the Label Bracket Punch and matching Tags 4 You Stamp Set as bundle! Wood-Mount 133293, Clear-Mount 133294***
Grid Paper (102787)
Stampin’ Scrub (126200)
Stampin’ Mist (102394)
StazOn Cleaner (109196)
ruler
Gathered Ribbon Tip: Quick Tip Tuesday #20
I hope you enjoy today’s quick little ribbon tip that’s great for any type of project: cards, scrapbook pages, 3D items, or any other paper craft you can dream up! I used it here on a vintage card but it will really work with most any style.
Stampin’ Up! sells their fabulous Seam Binding Ribbon in 8 colors. One of them is Very Vanilla and the great thing about Whisper White or Very Vanilla ribbon is that it is easy to dye to match any project using our Classic Ink Refills! So instead of just the 8 colors, you can have 50!!!
Head on over to my Online Store and get some ribbon to start creating with today! It is my very most favorite embellishment to add to any project!!!
Hello! Our new Firm Foam Pads need to be reinked a bit differently than the old felt style ones, so hopefully this video will help you to reink your awesome new Firm Foam Pads successfully! It’s super easy and one reinker should last you a very long time! Let me know if you have questions.
Happy Halloween + Quick Tip Video
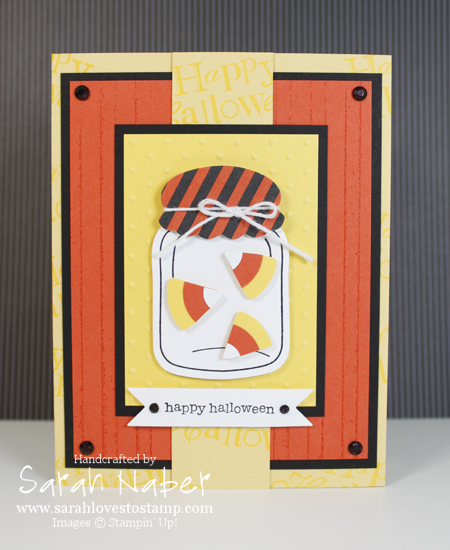
Hi there! Hope you’re all having a wonderful Halloween! I made a card to share with you that fits a lot of challenges online this week. Sure fun to get some ideas from other places – my favorite are sketches and color challenges and I used BOTH on this card. I would’ve NEVER thought to put So Saffron & Daffodil Delight together, but I LOVED them together. I stamped the “Happy Halloween” from the hostess set Wacky Wishes randomly on my So Saffron card stock in Daffodil Delight ink and that really helped pull those two yellows together! I also did a challenge that meant that you had to include bling, so I took my Stampin’ Up! Basic Rhinestone Jewels and colored them with a permanent black marker. Another fun challenge requires you to use supplies that are more than 6 months old – mine were my neglected colors So Saffron and Tangerine Tango, as well as the Whisper White Baker’s Twine and all of the circle punches!
One other tip is about the Candy Corn – I made it with a Whisper White 1/2″ circle punch, Tangerine Tango 1″ circle punch, and Daffodil Delight 1-3/8″ circle punch, centered and layered together. Then you cut wedges to make the individual Candy Corn pieces! So so simple! I also rounded all 3 corners so they looked even more like Candy Corn. Then I put them on Dimensionals and popped them in my little jar! I just love the Perfectly Preserved stamp set and Cannery framelits in the Holiday Catalog!!! There are so so many things that aren’t even in the stamp set, that you can fill that little jar with! 🙂
I hope you enjoy this project, as well as the Quick Tip Tuesday on using your embossing folders without the Big Shot. Such a fun technique! Give it a try and send me a picture of your creation! If you use all Stampin’ Up! goodies, I’d love to feature you and your project here as a guest stamper!
This card was entered into challenges at: Colour Q, Papertake Weekly, Brown Sugar, Fussy & Fancy Friday, Card Makin’ Mamas, Digistamps 4 Joy (vertical line 1), Stampin’ for the Weekend, Crafts and Me, Party Time Tuesdays, Fab n Funky, Scrappy Frogs, Inspire Me Fridays, A Gem of a Challenge, Frosted Designs Fabulous Friday, 2 Sisters, My Time to Craft, Oldie But a Goodie, Wags n Whiskers, The Artistic Stamper, The Sisterhood of Crafters, Dream Valley, Paper Pretties, and Creative Craft Challenges!
Supply List
STAMPS:
Perfectly Preserved (Wood-Mount 126690, Clear-Mount 126692)
Teeny Tiny Wishes (Wood-Mount 115370, Clear-Mount 127802)
Wacky Wishes Hostess Set (Wood-Mount 126410, Clear-Mount 126412) – available with a $150 party or order!
PAPER:
8-1/2″ x 11″ Whisper White Card Stock (100730)
8-1/2″ x 11″ Basic Black Card Stock (121045)
8-1/2″ x 11″ Daffodil Delight Card Stock (119683)
8-1/2″ x 11″ So Saffron Card Stock (105118)
8-1/2″ x 11″ Tangerine Tango Card Stock (111349)
Howlstooth & Scaringbone Designer Series Paper (126906)
INK:
Daffodil Delight Classic Stampin’ Pad (126944)
Tangerine Tango Classic Stampin’ Pad (126946)
Jet Black StazOn Ink Pad (101406)
ACCESSORIES:
Whisper White Baker’s Twine (124262)
Basic Rhinestone Jewels (119246)
Multipurpose Liquid Glue (110755)
Stampin’ Dimensionals (104430)
TOOLS:
Tabletop Paper Cutter (106959)
Simply Scored Scoring Tool (122334)
Bone Folder (102300)
Paper Snips (103579)
Craft Scissors (108360)
Brayer (102395)
1/2″ Circle Punch (119869)
1″ Circle Punch (119868)
1-3/8″ Circle Punch (119860)
Big Shot Die-Cutting Machine (113439)
Cannery Set Framelits Dies (127822)
Bitty Banners Framelits Dies (129267)
Perfect Polka Dots Textured Impressions Embossing Folder (117335)
Stripes Textured Impressions Embossing Folder (123128)
Grid Paper (102787)
Stampin’ Scrub (126200)
Stampin’ Mist (102394)
StazOn Cleaner (109196)
Permanent Black Marker (non-SU!)
Connect with Me!
Categories
Archives
Copyright Info
Copyright Info All Images © Stampin' Up! 2011 Sarah Naber, Independent Stampin' Up! Demonstrator The content of this blog is my sole responsibility as an independent Stampin' Up! demonstrator and the use of, and content of, the classes, services, or products offered on this blog is not endorsed by Stampin' Up!


