
Currently viewing the tag: "Feminine Cards"

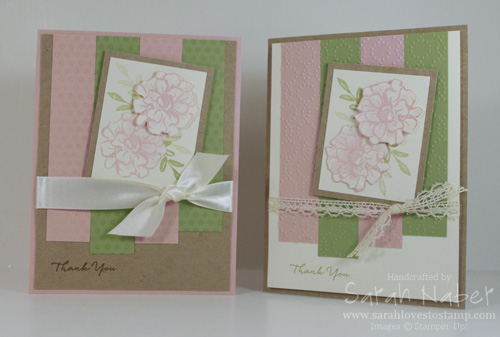
Hello! I hope you’re having a great start to your week! This was the first version of the pastel floral card I made Friday with the What I Love stamp set from Stampin’ Up! Sale-A-Bration 2016! I wasn’t sure if I loved it, so I tried again and made the card that I posted on Friday. Which version do you prefer?
The supplies are basically the same, except the lace trim and the strips are embossed instead of stamped.
CLICK HERE to check out my post about the card on the left, including the paper dimensions in the cut list. The Very Vanilla layer and Kraft layer are identical in size, as well as the card bases and the rest is the same colors and everything.
If you haven’t heard of Stampin’ Up! Sale-A-Bration, here’s a quick rundown of what that is. It’s our best promotion of the year because you get an exclusive free item with every $50 you spend! It’s also a great time to host – you get an extra $25 hostess dollars with a party of $250 or more or join – you get $155 worth of any products you choose for only $99 during Sale-A-Bration this year! Free shipping on your kit/order when you join too plus the $56 of freebies! Gotta love that!
Do you like seeing the full stamp sets in my posts? I’m happy to share them if it’s something people enjoy. Here’s the What I Love stamp set. It’s only available during Sale-A-Bration 2016 and it isn’t available to buy outright. You can earn it free by spending $50 in any product first.
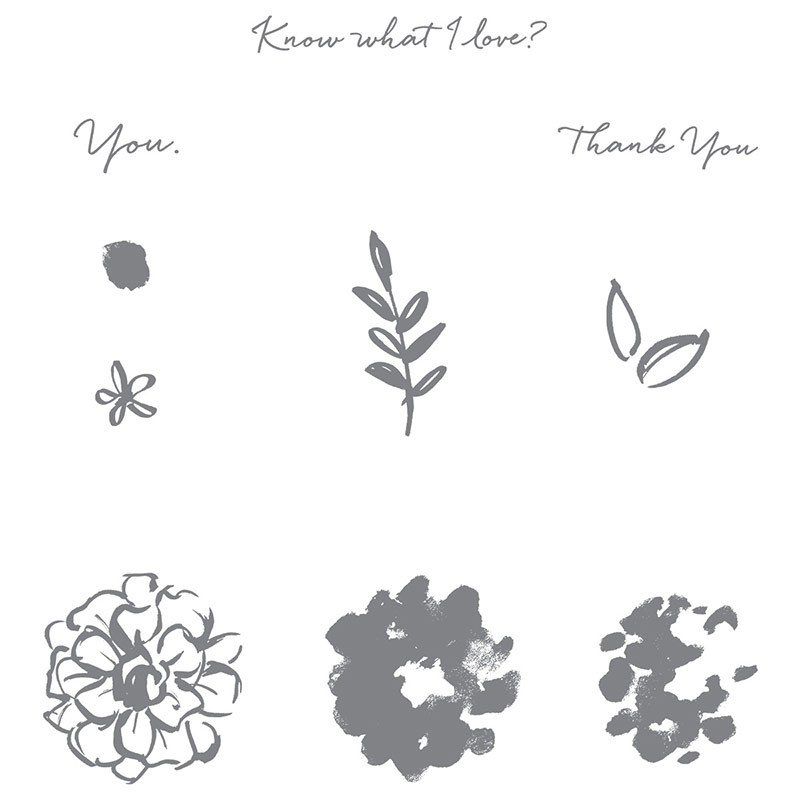
I’m also sharing a video today! This is a video by Stampin’ Up! all about the What I Love stamp set! It’s a short one but does show great ideas with this versatile set.
Today marks the end of February, meaning you have just one month remaining to get this year’s Sale-A-Bration items! The company has also said that stock is not guaranteed until March 31st. If you want to make sure you get the ones you love, click here to shop in my Online Store! It’s open 24/7! The What I Love stamp set featured here is just one of the great options from Sale-A-Bration 2016!!!
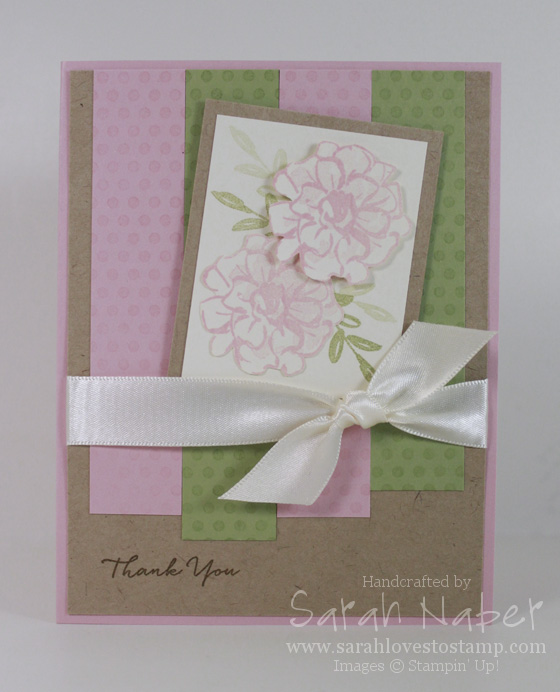
It’s no surprise that it’s pretty easy for me to make a feminine thank you card but I’m really loving the way this one came together. A “fill in the blank” challenge from As You See It (“Thank You” is my favorite sentiment to use), a color challenge from Color Throwdown, and a sketch challenge from Retro Sketches provided me with massive inspiration! I’m wild about this stamp set – What I Love – just one of the many Sale-A-Bration exclusive options this year FREE with a $50 purchase.
Today’s card uses a very basic stamping technique that never fails to delight me with it’s simplicity – 2nd generation stamping. It’s where you ink up the stamp and then stamp off onto scrap paper (I always use my grid paper since that’s what I work on) and then stamp it onto your project. The result is a lighter image and it works perfectly for two step stamp sets, although it’s a useful technique for many different things. I also love to use it when I am making a layered or collage stamped piece.
If you’re interested in seeing my first take on this card, as well as the two cards side by side, here’s a link to that post!
Cut List
Blushing Bride cardstock: 8-1/2″ x 5-1/2″, scored at 4-1/4″; 2 strips at 7/8″ x 4-1/4″
Pear Pizzazz cardstock: 7/8″ x 4-1/2″; 7/8″ x 4″
Kraft 12″x12″ cardstock: 4″ x 5-1/4″; 2-1/4″ x 2-3/4″
Very Vanilla cardstock: 2″ x 2-1/2″; scraps
How To
1. Stamp flower outline from What I Love twice onto Very Vanilla scrap in Blushing Bride ink. Stamp flower details (I used the stamp with less coverage but you could do either) lighter by stamping Blushing Bride inked stamp off onto scrap paper first.
2. Use Paper Snips to quickly fussy cut the two flowers.
3. Stamp leaf image (also from What I Love) onto Very Vanilla layer, stamping once full strength and then once without reinking to get a lighter image.
4. Adhere one flower directly to the layer and adhere one with Stampin’ Dimensionals.
5. Adhere Very Vanilla layer to Kraft mat.
6. Temporarily adhere strips onto a sheet of copy paper how they will appear on the card. Stamp the Dots for Days background on them in VersaMark ink. This will give them a seamless look.
7. Adhere strips onto larger Kraft layer.
8. Stamp “Thank You” sentiment from What I Love in Soft Suede ink onto the larger Kraft layer.
9. Tie Very Vanilla Satin Ribbon around the layer.
10. Adhere to Blushing Bride card base with Fast Fuse adhesive.
11. Adhere focal point with Stampin’ Dimensionals onto card.
I hope you enjoyed this feminine thank you card as much as I do! Check back tomorrow for an alternate take on these 3 challenges that is similar but different!
Leave a comment below and tell me what your crafty plans for the weekend are! Happy Friday!!!

“But I’m not creative…” That short phrase is probably one I hear more than any other as a demonstrator! I hear it at classes I teach, at workshops, and in the community when I tell people what I do and say they can do it too! Creativity is a tricky thing – I understand not feeling creative! I know some of my peers have more creativity in their pinky finger than I do in my entire body. But I love doing what I do, so my response is always the same! You don’t have to be creative to create things and to enjoy the process!
This card is a GREAT example of that! I used a color combination from the Stampin’ Up! Color Coach #120148 (a GREAT tool – in fact I did a video on it a while ago that I will link HERE): Perfect Plum, Wild Wasabi, and So Saffron!!! Gorgeous! This ended up being my favorite swap card I made for Stampin’ Up! Convention 2012! We also made this card shortly before I left for Convention in my Crazy about Techniques class as it uses the Faux Linen technique! This technique is an oldy but a goody!!! You use glossy card stock and sand it horizontally and vertically until the gloss is worn off, then sponge and stamp it and sand it more if you want until you get the desired result!!! LOVE IT! The layout is one I took from an old Mojo Monday challenge (I LOVE to print their monthly ones and then page through them when I’m creating – I rarely participate in a challenge in real time. I just found it and it was from Week 2 of Mojo Monday!!! Really really old!) I also LOVE the Field Flowers stamp set! (I do wish I had it in Wood-Mount though so I could make permanent vellum sheets to use with the Stamp-a-ma-jig!) And I used Teeny Tiny Wishes – my go-to stamp set as it includes every greeting I could need! (This card would be great for any occasion – just switch out the greeting!!!) I most always punch it out with the Word Window punch as I have here – super easy, cute and will fit anywhere on any card!!! I used another favorite of mine from SU! – background stamps!!! I LOVE them and they are a favorite of mine. I almost always make a card with either a background stamp or a background embossed with a Textured Impressions Embossing Folder and the Big Shot! Anyway enjoy!!! Let me know if you have any questions!!!
Supply List
STAMPS:
Field Flowers (Wood-Mount 122760, Clear-Mount 122762)
Teeny Tiny Wishes (Wood-Mount 115370, Clear-Mount 127802)
Netting Background Stamp (122655)
Distressed Dots Background Stamp (122815)
PAPER:
8-1/2″ x 11″ Glossy White Card Stock (102599)
8-1/2″ x 11″ Very Vanilla Card Stock (101650)
8-1/2″ x 11″ Perfect Plum Card Stock (101889)
8-1/2″ x 11″ So Saffron Card Stock (105118)
8-1/2″ x 11″ Wild Wasabi Card Stock (108641)
INK:
Perfect Plum Classic Stampin’ Pad (126963)
So Saffron Classic Stampin’ Pad (126957)
Wild Wasabi Classic Stampin’ Pad (126959)
ACCESSORIES:
Victoria 5/8″ Crochet Trim (118481)
Vintage Trinkets (118764)
SNAIL Adhesive (104332)
Multipurpose Liquid Glue (110755)
Stampin’ Dimensionals (104430)
TOOLS:
Tabletop Paper Cutter (106959)
Simply Scored Scoring Tool (122334)
Color Coach (120148)
2012-2014 In Color Color Coach Cards (126890)
2011-2013 In Color Color Coach Cards (124886)
Bone Folder (102300)
Craft Scissors (108360)
Stamp-a-ma-jig (101049)
Paper Piercing Tool (126189)
Stampin’ Pierce Mat (126199)
3/16″ Corner Rounder Punch (119871)
Word Window Punch (119857)
Big Shot Die-Cutting Machine (113439)
Labels Collection Framelits Dies (125598)
Grid Paper (102787)
Stampin’ Scrub (126200)
Stampin’ Mist (102394)
Connect with Me!


