
Currently viewing the category:
"As You See It Challenge"
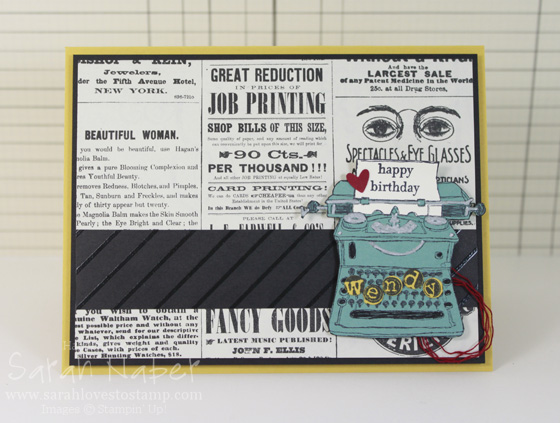
I thought I’d better get this Tap Tap Tap birthday card post up as the Tap Tap Tap stamp set is one that will be retiring this month! I found this post in my drafts folder so I actually created this card close to a year ago!
I cannot believe how long I’ve owned this stamp set and not used it! My sweet friend Allison is a huge fan of this stamp set and has constantly inspired me with her adorable uses for this versatile set. SO…I finally pulled it out to make a vintage-loving friend of mine a birthday card. Allison had colored a Lost Lagoon typewriter on one of her Tap Tap Tap cards in a similar way so that’s what I did – not sure if we used the same supplies, but hers was the look I was going for.
Cut List
Hello Honey Cardstock: 5-1/2″ x 8-1/2″, scored at 4-1/4″
Basic Black Cardstock: 5-1/4″ x 4″
Typeset Designer Series Paper: 5-1/8″ x 3-7/8″
Color Me Irresistable Designer Series Paper: 5-1/8″ x 1″
Lost Lagoon, Hello Honey, Cherry Cobbler, and Very Vanilla Cardstock scraps
How To
1. Stamp typewriter onto Lost Lagoon cardstock (RETIRING) and the paper portion of the typewriter onto Very Vanilla.
2. Stamp sentiment from Teeny Tiny Wishes onto Very Vanilla “typewriter paper”. I used post it notes to mask the sentiment to make it two lines (watch for a video on that coming soon). Cut out paper (two separate pieces).
3. Color typewriter parts with Basic Gray Stampin’ Write Marker and Silver Stampin’ Dazzle Marker (retired but any silver marker will do). Cut it out using the Paper Snips.
4. Stamp alphabet stamp on Hello Honey paper (RETIRING) with black ink. Punch out selected letters with the 1/4″ Handheld Circle Punch (RETIRING).
5. Punch heart from Owl Builder punch out of Cherry Cobbler scrap.
6. Adhere typewriter paper, letters and heart onto typewriter. Place Stampin’ Dimensionals on back.
7. Adhere black embossed stripe from Color Me Irresistable Specialty Designer Series Paper (RETIRING) onto Typeset Specialty Designer Series Paper (RETIRING). Adhere that onto black layer and then onto card base. *TIP: With this Typeset paper, they are much thinner (this is NOT true of all specialty DSPs but of the 24/pack ones), so use a dry adhesive instead of a liquid.
8. Unravel Cherry Cobbler Thick Baker’s Twine (RETIRING) and make a messy nest of a few strands. Stick it to the back of the typewriter, onto one of the Stampin’ Dimensionals.
9. Attach typewriter to card.
This was a card I created for the As You See It Challenge #101. Obviously it’s over now, but you can play along with the current challenge or use any past challenges to inspire you too!!!
I hope you enjoyed this birthday card made with the Tap Tap Tap stamp set! It’s one of my favorites and I think I’ll really miss it when it’s retired! The color combo of Lost Lagoon, Hello Honey, Cherry Cobbler, Basic Black, and Very Vanilla also includes two retiring In Colors too.
CLICK HERE to get your
Typeset Specialty Designer Series Paper, while supplies last!!!
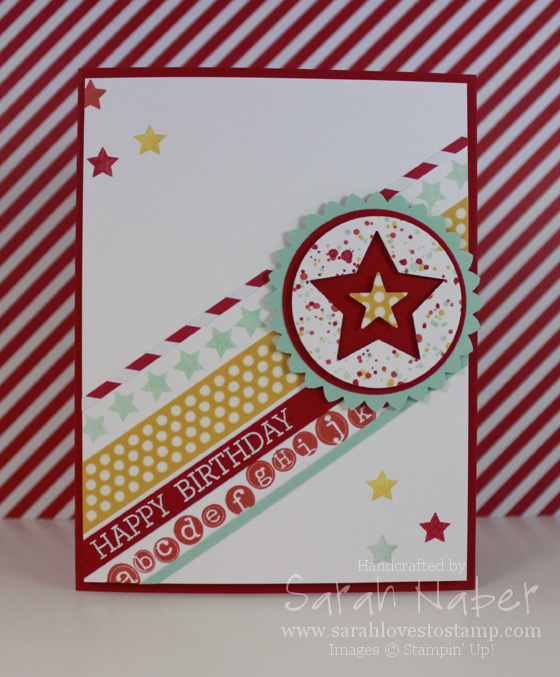
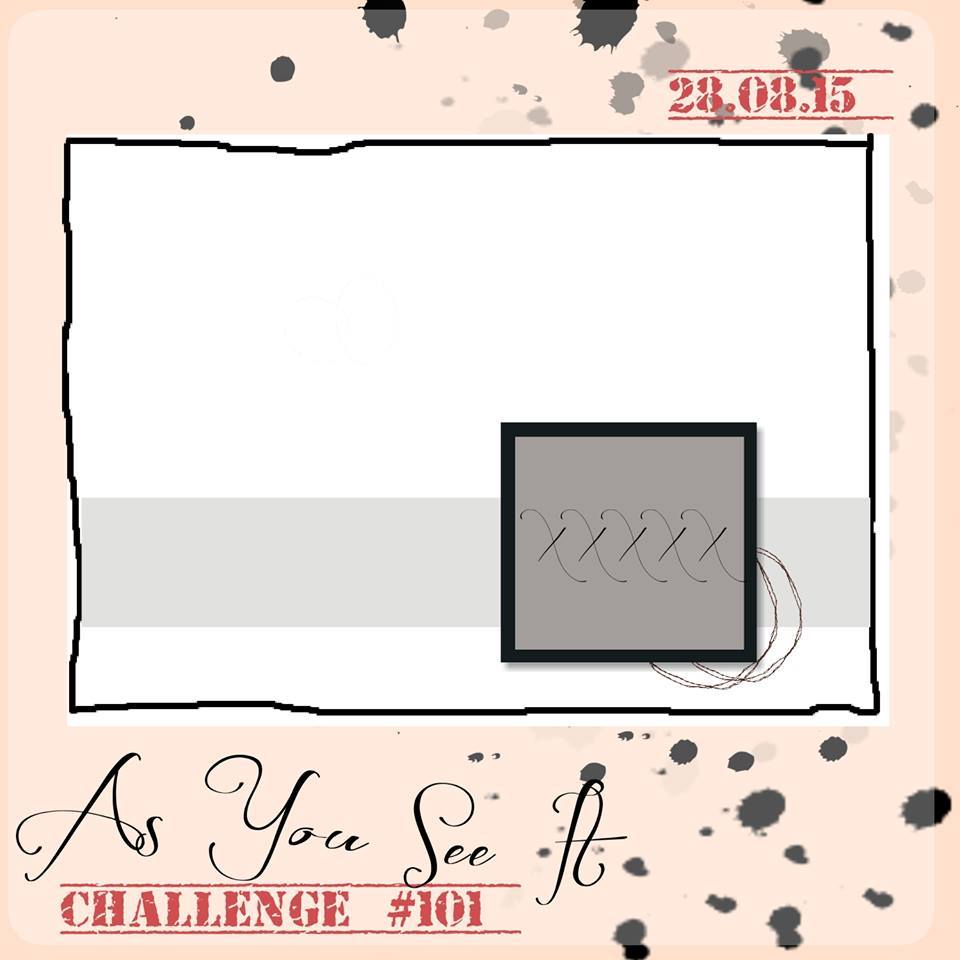
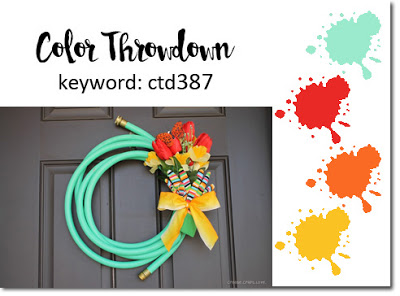
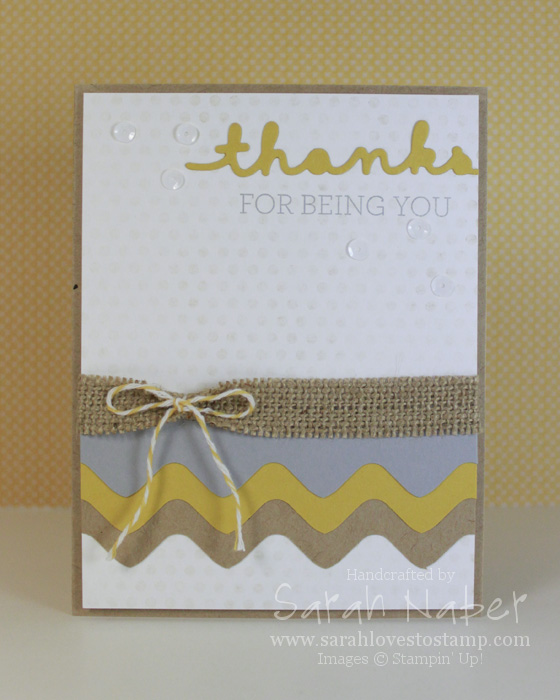
It’s another challenge from the As You See It Challenges! If you’ve been around very long, you know that this is my favorite type of challenge. I just love it and the great variety of creations people come up with to meet the challenge. I LOVE this color combo for this bright birthday card! It’s from the Color Throwdown for last week but baby’s nap on Friday wasn’t long enough for me to get the card finished, let alone photographed, edited and blogged. Oh, well. I ended up loving this combo of Real Red, Crushed Curry, Tangelo Twist, Pool Party and Whisper White. I have so rarely used Tangelo Twist and it is so, so bright in person!
 So today’s card is a mix of a bunch of different stamp sets, all melded together to create a super fun, bright birthday card perfect for any kid. (I find boys cards more challenging than girls, so I kept the elements pretty gender neutral. *Side note: Do you know how hard it is for me NOT to add ribbon to a card? Wow!) The star is from the Peaceful Pines stamp set, the alphabet strip from Tap Tap Tap, the splatters from Gorgeous Grunge, chevron from Stamp A Bag, and sentiment from Crazy for You.
One of my fav elements? That polka dot washi tape! I used it for the main diagonal stripe on my card and then used my grid paper to align every other stripe according to that one. I stuck a piece of washi onto Whisper White cardstock and simply punched to get the small star in the center.
This card is actually pretty simple! The only tricky (read: time consuming) part was the alphabet strip. That stamp is actually two lines so I stamped it onto my Stamp-a-ma-jig for perfect placement on the card, inked it up, removed the second line with a baby wipe, then stamped it using the Stamp-a-ma-jig. To finish the strip, I inked up the second line, removed the first line with a baby wipe and used the Stamp-a-ma-jig to align the second part of the alphabet with the first.
Here’s a link to a project from my stint as a Display Stamper for Convention 2014! I used the Stamp-a-ma-jig on it, as well!
You can’t see it in the picture but the Real Red strip has a chevron background stamped onto it, before I heat embossed the sentiment in white. Man, that was a labor of love; my VersaMark that I stamped the chevron with just wouldn’t dry down so powder kept sticking to it, as well as the sentiment!
I’ll have a video tutorial coming up about how I created the starburst punched piece. It’s a scallop circle punched and then put back in and rotated just a bit so you’re punching again, basically in the center of each scallop. The brilliance of this technique? Do it with any and ALL scallop circles – the size doesn’t matter!
This project is all about the tools that make every card faster and more professional looking! My go-to tools on this project are the punches, as well as the all time favorite Stamp-a-ma-jig! CLICK HERE to shop these awesome tools (and more) in my online store!

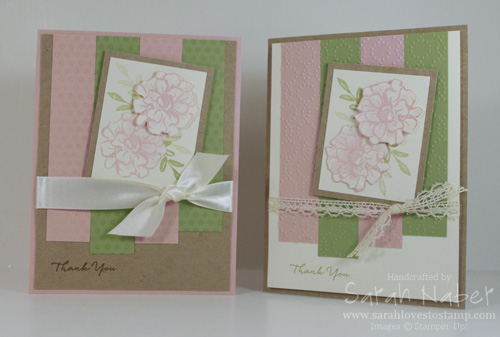
Hello! I hope you’re having a great start to your week! This was the first version of the pastel floral card I made Friday with the What I Love stamp set from Stampin’ Up! Sale-A-Bration 2016! I wasn’t sure if I loved it, so I tried again and made the card that I posted on Friday. Which version do you prefer?
The supplies are basically the same, except the lace trim and the strips are embossed instead of stamped.
CLICK HERE to check out my post about the card on the left, including the paper dimensions in the cut list. The Very Vanilla layer and Kraft layer are identical in size, as well as the card bases and the rest is the same colors and everything.
If you haven’t heard of Stampin’ Up! Sale-A-Bration, here’s a quick rundown of what that is. It’s our best promotion of the year because you get an exclusive free item with every $50 you spend! It’s also a great time to host – you get an extra $25 hostess dollars with a party of $250 or more or join – you get $155 worth of any products you choose for only $99 during Sale-A-Bration this year! Free shipping on your kit/order when you join too plus the $56 of freebies! Gotta love that!
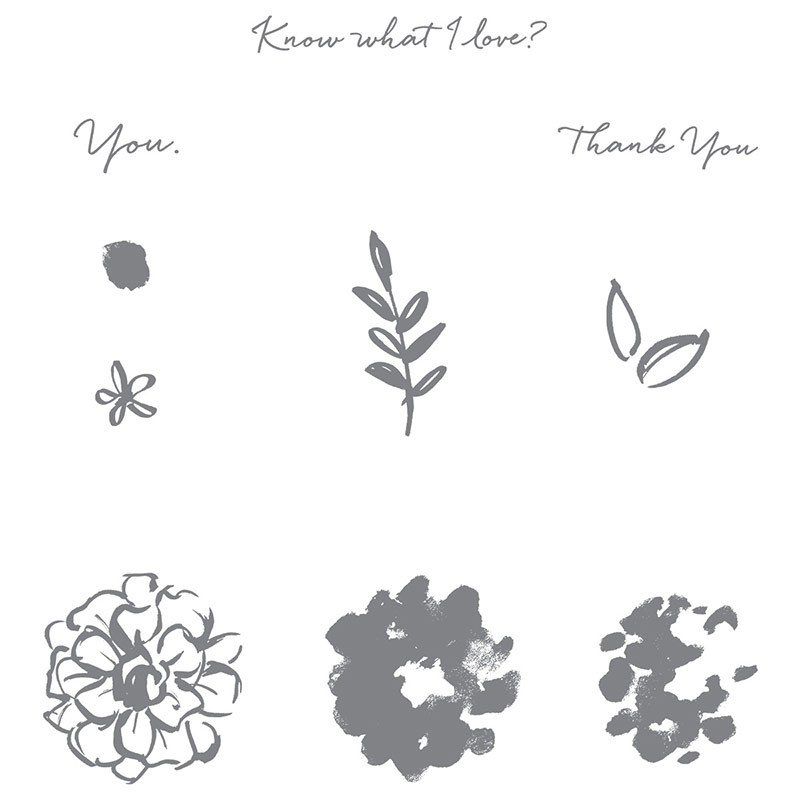
Do you like seeing the full stamp sets in my posts? I’m happy to share them if it’s something people enjoy. Here’s the What I Love stamp set. It’s only available during Sale-A-Bration 2016 and it isn’t available to buy outright. You can earn it free by spending $50 in any product first.
I’m also sharing a video today! This is a video by Stampin’ Up! all about the What I Love stamp set! It’s a short one but does show great ideas with this versatile set.
Today marks the end of February, meaning you have just one month remaining to get this year’s Sale-A-Bration items! The company has also said that stock is not guaranteed until March 31st. If you want to make sure you get the ones you love, click here to shop in my Online Store! It’s open 24/7! The What I Love stamp set featured here is just one of the great options from Sale-A-Bration 2016!!!
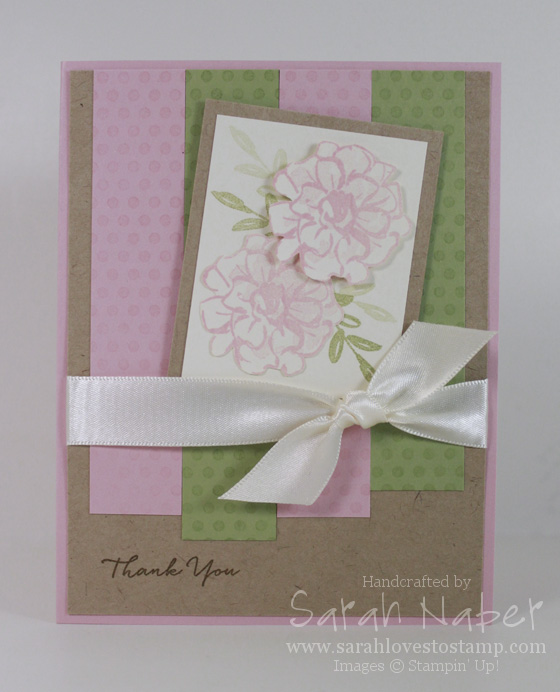
It’s no surprise that it’s pretty easy for me to make a feminine thank you card but I’m really loving the way this one came together. A “fill in the blank” challenge from As You See It (“Thank You” is my favorite sentiment to use), a color challenge from Color Throwdown, and a sketch challenge from Retro Sketches provided me with massive inspiration! I’m wild about this stamp set – What I Love – just one of the many Sale-A-Bration exclusive options this year FREE with a $50 purchase.
Today’s card uses a very basic stamping technique that never fails to delight me with it’s simplicity – 2nd generation stamping. It’s where you ink up the stamp and then stamp off onto scrap paper (I always use my grid paper since that’s what I work on) and then stamp it onto your project. The result is a lighter image and it works perfectly for two step stamp sets, although it’s a useful technique for many different things. I also love to use it when I am making a layered or collage stamped piece.
If you’re interested in seeing my first take on this card, as well as the two cards side by side, here’s a link to that post!
Cut List
Blushing Bride cardstock: 8-1/2″ x 5-1/2″, scored at 4-1/4″; 2 strips at 7/8″ x 4-1/4″
Pear Pizzazz cardstock: 7/8″ x 4-1/2″; 7/8″ x 4″
Kraft 12″x12″ cardstock: 4″ x 5-1/4″; 2-1/4″ x 2-3/4″
Very Vanilla cardstock: 2″ x 2-1/2″; scraps
How To
1. Stamp flower outline from What I Love twice onto Very Vanilla scrap in Blushing Bride ink. Stamp flower details (I used the stamp with less coverage but you could do either) lighter by stamping Blushing Bride inked stamp off onto scrap paper first.
2. Use Paper Snips to quickly fussy cut the two flowers.
3. Stamp leaf image (also from What I Love) onto Very Vanilla layer, stamping once full strength and then once without reinking to get a lighter image.
4. Adhere one flower directly to the layer and adhere one with Stampin’ Dimensionals.
5. Adhere Very Vanilla layer to Kraft mat.
6. Temporarily adhere strips onto a sheet of copy paper how they will appear on the card. Stamp the Dots for Days background on them in VersaMark ink. This will give them a seamless look.
7. Adhere strips onto larger Kraft layer.
8. Stamp “Thank You” sentiment from What I Love in Soft Suede ink onto the larger Kraft layer.
9. Tie Very Vanilla Satin Ribbon around the layer.
10. Adhere to Blushing Bride card base with Fast Fuse adhesive.
11. Adhere focal point with Stampin’ Dimensionals onto card.
I hope you enjoyed this feminine thank you card as much as I do! Check back tomorrow for an alternate take on these 3 challenges that is similar but different!
Leave a comment below and tell me what your crafty plans for the weekend are! Happy Friday!!!
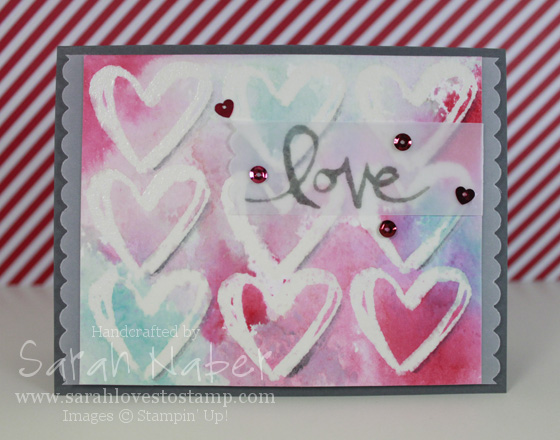
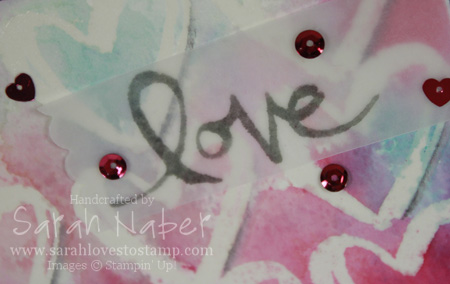
Hello! Today I have a new challenge coming at you from As You See It Challenges! LOVED this sketch. I obviously took it VERY literally but of course, you can do any repeated image! I also used a technique called watercolor smooshing. It is so easy and beautiful! Click to go check out the challenge over at the As You See It Challenge blog! I hope you can join us this week. The colors I used are from the Color Throwdown challenge. I actually used their colors in last week’s card but was too late to enter it by the time I got the blog post written!
If you read my last blog post, you’ll know that I’m participating in the The Daily Marker’s 30 Day Coloring Challenge. This card was a 2 day process. After it dried the first day, I ended up adding more color and decided to tie in the Basic Grey by adding it with an Aquapainter on one side of the heart for a shadow. *TIP: Our new Archival Ink pads in Basic Black and Basic Grey are not made for watercoloring and will dye the ends of your brush. They also don’t move as well as our regular inks as they aren’t water-based.
Here’s the sketch and color challenge I used this week!
Cut List
Basic Gray Cardstock: 8-1/2″ x 5-1/2″, scored at 4-1/4″
Watercolor Paper: I recommend using a larger piece and cutting it down after everything was dry. It ended up being 4-3/4″ x 3-15/16″ but I didn’t even measure it to get that. I just cut where I liked how the edges looked with the pattern.
Cardstock Vellum: 1-1/8″ x 3″ (to edge of scallop, the original piece was larger) Scallops were cut using the Squares Collection Framelits Dies.
Built for Free Using: My Stampin Blog
Hello! Today I’m getting my As You See It Challenge card posted! A few days late but I’m getting closer to getting back on schedule! This one was tricky as Stampin’ Up! has retired our edgelits and edge punches so I had several ideas swirling around on how to create the “ruffled” look. Check out the other Design Team gals’ creations at the As You See It Challenge Blog HERE! Check out Amy’s use of the fringe scissors…she’s a total genius! As for me, I ended up using the Envelope Punch Board to make my zig zag/ric rac look. Watch for a video on that coming soon!
I also combined the sketch challenge from AYSI with the Color Throwdown Challenge for this week! I LOVE the color combination here – I normally never do browns with blacks or greys so this really was a challenge for me! A tricky detail to see is the white sequins I’ve used to really draw the eye to the sentiment. I’m obsessed with these Greetings Thinlits Dies! They are fantastic – wonderful size and great font!
Cut List
Kraft 12″x12″ Cardstock: 8-1/2″ x 5-1/2″, scored at 4-1/4″, scrap 2″ x 5-1/2″ (cut to width after punching)
Whisper White Cardstock: 4″ x 5-1/4″
Delightful Dijon Cardstock: scrap 2″ x 5-1/2″ (cut to width after punching)
Smoky Slate Cardstock: scrap 2″ x 5-1/2″ (cut to width after punching)
Built for Free Using: My Stampin Blog
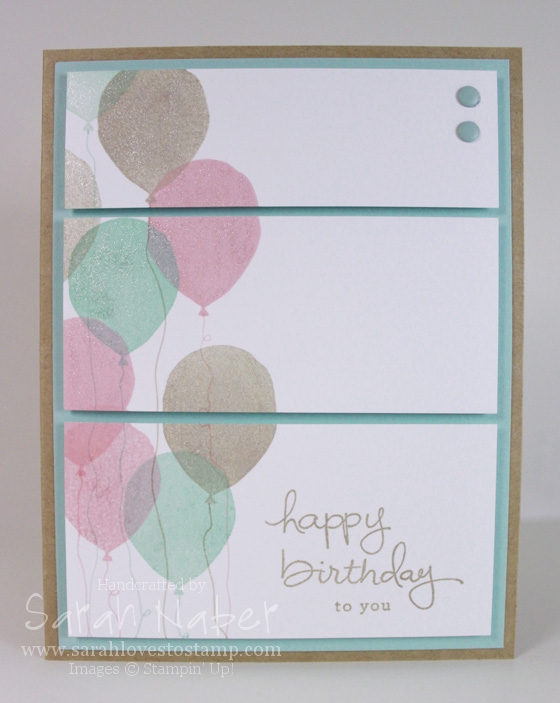
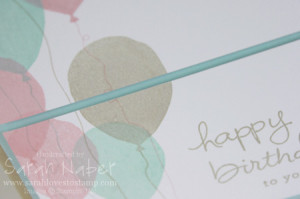
Hi there! I’m back with my favorite stamp set, Balloon Celebration, from the Occasions Catalog! It’s live now and I couldn’t be more thrilled!!! Love this catalog! If you want to see another sample with it, subscribe to my newsletter. (Over there on the right —> )
I’m loving this sketch as well. It’s last Friday’s challenge from over at As You See It!!! I had it done by Friday but have been sick for over a week so I didn’t get the photos edited and the post written. I apologize for that!
My sweet baby girl also turned one so be on the lookout for a series of the party themed paper crafty things I made for her party! 🙂
The star of this card? The Wink of Stella Clear Glitter Brush Pen! I’m obsessed with it! I colored over every balloon with it and it is just gorgeous in real life!
Cut List
Kraft 12″ x 12″ Cardstock: 8-1/2″ x 5-1/2″, scored at 4-1/4″
Pool Party Cardstock: 4″ x 5-1/4″
Whisper White Cardstock: 3-3/4″ x 4-3/4″, cut after stamped at 1-3/8″ (top piece) and 1-5/8″ (middle piece)
Built for Free Using: My Stampin Blog
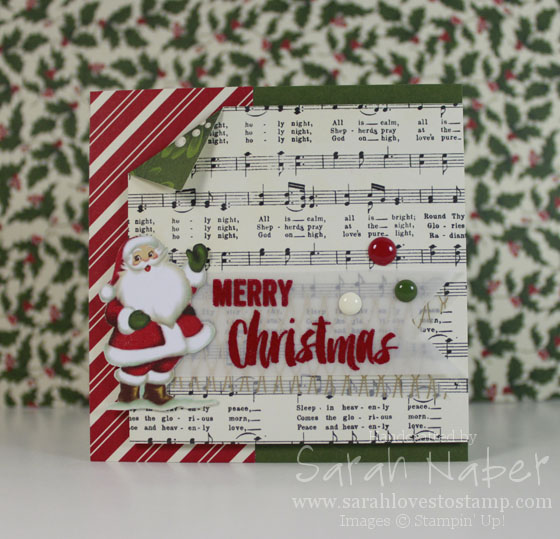
This week the As You See It Challenge is SANTA! This paper became a fast favorite when we used it at Convention this summer! We made a card element that I turned into a card (I’ll show it next week) and the main part of it was the Santa from the Home for Christmas Designer Series Paper! This paper is fantastic…especially if you like to fussy cut the beautiful, handpainted images of Santas, Christmas Trees, Poinsettias and if you aren’t me, Deer. (I swear I’m the only person on the planet who doesn’t love these deer.)
This card is really pretty simple. I combined the As You See It Challenge #116 with the Retro Sketches challenge this week. The sketch prompted me to do something I NEVER do…a square card! Here’s a tip for you: if you’re mailing a square card, it requires more postage, unless you put it in a rectangular envelope. The finished size of this card is 4-1/4″ x 4-1/4″ so you could pop it into a regular A2 envelope if you wanted to save on postage. OR, make a fabulous custom square envelope with the Envelope Punch Board!
Both patterned papers are from the same pack as the santa that I fussy cut. I layered a piece of the gold printed vellum from the Wonderland Vellum Stack (on sale now! more about that later!) under the vellum I stamped the sentiment on.
The sentiment is from the Project Life December 2015 Stamp Set. I am WILD about the font combinations in this stamp set! I used my Embossing Buddy to prep the vellum so stray powder flecks wouldn’t be a problem, stamped my sentiment in VersaMark (I stamped ‘Christmas’, poured the powder onto it, then stamped ‘Merry’, poured the powder onto it, and then heated it up), and used Cherry Cobbler Stampin’ Emboss Powder to really make the sentiment pop off the card. I went ahead and used Fast Fuse behind the gold foil vellum piece (I cannot see the adhesive) and hid a tiny bit of Multipurpose Liquid Glue behind the embossed letters, as well as adhering the banners under the Santa element.
The Sheet Music Designer Series Paper is popped up with a layer of Fun Foam. This is a tip I’m loving from Jennifer McGuire as it holds up better in the mail than foam tape, dimensionals, etc. on large layers. I stacked two Stampin’ Dimensionals I’d cut in half and put them under the left side of Santa (that’s hanging off of the paper layer) to support him.
My second favorite thing on this card (besides the yummy designer series paper) is the enamel dots! These are beautiful!!! Card measurements/cut list will be below, as well as the full list of supplies (just click on a picture to see it in my Online Store)!
New product alert…I may have lied…this may instead be my most favorite thing about this card! WINK OF STELLA Clear Glitter Brush Pen!!! It is coming out in our Occasions Catalog in January. I was excited about it, but didn’t truly fall in love until I brushed it onto the red parts of Santa’s suit! Gorgeous in real life!!!
All in all, a super simple but fun card! I hope you enjoyed it! Feel free to leave me a comment and tell me if you’re a fan of fussy cutting or not! I find it to be super relaxing and love to do it in front of the television.
NEW news…

If you aren’t on my email newsletter list, you’ll have missed my message that the Year-End Sale began today!!! We’re talking savings up to 60% on great products – some retiring products from the Holiday Catalog!
CLICK HERE to check out the Year-End Sale in my Online Store!
FINALLY, go check out the As You See It Challenge and play along! You have until next Wednesday to submit a card with a Santa theme! 🙂 Check it out at www.AsYouSeeItChallenge.com!!! If you haven’t been over there yet, we have a new challenge for you every Friday to get your creative juices flowing!

Cut List
Mossy Meadow: 4-1/4″ x 8-1/2″, scored at 4-1/4″
Home for Christmas Designer Series Paper: Red Stripe – 1-7/8″ x 4-1/4″; Sheet Music – 3-3/4″ x 3-3/4″
Vellum Banners: 1-1/8″ wide
Built for Free Using: My Stampin Blog
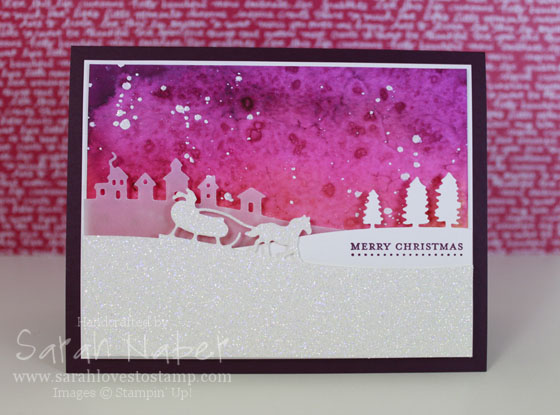
I fell in love with this technique when I saw my demo friend, Jen do it in shades of blue. I wanted to use this amazing edgelits set (RETIRING) as I’d just gotten it recently. The sketch was an As You See It Challenge a few weeks ago but I got sick so I just got around to editing the pictures and SURPRISE, a video too so I’m sharing those today! Check out the current challenge HERE!
The best thing about this technique is that you can do it with items you already have! Can’t beat that. 🙂 I love the color combo here of Pumpkin Pie (you can’t really see it except for at the very bottom of the colored part), Melon Mambo, Rich Razzleberry and Blackberry Bliss. I find doing things like this just really make me feel like a true artist!
I layered all 3 of the framelits here with the village in Vellum Cardstock, the trees in regular Whisper White and the sleigh in Dazzling Diamonds Glitter Paper. EACH layer was popped up with Stampin’ Dimensionals so this is a VERY dimensional card. I would not recommend sending it in a regular envelope.
A note about the white splatters. I did them to tie all the white together with the technique piece. However, I would do them differently next time. I mixed a bit of Whisper White Craft Ink and water and splattered it on with a paintbrush. 14 hours later it wasn’t dry! So I tried to add White Stampin’ Emboss Powder to the wet splatters. When I heated it, it was almost like the powder went to the edges and melted normally while the wet ink bubbled up through the center of the splatter. Next, I tried 2 separate rounds of Iridescent Ice Embossing Powder. It still wasn’t perfect (I could touch the splatters and still had a tiny amount of ink transfer onto my fingers) but it was as close as I thought it would get. Next time, I plan to try splattering with a mixture of Multipurpose Liquid Glue and water and then embossing with either white or a mix of white and iridescent ice since I ended up loving the touch of sparkle in the sky. Anyway, that’s how crafting goes…sometimes it works, sometimes it doesn’t! Hopefully, you can learn from my mistake.
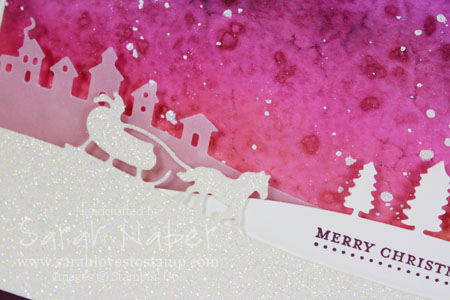
So here’s the video. I’ll also add the closeup picture, as well as the measurements and supplies below! 🙂
I used As You See It Challenge 113 for this card!

Cut List
Blackberry Bliss: 5-1/2″ x 8-1/2″, scored at 4-1/4″
Whisper White: 5-1/8″ x 4-7/8″
Watercolor piece (trimmed after technique was finished): 5″ x 4-3/4″
Village edge is 2″ from the bottom of the watercolor piece.
Built for Free Using: My Stampin Blog
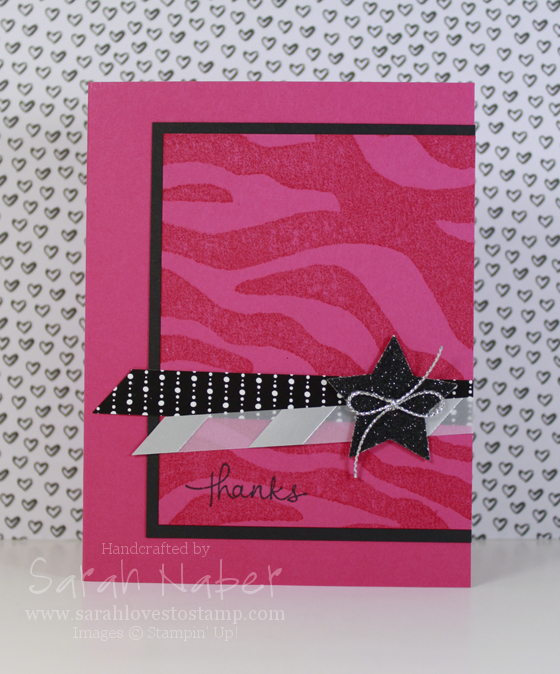
Oh how I love this sketch! I hope you’ll play along! I needed a thank you for my customers so I’m creating this card in a few different colors. I’ll post a picture of the finished cards later, or check out my Facebook and Instagram for an instant look!
Anyway, this card is pretty simple. Melon Mambo layer is stamped with the It’s Wild Background Stamp in Melon Mambo ink. The sentiment is from Endless Thanks and is stamped in Memento Tuxedo Black. And that’s all the stamping on this one!
The medium star punch was used to crop it out of the Black Glimmer Paper. It’s retiring! Did you see that? I’m so so sad! I LOVE it for so much more than Halloween. A piece of the Wonderland DSP (see how versatile it is?) and Silver Foil Vellum were added and then the star popped on top with Stampin’ Dimensionals. Check below for the cut list, as well as the supplies too!
I hope you’ll play along with us this week at the As You See It Challenge! This sketch is a great, simple one for ANY card! Lots of Christmas inspiration from the Design Team so head on over to the As You See It Challenge Blog and check it out!
Cut List
Melon Mambo: 5-1/2″ x 8-1/2″, scored at 4-1/4″; 3-3/8″ x 4-1/4″
Basic Black: 3-1/2″ x 4-1/2″
Silver Foil Vellum: 3/8″ wide
Black DSP: 1/2″ wide
Built for Free Using: My Stampin Blog
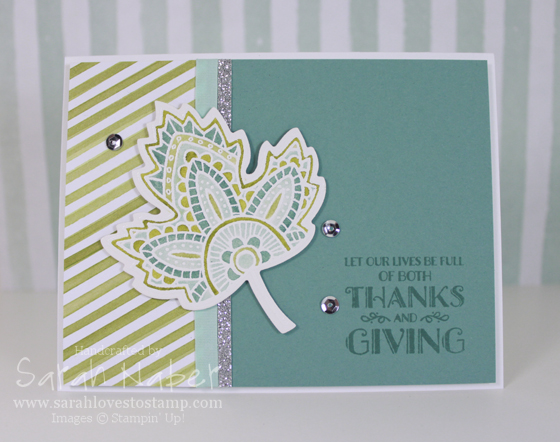
Here’s this week’s As You See It Challenge card! I hope you’ll hop on over to the challenge blog at www.AsYouSeeItChallenge.com and check out what the rest of the design team has to share, as well as join in on the challenge yourself! Lighthearted Leaves is my stamp obsession for fall and when I saw this color combo from fellow demonstrator, Teneale, I had to try it out! It may be my new favorite color combo!
The leaf is definitely the star of the card. I kept the rest very simple to let it shine! That’s really where all the time is on this card. It is stamped in VersaMark and white heat embossed onto Shimmery White cardstock. I LOVE how this paper takes watercoloring and also the shimmery shine that shows through as well.
Let’s talk dimension! I’ve become obsessed with the tip from Jennifer McGuire to use Fun Foam (yes, like the kind kids love!) behind large layers. She did a comparison with regular foam adhesive and with the Fun Foam where she actually mailed them to herself. The results were pretty interesting; regular foam adhesive really smashed in the mail, leaving any areas without foam adhesive sunken in while the fun foam card looked perfect. I ordered Fun Foam that day! So it is behind the main panel. I still LOVE Stampin’ Dimensionals for the smaller pieces on cards, like my leaf here.
The silver sequins were glued on with the new Fine-Tip Glue Pen in the Holiday Catalog. The sentiment was stamped with Lost Lagoon ink onto the Lost Lagoon cardstock. This tone-on-tone effect is striking and provides a bit deeper color than the VersaMark watermark look.
I’m going to try making my blog posts a bit shorter by not doing the full How To list. I’ve also added in a great feature that shows the products on my card – simply click on an item to see it in my Online Store. However, I am always thrilled when I find a card I love and the measurements to make it are given so I’ll continue that. As always, if you have any questions about the project, feel free to leave a comment and I’ll reply with the answer!
Cut List
Whisper White Thick Cardstock: 5 1/2″ x 8 1/2″, scored at 4 1/4″
Lost Lagoon Cardstock: 5 1/4″ x 4″
Season of Cheer DSP (Old Olive Pattern): 1 3/4″ x 4″
Silver Glimmer Paper: 1/8″ x 4″
Built for Free Using: My Stampin Blog
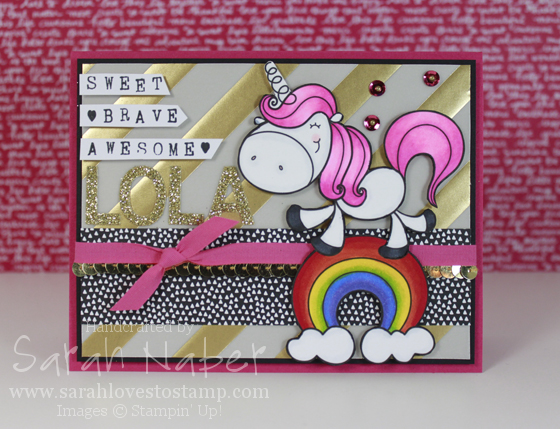
This is an extra special week of the As You See It Challenge! I’m honored to be participating in Lola’s Challenge! My best friend, Tara, has a sweet niece named Lola who has been battling cancer for several years now. She just had a stem cell transplant and was in the ICU when we decided to do something special for her. Since she was in the ICU, we decided a virtual card shower would be better than sending her cards…possibly with bad germs!
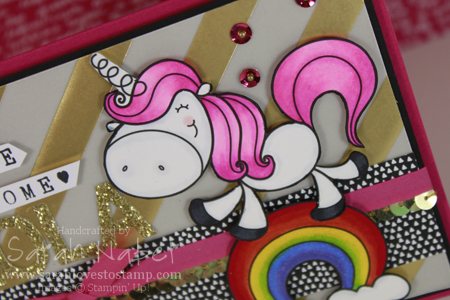
So here’s the challenge…before Wednesday, October 21st make a card with something for Lola. Gold for Childhood Cancer Awareness. Unicorns, fairies and pink are all things Lola loves! CLICK HERE to head on over to the As You See It Challenge site! Check out the other Design Team cards and PLEASE make and enter your own card for Lola! It’s so simple – you can pretty much put it anywhere online (as long as it’s public) and then just paste the link to enter your card! I set a goal of 100 cards for Lola so please share with everyone you know!
So that brings me to the card. I knew I wanted to include an image of one of Lola’s favorite things but I didn’t have any stamps with a unicorn or fairy…so I turned to the internet. A few searches and some really great things popped up! I chose this adorable Lucky Unicorn image from the Etsy shop 2CuteInk! Love it! I also found some great paper piecing files if you love to fussy cut or have a digital cutter. Or go with the fairy punch art route. If you want to play along, you can also use a FREE digi stamp too!
Besides the digi stamp and Copics I colored it with, everything is Stampin’ Up! I even used my new alphabet rotary stamp for the first time on this project! (Thanks for telling me I *had* to buy it, Amy!)
*I’ll be back with the supply list and measurements soon! 🙂

My hubby had his birthday this week so this is the card I made him. I used the fantastic Vintage Leaves stamp set, along with the sketch challenge from the As You See It Challenge this week and a fantastic color combo I dug up when googling fall color combinations.
I’ll try to come back and add more details soon! The duo-toned leaves are all stamped in the center color and then I used a sponge dauber to apply a different color to the edges. Very similar to the Rock and Roll Technique I used to do A LOT but it doesn’t work as well with the firm foam ink pads because they’re so juicy and have more squish to them than our old linen style ones. 🙂
Hi friends! I’ve been posting my weekly cards to our As You See It Challenge blog for my role in the Design Team over there but just haven’t gotten posts written here! Well here we go! I’ll try to get the posts up about the past challenge cards soon!
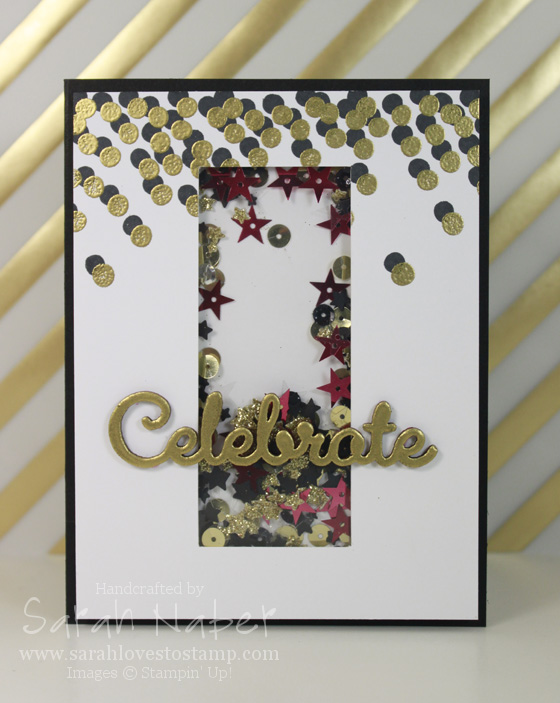
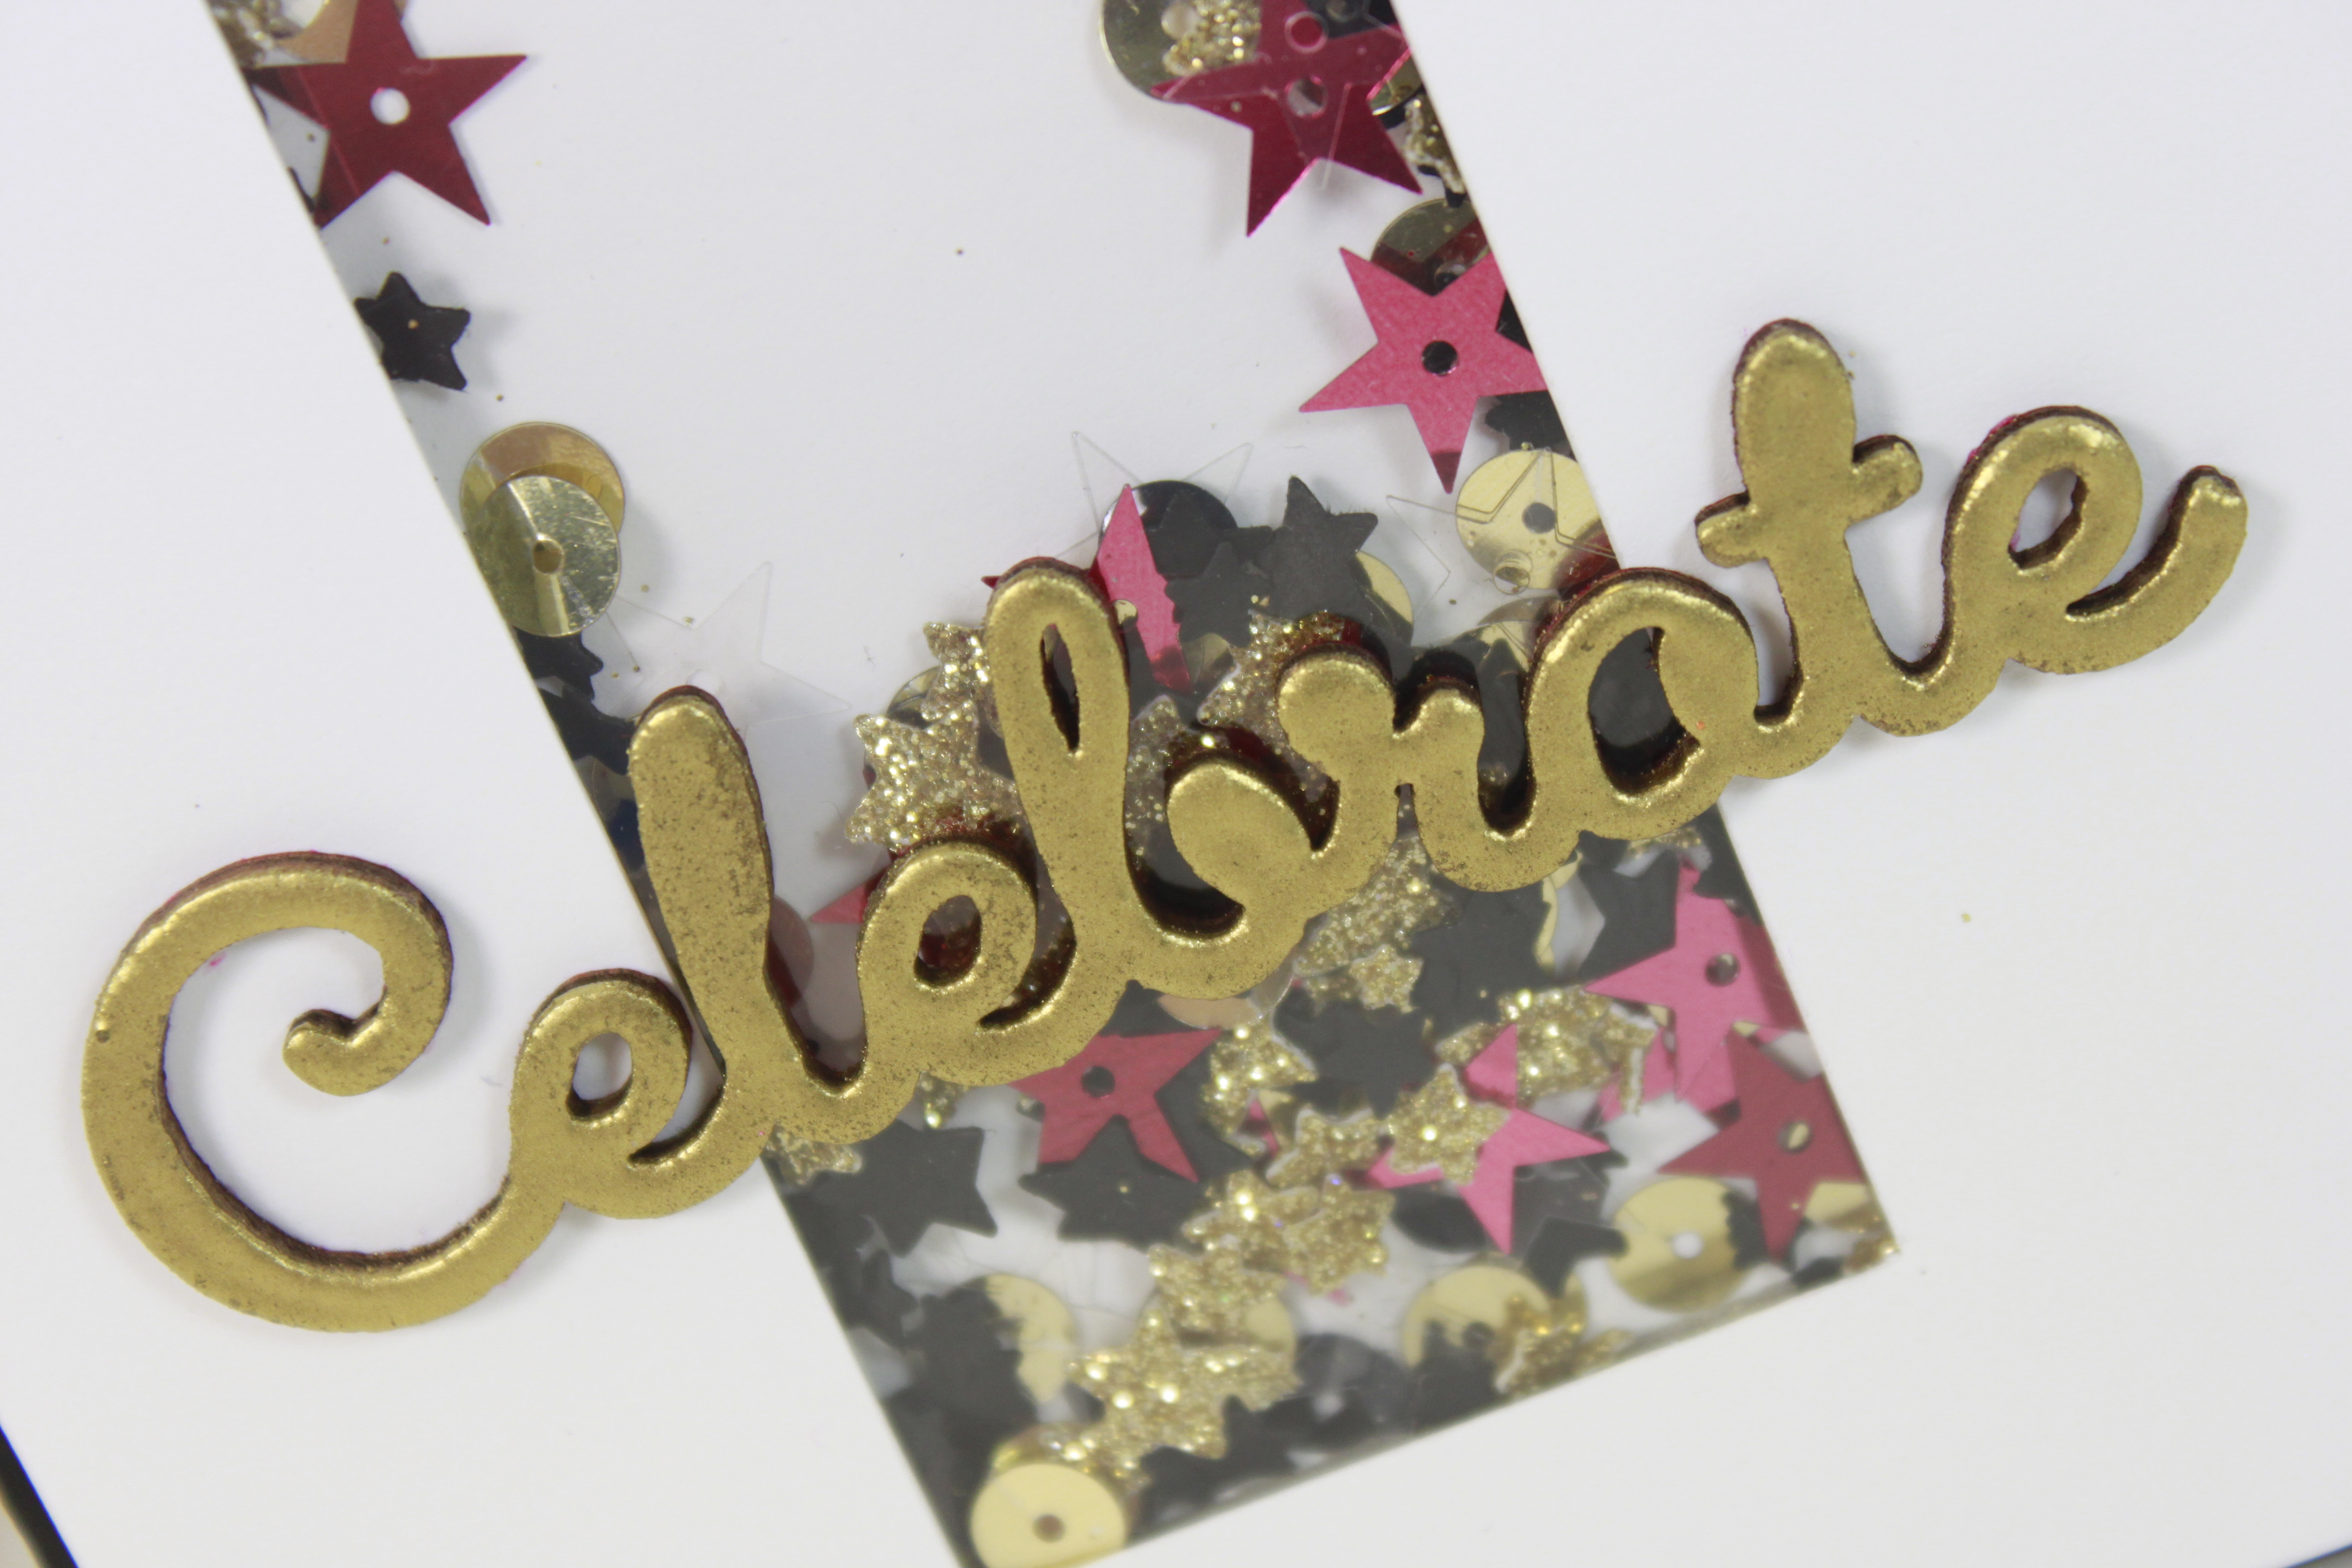
So it’s the 100th Challenge! I can’t believe it! I hope you’ll play along – you have TWO weeks to do so for this special challenge and there’s BLOG CANDY too!!! The only requirement? Celebrate is the theme!
I chose to make a fun shaker card for this challenge and use one of the new wood element words. I simply smooshed VersaMark on its front and covered it with Gold Stampin’ Emboss Powder. I repeated that process a second time to really make it look like it was coated in gold. 🙂
The shaker card “bits” are a mix of punched stars from the Confetti Star Punch (both in Basic Black cardstock and Gold Glitter Paper), Star Sequins (clear from the Neutrals Sequin Assortment and pink from the Brights Sequin Assortment), and round sequins (black from the Neutrals Sequin Assortment and gold pulled off of the Gold Sequin Trim).
I also have a video to go with this card that will be up next week!!!
Hi there! Found a bit of time to create this week while little Miss Izzy was sleeping! That was pretty exciting for me – to steal away and do something fun just for me, instead of doing laundry or dishes while she slept.
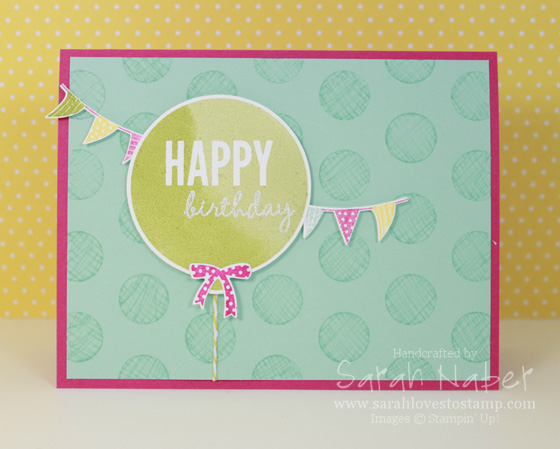
I hope you love the card this week. It’s made with my VERY favorite stamp set from the Occasions 2015 Catalog. Coincidentally, there’s something else I love about it…matching framelits! Genius! Another genius thing? The stamp set and framelits are a bundle, so ordering them together saves you 15%. Love that! Anyway, on to the card details.
The balloon was stamped into a Pear Pizzazz Classic Stampin’ Pad first. Then I used a sponge dauber to sponge Old Olive ink onto the left half of the balloon. I think I could have done a better job at blurring the line between the two but oh well.
The “birthday” sentiment is stamped with VersaMark after dusting the balloon with the Embossing Buddy. Then I used a combination of White and Iridescent Ice Stampin’ Emboss Powder (I believe my ratio was 1:1) and the Heat Tool to emboss it.
The banners were inked up with Melon Mambo, Old Olive, Daffodil Delight and Pool Party Stampin’ Write Markers. The bow was inked up with a Melon Mambo Classic Stampin’ Pad. Then all the pieces were cut out with the corresponding framelits dies.
The background is my FAVORITE part! We learned this technique at Convention last summer, but this was the first time I tried it! I placed the dots mask from the Dots & Stripes Decorative Masks onto a 4″ x 5-1/4″ piece of Pool Party Cardstock. Then I used the fine point of the Pool Party Stampin’ Write Marker to trace the circle and then fill it in with scribbles in one direction and then in the other direction. It creates a really neat, crosshatch-like pattern.
A tad bit of Crushed Curry Baker’s Twine acts as the balloon string and the bow and banners were attached to the main balloon and Stampin’ Dimensionals applied to that group before attaching to the Pool Party piece. Then that was attached to the Melon Mambo card base – cut at 5-1/2″ x 8-1/2″ and scored at 4-1/4″.
I hope you’ll play along with us at the As You See It Challenge this week. This was a GREAT sketch with a myriad of options! I also used the color combination from Colour Q Challenges.
Connect with Me!


