
Currently viewing the category:
"Scrapbooking"
Here I am to share my projects for my application to be an OnStage 2016 Display Stamper for the OnStage Local event in Kansas City in November! I was beyond excited when I found out OnStage local is coming so close to me! With only 5 US cities chosen, I feel so lucky that it’s only an hour away! After being a display stamper for Convention 2014, I was so bummed to miss out on trying for it in April for OnStage Live, so I’m excited for this opportunity! One exciting thing that’s changed since then is that I’ve become a mama – finally a cutie of my own to feature in my scrapbook pages!!!
*Warning: Picture heavy post ahead! 🙂
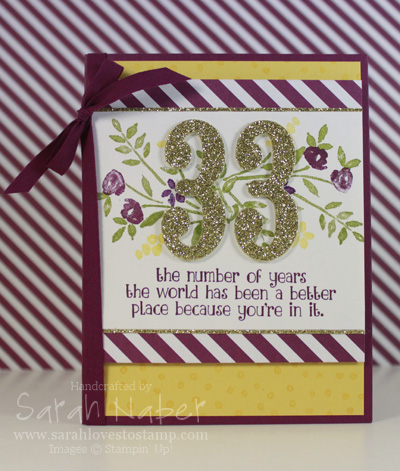
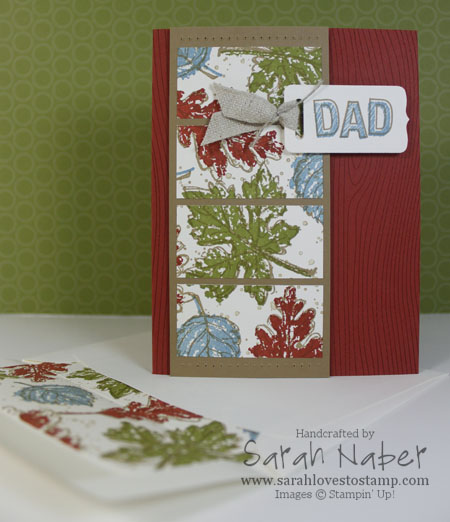
Number of Years Card – The first one features a few favorites – Gold Glimmer Paper, Brights Designer Series Paper Stack, Number of Years stamp set and Large Numbers Framelits dies. I can’t get enough of Rich Razzleberry and Daffodil Delight paired together. I love it! The background is stamped with the tiny dots stamp (in Daffodil Delight ink) from the Number of Years stamp set for a tad bit of texture. Tiny strips of Gold Glimmer Paper peek out from the edge of the main panel. This sentiment may be one of my favorites ever!!!
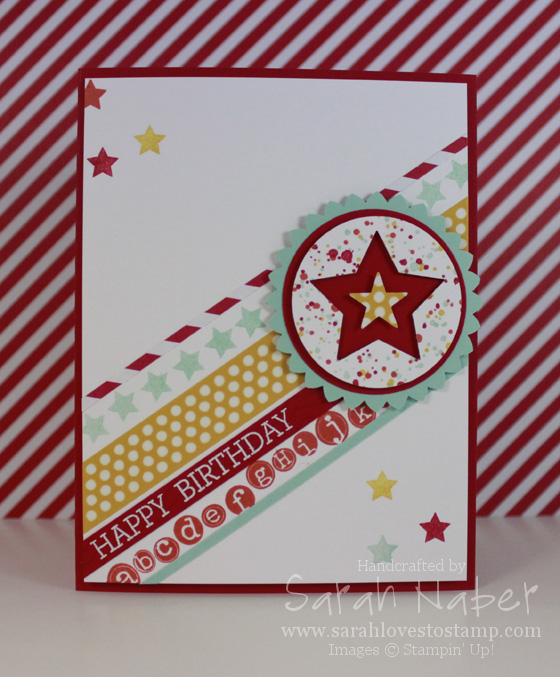
Starry Bright Birthday – This one is a fun one. I love the color combo on this one and did a few fun things. The alphabet stamp was two lines so I masked it off to make it one line, the sentiment is white embossed (heat embossing is one of my favorite ever things to do), and the washi tape was put onto a piece of white paper and punched out to make the small star! Gorgeous Grunge was used for the fun splatters on the main star. Both the main negative image star, as well as the little washi star were popped up for some depth with Stampin’ Dimensionals (I think I need an auto-ship subscription on those with the way I go through them)!
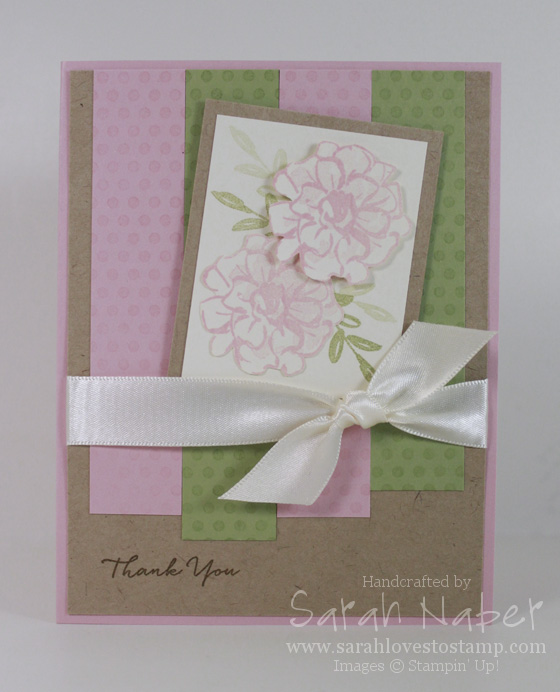
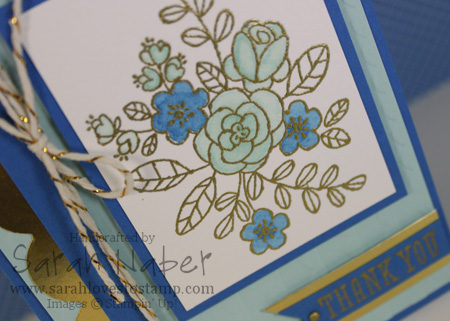
Soft Floral Thank You – When you have beautiful stamps, it’s really easy to make them shine! That’s why I stamped the images, cut them out and layered them over some first and second generation stamped leaves. My favorite detail of this card is that the pieces in the back were temporarily adhered to a separate sheet of paper so I could stamp the background onto all of the pieces at once, yielding a continuous background. I cannot get enough of this kraft paper. It’s really perfection…the perfect neutral to use with ANYTHING! 🙂
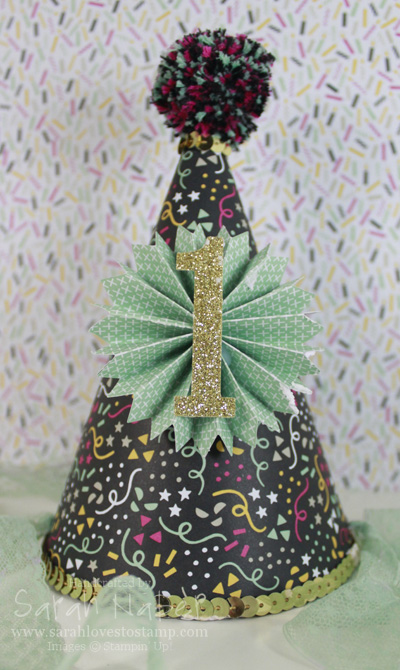
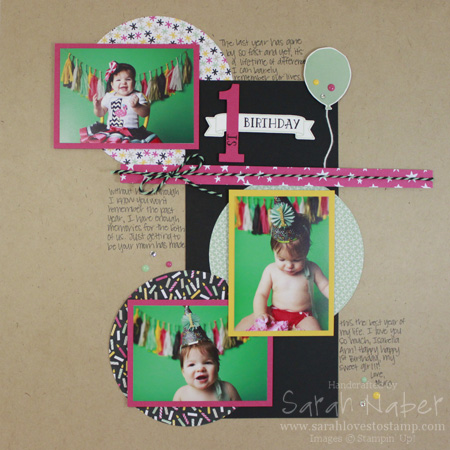
Izzy’s Party Hat – Ok, so this one may make you laugh. Remember how I said I’m a mama now? Well my sweetie turned one in January and of course, I had to use awesome Stampin’ Up! products for her party! So the night before we were to go to the photographer for her one year pics, I decided I’d make a party hat. It took me much longer than anticipated so I was up into the wee hours of the night crafting this beauty. As a result, it didn’t get photographed by me until after both the photographer’s pics and her actual party. Both times eating cake…so, you may see bits of frosting here and there. I figured this is an authentic 3D item…one that was used and loved! You’ll see pictures of her wearing it below on the scrapbook page.
The hat is two layers of Designer Series Paper to make it sturdy. I found a pattern on the internet that I traced onto the DSP and cut it out. The pom pom was made out of both the Mint Macaron/Basic Black and Melon Mambo/Basic Black Baker’s Twines. I threaded the string (that I tied around the bundle of twine) into the hole at the top of the hat and taped it inside to secure it. It’s definitely essential to find a way to secure the hat onto the party girl’s head so I poked holes on either side of the hat, threaded Mint Macaron lace trim through the holes, and both tied a knot and taped it to the inside. Hot glue was my best friend, both for gluing the sequin trim onto the edge of the hat and right under the pom pom, as well as to create the rosette. The “1” is my fav Large Number Framelits Dies (I just ordered the BRAND NEW letters yesterday! Yippee!), simply cut out of Gold Glimmer Paper.
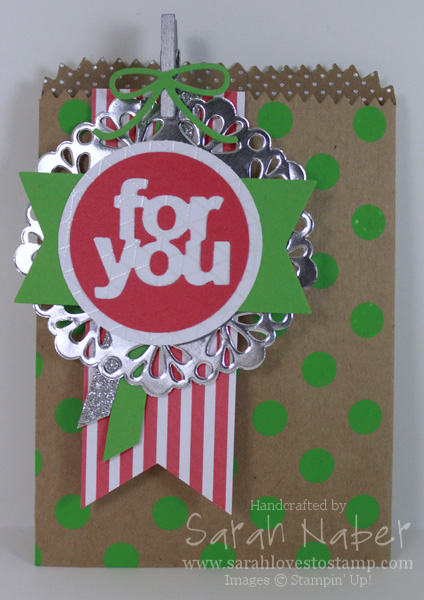
In Color Treat Bag – I had a friend convince me to get this die a few years ago. I haven’t regretted it since! So many options for great treats that fit inside. This bag actually has – SURPRISE – no stamping on it! It’s rare that happens to me as I love my stamps and ink, but the star of this bag are the dies included in the set (here the banner, sentiment, and bow). I made this one to show a technique at a local upline meeting where you place the positive image back into the negative image to place the little pieces back in (like the centers of the “o”s). I used circle punches to crop out the negative image and the layer behind it. The silver doily and Silver Glimmer Paper give a touch of shine! The largest banner in the back was punched with that genius Banner Triple Punch. Watermelon Wonder and Cucumber Crush together just make me happy!!!
1st Birthday Scrapbook Page – I bet you can’t tell who inspired this cute little scrapbook page. I once again turned to the same suite of products that I’d used for her party and relied on Stampin’ Up!’s expert coordinating products to make my page extra special. So this features not only the paper, but also the coordinating Baker’s Twine and Enamel Dots. I love the sweet little single balloon from the Balloon Celebration stamp set (and matching punch). The number, banner and word stamps are from the Large Number Framelits Dies and Number of Years stamp set (these and the balloon set/punch may be my favorite things I’ve purchased EVER). The base of the page is that fabulous Kraft cardstock, and the matching solid layers help ground the page, as well as the photos. There’s a lot of dimension here that is impossible to appreciate from pictures on a screen.
I hope you enjoyed the projects I shared with you today!
Hi there! I’m LOVING the partnership of Becky Higgins and Stampin’ Up! to bring you Project Life in Stampin’ Up!’s exclusive colors! There are lots of great products to this line that you can purchase now! Here’s my unboxing and first impressions of the first part of my Project Life order (I’m totally going to have to make another to get those awesome dies).
I posted this video to YouTube last week and forgot that I hadn’t put it onto the blog so that’s why the date on the video is before this post! Don’t want that to happen again? Subscribe to my YouTube channel and get notified when I upload new videos!
Here are the Project Life products that are currently available! More will be available in the new catalog on June 2nd! Did you know? I’m sending out the brand new 2014-2015 Annual Catalog NOW to anyone who places a $50 order (before shipping and tax) in May! If you’re ordering under $150, please use the hostess code RGSHXDMM and you receive a free gift along with your brand new catalog! (If you’re ordering over $150, please don’t use the hostess code as you’re eligible for your own hostess benefits. OF COURSE, I will still send you a catalog and a free gift (or two)! 🙂 Ok, whoops! I’m excited about that info…back to the Project Life products! CLICK on any of the product photos to see them in my online store (you can also click on them in the store to see them larger)!

Variety Pack 12″ x 12″ Project Life Photo
Pocket Pages (135294) $6.95
12 pages: 2 ea. of 6 designs.

Everyday Adventure Project Life Card Collection (135298) $15.95
100 double-sided, color -coordinated cards in 3 sizes:
4″ x 6″, 4″ x 4″, and 3″ x 4″

Everyday Adventure Project Life Accessory Pack (135301) $9.95
4 3″ x 4″ specialty cards; 8 sticker sheets;
1 acetate accents sheet; 8 wood accents;
2 epoxy stickers; 4 arrow paperclips;
1 roll washi tape (5 yds.)

Project Life Journaling Pens (135304) $4.95
2 pens (01 and 05)

Project Life Corner Punch (135346) $7.95

Cards & Labels Project Life Framelits Dies (135707) $24.95
5 dies

Project Life Day to Day Photopolymer Stamp Set (135785) $25.95
42 stamps

Project Life Au jour le jour (Day to Day Set in French) (136706) $25.95

Project Life Point & Click Photopolymer Stamp Set (135787) $15.95
26 stamps
Hi there! Back with a new Quick Tip Tuesday for you on how to add color to black & white or black & vanilla paper! While the two options I show in the video will soon be gone, there are 2 new options in the 2014-2015 Annual Catalog! 🙂 I LOVE to do this technique and I think the easiest to get great results turned out to be the brayering option. Check out the video and let me know what you think. Have you tried this before? If not, will you try it now? Feel free to send me your projects that you’ve made using this technique! I’d love to see them and maybe feature you on the old blog-o if you’re alright with that!
I’ll be back later to add in the edited pictures of the project I show during the video. Oh how I LOVE that card!!!
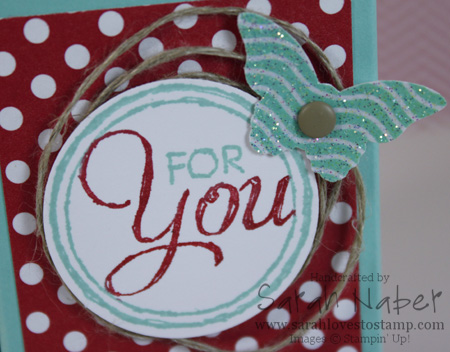
This post is probably the most picture-heavy post you’ve ever seen on my blog! 🙂 I’ve gone to Convention for the past six years and admired the display boards stamped by talented stampers from all over North America. This year, I’m throwing my hat in the ring to be a display stamper. We were asked to gather up three cards, two 3D items, and one scrapbook page to show examples of our work. First my cards:
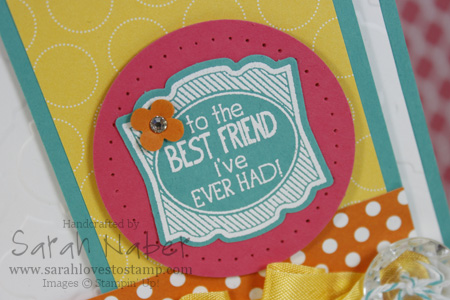
Label Love – I’ve included extra pictures to show some of the details on this card.
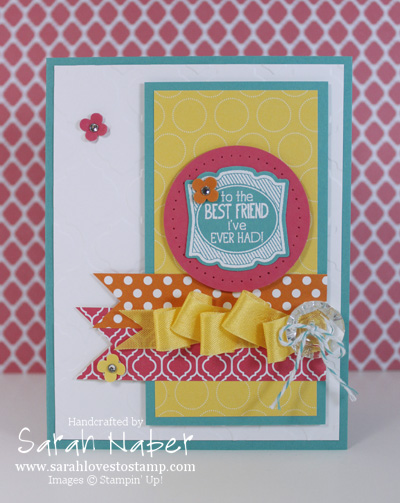
The first closeup shows a bit of the ruffled ribbon detail, as well as the dry embossing done with the Big Shot and Modern Mosaic Textured Impressions Embossing Folder.

The second closeup shows the main image embossed with White Stampin’ Emboss Powder onto Bermuda Bay Cardstock, as well as the paper piercing on the circle, done with the Essentials Paper Piercing Pack.
Gently Falling, Sketch & Outline Alphabets – This card uses some of my favorite things! A great two-step stamping set, the Chalk Talk Framelits, paper piercing, and a background stamp! Check out my original post about this card to see the video I filmed on making your own custom die cuts (in this case I wanted to shorten) as well as how to use the Envelope Liner Framelits Dies (how I made the matching envelope liner in the first picture).
The second picture is the decorated inside of the card. I kept the design of the inside super simple since I like to write a lot! 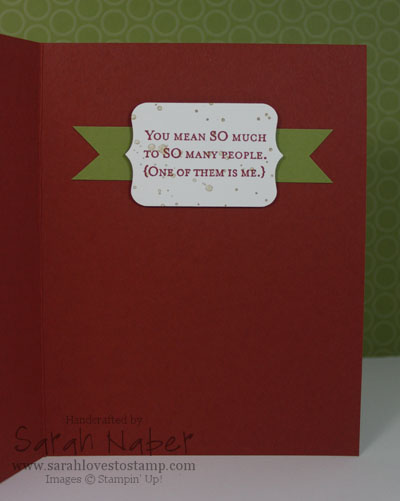
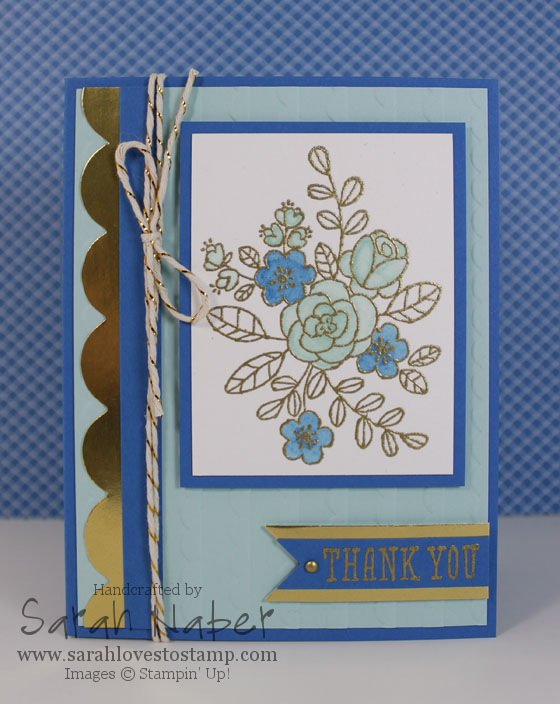
So Very Grateful – I used Gold Stampin’ Emboss Powder to make the stamped images really pop! I also used it to turn one of our 1/8″ Silver Mini Brads into gold! The main image is stamped onto watercolor paper and was colored using the Aqua Painter and our Classic Stampin’ Pads.
This picture shows a closeup of the dry embossing, again with the Big Shot, but this time using the Scalloped Textured Impressions Embossing Folder. You can also see the Gold Foil Paper under the sentiment and as the scalloped accent. I love that stuff but boy is it hard to photograph! 🙂 You can also see the silver brad turned gold here too!
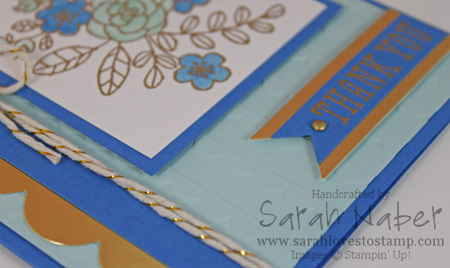
Just a closeup of the gold embossed and watercolored image! I love this stamp set!!!
Ok…on to my 3D items!
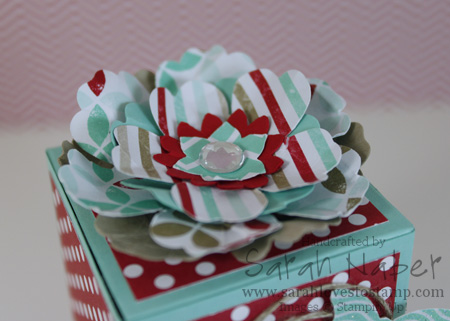
Candy Dispenser Box – I was able to make this by adapting a basic template I found online (no measurements so it was a tad tricky) to fit this entire box on a sheet of 8-1/2″ x 11″ cardstock! I love this combination of colors, taken from the Fresh Prints Designer Series Paper Stack!

The front of the box is decorated with a sentiment from the Chalk Talk stamp set. I also added a Bitty Butterfly punched out of designer series paper I first heat embossed with Iridescent Ice Embossing Powder to give it a great, glittery shine! The butterfly is topped off with a Crumb Cake Candy Dot…LOVE those! Loops of Linen Thread add to the whimsy!
The flower atop the candy dispenser is made with oodles of punches. I punched two from each punch, the bottom layer from cardstock and the top from the Fresh Prints Designer Series Paper Stack. The punches I used, from largest to smallest are: Blossom Punch, Pansy Punch, and Boho Blossoms Punch. A Large Rhinestone Jewel added a bit of flair to the center after I crumpled the papers up to give them a bit more life.
Dream Banner – The second of my 3Ds is one of my favorite projects I’ve ever made! It is 10 times more beautiful in real life!!! I used the Pennants Framelits Dies to cut out both the black and vanilla Modern Medley Designer Series Paper (largest pennant die), and the Gold Foil Designer Vellum (2nd largest). The pennant toppers were cut from the largest Deco Labels Collection Framelits Dies.
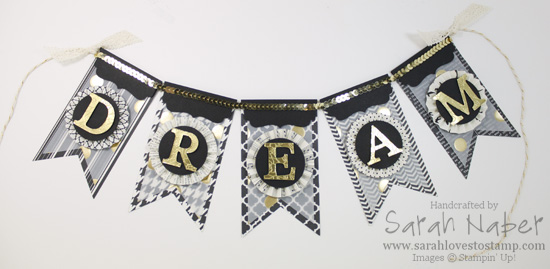
You can get a bit more detail in this picture. The letters are Gold Foil Paper with the So Very Grateful largest floral image (the one I used on the blue/gold card above) heat embossed on it with Gold Stampin’ Emboss Powder. It is so striking in real life! The rosettes were made by scoring every 1/4″ on the Simply Scored Scoring Tool. I strung them together with the Gold Baker’s Twine, used Sticky Strip to attach the Gold Sequin Trim and tied a knot of Victoria Crochet Trim at either end. Voila! 
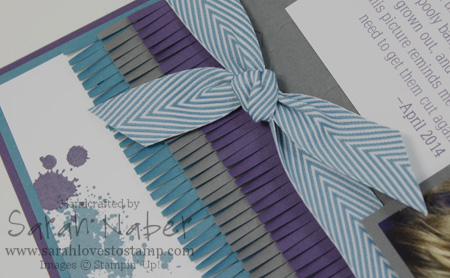
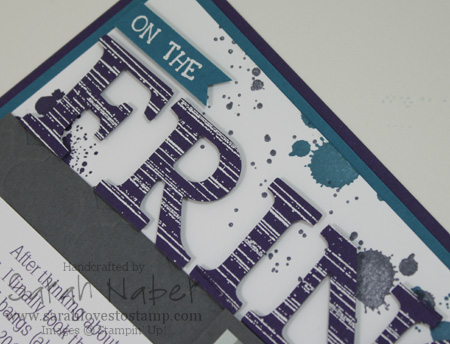
Gorgeous Grunge Scrapbook Page – On to the final entry! The splatters are all from my favorite stamp set of all time, Gorgeous Grunge. The letters are also heat embossed with White Stampin’ Emboss Powder – the large ones again using a stamp from Gorgeous Grunge. The large gray portion in the background is embossed with the Modern Mosaic folder, but it is super hard to tell in my photos!
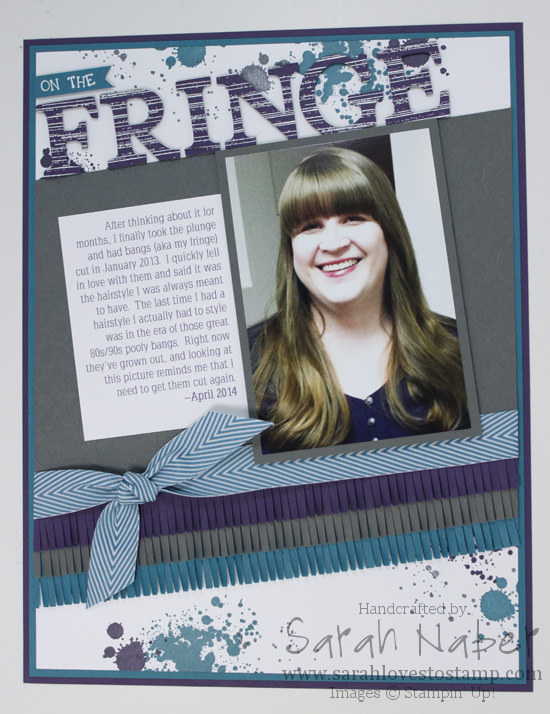
This picture shows the fun fringe I created with the Fringe Scissors. I thought it was the perfect touch on a page all about my much loved bangs! 🙂
Here’s a closeup of the letters embossed with White Stampin’ Emboss Powder.
I hope you enjoyed looking at my projects! I sure had a great time pulling together some favorites and making some new projects to enter into the selection for Convention 2014 Display Stampers. Thanks for sticking with me through this long post!


We are so so so excited to let you know we’ve partnered with the amazing Becky Higgins to bring you the real deal—authentic Project Life products, now in exclusive Stampin’ Up! colors and designs. If you’ve somehow missed the Project Life craze and are wondering what it’s all about, we’ll fill you in: it’s a super simple, totally affordable way to get your photos into albums: you just slip your photos into Photo Pocket Pages and add designed cards. It’s a back-to-basics approach to documenting your life. In a nutshell, it’s all about spending more time making memories and less time scrapbooking them.

You’ll be able to order a selection of Project Life products starting May 1! And with the launch of our new annual catalog on June 2, you’ll be able to buy from our complete line of Project Life products.
Can’t wait that long? Stampin’ Up! demonstrators will be able to order the limited selection starting April 21. So if you’re a demonstrator make sure to check the demonstrator website that day; if you’re not a demonstrator, sign up and you can order the products early too!
Here are the items you’ll be able to purchase on May 1:
 I started papercrafting when I was 10 when my mom and I started scrapbooking together. Many, many years later, I found Stampin’ Up! and fell in love with the simplicity of card making. Project Life is EXACTLY what I need to get back into scrapbooking again so I can’t wait to order these products and start documenting our memories again! I love looking at my old scrapbook pages and remembering the stories and people.
Now to print some of the thousands of pictures that I’ve taken…that’s definitely one drawback of digital photography. Anyone out there like me that hasn’t printed a picture in years? I think pictures are actually the #1 reason I quit scrapbooking. I’d print a picture but so often felt like I needed it in Black & White or a different size or whatever so I just went to card making where I didn’t have to worry about a picture at all.
I hope you’ll stay tuned! I’ll do some videos on the products when they come but I won’t be able to post those until it’s available for customers to order on May 1st. I hope you’re as excited as I am! And just in time for National Scrapbooking Month!!! Perfect timing!
I almost forgot…here’s the video announcement!
SU! Color Collection Core’dinations Cardstock
40 sheets of 12″ x 12″ Core’dinations Cardstock in SU!-exclusive colors (4 Sheets of each of 10 colors)
Normally $23.95, ONLY $16.77 until December 2, 2013!
Brights (129953)
Subtles (129954)
Regals (129955)
Neutrals (129956)
In Color Core’dinations Cardstock
20 sheets of 12″ x 12″ Core’dinations Cardstock in SU!-exclusive In Colors (4 sheets of each of 5 colors)
2012-2014 In Color (129957) Normally $11.95, ONLY $8.37 until Dec 2, 2013!
2013-2015 In Color (129958) Regular price NOT on sale $11.95
Clearance Rack Discontinued Core’dinations Cardstock
12 sheets of 12″ x 12″ Core’dinations Cardstock in SU!-exclusive
SINGLE color packs
Normally $6.95, ONLY $2.79 while supplies last!
Cherry Cobbler (127846)
Early Espresso (127848)
Gumball Green (127847)
Primrose Petals (129322)
I hope you enjoy today’s quick little ribbon tip that’s great for any type of project: cards, scrapbook pages, 3D items, or any other paper craft you can dream up! I used it here on a vintage card but it will really work with most any style.
Stampin’ Up! sells their fabulous Seam Binding Ribbon in 8 colors. One of them is Very Vanilla and the great thing about Whisper White or Very Vanilla ribbon is that it is easy to dye to match any project using our Classic Ink Refills! So instead of just the 8 colors, you can have 50!!!
Head on over to my Online Store and get some ribbon to start creating with today! It is my very most favorite embellishment to add to any project!!!
Hi there! The video is long again – I swear I cannot make a short video to save my life! There are just so many things I want to tell each of you! Check it out! Hope it helps you in your rosette making – I know I struggled to push the center down before the magic secret I show in the vid! 🙂 See you tomorrow – hopefully with a new card!
Hi there! Today’s belated Quick Tip Tuesday is just my take on a super cute project idea from Stampin’ Up! Convention 2012. September is a perfect month for it as you can choose a roll of our 3/8″ Stitched Satin Ribbon for every $40 increment you spend. Get out those ribbon scraps and make some fun ribbon cards or scrapbook pages incorporating this technique today!!!
Hi there! Sorry I missed posting for a few days – we were home for the long weekend here in the US. I did get the audio dubbed into that video I was talking about in my last post so that’s what I have for you today! Check back later for the Quick Tip Tuesday using the ribbon in the new “Back to Spool” September promotion!!!
I hope you enjoy the video today! This is probably the way I use my Big Shot most and my favorite thing to add to my project – TEXTURE with the embossing folders! 🙂 I show a few different ways to use them, as well as what “sandwich” you need for each type of folder.
See you again soon!!!
I hope you enjoy today’s video on how to cut out a stamped image with a Framelits Die and the Big Shot. Many of our Stampin’ Up! stamps are designed to coordinate with Framelits dies and I couldn’t be more thrilled to see a 15% discount on the Bundles that include a stamp set and matching Framelits dies in the Holiday Catalog! I’ll list all the bundles that are discounted below, and highlight the 4 that are stamp sets and matching Framelits. My other favorite bundle: the Ghoulish Googlies bundle! You’ll see that in an upcoming post soon! (You can click on any of the links to see the products in my online store.) Leave a comment below and let me know what your favorite bundle is!!! 🙂
Holiday Catalog Bundles
Ornament Keepsakes Bundle (Wood-Mount 129949, Clear-Mount 129950)
Scentsational Season Bundle (Wood-Mount 129945, Clear-Mount 129946)
Noel Notes Bundle (129909)
Everyday Happenings Bundle (129936)
Ghoulish Googlies Bundle (Wood-Mount 129852, Clear-Mount 129853)
Perfectly Preserved Bundle (Wood-Mount 129943, Clear-Mount 129944)
Friendship Preserves Bundle (Wood-Mount 129947, Clear-Mount 129948)
Remember December Digital Collection Disc (129836)
Haunts & Harvest Digital Collection Disc (129835)
Being able to tie the perfect knot is all about practice, practice, practice! In this video, I show you how to tie a knot around a card three different times. Pause the video and practice along. The third time, I even show you what to do if your ribbon is one-sided and you want a certain side only to show. Enjoy!
Hi there! Today I’m going to do a countdown of my 10 most favorite things in the Holiday Catalog that Stampin’ Up! released on August 1st! If you don’t have these, you will want to before the Holiday Catalog expires on January 2, 2013!!! Click on any of the links by the product names to see them in my Stampin’ Up! store for more info and prices!

10. Snow Festival Designer Printed Tags (128152)– So so cute and affordable! For only $3.95, you get 25 double sided tags that you can stamp or write on and then put on any of your holiday presents! Or, take an idea from Stampin’ Up! Convention and use either side of the tag to make a cute, fast, and fun holiday card! (Also great for scrapbook pages – but do note that while they are acid-free, they don’t say anything about being lignin-free.)
 9. Owl Occasions Stamp Set (Wood-Mount 128000, Clear-Mount 128003) – Owls have been a hot trend for a little while now and this stamp set fits right in! The best thing about this stamp set is how versatile he is! Dress him up as Santa, put some pastel presents and the balloon in his hand for a baby shower, let him party the night away as a Birthday greeter, or simply put him unadorned on his little branch for a scrapbook page or card appropriate for any occasion! This stamp set also comes with a “To: From:” stamp so he is also useful for tag making!!!
 8. Toxic Framable Digital Designer Template (128139)– At $3.95, this download is so much fun and affordable for Halloween decor in your home! Customize it to your own colors if you would like before printing and framing this super cute, trendy subway art!
7. 3-1/2″ Scalloped Tulle Ribbon (Cherry Cobbler 127841, Crumb Cake 127840, Early Espresso 127839)- Coming in 3 scrumptious colors, this makes a great addition to cards and scrapbook pages, as well as your holiday gift wrapping needs!

6. Howlstooth & Scaringbone Designer Series Paper (126906)– Using this at one of my Convention classes really opened my eyes to its versatility. While I LOVE it for Halloween projects, it is so great to be able to use the monochromatic designs for ANY other projects!!!


5. Window Frames Collection Framelits Dies (129021) and Festive Paper-Piercing Pack (127857)– I’m kind of cheating again by combining two products! I was thrilled to open the Holiday Catalog and see another basic shape framelits and to have a piercing template to match! If you didn’t know it already, the Essentials Paper-Piercing Pack from the 2012-2013 Catalog is my very favorite item so naturally I was thrilled to see this one that coordinates with the Labels Collection Framelits that I already had! Also love that it coordinates another Holiday Catalog Framelits set – Holiday Ornaments.
 4. Ornament Keepsakes Bundle (Wood-Mount 129949, Clear-Mount 129950) – This bundle includes the Ornament Keepsakes Stamp Set and Holiday Ornaments Framelits Dies at a 15% discount! It was used to create the breathtaking ornament on the front of the Holiday Catalog…’nough said!!!


3. Core’dinations Card Stock (Cherry Cobbler 127846, Early Espresso 127848, Gumball Green 127847), Stampin’ Sanding System (129367), and Core’dinations Dust Buddy (129366) – WOW! I grouped these together as they all have to do with this amazing card stock where you can sand away the exterior (in Stampin’ Up! colors) to get a lighter version of the color below. Gorgeous when paired with any of the Textured Impressions Embossing Folders and the Big Shot!


2. Border Banter Stamp Set (Wood-Mount 128927, Clear-Mount 128930) & 7/8″ Cotton Ribbon (127844) – I LOVE the idea of making my own custom ribbon! The Border Banter Stamp set is great as it has words to stamp on the ribbon for Christmas and Halloween as well as “Congratulations”, in addition to 3 decorative borders that can be used at any time of year!!! Pull out your Classic Stampin’ Pads and create ribbon in any color/pattern you want!
 1. Perfectly Preserved Bundle (Wood-Mount 129943, Clear-Mount 129944) – This includes the Perfectly Preserved Stamp Set and Cannery Set Framelits Dies at a 15% discount! This was my absolute must have stamp set from the Holiday Catalog! I LOVE the variety and how useful this stamp set can be all year long! Also, the apple & stem stamp and die are FANTASTIC for teacher gifts, thank yous, or other projects!
So that’s the end, but there are so so many things I left out: the THREE new embossing folders and the super cute Ghoulish Googlies Bundle! Man! Oh and those Frightening Feline and Frosty Friends single stamps – LOVE THEM TOO!!!
Leave me a comment and let me know what your favorite product is from the Holiday Catalog!!!
Hi there! Make sure you scroll down to see yesterday’s post (AND VIDEO!) as I posted it pretty late at night. I hope you enjoy today’s video – a little comparison between Stampin’ Up!’s New and Improved Heat Tool vs. the old one, as well as a quick and easy tutorial on the very basics of heat embossing! Love that cute, new gingerbread man! Check it out!!! Head on over to my YouTube channel by clicking the YouTube logo in the right sidebar and subscribe so you don’t miss out on a single video!
Today I have a video with a fun technique that you can use to accent any project. It uses Stampin’ Up!’s Scallop Edge Border Punch (#119882) to make an awesome, whimsical, little ric rac accent! I will show picture of the card in the video tomorrow.
As I mention in the video use a 1″ width strip with the old style (black) body and 5/8″ width strip with the new style (gray) body. Try it today and leave a comment below to let me know how it went!
Connect with Me!


