
Currently viewing the tag: "Ribbon"
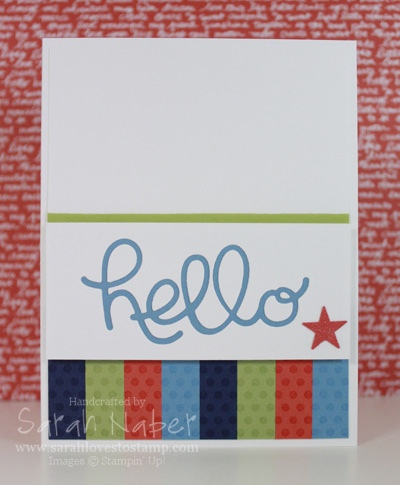
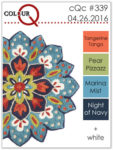
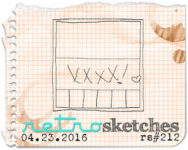
This bright card was a creation that blended the challenges from Colour Q Challenges and Retro Sketches this week! I LOVED both and wanted to make one more project to show at a mini tool demonstration I did at a team meeting last night. My tips were all about die cuts, specifically ones with more than just 2 pieces when the cut is complete. I’m planning on filming some videos on the tips I shared so those will go up on the blog as soon as I get them done (I’m nursing some dry, broken cuticles back to health before I can film).
 I’ve still been loving fun foam for popping up larger panels. I still use Stampin’ Dimensionals for most things but I know the fun foam for large panels holds up better if the card is going to be mailed. I’ve rediscovered my love for my ATG (Advanced Tape Glider) so I use that to adhere the fun foam to my cardstock, but any strong adhesive should work well. I have used Stampin’ Up!’s Tear & Tape, as well as Fast Fuse with good results!
Cut List
Thick Whisper White Cardstock: 8-1/2″ x 5-1/2″, scored at 4-1/4″; 4″ x 1-3/4″
Whisper White Cardstock: 4″ x 5-1/4″ (no reason you couldn’t use the Thick here – I already had panels cut to this size)
Marina Mist Cardstock: 3-3/4″ x 1-1/2″, 2 strips at 1/2″ x 1-3/4″
Tangerine Tango, Pear Pizzazz, and Night of Navy Cardstock: 2 strips each at 1/2″ x 1-3/4″
How To
1.Die cut Whisper White strip with ‘hello’ die from Hello You Thinlits Dies. Adhere a piece of Marina Mist cardstock to the back of strip.
2. Place regular word die cut (positive image) back into the cut strip to guide where to glue missing pieces in (the loops of the ‘h’ and both ‘l’s, and centers into the ‘e’ and ‘o’). *TIP: I use Multipurpose Liquid Glue (and a tweezers) for this but it is VERY important that you don’t get too much on the small pieces or it’ll squish out and adhere the positive image onto the Marina Mist too!
3. Adhere small colored cardstock strips to the bottom of Whisper White layer. Stamp Dots for Days Background Stamp (RETIRING) in VersaMark ink. Here’s another card using the Dots for Days Background Stamp!
4. Use SNAIL to adhere 1/4″ Pear Pizzazz Cotton Ribbon (RETIRING) about 3″ above the bottom of the card. Fold ends onto back. *TIP: I much prefer folding the ends of the ribbon onto the back of the card and securing them with Scotch tape to trimming the ribbon off at the edges. It often frays if it’s trimmed so taping it onto the back prevents this.
5. Adhere panel onto card base (I used Fast Fuse).
6. Use fun foam to pop up sentiment panel onto card front.
7. Cover a small area of a Tangerine Tango cardstock scrap with the clear Wink of Stella Glitter Brush pen. Punch star from Itty Bitty Accents Punch Pack (RETIRING) and adhere to card.
It’s really a pretty simple bright card, great for a masculine or kid’s card. It would also be super easy to make this into a more feminine card with a different color combo and a little heart (like in the original sketch). I was tempted to add some Candy Dots (RETIRING) or sequins to it but didn’t want to disrupt the white space, as I LOVE this sketch. I think I’ll have to use it again.
I have made all the retiring items in red letters, just so you don’t miss out on something you love! The Stampin’ Up! Retiring List is while supplies last for everything except stamps (they’ll be produced until May 22nd) and the last day to order these products will be May 31st. I’m a collector of background stamps and I think the Dots for Days is simply a MUST HAVE!
If you’re interested in checking out the retiring products in my Online Store,
simply CLICK HERE!

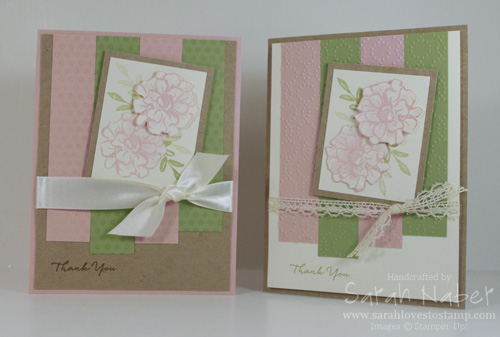
Hello! I hope you’re having a great start to your week! This was the first version of the pastel floral card I made Friday with the What I Love stamp set from Stampin’ Up! Sale-A-Bration 2016! I wasn’t sure if I loved it, so I tried again and made the card that I posted on Friday. Which version do you prefer?
The supplies are basically the same, except the lace trim and the strips are embossed instead of stamped.
CLICK HERE to check out my post about the card on the left, including the paper dimensions in the cut list. The Very Vanilla layer and Kraft layer are identical in size, as well as the card bases and the rest is the same colors and everything.
If you haven’t heard of Stampin’ Up! Sale-A-Bration, here’s a quick rundown of what that is. It’s our best promotion of the year because you get an exclusive free item with every $50 you spend! It’s also a great time to host – you get an extra $25 hostess dollars with a party of $250 or more or join – you get $155 worth of any products you choose for only $99 during Sale-A-Bration this year! Free shipping on your kit/order when you join too plus the $56 of freebies! Gotta love that!
Do you like seeing the full stamp sets in my posts? I’m happy to share them if it’s something people enjoy. Here’s the What I Love stamp set. It’s only available during Sale-A-Bration 2016 and it isn’t available to buy outright. You can earn it free by spending $50 in any product first.
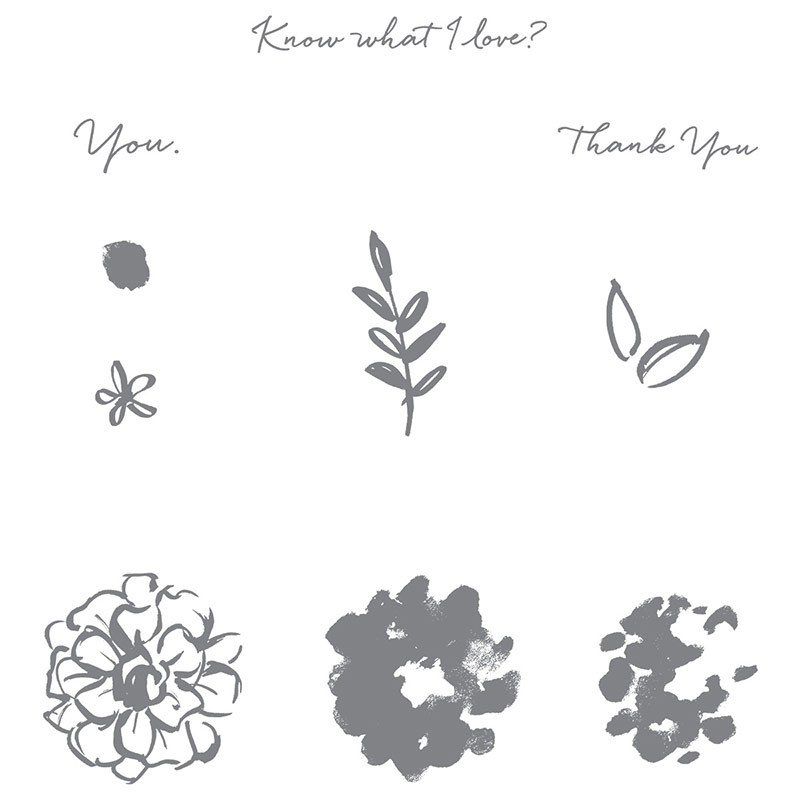
I’m also sharing a video today! This is a video by Stampin’ Up! all about the What I Love stamp set! It’s a short one but does show great ideas with this versatile set.
Today marks the end of February, meaning you have just one month remaining to get this year’s Sale-A-Bration items! The company has also said that stock is not guaranteed until March 31st. If you want to make sure you get the ones you love, click here to shop in my Online Store! It’s open 24/7! The What I Love stamp set featured here is just one of the great options from Sale-A-Bration 2016!!!
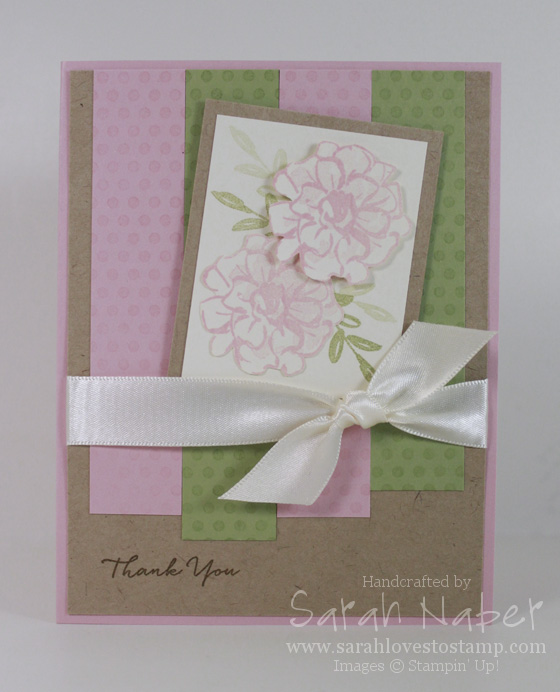
It’s no surprise that it’s pretty easy for me to make a feminine thank you card but I’m really loving the way this one came together. A “fill in the blank” challenge from As You See It (“Thank You” is my favorite sentiment to use), a color challenge from Color Throwdown, and a sketch challenge from Retro Sketches provided me with massive inspiration! I’m wild about this stamp set – What I Love – just one of the many Sale-A-Bration exclusive options this year FREE with a $50 purchase.
Today’s card uses a very basic stamping technique that never fails to delight me with it’s simplicity – 2nd generation stamping. It’s where you ink up the stamp and then stamp off onto scrap paper (I always use my grid paper since that’s what I work on) and then stamp it onto your project. The result is a lighter image and it works perfectly for two step stamp sets, although it’s a useful technique for many different things. I also love to use it when I am making a layered or collage stamped piece.
If you’re interested in seeing my first take on this card, as well as the two cards side by side, here’s a link to that post!
Cut List
Blushing Bride cardstock: 8-1/2″ x 5-1/2″, scored at 4-1/4″; 2 strips at 7/8″ x 4-1/4″
Pear Pizzazz cardstock: 7/8″ x 4-1/2″; 7/8″ x 4″
Kraft 12″x12″ cardstock: 4″ x 5-1/4″; 2-1/4″ x 2-3/4″
Very Vanilla cardstock: 2″ x 2-1/2″; scraps
How To
1. Stamp flower outline from What I Love twice onto Very Vanilla scrap in Blushing Bride ink. Stamp flower details (I used the stamp with less coverage but you could do either) lighter by stamping Blushing Bride inked stamp off onto scrap paper first.
2. Use Paper Snips to quickly fussy cut the two flowers.
3. Stamp leaf image (also from What I Love) onto Very Vanilla layer, stamping once full strength and then once without reinking to get a lighter image.
4. Adhere one flower directly to the layer and adhere one with Stampin’ Dimensionals.
5. Adhere Very Vanilla layer to Kraft mat.
6. Temporarily adhere strips onto a sheet of copy paper how they will appear on the card. Stamp the Dots for Days background on them in VersaMark ink. This will give them a seamless look.
7. Adhere strips onto larger Kraft layer.
8. Stamp “Thank You” sentiment from What I Love in Soft Suede ink onto the larger Kraft layer.
9. Tie Very Vanilla Satin Ribbon around the layer.
10. Adhere to Blushing Bride card base with Fast Fuse adhesive.
11. Adhere focal point with Stampin’ Dimensionals onto card.
I hope you enjoyed this feminine thank you card as much as I do! Check back tomorrow for an alternate take on these 3 challenges that is similar but different!
Leave a comment below and tell me what your crafty plans for the weekend are! Happy Friday!!!
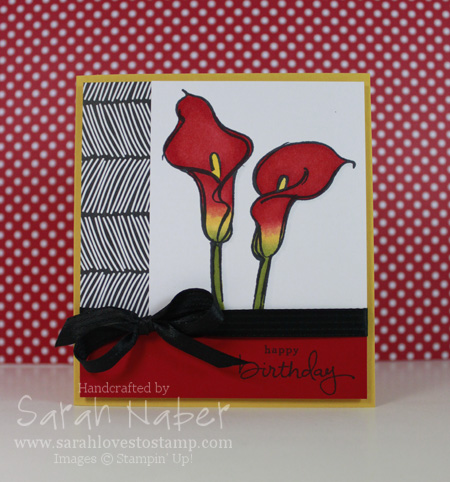
The Remarkable You stamp set is probably my favorite line art set I own! The images are a great size, wonderful to stand on their own on a simple notecard, to be the focal point of a larger card, or even for larger scrapbooking or 3D items. They’re fun to color, but also look stunning stamped in black ink on white cardstock or tone-on-tone with matching ink and cardstock too!
I used a bold color palette on this birthday card for my good friend, Sara (I hope she loved it as much as I did!). The mixed font greeting is from the awesome set, Endless Birthday Wishes. I LOVE that it’s a photopolymer set so it makes mixing and matching the sentiments especially easy. I would say it’s my 2nd most used set right behind Teeny Tiny Wishes!
The image was one I colored for the 30 day coloring challenge (I’m behind by a couple of days right now). I colored it with Copic markers. I’ve had them for a long time, but rarely used them as I started only using Stampin’ Up! products for several years now. You may or may not know, but Stampin’ Up! introduced our own alcohol-based markers a few years ago and I remembered how much I love coloring with this particular medium. The SU! ones had some issues from the manufacturer and were discontinued, but my love for alcohol-based marker coloring was rekindled! So I pulled them out, googled an image of a calla lily, and took inspiration from there to blend the green, yellow and red. I ended up really pleased with it.
Here’s a link to another card I did with a sketch that’s been a long time
favorite, as well as colored with alcohol-based markers!
I’m always saying that cardmaking is a process. This card was no different. I’d stumbled upon a sketch I loved when I was researching ideas with the Tap Tap Tap stamp set and wanted to try it with this image. The sketch I was inspired by had the main portion (focal image and vertical and horizontal strip) going from edge to edge on the card. I thought my image was plenty large enough and just started cutting. Before I knew it, it was too narrow to span to the edge and have the vertical strip be the 1″ that I planned. I tried it on a regular A2 card but just didn’t love it with the skinny border on two sides and larger at the top and bottom. So I ended up with a very unique sized card. 4-1/4″ x 4-3/4″ was the finished measurement. I may retry making it another day and cutting the focal image piece 1/4″ larger (width) to see how it would compare to this one!
Anyway, I think the rest of the card is pretty simple, so I’ll just get on to the Cut List and Supplies!
If you haven’t already, join my mailing list by entering your info into the box to the right. I send out an exclusive project PDF filled with ideas once a month to my subscribers!
Cut List
Crushed Curry Cardstock: 8-1/2″ x 4-3/4″, scored at 4-1/4″
Whisper White Cardstock: 4″ x 4-1/2″ (base I glued other pieces to)
White Copic-friendly Cardstock: 3″ x 3-1/2″
Everyday Chic Designer Series Paper: 1″ x 3-1/2″
Real Red Cardstock: 1″ x 4″
Built for Free Using: My Stampin Blog
Hello! Today I’m getting my As You See It Challenge card posted! A few days late but I’m getting closer to getting back on schedule! This one was tricky as Stampin’ Up! has retired our edgelits and edge punches so I had several ideas swirling around on how to create the “ruffled” look. Check out the other Design Team gals’ creations at the As You See It Challenge Blog HERE! Check out Amy’s use of the fringe scissors…she’s a total genius! As for me, I ended up using the Envelope Punch Board to make my zig zag/ric rac look. Watch for a video on that coming soon!
I also combined the sketch challenge from AYSI with the Color Throwdown Challenge for this week! I LOVE the color combination here – I normally never do browns with blacks or greys so this really was a challenge for me! A tricky detail to see is the white sequins I’ve used to really draw the eye to the sentiment. I’m obsessed with these Greetings Thinlits Dies! They are fantastic – wonderful size and great font!
Cut List
Kraft 12″x12″ Cardstock: 8-1/2″ x 5-1/2″, scored at 4-1/4″, scrap 2″ x 5-1/2″ (cut to width after punching)
Whisper White Cardstock: 4″ x 5-1/4″
Delightful Dijon Cardstock: scrap 2″ x 5-1/2″ (cut to width after punching)
Smoky Slate Cardstock: scrap 2″ x 5-1/2″ (cut to width after punching)
Built for Free Using: My Stampin Blog
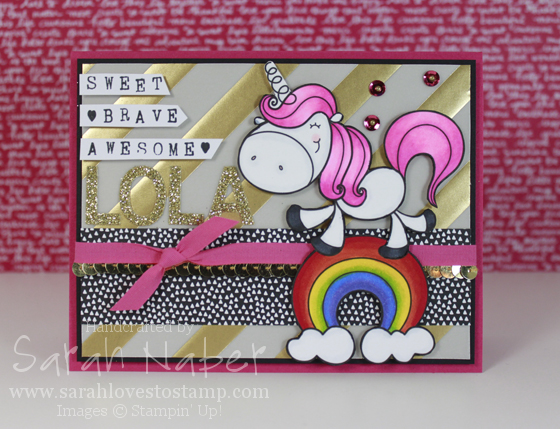
This is an extra special week of the As You See It Challenge! I’m honored to be participating in Lola’s Challenge! My best friend, Tara, has a sweet niece named Lola who has been battling cancer for several years now. She just had a stem cell transplant and was in the ICU when we decided to do something special for her. Since she was in the ICU, we decided a virtual card shower would be better than sending her cards…possibly with bad germs!
So here’s the challenge…before Wednesday, October 21st make a card with something for Lola. Gold for Childhood Cancer Awareness. Unicorns, fairies and pink are all things Lola loves! CLICK HERE to head on over to the As You See It Challenge site! Check out the other Design Team cards and PLEASE make and enter your own card for Lola! It’s so simple – you can pretty much put it anywhere online (as long as it’s public) and then just paste the link to enter your card! I set a goal of 100 cards for Lola so please share with everyone you know!
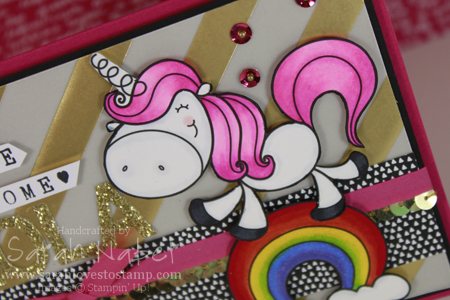
So that brings me to the card. I knew I wanted to include an image of one of Lola’s favorite things but I didn’t have any stamps with a unicorn or fairy…so I turned to the internet. A few searches and some really great things popped up! I chose this adorable Lucky Unicorn image from the Etsy shop 2CuteInk! Love it! I also found some great paper piecing files if you love to fussy cut or have a digital cutter. Or go with the fairy punch art route. If you want to play along, you can also use a FREE digi stamp too!
Besides the digi stamp and Copics I colored it with, everything is Stampin’ Up! I even used my new alphabet rotary stamp for the first time on this project! (Thanks for telling me I *had* to buy it, Amy!)
*I’ll be back with the supply list and measurements soon! 🙂
Here’s a card I made for a challenge over at part of being on the As You See It Design Team! It was several weeks ago but I have some news to share…I’m pregnant! It seems the first trimester exhaustion has spilled over into my second trimester, so I apologize for my absence! I am just, at 24 weeks, feeling more like myself again so hopefully that’ll mean good things for you if you’d like to see more from me! 🙂 I don’t mean it at all as complaining because we couldn’t feel more excited or blessed to add the first little person to our family in January, but I thought some explanation for my extended absences was in order! 🙂
Anyway, I liked this card so I thought I’d share anyway. It also shows you that you can use previous challenges from any challenge site to inspire your creativity!!! New challenges on As You See It post on Friday mornings and you have until the following Wednesday night to complete the challenge! Check it out here at the As You See It Challenge Blog (and feel free to dive into the archives to check out some of the past challenges by our fabulous team leader, Amanda to inspire you)!
An apology in advance for this lengthy post! 🙂 I also apologize for my long hiatus! I’m working on 24 samples for display for our Stampin’ Up! Convention in July so I’m really trying to get those done. Bonus…in July, I’ll have 24 pretty sweet projects to share! 🙂
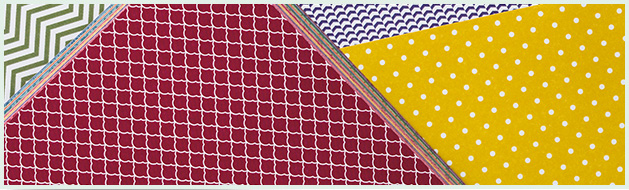
A new catalog is always exciting and brings a great variety of new things everyone wants to try out! I’m doing my first catalog shares to help you try everything you want at a MUCH lower cost than buying it all yourself. 🙂 A share means several people are splitting the 10 yard rolls of ribbon into 2 yard segments and getting every color OR cutting the Designer Series Paper into 6″x6″ pieces and having every pattern right now!
Here’s how the 2014-2015 Stampin’ Up! Product Shares work:
-Sign up for a spot in the product share(s) you’d like to receive
-As soon as the share is full, you’ll receive a Paypal invoice for the total amount
-Once I’ve collected payment from all people in the share, I will place the order for the product (SU! policy says I cannot order it and collect payment later)
-I will order the first round, if full, on June 2nd, and will plan to ship it out the week of June 9th (estimated arrival time is two weeks allowing for time for it to ship to me, get packaged and ship out to you)
-Designer Series Paper (DSP) Shares & I WANT IT ALL Shares will come packaged in a cello bag (to protect from water damage) in a Flat Rate Priority Bubble Mailer. Ribbon Shares will come wrapped and secured to chipboard for wrinkle free use and packaged in a cello bag in a bubble mailer.
-If you are local to me (St. Joseph, MO area), you can pick up your share(s) at my home instead of paying the shipping cost.
Pictures of shares will be added as soon as products are received.
PAPER SHARES
Designer Series Paper Share: 60 sheets 6″x6″ double-sided
$15.99 (+$5.95 Priority Shipping)
-Designer Series Paper (DSP) – 48 sheets
-Specialty Designer Series Paper (DSP) – 12 sheets
-If you wanted to buy full packages of all of this DSP, it would cost you $113.50 + shipping & tax!
***Are you a scrapbooker?***
***Would you rather have a 6″x12″ pieces?***
Do a double share of the above Designer Series Paper Share for $31.75
Background DSP Stacks Paper Share: 100 sheets 6″x6″ double-sided
$16.50 (+$5.95 Priority Shipping)
-Brights DSP stack – 20 sheets
-Subtles DSP stack – 20 sheets
-Regals DSP stack – 20 sheets
-Neutrals DSP stack – 20 sheets
-2013-2015 In Color Stack – 10 sheets
-2014-2016 In Color Stack – 10 sheets
-If you wanted to buy full stacks of all of this DSP, it would cost you $131.70 + shipping & tax!
RIBBON SHARES
NEW 5/8″ Satin Ribbon Share: $6.95 (+$3.00 shipping)
-Approximately 2 yards each of 4 colors = 8 yards total
-Gold, Silver, Very Vanilla, Whisper White
-Picture to follow.
-If you wanted to buy rolls of all of this ribbon, it would cost you $27.80 + shipping & tax!
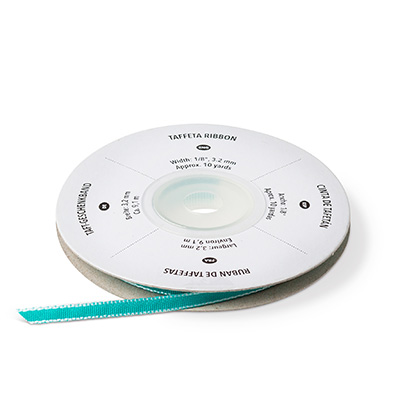
1/8″ Taffeta Ribbon: $13.95 (+$3.00 shipping)
-Approximately 2 yards of each of 10 colors = 20 yards total
-Gold, Silver, Basic Black, Bermuda Bay, Crushed Curry, Melon Mambo, Old Olive, Real Red, Smoky Slate, Soft Sky
-If you wanted to buy rolls of all of this ribbon, it would cost you $57.50 + shipping & tax!
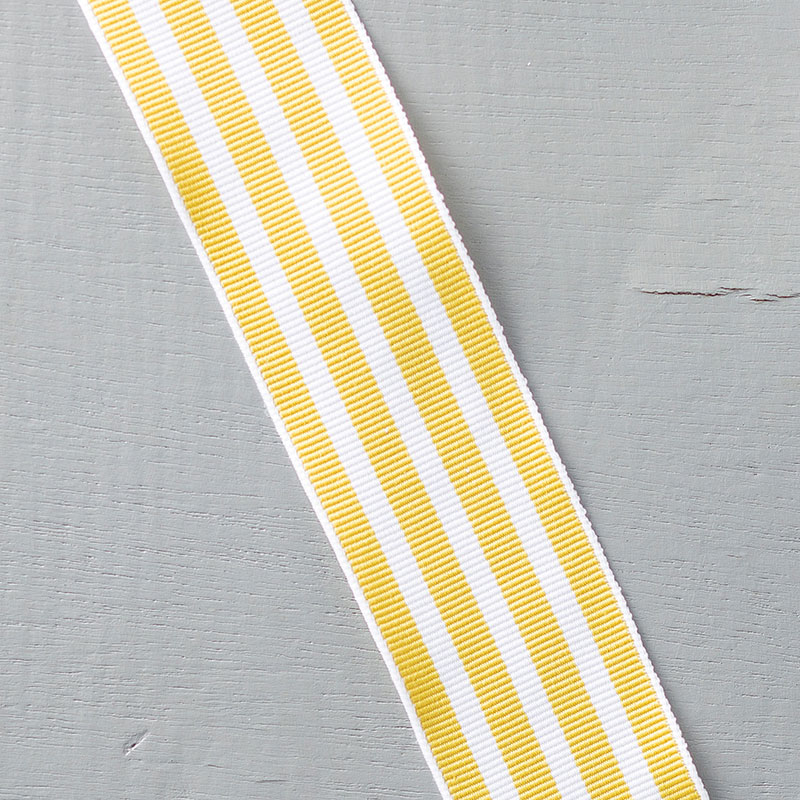
NEW 1-1/4″ Striped Grosgrain Ribbon Share: $10.95 (+$3.00 shipping)
-Approximately 2 yards of each of 5 colors = 10 yards total
-Bermuda Bay, Blushing Bride, Cherry Cobbler, Crumb Cake, Crushed Curry
-If you wanted to buy rolls of all of this ribbon, it would cost you $44.75 + shipping & tax!

NEW In Color 3/8″ Stitched Ribbon Share: $10.95 (+$3.00 shipping)
-Approximately 2 yards of each of 5 colors = 10 yards total
-Blackberry Bliss, Hello Honey, Lost Lagoon, Mossy Meadow, Tangelo Twist
-If you wanted to buy rolls of all of this ribbon, it would cost you $44.75 + shipping & tax!
*Project from Shelli Gardner, SU! CEO & Co-founder
NEW 1/4″ Cotton Ribbon Share: $17.50 (+$3.00 shipping)
-Approximately 2 yards of each of 12 colors = 24 yards total
-Blushing Bride, Daffodil Delight, Early Espresso, Island Indigo, Marina Mist, Melon Mambo, Pear Pizzazz, Pool Party, Pumpkin Pie, Real Red, Rich Razzleberry, Whisper White
-If you wanted to buy rolls of all of this ribbon, it would cost you $71.40 + shipping & tax!
*Project from Shelli Gardner, SU! CEO and Co-founder – At our catalog premiere, Shelli kept talking about how nicely it ties and how soft it feels. I can’t wait to have this in hand!!! 🙂
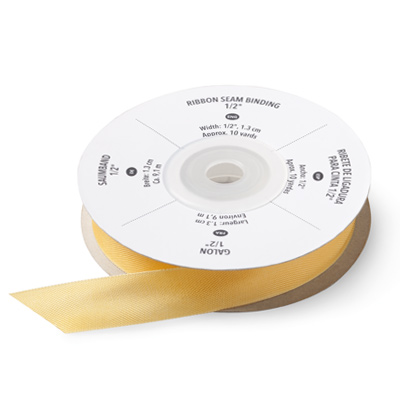
1/2″ Seam Binding Ribbon Share: $19.95 (+$3.00 shipping)
-Approximately 2 yards of each of 12 colors = 24 yards total
-Calypso Coral, Cherry Cobbler, Crumb Cake, Daffodil Delight, Early Espresso, Night of Navy, Pink Pirouette, Soft Sky, Very Vanilla, Whisper White, Wild Wasabi, Wisteria Wonder
-If you wanted to buy rolls of all of this ribbon, it would cost you $83.40 + shipping & tax!
![]()
3/4″ Chevron Ribbon Share: $25.95 (+$3.00 shipping)
-Approximately 2 yards of each of 12 colors = 24 yards total
-Basic Black, Blushing Bride, Calypso Coral, Cherry Cobbler, Chocolate Chip, Crushed Curry, Island Indigo, Marina Mist, Pear Pizzazz, Pumpkin Pie, Smoky Slate, Wisteria Wonder
-If you wanted to buy rolls of all of this ribbon, it would cost you $107.40 + shipping & tax!
I WANT IT ALL!!!
“I’m a Ribbon Addict!” – ALL ribbons listed above!!!
$104.50 + FREE SHIPPING
That’s 120 yards of glorious, SU! exclusive ribbon!
Total, if you bought ALL of the rolls of ribbon instead, $427.10!!!
“I WANT IT ALL!” – EVERYTHING listed above!!!
$136.95 + FREE SHIPPING.
That’s 160 6″x6″ sheets of DSP and 120 yards of ribbon!
Total cost if you were to buy it all in full packs, stacks and rolls…a whopping $672.30!!!

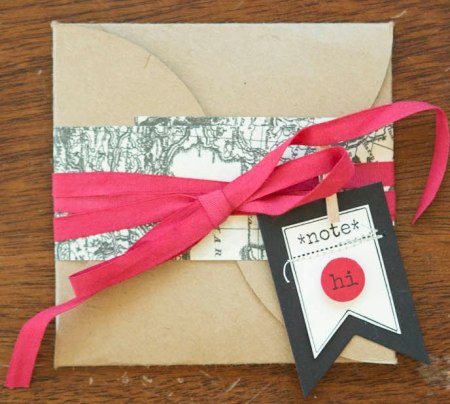
Hi there! Today I have my husband’s Valentine’s Day card to share with you! I combined a few great challenges to bring a fun, masculine card to you (at least my hubby says it is still masculine with the pink since it was for V-day and he says ribbon is ok too). Loving this lovey combo of colors from the Color Throwdown Challenge and the FABULOUS sketch from Freshly Made Sketches! I can tell you I will be using this layout again soon! LOVE!
I received the Language of Love stamp set (Wood-Mount 133074, Clear-Mount 133077) at Stampin’ Up! Leadership in Houston in January (FREE perk for attendees! Woohoo!) and had NO idea I’d fall in love with it (no pun intended…honestly) this much!!! I combined it with the perfect sentiment from the FREE Sale-A-Bration exclusive stamp set, See Ya Later (Wood-Mount 133533, Clear-Mount 133536)! LOVE IT! This sentiment is also GREAT for any love card: Valentine’s Day (obviously), weddings, anniversaries, best friends, and even for adopted parents/children too (I instantly thought of how much my parents changed my life when they adopted me).
One tiny detail you can’t see well from the picture? I used markers to ink up the 5 Heart Strip stamp from Language of Love in the 4 different colors I used and stamped it in the bottom left corner of my envelope. I used the Basic Gray Stampin’ Write Marker to put a tiny “W + S” in one of the open hearts on the envelope for a personalized touch for my hubby, William. I also used the Envelope Liners Framelits Dies (132172) to line the envelope with some Real Red patterned paper from the Brights Designer Series Paper Stack (130134).
You can earn See Ya Later, or any of the other 12 SAB exclusive choices, FREE with any $50 product order! Don’t miss out on this awesome opportunity! Click here, or any of the links below to visit my Online Store!
How To
1. Cut Basic Gray cardstock to 8-1/2″ x 5-1/2″ and score in half at 4-1/4″. Cut a strip of Basic Gray to 4-1/4″ x 1″. Cut Whisper White cardstock to 4″ x 5-1/4″.
2. Using Small Heart Punch, punch 2 hearts out of scraps of each of Basic Gray, Melon Mambo, Pink Pirouette, and Real Red cardstocks. Push the punch in as far as it will go and leave space between the 2 punched hearts for the next step! (Set aside the hearts you punched out, as you actually want the negative image for this project!)
3. Using the 1″ Circle Punch upside down (so you can see where you’re punching), center it around each of the punched hearts from Step 2. Punch all 8 of these out and decide on how you want to arrange them! 🙂
4. Stamp the 5 Heart Strip stamp from Language of Love on 1″ strips of Whisper White cardstock in each of the following colors: Basic Gray, Melon Mambo, Pink Pirouette and Real Red. Use the 3/4″ Circle Punch to punch out 2 hearts from each color. The hearts that look white above are actually Pink Pirouette. This color is VERY pale and hard to pick up in the photo. Sorry about that! *TIP: The hearts are close enough together that you will punch an edge of the heart next to it. This is not a big deal at all because you won’t see that through the little circle/heart windows we made in Step 3.
5. Use Stampin’ Dimensionals (cut apart) to adhere the circle/heart windows from Step 3 onto the stamped heart circles from Step 4. I put my dimensionals on the back of the circle/heart windows – a half dimensional at the top of the heart point and a quarter dimensional on each side of the bottom point of the heart. Then I lined it up over the top of the heart I wanted behind the window and pressed down.
6. Next I laid out where I wanted the circles to be and made a mark between the 2nd and 3rd set of circles so the sentiment could be right in the void between the circles. I then used my Stamp-a-ma-jig to position the “Someone” sentiment from the Sale-A-Bration choice See Ya Later stamp set in Real Red ink. Earn it FREE with a $50 purchase from now until March 31, 2014.
7. I used the Multipurpose Liquid Adhesive to adhere the circle hearts down to the white layer. *TIP: Use the Multipurpose Liquid Adhesive anytime you need a bit of time to move things around a titch. That’s the beauty of a liquid adhesive – it’s a total life saver for my perfectionist nature!
8. Run the strip of Basic Gray cardstock through the Big Shot Die-Cutting Machine with the pinked edge from the Finishing Touches Edgelits Dies. You’ll have to run it through once for one edge and a second time for the second edge.
9. Run the strip of Basic Gray through the Big Shot again using the Woodgrain Embossing Folder to give it a bit extra oomph and add some texture to the card! It is rare that I can make a card without these things!!! *TIP: Do all embossing LAST! If you have any cutting to do with the Big Shot, running an embossed piece through the machine will flatten the embossing a bit.
10. Glue the Basic Gray strip to the top of the card. Trim the excess off of the edges. *TIP: I shared this yesterday, but when I’m going to emboss and I need it to be a specific size (this strip needed to be 4″ wide), I cut it a bit bigger and trim it after embossing, either on my paper cutter or with Paper Snips if it is a strip that will overhang the edge like this one.
11. Finally, tie a knot of ribbon around the white layer and adhere the layer to the card base! 🙂 *TIP: Whisper White and Very Vanilla are a bit thinner than our other cardstocks and thus I have trouble with them buckling when I go to tie my ribbon around a single layer of these cardstocks, so I used my favorite ribbon tying trick on this card. Check out the video posted below for how I do this. On this project, as I mentioned in the video, I used a Glue Dot (Stampin’ Up!’s are mini sized) in the center of my knot to put it exactly where I wanted it. Also, in the video, I used our regular Stampin’ Mist bottle. Since the ribbon needed to span 4″ (plus some to tape on the back) on this card, I used the Stampin’ Mist Refill bottle as my cylinder (it is larger). I taped the edges to the back before adhering it to the card base.
*BONUS TIP: The ribbon tip in this video will also help you use a little less ribbon too – stretching your roll to make even more projects before it runs out! Just by a couple of inches of course so not huge but if you’re using a specific color tons or mass producing cards, you’ll notice a difference.
Supply List
STAMPS:
- Language of Love (Wood-Mount 133074, Clear-Mount 133077)
- See Ya Later (Wood-Mount 133533, Clear-Mount 133536) *Earn it FREE with a $50 product order during Stampin’ Up! Sale-A-Bration. Offer ends March 31, 2014.*
PAPER:
- 8-1/2″ x 11″ Whisper White Cardstock (100730)
- 8-1/2″ x 11″ Basic Gray Cardstock (121044)
- 8-1/2″ x 11″ Melon Mambo Cardstock (115320)
- 8-1/2″ x 11″ Pink Pirouette Cardstock (111351)
- 8-1/2″ x 11″ Real Red Cardstock (102482)
INK:
- Basic Gray Classic Stampin’ Pad (126981)
- Melon Mambo Classic Stampin’ Pad (126948)
- Pink Pirouette Classic Stampin’ Pad (126956)
- Real Red Classic Stampin’ Pad (126949)
ACCESSORIES:
- Real Red 1/4″ Stitched Grosgrain Ribbon (126875)
- SNAIL Adhesive (104332)
- Multipurpose Liquid Glue (110755)
- Mini Glue Dots (103683)
- Stampin’ Dimensionals (104430)
TOOLS:
- Stampin’ Trimmer (126889)
- Simply Scored Scoring Tool (122334)
- Bone Folder (102300)
- Paper Snips (103579)
- Craft Scissors (108360)
- Stamp-a-ma-jig (101049)
- Small Heart Punch (117193)
- 3/4″ Circle Punch (119873)
- 1″ Circle Punch (119868)
- Big Shot Die-Cutting Machine (113439)
- Big Shot Magnetic Platform (130658)
- Finishing Touches Edgelits Dies (127010)
- Woodgrain Textured Impressions Embossing Folders (127821)
- Grid Paper (102787)
- Stampin’ Scrub (126200)
- Stampin’ Mist (102394)
This card was entered into challenge at: Color Throwdown, Cupcake Inspirations, Freshly Made Sketches, Artistic Inspirations, Crafting from the Heart, Challenges 4 Everybody, Cuttin and Stampin, Digistamps4Joy, Lexi’s Creations, Lady Bug Crafts, Oldie But a Goodie (Woodgrain folder, Edgelits, Punches, Pink Pirouette), Paper Pretties, and Splitcoaststampers Ways to Use It (Red, Red, Red). 🙂

Hi there! It’s Friday and that means a new challenge over at the As You See It Challenge Blog! Check out the creations by the other AYSI Design Team Members too! I also combined it with the color challenge from Colour Q Challenges this week. I wasn’t sure about these colors to begin with but loved the final result. I hope you do too!
How To
1. Cut your Pool Party cardstock to 8-1/2″ x 5-1/2″ for your card base and score it at 4-1/4″. Cut the Pacific Point to 4″ x 5-1/4″. Cut a piece of Whisper White to 1-7/8″ x 5″. Cut a piece of Real Red to 2″ x 5-1/4″ – see Step 3 for why!
2. Ink up the Dictionary Background Stamp in Soft Sky ink, stamp off onto a scrap paper once and then stamp it onto the Whisper White piece. (This is super hard to see in the photo but is gorgeous in real life!) Then use the Petal Parade stamp set (FREE Sale-A-Bration exclusive stamp set with any $50 purchase!) and Pacific Point, Pool Party, and Real Red inks to stamp the rest of the white panel.
3. Run the Real Red piece through the Big Shot with the Arrows Textured Impressions Embossing Folder. Cut the final piece down to 1-7/8″ x 5″. *TIP: Cut your piece of cardstock a bit larger than you want it (usually 1/8″ is plenty depending on how intricate the embossing folder design is) and trim it down to the size you want AFTER embossing! The embossing “shrinks” the paper a bit so this is a great idea when you need an exact size or to match up with another piece like I needed on my card.
4. Use the Multipurpose Liquid Adhesive to adhere both the Whisper White and Real Red strips side-by-side onto the Pacific Point layer.
5. Tie the Real Red and Whisper White 1/4″ Stitched Grosgrain Ribbons around the Pacific Point layer. Adhere this to the card base.
6. Stamp the “Happy Big Day” from the Chalk Talk Stamp Set (LOVE!) in Pacific Point ink onto a scrap of Whisper White. Die cut it out with the Big Shot and the matching Chalk Talk Framelits Dies.
7. Die cut two more of the same label shape out of a scrap of Pool Party cardstock. Cut one set in half horizontally and one set in half vertically and glue behind the sentiment to make a custom mat! *TIP: This is one of my favorite tricks to do with punches and die cuts that may not have a nesting shape! Make your own! Works fabulously with the Decorative Label Punch among others.
I hope you love this card! This sketch was a great one to work with. Head on over to the As You See It Challenge Blog and play along! 🙂 We’re always excited to see what you have created!!!
This card was entered into challenges at: ColourQ, polkadoodles, Crafting from the Heart, Challenges 4 Everybody, and Word Art Wednesday.

Supply List
STAMPS:
Petal Parade (Wood-Mount 133599, Clear-Mount 133602)***FREE Sale-A-Bration Choice with $50 Order***
Chalk Talk (Wood-Mount 130631, Clear-Mount 130634) *Get the stamp set with the matching framelits and save 15% with the Chalk Talk Bundle: Wood-Mount 132731, Clear-Mount 132730!*
Dictionary Background (Wood-Mount 130348, Clear-Mount 130351)
PAPER:
8-1/2″ x 11″ Whisper White Cardstock (100730)
8-1/2″ x 11″ Pacific Point Cardstock (111350)
8-1/2″ x 11″ Pool Party Cardstock (122924)
8-1/2″ x 11″ Real Red Cardstock (102482)
INK:
Pacific Point Classic Stampin’ Pad (126951)
Pool Party Classic Stampin’ Pad (126982)
Real Red Classic Stampin’ Pad (126949)
Soft Sky Classic Stampin’ Pad (131181)
ACCESSORIES:
Real Red 1/4″ Stitched Grosgrain Ribbon (126875)
Whisper White 1/4″ Stitched Grosgrain Ribbon (126877)
SNAIL Adhesive (104332)
Multipurpose Liquid Glue (110755)
Stampin’ Dimensionals (104430)
TOOLS:
Stampin’ Trimmer (126889)
Simply Scored Scoring Tool (122334)
Bone Folder (102300)
Paper Snips (103579)
Craft Scissors (108360)
Big Shot Die-Cutting Machine (113439)
Big Shot Magnetic Platform (130658)
Chalk Talk Framelits Dies (129983) *Get the stamp set with the matching framelits and save 15% with the Chalk Talk Bundle: Wood-Mount 132731, Clear-Mount 132730!*
Arrows Textured Impressions Embossing Folders (132187)
Grid Paper (102787)
Stampin’ Scrub (126200)
Stampin’ Mist (102394)
Here it is! My first new video for the New Year! Better late than never, right? I’m excited about LOTS of new things that will be coming your way! I hope you enjoy this video – it’s a bit different than my normal cardmaking or tool tips. I LOVE Post It Notes and am constantly reaching for them to jot something down so it’s pretty appropriate for me! 🙂 Thanks for your patience as I took time with family over the holidays and went on a much needed vacation with my hubby in early December! My New Year’s Resolution is to post regularly for you all on my blog and YouTube especially, adding in Facebook, Twitter and Pinterest more too!!! I also still need to blog my AWESOME trip to Houston last week for Stampin’ Up!’s Leadership Conference!!!

Hi there!!! Are you enjoying my Friday posts for the As You See It Design Team? I’m sure enjoying making these projects with the awesome inspiration from the challenge blog. I combined this week’s color challenge with a few other ones so I’ll list those below. 🙂
Super simple card for you today! I LOVE the sketch from over at Retro Sketches and I thought a simple layout would be best for this bright and funky color combination of Pumpkin Pie, Crushed Curry, and Gumball Green. I only used ONE stamp set on this project! (Ok, that’s like, a miracle for me!) I’ve been loving the fun and surprise of getting a new Best of set each month featuring a theme and best selling stamps fitting that theme from the 25 years SU! has been in business!!! The set I used here was the Best of Autumn! LOVE, LOVE, LOVE! *Side Note: The Best of Christmas released on October 1st and is going to have to be mine!!! It’s so awesome!
As far as details, I have just a couple here. The greeting was stamped in VersaMark and heat embossed with White Stampin’ Emboss Powder onto the Gumball Green cardstock. I added a couple of pearls to mimic the dots in the sketch. Then I used a temporary adhesive to layer the Gumball Green cardstock piece onto my leaf stamped Whisper White panel and used straight piercing template from the Essentials Paper-Piercing Pack (along with a Paper Piercer and Stampin’ Pierce Mat) to pierce holes that would outline the Gumball Green piece. It’s easier to see in person. Then I popped the Gumball Green piece up on Stampin’ Dimensionals and onto the Whisper White piece. This whole panel then was glued to a Pumpkin Pie card base. I tied some Whisper White Stitched Grosgrain Ribbon around the top to finish it off! (I did a bow instead of a knot this time to add a little more weight on the left side of the card to balance it a bit more.)
Head on over to the As You See It Challenge Blog and play along!!!

This card was entered into challenges at: Retro Sketches, Tuesday Throwdown, Dream Valley Challenges, Moving Along with the Times, Creative Craft Challenges 2, Pile It On Challenge, and Loves Rubber Stamps.
Supply List
STAMPS:
Best of Autumn (Clear-Mount ONLY 134390)
***Note: Buy 6 of the Best of… Stamp Sets and get any set $14.95 or under for FREE!***
PAPER:
8-1/2″ x 11″ Whisper White Cardstock (100730)
8-1/2″ x 11″ Gumball Green Cardstock (126840)
8-1/2″ x 11″ Pumpkin Pie Cardstock (105117)
INK:
Crushed Curry Classic Stampin’ Pad (131173)
Gumball Green Classic Stampin’ Pad (126861)
Pumpkin Pie Classic Stampin’ Pad (126945)
VersaMark (102283)
ACCESSORIES:
Basic Pearl Jewels (119247)
1/4″ Whisper White Stitched Grosgrain Ribbon (126877)
Multipurpose Liquid Glue (110755)
Stampin’ Dimensionals (104430)
TOOLS:
Stampin’ Trimmer (126889)
Simply Scored Scoring Tool (122334)
Bone Folder (102300)
Craft Scissors (108360)
Stamp-a-ma-jig (101049)
Paper Piercing Tool (126189)
Stampin’ Pierce Mat (126199)
Essentials Paper-Piercing Pack (126187)
White Stampin’ Emboss Powder (109132)
Heat Tool (129053)
Grid Paper (102787)
Stampin’ Scrub (126200)
Stampin’ Mist (102394)

Hi there! Today I have for you another card I made as a swap for Stampin’ Up!’s Convention this summer. This is my FAVORITE color combo! It’s bright, fun and oh, so pretty together! Strawberry Slush (loving those new in colors), Bermuda Bay (loving the color refresh bringing some old favorites back), Daffodil Delight, and Pumpkin Pie. It’s really a pretty simple card – just layers of fun things!
The sentiment from Label Love is embossed with White Embossing Powder onto Bermuda Bay card stock, then easily punched out with the matching Artisan Label punch. Layered onto a 1-3/4″ Circle punched out of Strawberry Slush card stock and pierced with the Paper-Piercing Tool, Piercing Mat, and the Essentials Paper-Piercing Pack. The Designer Series Paper (DSP) is from the Polka Dot Parade DSP (Daffodil Delight large circle dot and Pumpkin Pie small polka dot patterns) and the Quatrefancy Specialty DSP (Strawberry Slush geometric pattern). Oh, and that Bermuda Bay Baker’s Twine!!! It’s from the Tag a Bag Accessory Kit! I love that it comes with 20 feet of each of 3 colors exclusive to the kit. The tragedy of photographs? You totally cannot tell that the background piece of Whisper White is embossed with the Big Shot and the Modern Mosaic Textured Impressions Embossing Folder. You guys know I’m a total ribbon lover, right? I LOVE to do this technique with the Seam Binding Ribbon and will show it in a video super soon!
Check out my über late Quick Tip Tuesday #21 on Custom Dyed Baker’s Twine. The Strawberry Slush Baker’s Twine was actually dyed for this project before I decided that I liked the Bermuda Bay better. 🙂 That post is dated today as well as I had some serious technical issues last night/this morning (uploaded 4 separate times to YouTube).
Supply List
STAMPS:
Label Love (Wood-Mount 130619, Clear-Mount 130622)
***Buy it as a Bundle with the Artisan Label Punch and save 15%. Wood-Mount 132723, Clear-Mount 132722***
PAPER:
8-1/2″ x 11″ Whisper White Card Stock (100730)
8-1/2″ x 11″ Bermuda Bay Card Stock (131197)
8-1/2″ x 11″ Daffodil Delight Card Stock (119683)
8-1/2″ x 11″ Pumpkin Pie Card Stock (105117)
8-1/2″ x 11″ Strawberry Slush Card Stock (131295)
Quatrefancy Specialty Designer Series Paper (130141)
Polka Dot Parade Designer Series Paper (126902)
INK:
VersaMark (102283)
ACCESSORIES:
Basic Rhinestone Jewels (119246)
Vintage Faceted Designer Buttons (127555)
Daffodil Delight 1/2″ Seam Binding Ribbon (125583)
Tag a Bag Accessory Kit (130153)
***Buy it as a Bundle with 2 Options: Tag a Bag Bundle 131371 or Tag a Box Bundle 131372 and save 15%!***
SNAIL Adhesive (104332)
Multipurpose Liquid Glue (110755)
Mini Glue Dots (103683)
Stampin’ Dimensionals (104430)
Sticky Strip (104294)
TOOLS:
Stampin’ Trimmer (126889)
Simply Scored Scoring Tool (122334)
Bone Folder (102300)
Paper Snips (103579)
Craft Scissors (108360)
Paper Piercing Tool (126189)
Stampin’ Pierce Mat (126199)
Essentials Paper-Piercing Pack (126187)
Artisan Label Punch (130920)
Itty Bitty Shapes Punch Pack (118309)
1-3/4″ Circle Punch (119850)
Big Shot Die-Cutting Machine (113439)
Modern Mosaic Textured Impressions Embossing Folders (129984)
Grid Paper (102787)
Stampin’ Scrub (126200)
Stampin’ Mist (102394)

Where do I start? So so many things I love about this card!!! Silver Glimmer Paper makes me swoon! So beautiful, glittery, simple, mess-less (am I making up words again?)…and you can get it free with a party or $150 order during Sale-A-Bration! Speaking of Stampin’ Up!’s best sale of the year, Sale-A-Bration 2013, do you see that fabulous stamp? It’s from my favorite SAB stamp set, Vintage Verses!!! (The “Thanks” in the set is to die for as well!) I also love the new Honeycomb Textured Impressions Embossing Folder that is in the Spring Catalog. Here I’ve embossed it onto Pool Party Core’dinations Card Stock and then sanded with the Stampin’ Sanding Block to reveal the lighter color on the inside of the paper. Oh, did I mention the ribbon? Or that doily? Read on…
The ribbon is ANOTHER free option during SAB with any $50 order! The Sycamore Street Ribbon & Button Pack is so so awesome, it contains 3 spools of gorgeous 1/4″ ribbon in 3 colors: Island Indigo, Pool Party, and Tangerine Tango, as well as buttons in Rich Razzleberry, Pool Party, and Tangerine Tango! Seriously, ALL of that!!! Wowza! I am seriously hoping this pretty ribbon is offered in more fabulous colors in our next Annual Catalog!
The Paper Doily is from the Spring Catalog! These things are a steal at $2.95 for 24 of them! That’s right, I said 24!!! For this card, I folded it in half (not perfectly) so it would add more dimension to the card, but if you’re going for more bang for your buck, simply cut these pretties in half and have twice as many! YAY!
I used the Bitty Butterfly punch (again Spring Catalog) and punched a few out of the Silver Glimmer Paper to add some sparkle and shine to the card. Did I tell you yet how excited I am about this punch? I probably did – but I’ll tell you again! It coordinates with one of my all time favorite stamp sets, Papillon Potpourri!!! Are you kidding me? A punch for the large butterfly and the small one now too?!? Oh, double yay! This punch also matches the FREE SAB stamp set Bloomin’ Marvelous!!! (It’s pretty too! I bet you’re surprised that I think that!) I finished off the card with a couple of adhesive rhinestones to accent the beauty of the stamp – and let’s not kid ourselves, add a little more sparkle and shine, because who doesn’t love that? 🙂
Now, let’s talk about the color combo! Put any lighter color with Basic Gray and BAM, you’ve got yourself a beautiful monochromatic card! Other favorites besides Pool Party – Summer Starfruit or Pretty in Pink or Pink Pirouette or Certainly Celery…and oh, Calypso Coral would look pretty! See it works with brighter colors too, just a little less contrast! Give it a try!
This fabulous card was a complete CASE of my friend Desiree Spenst, who I believe CASEd it from someone else. That’s how we roll in the stamp world! Share and stamp, stamp and share!
If you haven’t already, place your Sale-A-Bration order today to start playing with many of these fun goodies! As always, if you have questions, don’t hesitate – that’s what I’m here for!!!
CHECK OUT the Simplified Sale-A-Bration Brochure HERE! It is a viewer friendly format of everything you can earn free with each increment of $50 you spend (before tax & shipping).
Supplies
STAMPS:
Vintage Verses (Wood-Mount 129633, Clear-Mount 129636) *FREE during Sale-A-Bration with any $50 order!!!
PAPER:
8-1/2″ x 11″ Whisper White Card Stock (100730)
8-1/2″ x 11″ Basic Gray Card Stock (121044)
12″ x 12″ Pool Party Core’dinations Card Stock (129321)
12″ x 12″ Silver Glimmer Paper (124005)
INK:
Basic Gray Classic Stampin’ Pad (126981)
ACCESSORIES:
Sycamore Street Ribbon & Button Pack (130812) *FREE during Sale-A-Bration with any $50 order!!!
Basic Rhinestone Jewels (119246)
Paper Doilies (129399)
SNAIL Adhesive (104332)
Multipurpose Liquid Glue (110755)
Mini Glue Dots (103683)
Stampin’ Dimensionals (104430)
TOOLS:
Tabletop Paper Cutter (106959)
Simply Scored Scoring Tool (122334)
Bone Folder (102300)
Craft Scissors (108360)
Stampin’ Sanding Block (129367)
Bitty Butterfly Punch (129406)
2-1/2″ Circle Punch (120906)
Big Shot Die-Cutting Machine (113439)
Labels Collection Framelits Dies (125598)
Honeycomb Textured Impressions Embossing Folder (129378)
Grid Paper (102787)
Stampin’ Scrub (126200)
Stampin’ Mist (102394)

Hey! Today’s card is not my own design – I totally copied it from the Stampin’ Up! home office team. I’ve seen a few of them floating around thanking demonstrators for presenting at Convention or our more recent Regional Conferences. I changed VERY little as I LOVED it exactly how it was. The original card used Sassy Salutations which I don’t own, so I substituted the Hostess-only stamp set Wacky Wishes. (I also thought that the “Thank You” from Curly Cute would also work but hadn’t used Wacky Wishes yet!) Also, the sentiment on the original seems to be stamped in Basic Black, where I just stuck with the color scheme and used Midnight Muse. One of my favorite things about this card? That it uses the fabulous polka dot leftovers from the Daydream Medallions stamp set (see what I mean in THIS VIDEO). I also wanted to show you the Crumb Cake envelope that I stamped to match too! And don’t forget, this ribbon is just one of five colors you can choose from with this month’s Back to Spool promotion where you’ll get a FREE roll with every $40 spent!!!
Supply List
STAMPS:
Daydream Medallions (Wood-Mount 126465, Clear-Mount 126467)
Wacky Wishes (Wood-Mount 126410, Clear-Mount 126412)
PAPER:
8-1/2″ x 11″ Crumb Cake Card Stock (120953)
8-1/2″ x 11″ More Mustard Card Stock (100946)
8-1/2″ x 11″ Primrose Petals Card Stock (126841)
First Edition Designer Series Paper (121878)
Crumb Cake Medium Envelopes (107297)
INK:
Daffodil Delight Classic Stampin’ Pad (126944)
Midnight Muse Classic Stampin’ Pad (126860)
More Mustard Classic Stampin’ Pad (126964)
Primrose Petals Classic Stampin’ Pad (126858)
VersaMark (102283)
ACCESSORIES:
In Color Dahlias (127556)
Midnight Muse 3/8″ Stitched Satin Ribbon (126847)
SNAIL Adhesive (104332)
Multipurpose Liquid Glue (110755)
Mini Glue Dots (103683)
Stampin’ Dimensionals (104430)
TOOLS:
Tabletop Paper Cutter (106959)
Simply Scored Scoring Tool (122334)
Bone Folder (102300)
Craft Scissors (108360)
Elegant Butterfly Punch (127526)
1-3/8 Square Punch (119877)
Big Shot Die-Cutting Machine (113439)
Floral Frames Framelits Dies (127012)
Grid Paper (102787)
Stampin’ Scrub (126200)
Stampin’ Mist (102394)
Connect with Me!


