Adding Color to Black & White Paper
Hi there! Back with a new Quick Tip Tuesday for you on how to add color to black & white or black & vanilla paper! While the two options I show in the video will soon be gone, there are 2 new options in the 2014-2015 Annual Catalog! 🙂 I LOVE to do this technique and I think the easiest to get great results turned out to be the brayering option. Check out the video and let me know what you think. Have you tried this before? If not, will you try it now? Feel free to send me your projects that you’ve made using this technique! I’d love to see them and maybe feature you on the old blog-o if you’re alright with that!
I’ll be back later to add in the edited pictures of the project I show during the video. Oh how I LOVE that card!!!
Hi there! I wanted to show you my new system for storing my Framelits dies! I’m loving the magnetic sheets and how this streamlines the amount of items inside the folder so it is easier to take them out and put them away. You can also do this and then leave the magnetic sheets outside of the folders and put them into some sort of container that makes it easy to flip through. If I didn’t put all of mine in their folders, I bet I could fit all of them into one Littles Carry-All Caddy from thirty-one. This has helped me tremendously with storage and organization but also with my creative process as I can easily see and access all of my Framelits dies. Maybe this tip will help someone else too!
5 Ways to Use Core’dinations Cardstock: Quick Tip Tuesday #23
SU! Color Collection Core’dinations Cardstock
40 sheets of 12″ x 12″ Core’dinations Cardstock in SU!-exclusive colors (4 Sheets of each of 10 colors)
Normally $23.95, ONLY $16.77 until December 2, 2013!
Brights (129953)
Subtles (129954)
Regals (129955)
Neutrals (129956)
In Color Core’dinations Cardstock
20 sheets of 12″ x 12″ Core’dinations Cardstock in SU!-exclusive In Colors (4 sheets of each of 5 colors)
2012-2014 In Color (129957) Normally $11.95, ONLY $8.37 until Dec 2, 2013!
2013-2015 In Color (129958) Regular price NOT on sale $11.95
Clearance Rack Discontinued Core’dinations Cardstock
12 sheets of 12″ x 12″ Core’dinations Cardstock in SU!-exclusive
SINGLE color packs
Normally $6.95, ONLY $2.79 while supplies last!
Cherry Cobbler (127846)
Early Espresso (127848)
Gumball Green (127847)
Primrose Petals (129322)
Vintage Papillon Potpourri Card
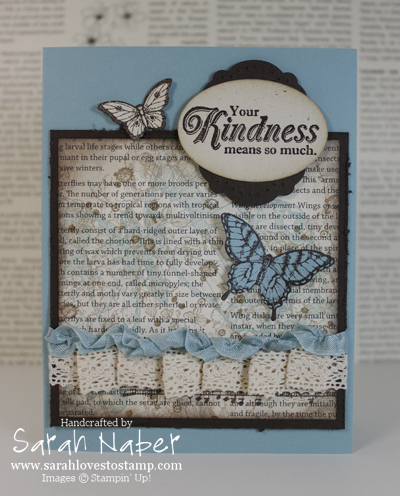
Hello! I hope today’s card reminds you that spring is just around the corner. I’ve layered tons of images onto the First Edition Designer Series Paper by stamping in different colors. It may be hard to see in the photo, but in real life, it looks really, really cool. One other thing I LOVE about this card is the butterflies from Papillon Potpourri – they were probably the simplest thing I did on this page because of their matching punches!!! I was beyond excited when I saw that the smaller butterfly had a matching punch in the new Spring Catalog! (FYI: The Bitty Butterfly Punch also matches the butterfly in the FREE Sale-A-Bration offering, Bloomin’ Marvelous.) YAY!!! Anyway, I love the vintage style and don’t typically gravitate to making cards of that style myself so I signed up for a Vintage Swap at Leadership Conference for a bit of a challenge! 🙂 I love the final result and it makes me want to try vintage more often!
You may be thinking that this card looks familiar! That’s because I showed you a few of the pieces of how I made it in two of my recent videos HERE and HERE! If you haven’t watched those yet, I hope you do! A few other details – the Label Framelit layered behind the Oval Punch is turned 90 degrees from how you typically see it. It is also pierced with its matching template from the Festive Paper-Piercing Pack and then flipped over to the other side so you see the rough sides of the holes instead of the clean ones. Again, a little vintage touch! I also really like to do that to masculine cards to give them more of a rough feel.
You may have been thinking, wait, I thought that paper-piercing pack was in the Holiday Catalog? You’d be right! It did debut there but it is in the Spring Catalog on page 36 with the other selection of items that were in the Holiday Catalog and are still available for order. The stamp sets are listed on the side (please let me know if you don’t have a Holiday Catalog if you’d like to see the images) and then the rest of the goodies are pictured on that page. One item that is still available but missed making it onto the page is the Champagne Glimmer Paper! I LOVE all of the Glimmer Papers so I was pretty excited about this! If you want to order it, just punch in item 127885!
Ok, finally, I’ll give you a rundown of what those “tons of images” that are stamped on the First Edition DSP so you can recreate this card! 🙂 It doesn’t really matter the order you do these things in – although I normally go from your lightest ink to darkest so you can best see what and where you’re stamping. I stamped the large floral image from Elements of Style several times in Crumb Cake ink over the entire piece to cover it. The Swallowtail butterfly is stamped in Baja Breeze ink. Then I stamped the paint splatter image (LOVE IT! This is a must-have stamp for me!) several times in Soft Suede ink. Finally I stamped my Music Notes wheel in Early Espresso ink towards the bottom. I unmount my wheels (see a video of that HERE) and I didn’t want to have a harsh edge so I used a torn post it note to mask off the left side of the wheel so it would look gradual with the torn edge instead of harsh with a straight edge. If I had it to do over again, I would either stamp my Music Notes wheel all the way to the bottom or move my ribbon up a bit. In the video showing you how to gather your ribbon like I did on this swap, you see why this happened to me as my ribbon hung down much farther than where I originally applied my sticky strip. (I knew this would happen but didn’t compensate for it as much as I should’ve to show the music notes a bit more.) I layered this piece onto my distressed Espresso piece (see that video HERE), and then applied the ribbon treatment on top of that so I could tape the ends onto the back. The butterflies were added with glue dots and the sentiment and Espresso pierced framelit were layered together with Multipurpose Liquid Adhesive and then added onto the card with Stampin’ Dimensionals!
I hope you enjoyed this project! It’s one of my favorites that I’ve made in a long, long time! If you don’t want to miss out on a single post, please subscribe to my blog! 🙂
Supplies
STAMPS:
Papillon Potpourri (Wood-Mount 123757, Clear-Mount 123759)
From My Heart (Wood-Mount 126555, Clear-Mount 126557)
Swallowtail (Wood-Mount 129213, Clear-Mount 129216) – Spring Catalog pg. 18
French Foliage (Wood-Mount 120845, Clear-Mount 121166)
Elements of Style (Wood-Mount 118611, Clear-Mount 120045)
Music Notes Wheel (120327)
PAPER:
8-1/2″ x 11″ Naturals Ivory Card Stock (101849)
8-1/2″ x 11″ Baja Breeze Card Stock (111352)
8-1/2″ x 11″ Early Espresso Card Stock (119686)
First Edition Specialty Designer Paper (121878)
INK:
Baja Breeze Classic Stampin’ Pad (126960)
Crumb Cake Classic Stampin’ Pad (126975)
Early Espresso Classic Stampin’ Pad (126974)
Soft Suede Classic Stampin’ Pad (126978)
ACCESSORIES:
5/8″ Victoria Crochet Trim (118481)
Baja Breeze 1/2″ Seam Binding Ribbon (122331)
SNAIL Adhesive (104332)
Multipurpose Liquid Glue (110755)
Mini Glue Dots (103683)
Stampin’ Dimensionals (104430)
Anywhere Glue Sticks (104045)
Sticky Strip (104294)
TOOLS:
Tabletop Paper Cutter (106959)
Simply Scored Scoring Tool (122334)
Bone Folder (102300)
Craft Scissors (108360)
Stampin’ Distress Tool (127562) – Spring Catalog pg. 14
Paper Piercing Tool (126189)
Stampin’ Pierce Mat (126199)
Festive Paper-Piercing Pack (127857) – Spring Catalog pg. 36
Extra-Large Oval Punch (119859)
Elegant Butterfly Punch (127526)
Bitty Butterfly Punch (129406)
Big Shot Die-Cutting Machine (113439)
Labels Collection Framelits Dies (125598)
Grid Paper (102787)
Stampin’ Scrub (126200)
Stampin’ Mist (102394)
Gathered Ribbon Tip: Quick Tip Tuesday #20
I hope you enjoy today’s quick little ribbon tip that’s great for any type of project: cards, scrapbook pages, 3D items, or any other paper craft you can dream up! I used it here on a vintage card but it will really work with most any style.
Stampin’ Up! sells their fabulous Seam Binding Ribbon in 8 colors. One of them is Very Vanilla and the great thing about Whisper White or Very Vanilla ribbon is that it is easy to dye to match any project using our Classic Ink Refills! So instead of just the 8 colors, you can have 50!!!
Head on over to my Online Store and get some ribbon to start creating with today! It is my very most favorite embellishment to add to any project!!!
Happy Halloween + Quick Tip Video
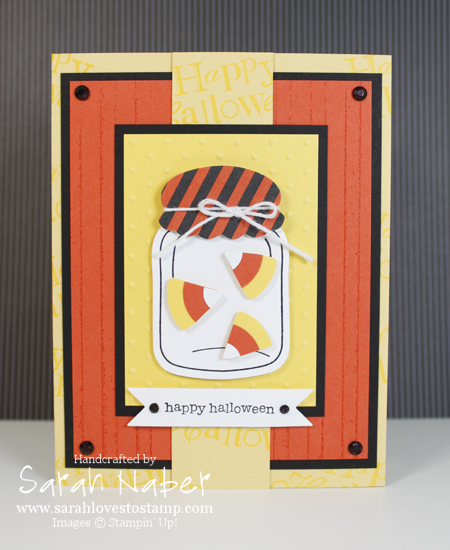
Hi there! Hope you’re all having a wonderful Halloween! I made a card to share with you that fits a lot of challenges online this week. Sure fun to get some ideas from other places – my favorite are sketches and color challenges and I used BOTH on this card. I would’ve NEVER thought to put So Saffron & Daffodil Delight together, but I LOVED them together. I stamped the “Happy Halloween” from the hostess set Wacky Wishes randomly on my So Saffron card stock in Daffodil Delight ink and that really helped pull those two yellows together! I also did a challenge that meant that you had to include bling, so I took my Stampin’ Up! Basic Rhinestone Jewels and colored them with a permanent black marker. Another fun challenge requires you to use supplies that are more than 6 months old – mine were my neglected colors So Saffron and Tangerine Tango, as well as the Whisper White Baker’s Twine and all of the circle punches!
One other tip is about the Candy Corn – I made it with a Whisper White 1/2″ circle punch, Tangerine Tango 1″ circle punch, and Daffodil Delight 1-3/8″ circle punch, centered and layered together. Then you cut wedges to make the individual Candy Corn pieces! So so simple! I also rounded all 3 corners so they looked even more like Candy Corn. Then I put them on Dimensionals and popped them in my little jar! I just love the Perfectly Preserved stamp set and Cannery framelits in the Holiday Catalog!!! There are so so many things that aren’t even in the stamp set, that you can fill that little jar with! 🙂
I hope you enjoy this project, as well as the Quick Tip Tuesday on using your embossing folders without the Big Shot. Such a fun technique! Give it a try and send me a picture of your creation! If you use all Stampin’ Up! goodies, I’d love to feature you and your project here as a guest stamper!
This card was entered into challenges at: Colour Q, Papertake Weekly, Brown Sugar, Fussy & Fancy Friday, Card Makin’ Mamas, Digistamps 4 Joy (vertical line 1), Stampin’ for the Weekend, Crafts and Me, Party Time Tuesdays, Fab n Funky, Scrappy Frogs, Inspire Me Fridays, A Gem of a Challenge, Frosted Designs Fabulous Friday, 2 Sisters, My Time to Craft, Oldie But a Goodie, Wags n Whiskers, The Artistic Stamper, The Sisterhood of Crafters, Dream Valley, Paper Pretties, and Creative Craft Challenges!
Supply List
STAMPS:
Perfectly Preserved (Wood-Mount 126690, Clear-Mount 126692)
Teeny Tiny Wishes (Wood-Mount 115370, Clear-Mount 127802)
Wacky Wishes Hostess Set (Wood-Mount 126410, Clear-Mount 126412) – available with a $150 party or order!
PAPER:
8-1/2″ x 11″ Whisper White Card Stock (100730)
8-1/2″ x 11″ Basic Black Card Stock (121045)
8-1/2″ x 11″ Daffodil Delight Card Stock (119683)
8-1/2″ x 11″ So Saffron Card Stock (105118)
8-1/2″ x 11″ Tangerine Tango Card Stock (111349)
Howlstooth & Scaringbone Designer Series Paper (126906)
INK:
Daffodil Delight Classic Stampin’ Pad (126944)
Tangerine Tango Classic Stampin’ Pad (126946)
Jet Black StazOn Ink Pad (101406)
ACCESSORIES:
Whisper White Baker’s Twine (124262)
Basic Rhinestone Jewels (119246)
Multipurpose Liquid Glue (110755)
Stampin’ Dimensionals (104430)
TOOLS:
Tabletop Paper Cutter (106959)
Simply Scored Scoring Tool (122334)
Bone Folder (102300)
Paper Snips (103579)
Craft Scissors (108360)
Brayer (102395)
1/2″ Circle Punch (119869)
1″ Circle Punch (119868)
1-3/8″ Circle Punch (119860)
Big Shot Die-Cutting Machine (113439)
Cannery Set Framelits Dies (127822)
Bitty Banners Framelits Dies (129267)
Perfect Polka Dots Textured Impressions Embossing Folder (117335)
Stripes Textured Impressions Embossing Folder (123128)
Grid Paper (102787)
Stampin’ Scrub (126200)
Stampin’ Mist (102394)
StazOn Cleaner (109196)
Permanent Black Marker (non-SU!)
Paper Rosettes Made Easy: Quick Tip Tuesday #17
Hi there! The video is long again – I swear I cannot make a short video to save my life! There are just so many things I want to tell each of you! Check it out! Hope it helps you in your rosette making – I know I struggled to push the center down before the magic secret I show in the vid! 🙂 See you tomorrow – hopefully with a new card!
Using Markers with the Piercing Pack: Quick Tip Tuesday #16
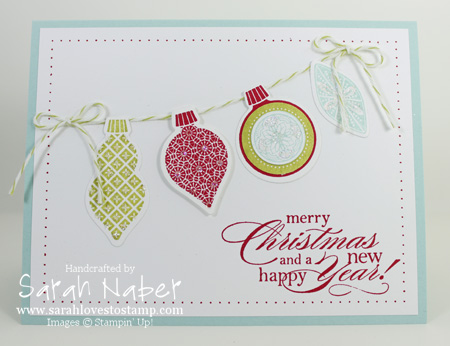
Today’s video is a long one as I ended up making the entire card on camera! I hope you enjoy it! I show a little bonus tip about how I add Dazzling Diamonds Stampin’ Glitter to my projects as well. I’ll be back later today to edit this post with a full supply list, as well as a photo of the card I made in the video. I apologize that the video didn’t get posted until today – I didn’t notice (for a long time) that my YouTube upload had completely stalled out and I had to restart it! Sorry!
Supply List
STAMPS:
Ornament Keepsakes Bundle (Wood-Mount 128048, Clear-Mount 128051) OR the October Promotion, CLICK HERE!
Delightful Dozen (Wood-Mount 122650, Clear-Mount 122652)
PAPER:
8-1/2″ x 11″ Whisper White Card Stock (100730)
8-1/2″ x 11″ Pool Party Card Stock (122924)
INK:
Lucky Limeade Classic Stampin’ Pad (126984)
Pool Party Classic Stampin’ Pad (126982)
Real Red Classic Stampin’ Pad (126949)
Real Red Stampin’ Write Marker (100052)
ACCESSORIES:
Lucky Limeade Baker’s Twine (125572)
Dazzling Diamonds Stampin’ Glitter (102023)
Multipurpose Liquid Glue (110755)
2-Way Glue Pen (100425)
Mini Glue Dots (103683)
Stampin’ Dimensionals (104430)
TOOLS:
Tabletop Paper Cutter (106959)
Simply Scored Scoring Tool (122334)
Bone Folder (102300)
Craft Scissors (108360)
Stamp-a-ma-jig (101049)
Paper Piercing Tool (126189)
Stampin’ Pierce Mat (126199)
Essentials Paper-Piercing Pack (126187)
3/4″ Circle Punch (119873)
1″ Circle Punch (119868)
Big Shot Die-Cutting Machine (113439)
Grid Paper (102787)
Stampin’ Scrub (126200)
Stampin’ Mist (102394)
Hi there! Today is a fun and easy way to add some fun glitter to your cards, scrapbook pages and any other projects. My favorite part? The glitter won’t budge when you follow my simple, easy steps! Check it out!!! Leave me a comment (click the link next to the name of the post) and let me know what you think!
How to Use Ribbon Scraps: Quick Tip Tuesday #14
Hi there! Today’s belated Quick Tip Tuesday is just my take on a super cute project idea from Stampin’ Up! Convention 2012. September is a perfect month for it as you can choose a roll of our 3/8″ Stitched Satin Ribbon for every $40 increment you spend. Get out those ribbon scraps and make some fun ribbon cards or scrapbook pages incorporating this technique today!!!
How to Make a Paper Bow: Quick Tip Tuesday #13
*Note: Scroll down to the next post if you didn’t see my video I posted this morning!
Hi there! A video today all about how to make a paper bow. This is so so cute and hot right now! I noticed it is pretty similar (minus a few things) to the paper bow on the front of the Stampin’ Up! 2012-2013 Catalog! The project I show in the video is one of our many Make & Takes from Convention 2012 , so I can’t take credit for the idea. I LOVE how they told us to keep the punched out rubber circles to use as stamps instead of trash. Upcycling and making my stamp set go from 5 stamps to 8 at no extra cost! WOOHOO! I LOVE this stamp set and was thrilled that it was one of the chosen ones for our Make & Takes (meaning we get it at Convention at no extra cost)! It is so incredible when paired with the Floral Frames Framelits dies too!!! AMAZING!!! (Check out page 116 and 190 in the 2012-2013 Catalog for awesome samples with the Daydream Medallions stamp set and Floral Frames Framelits duo!)
I hope you enjoy the idea and that it comes in handy for you for a birthday gift or even a Christmas gift very soon!!!
Supply List
STAMPS:
Daydream Medallions Stamp Set (Wood-Mount 126465, Clear-Mount 126467)
Affection Collection Stamp Set (Wood-Mount 127946, Clear-Mount 127949)
Daydream Stampin’ Around Jumbo Wheel (126939)
PAPER:
12″ x 12″ Whisper White Card Stock (124302) (cut four at 3″ x 6″, score at 3″)
8-1/2″ x 11″ Primrose Petals Card Stock (126841) (1″ x 8-1/2″, 1″ x 7″, 1 x 5-1/4″, 5/8″ x 2-3/4″)
8-1/2″ x 11″ More Mustard Card Stock (100946)
“Love Note” 3-1/8″ x 3-1/8″ Whisper White Square Envelopes (107309)
Kraft Gift Boxes (124106)
INK:
Daffodil Delight Classic Stampin’ Pad (126944)
Early Espresso Classic Stampin’ Pad (126974)
Midnight Muse Classic Stampin’ Pad (126860)
More Mustard Classic Stampin’ Pad (126964)
Primrose Petals Classic Stampin’ Pad (126858)
VersaMark (102283)
ACCESSORIES:
Primrose Petals 3/8″ Stitched Satin Ribbon (126844)
Linen Thread (104199)
Vintage Faceted Designer Buttons (127554)
Basic Rhinestone Jewels (119246)
Mini Glue Dots (103683)
Sticky Strip (104294)
TOOLS:
Tabletop Paper Cutter (106959)
Simply Scored Scoring Tool (122334)
Bone Folder (102300)
Paper Snips (103579)
Craft & Rubber Scissors (103179)
Stamp-a-ma-jig (101049)
Big Shot Die-Cutting Machine (113439)
Floral Frames Framelits Dies (127012)
Grid Paper (102787)
Stampin’ Scrub (126200)
Stampin’ Mist (102394)
I’m pretty late on the video posting tonight! I apologize but I haven’t felt well for the past couple of days. I hope you enjoy this tip – I know it sure helps me!!! The tip is important as it is how I keep from losing or misplacing any of my stamps! I also give you a tiny peek into my Stamp Studio to show you how and where I store my stamps as well (please excuse the video at that point…it looks a little like I filmed it onboard a ship! I will get my better/taller tripod next time I need to do this type of video). Having well-organized stamp storage will help you cut down on the amount of time you spend crafting, card making, or scrapbooking as you can find your stamps so easily!
I spent quite a few of my office hours working on bringing you some fresh ideas and new projects through challenges! I hope for it to be something you all really enjoy as it will get me to expand my creativity. Check back for that – hopefully tomorrow!!! 🙂
Tying Ribbon into the Perfect Knot: Quick Tip Tuesday #11
Being able to tie the perfect knot is all about practice, practice, practice! In this video, I show you how to tie a knot around a card three different times. Pause the video and practice along. The third time, I even show you what to do if your ribbon is one-sided and you want a certain side only to show. Enjoy!
Hi there!!! Today a video on how I’ve been using my wheels for the past 6 months or so! I use them way more often than I did when they were in the regular wheel form. I just never could get them to ink up evenly or roll in a straight line. The other nice thing is that you don’t need the two different handles and the builder wheel spindle & spacers. The one thing you do need is the Clear-Mount Cling Foam (124236). It costs $10.95 for two 8-1/2″ x 11″ sheets (one side cling & one side adhesive). You’d pay $13.85 for the standard handle, jumbo handle and builder wheel spindle & spacers so it is really about the same price depending on your preference.
Enjoy!!! I LOVE the wheels so choose how you want to stamp with them and head on over to my online store and get some to try today!!!
Products Mentioned in the Video
Clear-Mount Stamp Cases (119105) $5.95 for 4 DVD-sized cases
Clear-Mount Block F (118483) $16.95 OR
Clear-Mount Block Bundle (118491) $66.95 for ALL 9 blocks with a 15% discount!!!
Clear-Mount Cling Foam (124236)$10.95 for two 8-1/2″ x 11″ sheets
Craft & Rubber Scissors (103179) $19.95
Betsy’s Blooms Standard Wheel (126943) $6.50
Quick Tip Tuesday #6: Ric Rac Using the Scallop Edge Punch
Today I have a video with a fun technique that you can use to accent any project. It uses Stampin’ Up!’s Scallop Edge Border Punch (#119882) to make an awesome, whimsical, little ric rac accent! I will show picture of the card in the video tomorrow.
As I mention in the video use a 1″ width strip with the old style (black) body and 5/8″ width strip with the new style (gray) body. Try it today and leave a comment below to let me know how it went!
Connect with Me!
Categories
Archives
Copyright Info
Copyright Info All Images © Stampin' Up! 2011 Sarah Naber, Independent Stampin' Up! Demonstrator The content of this blog is my sole responsibility as an independent Stampin' Up! demonstrator and the use of, and content of, the classes, services, or products offered on this blog is not endorsed by Stampin' Up!


