From the monthly archives: December 2013
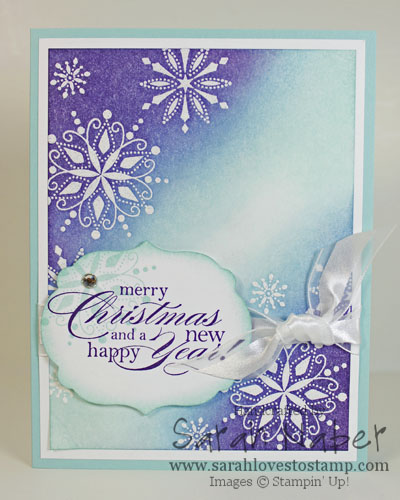 This was a favorite card from last year that I never got around to posting! It’s a total CASE (Copy And Share Everything) of a card Catherine Pooler made, but she brayered and I chose to sponge it instead. 🙂 I’m not sure my colors are the same as hers and I used a different shape for the sentiment, a different ribbon, and different stamp sets too so that hopefully shows you that there are a variety of ways to accomplish a similar card.
First, start by embossing your snowflakes onto a piece of Whisper White Cardstock cut to 3-3/4″ x 5″ with either White Stampin’ Emboss Powder or Clear Stampin’ Emboss Powder. (I believe I used clear here with VersaMark ink, but you could also use the white powder or White Craft Pad too.) *TIP: Rub your cardstock with the Embossing Buddy before you stamp the images you want to emboss. This will remove the static and allow your images to remain crisp and sharp, with no extra embossing powder little pieces left behind. I’ve heard you can make your own, but I’ve had the same one for over 5 years now and it won’t need replacing probably in my lifetime! I’ve also heard a used dryer sheet works too but again, I’ve been using the Embossing Buddy with great results so I haven’t tried that one. (FYI: I did try a brand new dryer sheet and that definitely doesn’t work.) Then I sponged the upper left hand and bottom right hand corner with Elegant Eggplant ink, leaving a large portion of the center blank. I followed that with Marina Mist ink blended into the Elegant Eggplant and used circular motions to move towards the center a tad bit more. I used the same process to add the Pool Party ink. The end result is gorgeous!!!
If you’re sending out your Christmas cards late this year, mailing a joint Christmas/New Years card is a great idea! This sentiment, from Delightful Dozen, is a favorite of mine. It is stamped in Elegant Eggplant, then I added a snowflake to the corner in Pool Party. It was cropped out with a Labels Collection Framelits Die, then the edges were sponged with Pool Party ink. I glued the sponged panel to a piece of Whisper White cardstock cut to 4″ x 5-1/4″, then tied a piece of 5/8″ Whisper White Organza Ribbon around it, and attached it to a 8-1/2″ x 5-1/2″ Pool Party card base, scored at 4-1/4″. I popped the sentiment panel up with Stampin’ Dimensionals and for the very final touch, I added a Rhinestone Basic Jewel to the center of the snowflake on the sentiment panel.
The other great thing about this card is that it is PERFECT for those upcoming winter birthdays in January and February if you just switch out the sentiment! Or you can play with different color combinations to completely change the look of the card (pinks and purples? blues and greens? or just monochromatic aquas?) Super fun! If you give it a try, let me know and send me a picture of it! 🙂
I hope you enjoyed today’s project and that you had a very merry Christmas! I was blessed to take a bit of time off to spend with friends and family. I hope you were able to do the same! See you back here soon!
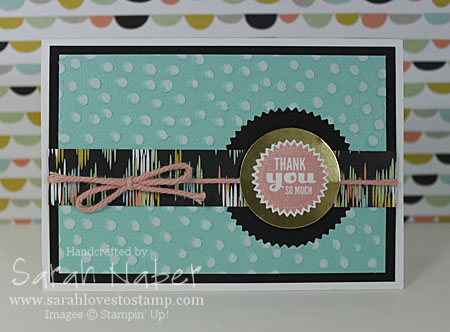
Hi there! I hope you’re having a great start to your weekend! Today I have a SUPER fun project to share with you using LOTS of new goodies!!! This card uses a stamp set from the upcoming Occasions Catalog, Starburst Sayings, as well as the matching Starburst Framelits Dies. Of course, Stampin’ Up! is being amazing and offering bundles again so you can get the stamp set and framelits at a 15% discount.
I also used the same Designer Series Paper as my project yesterday – the new Sale-A-Bration offering, Sweet Sorbet DSP. Starting January 31, 2014, you’ll be able to get this package of fantastic DSP for free with a $50 purchase! Oh yay! I also used the same twine too that is from the SAB Sweet Sorbet Accessory Pack. AND…a BRAND NEW Sale-A-Bration Decorative Dots embossing folder too!!! Could this year’s Sale-A-Bration get any better?!?
I’m sure you also noticed my piece of 3″ x 4-1/2″ Core’dinations cardstock (can I even make a project without it?) that I cut the starburst shape out of using the 2nd smallest Starburst Framelits Die. Then I embossed and then sanded with the Stampin’ Sanding Block to reveal that lighter inner core. *TIP: Remember to do all of your cutting with framelits or other dies before you emboss. Otherwise the embossing will be flattened because of running the embossed piece through the machine without its folder. I then glued it down with the Multipurpose Liquid Adhesive to a piece of 3-1/4″ x 4-3/4″ Basic Black Cardstock. A 3/4″ x 4-3/4″ strip of my favorite pattern from the Sweet Sorbet DSP is layered over the top. I tied a bow of the Crisp Cantaloupe twine from the Sweet Sorbet Accessory Pack over the top of the DSP and glued it down to the Whisper White Note Card base (they come pre-cut and pre-scored with matching envelopes…easy peasy!).
I stamped the “Thank You So Much” stamp in Crisp Cantaloupe ink onto a scrap of Whisper White Cardstock and used the matching framelit to cut it out (the smallest one). *TIP: I actually stamped this first and ran it through the Big Shot at the same time as the Core’dinations piece with the 2nd smallest framelit. I try to always run all of my framelits for one project through at the same time if possible to save time! Super easy, especially with the Magnetic Platform to hold each piece in place. I layered that onto a circle of Gold Foil Sheet punched out with the 1-3/8″ Circle Punch. Finally, I cut a Stampin’ Dimensional in half and put one half on the top and one half on the bottom then stuck it onto the card! *TIP: Placing your dimensionals so they adhere straight to the card (not the twine) will insure that everything lays flat. If the dimensionals were on top of the twine, then the focal point may bow around the twine a bit. Not too big of a deal, but just a little idea to add that extra professional look to your projects.
Supply List
STAMPS:
Starburst Sayings (Wood-Mount 133182, Clear-Mount 133185)*
-Also available as a bundle with the Starburst Framelits Dies at a 15% discount! Wood-Mount 134817, Clear-Mount 134818*
PAPER:
Whisper White Note Cards & Envelopes (131527)
8-1/2″ x 11″ Whisper White Cardstock (100730)
8-1/2″ x 11″ Basic Black Cardstock (121045)
12″ x 12″ Gold Foil Sheets (132622)
In Color 2012-2014 Core’dinations Cardstock (129957)
SAB Sweet Sorbet DSP (133521)**
INK:
Crisp Cantaloupe Classic Stampin’ Pad (131176)
ACCESSORIES:
SAB Sweet Sorbet Accessory Pack (133522)**
SNAIL Adhesive (104332)
Multipurpose Liquid Glue (110755)
Stampin’ Dimensionals (104430)
TOOLS:
Stampin’ Trimmer (126889)
Simply Scored Scoring Tool (122334)
Bone Folder (102300)
Craft Scissors (108360)
Stampin’ Sanding Block (129367)
Core’dinations Dust Buddy (129366)
1-3/8″ Circle Punch (119860)
Big Shot Die-Cutting Machine (113439)
Big Shot Magnetic Platform (130658)
Starburst Framelits Dies (132967)*
-Also available as a bundle with the Starburst Framelits Dies at a 15% discount! Wood-Mount 134817, Clear-Mount 134818*
SAB Decorative Dots Textured Impressions Embossing Folders (133520)**
Grid Paper (102787)
Stampin’ Scrub (126200)
Stampin’ Mist (102394)
*Available January 3, 2014 when the Stampin’ Up! Occasions Catalog begins!
**Exclusive Sale-A-Bration item FREE with each $50 purchase from January 28, 2014-March 31, 2014!
Sarah-AYSI-Challenge-015-SAB-DSP-Card
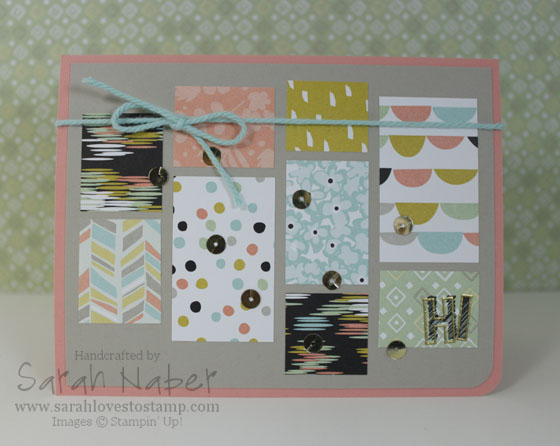
Wow! This one was a toughie for me! I LOVE this sketch now but I sure struggled to get it together for this card. This sketch is a GREAT one for showcasing SU!’s Designer Series Paper (DSP) because the packages come with 12 different double-sided designs (12 sheets 12″ x 12″, 2 of each double-sided design) in our coordinating colors. SO…I picked out the fantastic NEW Sale-A-Bration DSP!!! I’m SO SO SO in love with this paper that it isn’t even funny! The best thing about it? You can get it FREE with a $50 purchase beginning on January 28, 2014! I’m super stoked about this year’s Sale-A-Bration offerings.
Anyway, this color combo of Basic Black, Pistachio Pudding, Sahara Sand, Whisper White, Coastal Cabana, Summer Starfruit, and Crisp Cantaloupe feels SO fresh! Combine that with whimsical scallops, fun florals and interesting ikats and you have a home run!!! I wanted to make the DSP the star of the show so I used a simple Sahara Sand layer behind the papers and added the “Hi” greeting with my favorite Sketch and Outline Alphabets. I stamped the sketch ones in Jet Black Staz On and embossed the Outline ones with Gold Stampin’ Emboss Powder. The twine is also a Sale-A-Bration offering! I LOVE it as it’s a tad weightier than the normal SU! Baker’s Twine. 🙂 Super fun! The twine is specifically designed to coordinate with the DSP and comes in a package of 3 colors, as well as some fun adhesive backed printed cork die cuts. There’s also a stamp set that goes with this suite of products too! Again, each $50 you spend will allow you to pick from our fabulous choices! (From January 28, 2014 – March 31, 2014)
I hope you love today’s card! I couldn’t resist throwing a few sequins on there from an upcoming Sequin Trim that I just pulled apart to get some individual cuties. 🙂
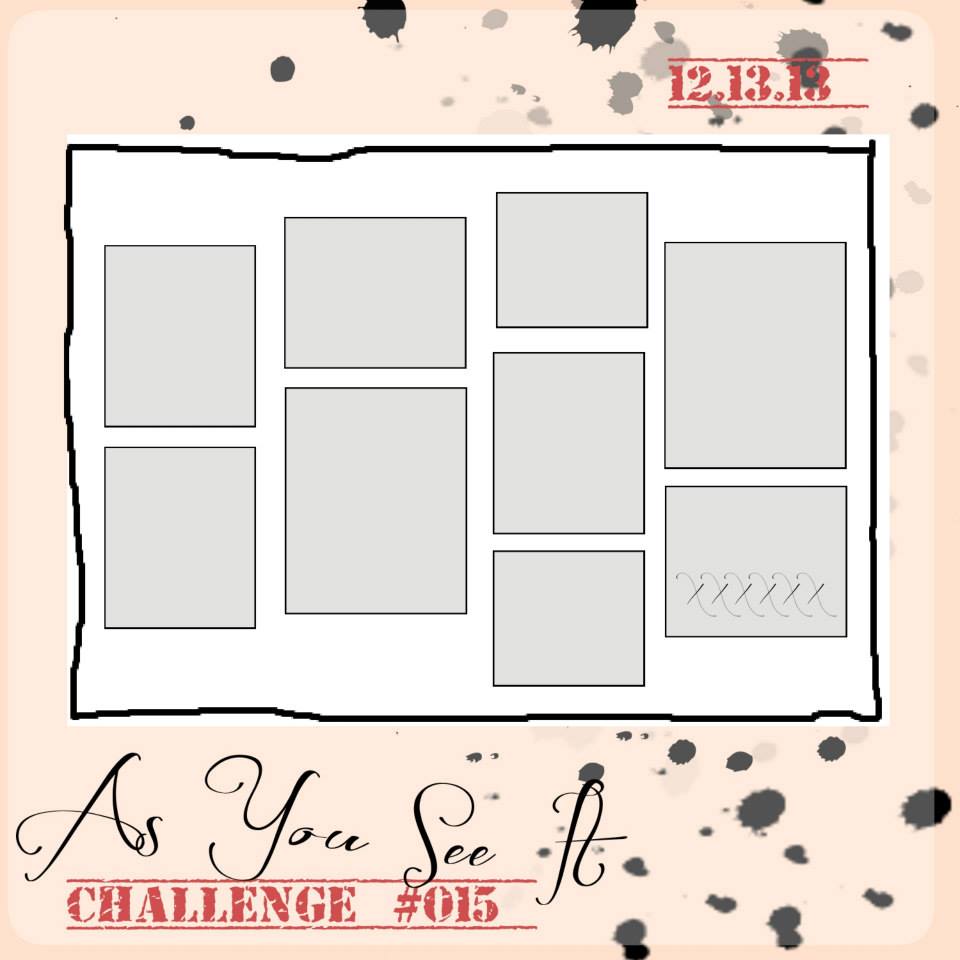
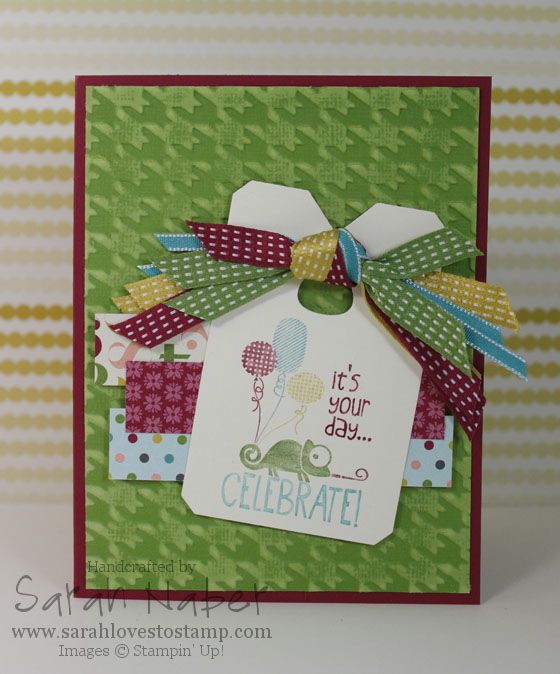
I’m late on this challenge from our As You See It Challenge Blog last week! You still have time to play along today though! I cannot believe how fast December is FLYING by! WOW! Do you have all of your Christmas cards done?
I knew from the sketch, I wanted to use the large tag from the Chalk Talk Framelits and I immediately thought of this super cute lizard from Stampin’ Up!’s Ronald McDonald House Charity Stamp Set this year, Tag It! I LOVE it and it is designed to work with the Chalk Talk Framelits! YAY – gotta love that coordination!
My fav thing about this card? Well, it may be a tie between the Core’dinations Cardstock and the ribbon treatment I did here. I started with 4 different ribbons, 2 pieces each and tied them into a knot. I simply attached it with a dimensional over the hole in the tag. Ohhh…I also LOVE this DSP! Such fun colors and patterns for birthday! Super cheery and fun!