
Currently viewing the category:
"Convention 2014"
Hi there!
Finally home and able to update you all on the exciting happenings of Stampin’ Up! Convention 2014, as well as beginning to share a few of my 24 Convention Display Stamper samples as well. I was SO honored to be chosen by the company (check out my submission I was chosen from HERE) and to be able to create some projects I was really proud of to hopefully inspire the thousands of demonstrators that attended Convention with the three stamp sets all Convention attendees received free as the stamp sets to complete our Convention Make & Takes!
The three sets we received were Amazing Birthday, Kinda Eclectic and Seasonally Scattered (not in the Online Store yet as it’s in the Holiday Catalog)! They were so fun to work with and I hope you enjoy seeing my contributions to the board (with 27 other amazing women) in upcoming posts! Click the button below to check out our Pinterest Board with our creations!
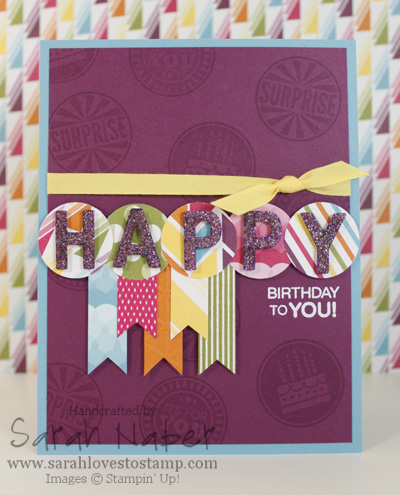
Here’s a quick closeup of the details! I’ll put the instructions and supply list below my Convention Day 1 Recap! 🙂
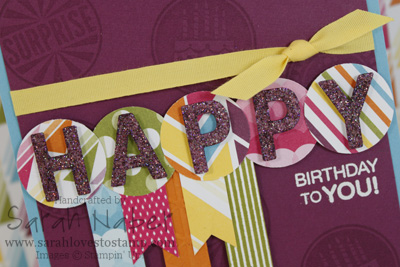
***My favorite part about this card? Coloring the Dazzling Diamonds Glimmer Paper with one of the Rich Razzleberry Stampin’ Blendabilities trio! However, I also chose this card as my swap with my other Display Stampers, and ended up using Rich Razzleberry Classic Ink Refill and 70% Rubbing Alcohol in a Stampin’ Spritzer to color it! (The paper is pretty “gritty” so I was worried about what coloring over 20 sets of these letters would do to the tip of my Blendabilities marker.) Check out below the Convention Recap for the Instructions on how to make this card. 🙂
Convention Day 1 Recap
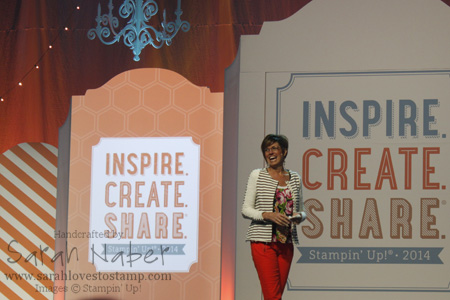
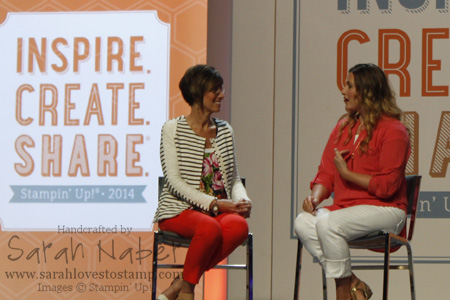
Thursday, July 17th, 2014 was the first official day of the Stampin’ Up! Inspire.Create.Share. 2014 (previously called Convention…old habits die hard, right?). Our CEO and Co-Founder Shelli Gardner kicked us off. She is so sweet and I always love to hear her speak!
Shelli was joined onstage by the creator of Project Life, Becky Higgins, to talk a bit about Stampin’ Up!’s newest partnership: Project Life by Stampin’ Up! It was fun to hear a little of the story of the creation of Project Life, as well as what her favorite Project Life by Stampin’ Up! offering is! (If you’re wondering, she said that the needs of the person depends on which kit is best for them, but that she loves the Everyday Adventure Card Collection & Accessory Pack for it’s fresh colors! I’m a fan too!)
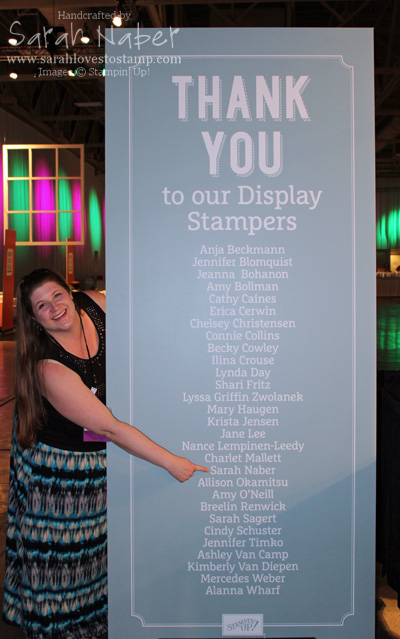
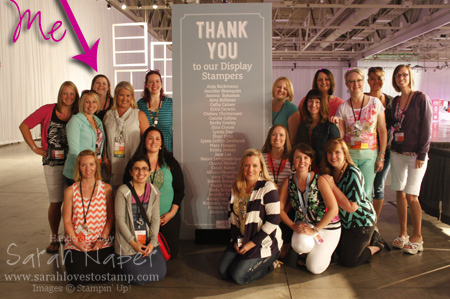
After our first General Session, the Display Stampers met near our creations on the display boards and swapped our favorite cards we created, as well as took a few pictures! 🙂 It was so exciting to meet the gals I’d been chatting with for months on Facebook!
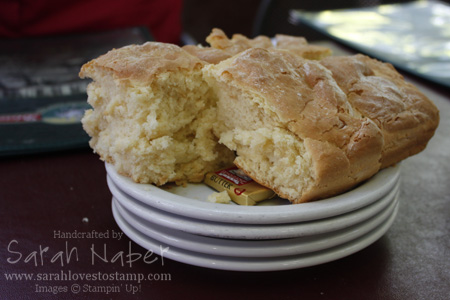
 A few of us had met up the day before at the fabulous Ruth’s Diner in Emigration Canyon, so I got to chat with those gals a bit longer than our quick meetup to swap and take a picture before heading off to our classes! You’ll probably laugh but the only picture I took that day was of the biscuits! They are famous at Ruth’s Diner and they call them their Mile High Biscuits…check out how teeny that pat of butter is and it’ll give you an idea how very huge the biscuits actually are! 🙂
How To
1. Spritz a 1″ strip of Dazzling Diamonds Glimmer Paper with a mix of Rich Razzleberry Classic Stampin’ Ink Refill and water (into a Stampin’ Spritzer). Set aside to dry. *TIP: I use an old cardboard (aka Stampin’ Up!) box to spritz into so I don’t make a mess in my crafting area.
2. Cut Tempting Turquoise Cardstock to 5-1/2″ x 8-1/2″. Score it at 4-1/4″ and crease with a Bone Folder.
3. Cut Rich Razzleberry Cardstock to 4″ x 5-1/4″.
4. Run the Embossing Buddy over the Rich Razzleberry Cardstock. Mask off the top “Happy happy happy happy” from the Amazing Birthday sentiment and only stamp the “Birthday to You!” in VersaMark ink about 2/3 of the way down on the right side of the cardstock. Cover with White Stampin’ Emboss Powder and heat just until the powder melts with the Heat Tool. *TIP: I used a Stamp-a-ma-jig for perfect positioning and alignment.
5. Stamp the 3 circular images from Amazing Birthday randomly onto the Rich Razzleberry layer.
6. Cut a variety of banners from DSP, embossed cardstock and Whisper White Cardstock. The shorter ones measure 1/2″ x 1-1/4″ and the longer ones measure 1/2″ x 1-3/4″. I used a pair of Paper Snips to cut the notched/ribbon ends but you can also use the 1″ square punch.
- Tempting Turquoise banner: Sweet Taffy DSP
- Melon Mambo banner: Whisper White Cardstock stamped with the stripe stamp from Amazing Birthday diagonally in both directions to create a crossed/diamond pattern
- Pumpkin Pie banner: Pumpkin Pie Cardstock dry embossed with the Tiny Triangles Textured Impressions Embossing Folder
- Daffodil Delight banner: Sweet Taffy DSP
- Old Olive banner: Whisper White Cardstock stamped with the stripe stamp from Amazing Birthday
7. Glue the banners together (they will look exactly like this if you align the top straight edges with one another) and attach with Stampin’ Dimensionals as pictured.
8. Use the 1″ Circle Punch to punch out 5 circles from the Sweet Taffy DSP. Use Stampin’ Dimensionals to attach them to the Rich Razzleberry layer.
9. Use the Big Shot Die-Cutting Machine and the Little Letters Thinlits Dies to cut out the letters for “HAPPY” from the dyed glimmer paper from Step 1. Attach with tiny pieces of Stampin’ Dimensionals for this look (remember, I made only ONE of these cards for the display boards) or use Multipurpose Liquid Adhesive for a simpler option (my Display Stamper Swap cards used the regular adhesive option).
10. Tie the 1/4″ Daffodil Delight Cotton Ribbon (are you loving this ribbon? I AM!) around the Rich Razzleberry Cardstock piece and attach to the card base! You’re done! The directions sound a LOT more complicated than this card actually is so I hope you’ll give it a try!
Supply List
STAMPS:
Amazing Birthday (Wood-Mount 134225, Clear-Mount 134228)
PAPER:
8-1/2″ x 11″ Whisper White Cardstock (100730)
8-1/2″ x 11″ Pumpkin Pie Cardstock (104117)
8-1/2″ x 11″ Rich Razzleberry Cardstock (115316)
8-1/2″ x 11″ Tempting Turquoise Cardstock (102067)
Sweet Taffy Designer Series Paper (133693)
Dazzling Diamonds Glimmer Paper (135315)
INK:
Melon Mambo Classic Stampin’ Pad (126948)
Old Olive Classic Stampin’ Pad (126953)
Rich Razzleberry Classic Stampin’ Ink Refill (115664)
VersaMark (102283)
ACCESSORIES:
1/4″ Daffodil Delight Cotton Ribbon (134559)
SNAIL Adhesive (104332)
Multipurpose Liquid Glue (110755)
Stampin’ Dimensionals (104430)
TOOLS:
Stampin’ Trimmer (126889)
Simply Scored Scoring Tool (122334)
Bone Folder (102300)
Paper Snips (103579)
Craft Scissors (108360)
Stamp-a-ma-jig (101049)
Heat Tool (129053)
White Stampin’ Emboss Powder (109132)
Embossing Buddy (103083)
1″ Circle Punch (119868)
Big Shot Die-Cutting Machine (113439)
Big Shot Magnetic Platform (130658)
Little Letters Thinlits Dies (133730)
Tiny Triangles Textured Impressions Embossing Folder (133740)
Grid Paper (102787)
Stampin’ Scrub (126200)
Stampin’ Mist (102394)
Connect with Me!


