
Currently viewing the tag: "Designer Series Paper"
I thought I’d better get this Tap Tap Tap birthday card post up as the Tap Tap Tap stamp set is one that will be retiring this month! I found this post in my drafts folder so I actually created this card close to a year ago!
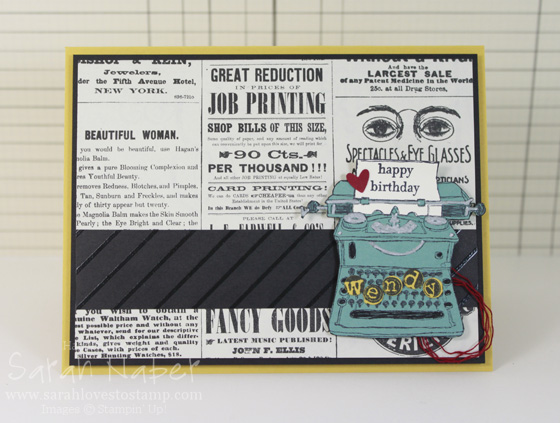
I cannot believe how long I’ve owned this stamp set and not used it! My sweet friend Allison is a huge fan of this stamp set and has constantly inspired me with her adorable uses for this versatile set. SO…I finally pulled it out to make a vintage-loving friend of mine a birthday card. Allison had colored a Lost Lagoon typewriter on one of her Tap Tap Tap cards in a similar way so that’s what I did – not sure if we used the same supplies, but hers was the look I was going for.
Cut List
Hello Honey Cardstock: 5-1/2″ x 8-1/2″, scored at 4-1/4″
Basic Black Cardstock: 5-1/4″ x 4″
Typeset Designer Series Paper: 5-1/8″ x 3-7/8″
Color Me Irresistable Designer Series Paper: 5-1/8″ x 1″
Lost Lagoon, Hello Honey, Cherry Cobbler, and Very Vanilla Cardstock scraps
How To
1. Stamp typewriter onto Lost Lagoon cardstock (RETIRING) and the paper portion of the typewriter onto Very Vanilla.
2. Stamp sentiment from Teeny Tiny Wishes onto Very Vanilla “typewriter paper”. I used post it notes to mask the sentiment to make it two lines (watch for a video on that coming soon). Cut out paper (two separate pieces).
3. Color typewriter parts with Basic Gray Stampin’ Write Marker and Silver Stampin’ Dazzle Marker (retired but any silver marker will do). Cut it out using the Paper Snips.
4. Stamp alphabet stamp on Hello Honey paper (RETIRING) with black ink. Punch out selected letters with the 1/4″ Handheld Circle Punch (RETIRING).
5. Punch heart from Owl Builder punch out of Cherry Cobbler scrap.
6. Adhere typewriter paper, letters and heart onto typewriter. Place Stampin’ Dimensionals on back.
7. Adhere black embossed stripe from Color Me Irresistable Specialty Designer Series Paper (RETIRING) onto Typeset Specialty Designer Series Paper (RETIRING). Adhere that onto black layer and then onto card base. *TIP: With this Typeset paper, they are much thinner (this is NOT true of all specialty DSPs but of the 24/pack ones), so use a dry adhesive instead of a liquid.
8. Unravel Cherry Cobbler Thick Baker’s Twine (RETIRING) and make a messy nest of a few strands. Stick it to the back of the typewriter, onto one of the Stampin’ Dimensionals.
9. Attach typewriter to card.
This was a card I created for the As You See It Challenge #101. Obviously it’s over now, but you can play along with the current challenge or use any past challenges to inspire you too!!!
I hope you enjoyed this birthday card made with the Tap Tap Tap stamp set! It’s one of my favorites and I think I’ll really miss it when it’s retired! The color combo of Lost Lagoon, Hello Honey, Cherry Cobbler, Basic Black, and Very Vanilla also includes two retiring In Colors too.
CLICK HERE to get your
Typeset Specialty Designer Series Paper, while supplies last!!!
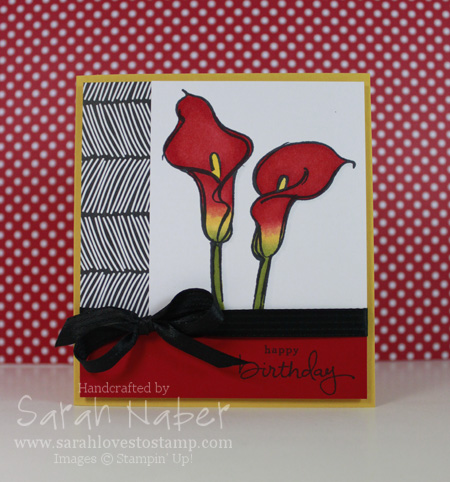
The Remarkable You stamp set is probably my favorite line art set I own! The images are a great size, wonderful to stand on their own on a simple notecard, to be the focal point of a larger card, or even for larger scrapbooking or 3D items. They’re fun to color, but also look stunning stamped in black ink on white cardstock or tone-on-tone with matching ink and cardstock too!
I used a bold color palette on this birthday card for my good friend, Sara (I hope she loved it as much as I did!). The mixed font greeting is from the awesome set, Endless Birthday Wishes. I LOVE that it’s a photopolymer set so it makes mixing and matching the sentiments especially easy. I would say it’s my 2nd most used set right behind Teeny Tiny Wishes!
The image was one I colored for the 30 day coloring challenge (I’m behind by a couple of days right now). I colored it with Copic markers. I’ve had them for a long time, but rarely used them as I started only using Stampin’ Up! products for several years now. You may or may not know, but Stampin’ Up! introduced our own alcohol-based markers a few years ago and I remembered how much I love coloring with this particular medium. The SU! ones had some issues from the manufacturer and were discontinued, but my love for alcohol-based marker coloring was rekindled! So I pulled them out, googled an image of a calla lily, and took inspiration from there to blend the green, yellow and red. I ended up really pleased with it.
Here’s a link to another card I did with a sketch that’s been a long time
favorite, as well as colored with alcohol-based markers!
I’m always saying that cardmaking is a process. This card was no different. I’d stumbled upon a sketch I loved when I was researching ideas with the Tap Tap Tap stamp set and wanted to try it with this image. The sketch I was inspired by had the main portion (focal image and vertical and horizontal strip) going from edge to edge on the card. I thought my image was plenty large enough and just started cutting. Before I knew it, it was too narrow to span to the edge and have the vertical strip be the 1″ that I planned. I tried it on a regular A2 card but just didn’t love it with the skinny border on two sides and larger at the top and bottom. So I ended up with a very unique sized card. 4-1/4″ x 4-3/4″ was the finished measurement. I may retry making it another day and cutting the focal image piece 1/4″ larger (width) to see how it would compare to this one!
Anyway, I think the rest of the card is pretty simple, so I’ll just get on to the Cut List and Supplies!
If you haven’t already, join my mailing list by entering your info into the box to the right. I send out an exclusive project PDF filled with ideas once a month to my subscribers!
Cut List
Crushed Curry Cardstock: 8-1/2″ x 4-3/4″, scored at 4-1/4″
Whisper White Cardstock: 4″ x 4-1/2″ (base I glued other pieces to)
White Copic-friendly Cardstock: 3″ x 3-1/2″
Everyday Chic Designer Series Paper: 1″ x 3-1/2″
Real Red Cardstock: 1″ x 4″
Built for Free Using: My Stampin Blog
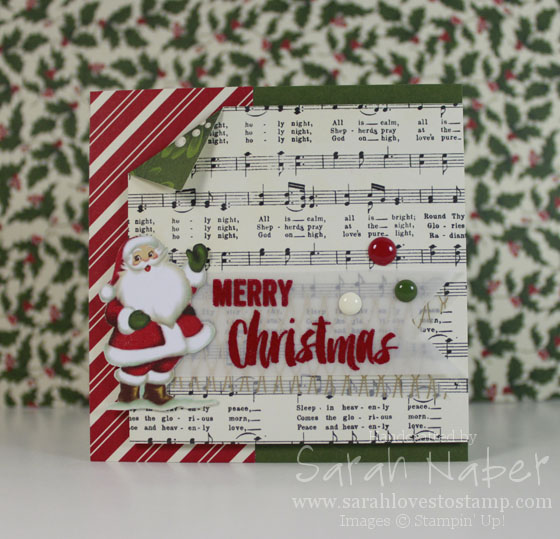
This week the As You See It Challenge is SANTA! This paper became a fast favorite when we used it at Convention this summer! We made a card element that I turned into a card (I’ll show it next week) and the main part of it was the Santa from the Home for Christmas Designer Series Paper! This paper is fantastic…especially if you like to fussy cut the beautiful, handpainted images of Santas, Christmas Trees, Poinsettias and if you aren’t me, Deer. (I swear I’m the only person on the planet who doesn’t love these deer.)
This card is really pretty simple. I combined the As You See It Challenge #116 with the Retro Sketches challenge this week. The sketch prompted me to do something I NEVER do…a square card! Here’s a tip for you: if you’re mailing a square card, it requires more postage, unless you put it in a rectangular envelope. The finished size of this card is 4-1/4″ x 4-1/4″ so you could pop it into a regular A2 envelope if you wanted to save on postage. OR, make a fabulous custom square envelope with the Envelope Punch Board!
Both patterned papers are from the same pack as the santa that I fussy cut. I layered a piece of the gold printed vellum from the Wonderland Vellum Stack (on sale now! more about that later!) under the vellum I stamped the sentiment on.
The sentiment is from the Project Life December 2015 Stamp Set. I am WILD about the font combinations in this stamp set! I used my Embossing Buddy to prep the vellum so stray powder flecks wouldn’t be a problem, stamped my sentiment in VersaMark (I stamped ‘Christmas’, poured the powder onto it, then stamped ‘Merry’, poured the powder onto it, and then heated it up), and used Cherry Cobbler Stampin’ Emboss Powder to really make the sentiment pop off the card. I went ahead and used Fast Fuse behind the gold foil vellum piece (I cannot see the adhesive) and hid a tiny bit of Multipurpose Liquid Glue behind the embossed letters, as well as adhering the banners under the Santa element.
The Sheet Music Designer Series Paper is popped up with a layer of Fun Foam. This is a tip I’m loving from Jennifer McGuire as it holds up better in the mail than foam tape, dimensionals, etc. on large layers. I stacked two Stampin’ Dimensionals I’d cut in half and put them under the left side of Santa (that’s hanging off of the paper layer) to support him.
My second favorite thing on this card (besides the yummy designer series paper) is the enamel dots! These are beautiful!!! Card measurements/cut list will be below, as well as the full list of supplies (just click on a picture to see it in my Online Store)!
New product alert…I may have lied…this may instead be my most favorite thing about this card! WINK OF STELLA Clear Glitter Brush Pen!!! It is coming out in our Occasions Catalog in January. I was excited about it, but didn’t truly fall in love until I brushed it onto the red parts of Santa’s suit! Gorgeous in real life!!!
All in all, a super simple but fun card! I hope you enjoyed it! Feel free to leave me a comment and tell me if you’re a fan of fussy cutting or not! I find it to be super relaxing and love to do it in front of the television.
NEW news…

If you aren’t on my email newsletter list, you’ll have missed my message that the Year-End Sale began today!!! We’re talking savings up to 60% on great products – some retiring products from the Holiday Catalog!
CLICK HERE to check out the Year-End Sale in my Online Store!
FINALLY, go check out the As You See It Challenge and play along! You have until next Wednesday to submit a card with a Santa theme! 🙂 Check it out at www.AsYouSeeItChallenge.com!!! If you haven’t been over there yet, we have a new challenge for you every Friday to get your creative juices flowing!

Cut List
Mossy Meadow: 4-1/4″ x 8-1/2″, scored at 4-1/4″
Home for Christmas Designer Series Paper: Red Stripe – 1-7/8″ x 4-1/4″; Sheet Music – 3-3/4″ x 3-3/4″
Vellum Banners: 1-1/8″ wide
Built for Free Using: My Stampin Blog
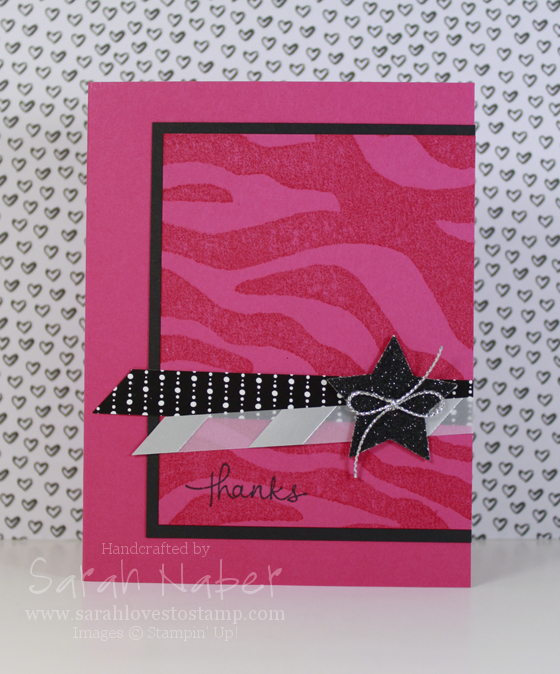
Oh how I love this sketch! I hope you’ll play along! I needed a thank you for my customers so I’m creating this card in a few different colors. I’ll post a picture of the finished cards later, or check out my Facebook and Instagram for an instant look!
Anyway, this card is pretty simple. Melon Mambo layer is stamped with the It’s Wild Background Stamp in Melon Mambo ink. The sentiment is from Endless Thanks and is stamped in Memento Tuxedo Black. And that’s all the stamping on this one!
The medium star punch was used to crop it out of the Black Glimmer Paper. It’s retiring! Did you see that? I’m so so sad! I LOVE it for so much more than Halloween. A piece of the Wonderland DSP (see how versatile it is?) and Silver Foil Vellum were added and then the star popped on top with Stampin’ Dimensionals. Check below for the cut list, as well as the supplies too!
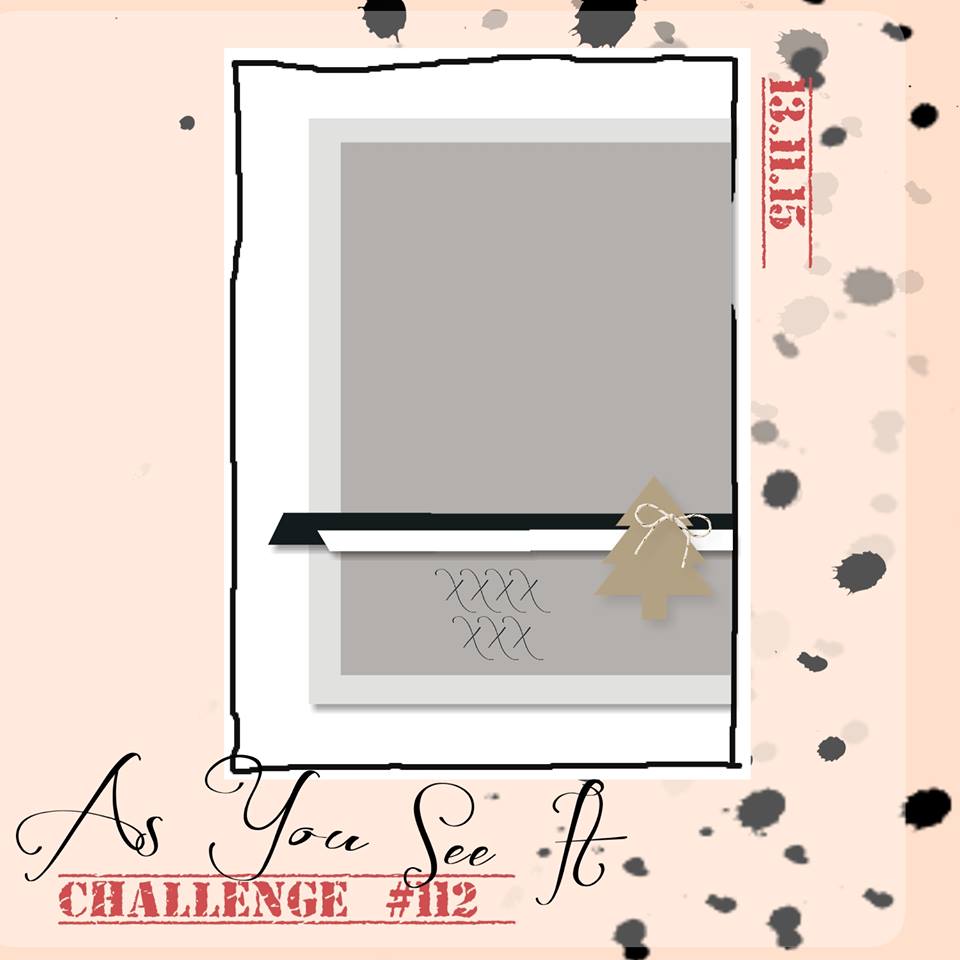
I hope you’ll play along with us this week at the As You See It Challenge! This sketch is a great, simple one for ANY card! Lots of Christmas inspiration from the Design Team so head on over to the As You See It Challenge Blog and check it out!
Cut List
Melon Mambo: 5-1/2″ x 8-1/2″, scored at 4-1/4″; 3-3/8″ x 4-1/4″
Basic Black: 3-1/2″ x 4-1/2″
Silver Foil Vellum: 3/8″ wide
Black DSP: 1/2″ wide
Built for Free Using: My Stampin Blog
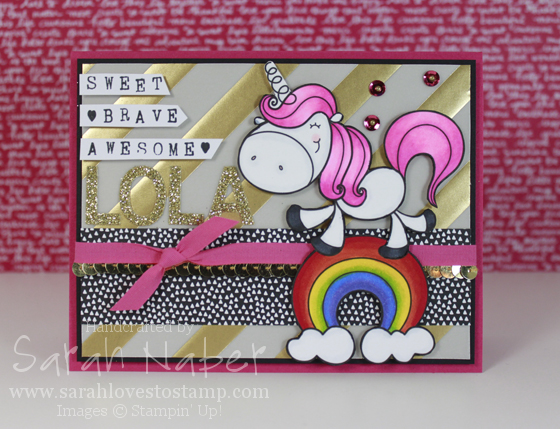
This is an extra special week of the As You See It Challenge! I’m honored to be participating in Lola’s Challenge! My best friend, Tara, has a sweet niece named Lola who has been battling cancer for several years now. She just had a stem cell transplant and was in the ICU when we decided to do something special for her. Since she was in the ICU, we decided a virtual card shower would be better than sending her cards…possibly with bad germs!
So here’s the challenge…before Wednesday, October 21st make a card with something for Lola. Gold for Childhood Cancer Awareness. Unicorns, fairies and pink are all things Lola loves! CLICK HERE to head on over to the As You See It Challenge site! Check out the other Design Team cards and PLEASE make and enter your own card for Lola! It’s so simple – you can pretty much put it anywhere online (as long as it’s public) and then just paste the link to enter your card! I set a goal of 100 cards for Lola so please share with everyone you know!

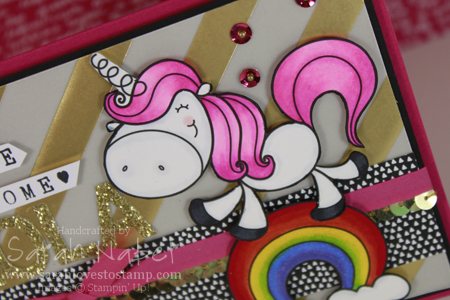
So that brings me to the card. I knew I wanted to include an image of one of Lola’s favorite things but I didn’t have any stamps with a unicorn or fairy…so I turned to the internet. A few searches and some really great things popped up! I chose this adorable Lucky Unicorn image from the Etsy shop 2CuteInk! Love it! I also found some great paper piecing files if you love to fussy cut or have a digital cutter. Or go with the fairy punch art route. If you want to play along, you can also use a FREE digi stamp too!
Besides the digi stamp and Copics I colored it with, everything is Stampin’ Up! I even used my new alphabet rotary stamp for the first time on this project! (Thanks for telling me I *had* to buy it, Amy!)
*I’ll be back with the supply list and measurements soon! 🙂
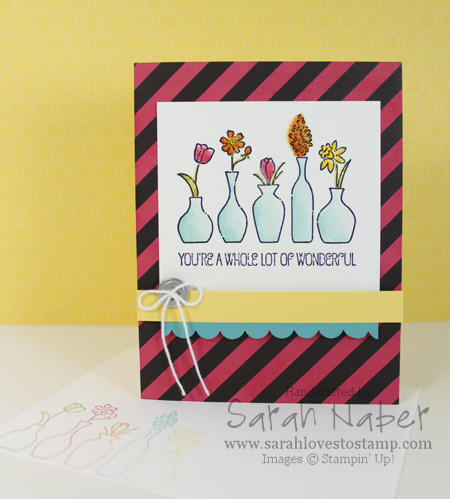
I LOVED this card made with the Vivid Vases single stamp! It was designed as one of our Make and Take projects for Stampin’ Up! Leadership 2014 this past January. This project is also what inspired me to make my video the other day about coloring black and white Designer Series Paper to custom match it to your project. (Check that out below.)
In particular, in this project, I thought coloring Designer Series Paper was a good solution as the Whisper White in the Designer Series Paper looked super bright next to the more muted white of the Watercolor Paper. It can also work well if your Designer Series Paper is Whisper White and your project features Very Vanilla or vice versa.
How To
1. Cut a piece of Daffodil Delight cardstock to 5-1/2″ x 8-1/2″. Score it at 4-1/4″ and crease with a Bone Folder.
2. Cut a piece of the black & white diagonal striped paper from the Kaleidoscope Designer Series Paper pack to 4-1/4″ x 5-1/2″. Color it with the Strawberry Slush Classic Stampin’ Pad using one of the techniques in the video below. Adhere it to the front of the card base with Multipurpose Liquid Glue.
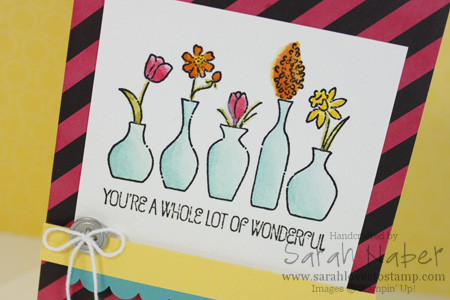
3. Cut Watercolor Paper to 3-1/2″ x 3-1/4″. Stamp the Vivid Vases single stamp on it with the Jet Black StazOn Ink Pad. *TIP: For perfect placement, use the Stamp-a-ma-jig.
4. Watercolor the images with the fine tipped Aqua Painter and the Strawberry Slush, Pumpkin Pie, Daffodil Delight, Old Olive, and Bermuda Bay Classic Stampin’ Pads. (I’ll add my Watercoloring Basics Video below.) Adhere it to the card using Multipurpose Liquid Glue.
5. Cut a strip of Daffodil Delight cardstock to 4-1/4″ x 1/2″ and a piece of Bermuda Bay cardstock to 3-1/2″ x 3/4″. Punch the Bermuda Bay strip with the Scallop Edge punch, attach it to the Daffodil Delight strip and attach them both to the card with Stampin’ Dimensionals.
6. Thread a metal button with Whisper White Baker’s Twine, tie a bow and attach it to the card with a Glue Dot.
7. Use Stampin’ Write Markers to ink up each vase in a different color and stamp them onto the envelope. I used a Stamp-a-ma-jig for perfect placement (and to eliminate the sentiment on the envelope). You can see the stamped envelope in the first picture.
Related Videos
*Check out below the videos for the full supply list for this card.
Adding Color to Black & White Paper
Easy Watercolor Tips
Supply List
STAMPS:
Vivid Vases (Wood-Mount Only 133818)
PAPER:
8-1/2″ x 11″ Bermuda Bay Cardstock (131197)
8-1/2″ x 11″ Daffodil Delight Cardstock (119683)
Kaleidoscope Designer Series Paper (132995)
Watercolor Paper (122959)
INK:
Bermuda Bay Classic Stampin’ Pad (131171)
Daffodil Delight Classic Stampin’ Pad (126944)
Old Olive Classic Stampin’ Pad (126953)
Pumpkin Pie Classic Stampin’ Pad (126945)
Strawberry Slush Classic Stampin’ Pad (131178)
Jet Black StazOn Ink Pad (101406)
ACCESSORIES:
Basic Metal Buttons (133319)
Whisper White Baker’s Twine (124262)
Multipurpose Liquid Glue (110755)
Mini Glue Dots (103683)
Stampin’ Dimensionals (104430)
TOOLS:
Stampin’ Trimmer (126889)
Simply Scored Scoring Tool (122334)
Bone Folder (102300)
Craft Scissors (108360)
Aqua Painters (103954)
Stamp-a-ma-jig (101049)
Scallop Edge Border Punch (119882)
Grid Paper (102787)
Stampin’ Scrub (126200)
Stampin’ Mist (102394)
StazOn Cleaner (109196)
Here it is! My first new video for the New Year! Better late than never, right? I’m excited about LOTS of new things that will be coming your way! I hope you enjoy this video – it’s a bit different than my normal cardmaking or tool tips. I LOVE Post It Notes and am constantly reaching for them to jot something down so it’s pretty appropriate for me! 🙂 Thanks for your patience as I took time with family over the holidays and went on a much needed vacation with my hubby in early December! My New Year’s Resolution is to post regularly for you all on my blog and YouTube especially, adding in Facebook, Twitter and Pinterest more too!!! I also still need to blog my AWESOME trip to Houston last week for Stampin’ Up!’s Leadership Conference!!!

Hi there! I hope you’re having a great start to your weekend! Today I have a SUPER fun project to share with you using LOTS of new goodies!!! This card uses a stamp set from the upcoming Occasions Catalog, Starburst Sayings, as well as the matching Starburst Framelits Dies. Of course, Stampin’ Up! is being amazing and offering bundles again so you can get the stamp set and framelits at a 15% discount.
I also used the same Designer Series Paper as my project yesterday – the new Sale-A-Bration offering, Sweet Sorbet DSP. Starting January 31, 2014, you’ll be able to get this package of fantastic DSP for free with a $50 purchase! Oh yay! I also used the same twine too that is from the SAB Sweet Sorbet Accessory Pack. AND…a BRAND NEW Sale-A-Bration Decorative Dots embossing folder too!!! Could this year’s Sale-A-Bration get any better?!?
I’m sure you also noticed my piece of 3″ x 4-1/2″ Core’dinations cardstock (can I even make a project without it?) that I cut the starburst shape out of using the 2nd smallest Starburst Framelits Die. Then I embossed and then sanded with the Stampin’ Sanding Block to reveal that lighter inner core. *TIP: Remember to do all of your cutting with framelits or other dies before you emboss. Otherwise the embossing will be flattened because of running the embossed piece through the machine without its folder. I then glued it down with the Multipurpose Liquid Adhesive to a piece of 3-1/4″ x 4-3/4″ Basic Black Cardstock. A 3/4″ x 4-3/4″ strip of my favorite pattern from the Sweet Sorbet DSP is layered over the top. I tied a bow of the Crisp Cantaloupe twine from the Sweet Sorbet Accessory Pack over the top of the DSP and glued it down to the Whisper White Note Card base (they come pre-cut and pre-scored with matching envelopes…easy peasy!).
I stamped the “Thank You So Much” stamp in Crisp Cantaloupe ink onto a scrap of Whisper White Cardstock and used the matching framelit to cut it out (the smallest one). *TIP: I actually stamped this first and ran it through the Big Shot at the same time as the Core’dinations piece with the 2nd smallest framelit. I try to always run all of my framelits for one project through at the same time if possible to save time! Super easy, especially with the Magnetic Platform to hold each piece in place. I layered that onto a circle of Gold Foil Sheet punched out with the 1-3/8″ Circle Punch. Finally, I cut a Stampin’ Dimensional in half and put one half on the top and one half on the bottom then stuck it onto the card! *TIP: Placing your dimensionals so they adhere straight to the card (not the twine) will insure that everything lays flat. If the dimensionals were on top of the twine, then the focal point may bow around the twine a bit. Not too big of a deal, but just a little idea to add that extra professional look to your projects.
Supply List
STAMPS:
Starburst Sayings (Wood-Mount 133182, Clear-Mount 133185)*
-Also available as a bundle with the Starburst Framelits Dies at a 15% discount! Wood-Mount 134817, Clear-Mount 134818*
PAPER:
Whisper White Note Cards & Envelopes (131527)
8-1/2″ x 11″ Whisper White Cardstock (100730)
8-1/2″ x 11″ Basic Black Cardstock (121045)
12″ x 12″ Gold Foil Sheets (132622)
In Color 2012-2014 Core’dinations Cardstock (129957)
SAB Sweet Sorbet DSP (133521)**
INK:
Crisp Cantaloupe Classic Stampin’ Pad (131176)
ACCESSORIES:
SAB Sweet Sorbet Accessory Pack (133522)**
SNAIL Adhesive (104332)
Multipurpose Liquid Glue (110755)
Stampin’ Dimensionals (104430)
TOOLS:
Stampin’ Trimmer (126889)
Simply Scored Scoring Tool (122334)
Bone Folder (102300)
Craft Scissors (108360)
Stampin’ Sanding Block (129367)
Core’dinations Dust Buddy (129366)
1-3/8″ Circle Punch (119860)
Big Shot Die-Cutting Machine (113439)
Big Shot Magnetic Platform (130658)
Starburst Framelits Dies (132967)*
-Also available as a bundle with the Starburst Framelits Dies at a 15% discount! Wood-Mount 134817, Clear-Mount 134818*
SAB Decorative Dots Textured Impressions Embossing Folders (133520)**
Grid Paper (102787)
Stampin’ Scrub (126200)
Stampin’ Mist (102394)
*Available January 3, 2014 when the Stampin’ Up! Occasions Catalog begins!
**Exclusive Sale-A-Bration item FREE with each $50 purchase from January 28, 2014-March 31, 2014!

I have a little bit of a double feature for you today! I started to make the Thank You card first and it just wasn’t working out for me, so I scrapped it and made the Thanksgiving card. I had the idea to replicate the space in the strip on the sketch with a punch and this punch and stamp set from the Holiday Catalog were a perfect match for the idea I had! I LOVED our sketch this week over at As You See It Challenges, so I hope you’ll join in and be inspired for our 2nd challenge EVER! 🙂 Click here and bookmark http://www.asyouseeitchallenge.com for new challenges every Friday! 🙂
A couple of little details about the first card…I used the Sweater Weather Designer Series Paper for the snappy, masculine-friendly patterned papers. I also stamped the outline oak leaf Gently Falling stamp (Love this versatile stamp set! Use just the solid parts, just the outlines or use them together!) in VersaMark and embossed with clear embossing powder. I stamped the main focal point from the Tags 4 You stamp set in the Holiday Catalog in Chocolate Chip ink on Crushed Curry card stock. If you look closely, you can see it’s shiny! Why? Because I used clear embossing powder and embossed quickly, before the ink could dry. Traditionally, you can’t emboss with dye based inks, but our new ink pad design (updated in June 2012) makes for juicy, but still fairly quick drying images that will accept the embossing powder! Just heat it up quick and you’re good to go! I cropped it out with the matching punch. The final touch was two Tangerine Tango Candy Dots and Candy Dot Brad Bases! I LOVE these!!!

On to my 2nd card…the problem card! I so badly wanted to use Stippled Blossoms as I’ve had it for about a year and never used it! (*GASP*) The sentiment is embossed with Pool Party Embossing Powder and the edges of the stamped panels are sponged with Pool Party ink to make them stand out against the Whisper White background. In the moments before I was going to throw it away, I had a brain wave to add the Perfect Polka Dots Textured Impressions Embossing Folder to the front of the card and the Whisper White taffeta ribbon too! I ended up with a card that I really, really like! *Crafting lesson: If a project isn’t going the way you’d like it to, put it down and move on to something else! Pick it up later and try to rework it into something you’re happy with! 🙂
Now for the sketch!

Supply List – Thanksgiving Card
STAMPS:
Gently Falling (Wood-Mount 128430, Clear-Mount 123804)
Tags 4 You (Wood-Mount 131820, Clear-Mount 131823) *Holiday Catalog*
Buy the Tags 4 You stamp set with the Label Bracket Punch in a Bundle and save 15%! (Wood-Mount Bundle 133293, Clear-Mount Bundle 133294)
PAPER:
8-1/2″ x 11″ Chocolate Chip Card Stock (102128)
8-1/2″ x 11″ Crushed Curry Card Stock (131199)
8-1/2″ x 11″ Tangerine Tango Card Stock (111349)
Sweater Weather Designer Series Paper (132184) *Holiday Catalog*
INK:
Chocolate Chip Classic Stampin’ Pad (126979)
VersaMark (102283)
ACCESSORIES:
Brights Candy Dots (130931)
Candy Dots Brad Bases (132293)
Clear Stampin’ Emboss Powder (109130)
Multipurpose Liquid Glue (110755)
Stampin’ Dimensionals (104430)
TOOLS:
Stampin’ Trimmer (126889)
Simply Scored Scoring Tool (122334)
Bone Folder (102300)
Heat Tool (129053)
Paper Piercing Tool (126189)
Stampin’ Pierce Mat (126199)
Label Bracket Punch (132153) *Holiday Catalog*
Grid Paper (102787)
Stampin’ Scrub (126200)
Stampin’ Mist (102394)
Supply List – Thank You Card
STAMPS:
Stippled Blossoms (Wood-Mount 132076, Clear-Mount 126747)
Perfectly Penned (Wood-Mount 128703, Clear-Mount 122892)
PAPER:
8-1/2″ x 11″ Whisper White Card Stock (100730)
8-1/2″ x 11″ Pool Party Card Stock (122294)
INK:
Coastal Cabana Classic Stampin’ Pad (131175)
Pool Party Classic Stampin’ Pad (126982)
VersaMark (102283)
ACCESSORIES:
3/8″ Whisper White Taffeta Ribbon (109070)
Pool Party Stampin’ Emboss Powder (129398)
Stampin’ Dimensionals (104430)
TOOLS:
Stampin’ Trimmer (126889)
Simply Scored Scoring Tool (122334)
Bone Folder (102300)
Heat Tool (129053)
Craft Scissors (108360)
Stamping Sponges (101610)
Big Shot Die-Cutting Machine (113439)
Perfect Polka Dots Textured Impressions Embossing Folders (117335)
Grid Paper (102787)
Stampin’ Scrub (126200)
Stampin’ Mist (102394)

The day is finally here! Our first sketch from the As You See It Challenge site is up, as well as all of the Design Team Members creations with it!!! I hope you’ll take the time this weekend to play along! We cannot wait to see what you’ve created. (If you have no idea what I’m talking about, check out my announcement HERE.)
If you read my Design Team Q&A, you know I said that my favorite stamp set is Gorgeous Grunge, but that I hadn’t actually inked it up! Sounds crazy, right? Well, I couldn’t wait to use it for this challenge!!! I paired up the sketch from our As You See It Challenge #001 with a color combination from the Stampin’ Up! Color Coach of Island Indigo, Basic Gray, and Elegant Eggplant.
Some details: I sponged some Whisper White Craft Ink around the edges of the Basic Gray mat and the Island Indigo flags to really make them pop. I also dyed some Whisper White Baker’s Twine with a mixture of Basic Gray Classic Ink Refill and rubbing alcohol. Stay tuned for a video on how to do this! Another little detail – the diagonal stripe stamp is stamped in Island Indigo, then onto a scratch piece of paper then onto the project. This technique, called stamping off, makes the image a little less bold and is great for collage stamping like this. The sentiment, from Hello, Lovely, was stamped on Whisper White and cut out with the Paper Snips. Did you see the Elegant Eggplant button? It’s from the brand new, redesigned Regals Collection Designer Buttons! They are better than ever! LOVE them!!! Also, the Gray and White chevron pattern (used for the flags) are from the I Am Me Designer Series Paper – one of my favorites in the 2013-2014 Annual Catalog! Lastly, the Island Indigo flags were embossed with the Alphabet Press Embossing Folder and the Big Shot. It’s a bit difficult to see in the picture but it’s beautiful in real life.
Check out the sketch I used to create my project below! The full supply list with links to the items in my Stampin’ Up! Store are below the sketch. I really hope you play along at the first ever As You See It Challenge! Check it out at the As You See It Challenge Blog!!!

Supply List
STAMPS:
Gorgeous Grunge (Wood-Mount 130514, Clear-Mount 130517)
Hello, Lovely (Wood-Mount 130240, Clear-Mount 130243)
PAPER:
8-1/2″ x 11″ Whisper White Card Stock (100730)
8-1/2″ x 11″ Basic Gray Card Stock (121044)
8-1/2″ x 11″ Elegant Eggplant Card Stock (105126)
8-1/2″ x 11″ Island Indigo Card Stock (122923)
I Am Me Designer Series Paper (130138)
INK:
Basic Gray Classic Stampin’ Pad (126981)
Elegant Eggplant Classic Stampin’ Pad (126969)
Island Indigo Classic Stampin’ Pad (126986)
Whisper White Craft Stampin’ Pad (101731)
Basic Gray Classic Ink Refill (109121)
ACCESSORIES:
Regals Collection Designer Buttons (130029)
Whisper White Baker’s Twine (124262)
SNAIL Adhesive (104332)
Multipurpose Liquid Glue (110755)
Mini Glue Dots (103683)
Stampin’ Dimensionals (104430)
TOOLS:
Stampin’ Trimmer (126889)
Simply Scored Scoring Tool (122334)
Bone Folder (102300)
Paper Snips (103579)
Craft Scissors (108360)
Stamping Sponges (101610)
Big Shot Die-Cutting Machine (113439)
Alphabet Press Textured Impressions Embossing Folders (130916)
Grid Paper (102787)
Stampin’ Scrub (126200)
Stampin’ Mist (102394)
Rubbing Alcohol

Hi there! Today I have another super cute card that we made at my Stamp-a-Stack this month! This one was CASEd from my dear, dear Canadian friend Desiree Spenst – although I think she said she had also CASEd it from someone else. Such is the stamping world!!! 🙂 Anyway, remember that our fabulous Online Extravaganza Sale lasts until Wednesday, November 28th – again, ending the sale with three 24 hour only deals! CLICK HERE to download the PDF and check out all of the spectacular deals!
I just love this little gingerbread boy and girl from the Scentsational Season stamp set in the Holiday Catalog! Remember that if you love them too, they are only available until January 2, 2013!!! To make the little boy, I tied a little bow with the Cherry Cobbler Baker’s Twine and put some of the Basic Rhinestone Jewels on for his buttons. They are on sale for only $3.47!!! I think I already ordered 4 packages to stock up!!! The little girl gingerbread’s bow is made with 2 of the tiny hearts from the Owl Builder Punch! Clever use, huh? 🙂 As I said, not my idea but BRILLIANT!!! I also used the Gumball Green ribbon that is on sale in the bundle, as well as the Brights Designer Series Paper Stack. I LOVE both of these items, but think it especially hard to see how awesome the Brights DSP Stack is! It includes 2 each of 2 double-sided designs in all 10 colors in the Brights Collection! LOVE it!!! All of the patterns are tone-on-tone and include: polka dots, stripes, a text pattern, and a fancier looking motif! So so so useful!!!
Check out below for a full supply list! Don’t miss out on this sale and CLICK HERE to shop in my Online Store! 🙂 (Add some items from the Clearance Rack to get even more amazing deals on our awesome products!!!)
Supply List
STAMPS:
Scentsational Season (Wood-Mount 121026, Clear-Mount 121190)
OR Scentsational Season Bundle 15% Savings with Stamp Set & Matching Framelits (Wood-Mount 129945, Clear-Mount 129946)
PAPER:
8-1/2″ x 11″ Whisper White Card Stock (100730)
8-1/2″ x 11″ Gumball Green Card Stock (126840)
8-1/2″ x 11″ Real Red Card Stock (102482)
8-1/2″ x 11″ Soft Suede Card Stock (115318)
Brights Designer Series Paper Stack (117155) 20% OFF!!!
INK:
Soft Suede Classic Stampin’ Pad (126978)
ACCESSORIES:
Basic Rhinestone Jewels (119246) 30% OFF!!!
Ribbon Bundle (132701) – includes Gumball Green, Raspberry Ripple, & Summer Starfruit 30% OFF!!!
SNAIL Adhesive (104332)
Multipurpose Liquid Glue (110755)
Stampin’ Dimensionals (104430)
TOOLS:
Tabletop Paper Cutter (106959) 30% OFF!!!
Simply Scored Scoring Tool (122334)
Bone Folder (102300)
Paper Snips (103579)
Craft Scissors (108360)
Owl Builder Punch (118074)
Big Shot Die-Cutting Machine (113439)
Holiday Collection Framelits Dies (127814)
Scallop Squares Duo Bigz Die (120903)
Grid Paper (102787)
Stampin’ Scrub (126200)
Stampin’ Mist (102394)
Connect with Me!


