
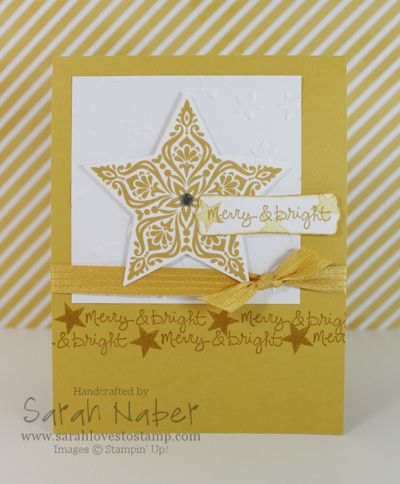
Currently viewing the category:
"As You See It Challenge"
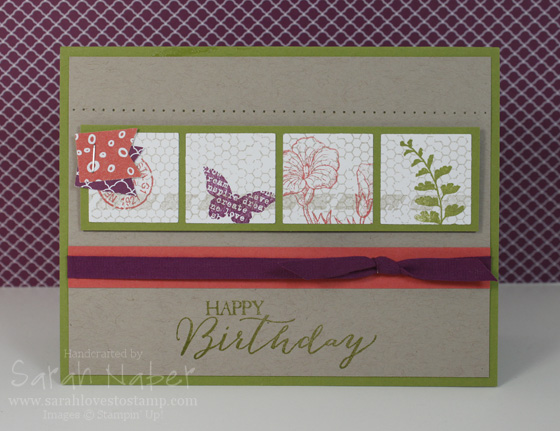
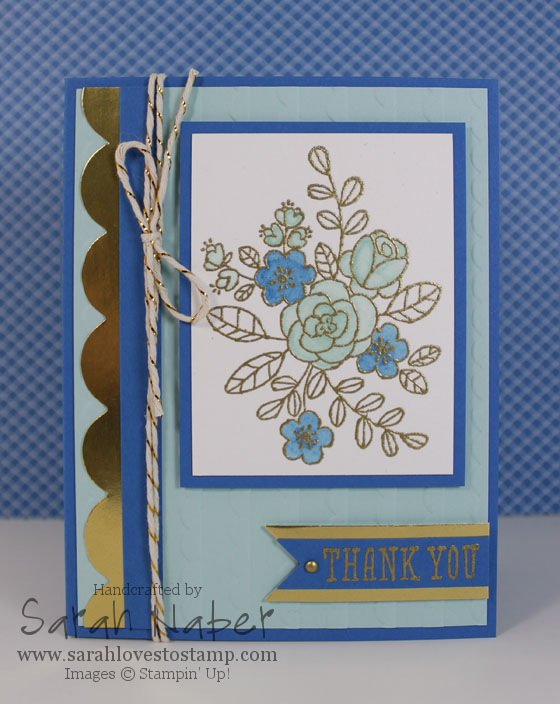
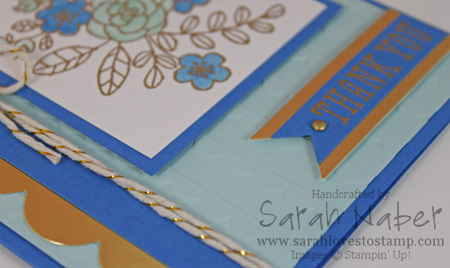
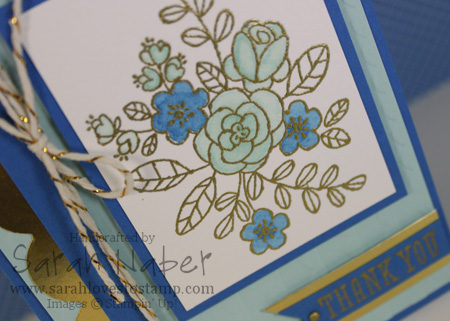
Hi there! I’m finally back! My sweet baby girl is almost 7 weeks old now. I enjoyed creating this card at an overnight crop at my church. It took me a ridiculous amount of time as I probably hadn’t created in 3 months with my pregnancy challenges and then having a newborn. 🙂 But…although it took a long time, I enjoyed it SO much and really liked the end result. I hope you do too!
I think the instructions are pretty straight forward this time. How much do you love those cute little banners stapled on the edge of the main focal point? LOVE! I used the fantastic photopolymer set so I didn’t even need my Stamp-a-ma-jig to get perfect positioning of the sentiment!
Supply List
STAMPS:
Butterfly Basics (Wood 138813, Clear 138816, Photopolymer 137154)
*Save 15% and buy it as a bundle with the Butterfly Thinlits Dies (Wood 139322, Clear 139323, Photopolymer 138865)
PAPER:
8-1/2″ x 11″ Whisper White Cardstock (100730)
8-1/2″ x 11″ Calypso Coral Cardstock (122925)
8-1/2″ x 11″ Crumb Cake Cardstock (120953)
8-1/2″ x 11″ Old Olive Cardstock (100702)
Brights Collection Backgrounds Designer Series Paper Stack (130134)
Park Lane Designer Series Paper (133694)
INK:
Calypso Coral Classic Stampin’ Pad (126983)
Crumb Cake Classic Stampin’ Pad (126975)
Old Olive Classic Stampin’ Pad (126953)
Rich Razzleberry Classic Stampin’ Pad (126950)
ACCESSORIES:
1/4″ Rich Razzleberry Cotton Ribbon (134564)
Multipurpose Liquid Glue (110755)
Stampin’ Dimensionals (104430)
TOOLS:
Stampin’ Trimmer (126889)
Bone Folder (102300)
Craft Scissors (108360)
Paper Piercing Tool (126189)
Stampin’ Pierce Mat (126199)
Essentials Piercing Pack (126187)
Handheld Stapler (139083)
Silver Mini Staples (135847)
Banner Punch (133519)
Here’s a card I made for a challenge over at part of being on the As You See It Design Team! It was several weeks ago but I have some news to share…I’m pregnant! It seems the first trimester exhaustion has spilled over into my second trimester, so I apologize for my absence! I am just, at 24 weeks, feeling more like myself again so hopefully that’ll mean good things for you if you’d like to see more from me! 🙂 I don’t mean it at all as complaining because we couldn’t feel more excited or blessed to add the first little person to our family in January, but I thought some explanation for my extended absences was in order! 🙂
Anyway, I liked this card so I thought I’d share anyway. It also shows you that you can use previous challenges from any challenge site to inspire your creativity!!! New challenges on As You See It post on Friday mornings and you have until the following Wednesday night to complete the challenge! Check it out here at the As You See It Challenge Blog (and feel free to dive into the archives to check out some of the past challenges by our fabulous team leader, Amanda to inspire you)!
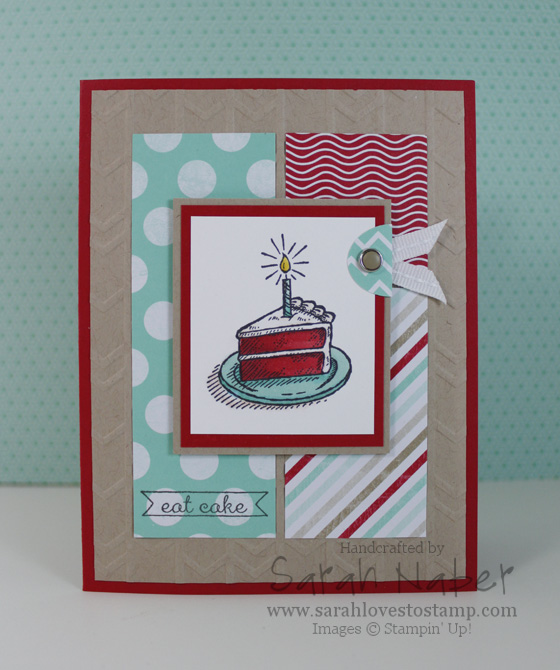
I’m so excited to show you my very first creation with Stampin’ Up!’s brand new alcohol-based markers, Blendabilities! They’re beyond fantastic and I’m loving that they come in SU!’s exclusive colors and are totally fool proof as they come in sets of 3 with a light, medium and dark of the same hue! I thought…if I’m using the piece of cake image from Sketched Birthday, why not make it Red Velvet? YUM!
What else do I love? THIS SKETCH! It’s out of this world! Won’t you please play along with us at the As You See It Challenge? Head over there by clicking the link and check out what the other Design Team members have to share today! I can’t wait to see what you’ll create!
I also used some favorites that will be gone after May 31st as they are in the Occasions Catalog. The Fresh Prints Designer Series Paper Stack is so darn cute! I’m obsessed with this color combo! I used the Cherry Cobbler Blendabilities and used a tiny amount of the darkest color to add the shading without using too much so that it would retain the brightness it needed to in order to look good with the Real Red in the Fresh Prints Designer Series Paper Stack.
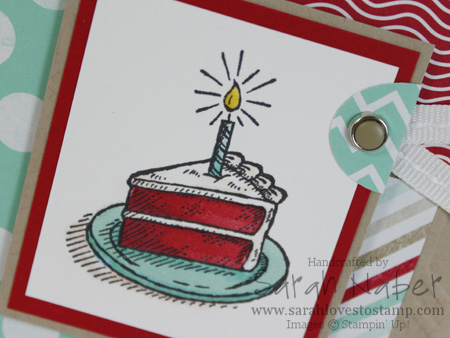
Here’s a closeup of the focal image. 🙂 Again, it isn’t perfect coloring but I was still pretty happy with the end result.
 How To
1. Cut Real Red Cardstock to 5-1/2″ x 8-1/2″. Score and fold at 4-1/4″
2. Cut Crumb Cake Cardstock to 4″ x 5-1/4″. Run through the Big Shot Die-Cutting Machine with the Arrows Textured Impressions Embossing Folder. Adhere to card base with Multipurpose Liquid Adhesive. *TIP: Anytime you want to adhere a textured piece of cardstock to another piece of cardstock, Multipurpose Liquid Adhesive is the best way to do it! The liquid glue is able to seep into the nooks and crannies and provide an excellent bond between the two paper layers.
3. Cut Fresh Prints Designer Series Paper (retiring May 31st) patterns to 1-1/2″ x 4-1/4″, 1-1/2″ x 2-5/8″ and 1-1/2″ x 1-1/2″. Stamp the greeting from Sketched Birthday on the bottom of the largest DSP piece with Memento Tuxedo Black Ink*. *TIP: I used my Stamp-a-ma-jig to get perfect positioning of the sentiment on the DSP. LOVE that Stamp-a-ma-jig!!!
4. Cut Crumb Cake Cardstock layer to 2-1/4″ x 2-5/8″, Real Red Cardstock to 2-1/8″ x 2-1/2″, and Whisper White Cardstock to 1-7/8″ x 2-1/4″.
5. Stamp the birthday cake image from Sketched Birthday onto the Whisper White piece from Step 4.
6. Color with Cherry Cobbler, Coastal Cabana and Daffodil Delight Blendabilities* trios. Add a bit of the lightest color from the Blendabilities Skin Tone Assortment* to the frosting and underneath the plate to add some extra dimension and realism (frosting isn’t truly white). *TIP: To better match my Real Red in the color combination (from the DSP), I used a LOT more of the light and medium markers in the Cherry Cobbler trio than the darkest. I used a tiny bit of the darkest color to add the shading I needed.
7. Attach the 3 cardstock focal-point layers from Step 4 together. *Tip: I use SNAIL to adhere Whisper White to other cardstock. Although Multipurpose Liquid Glue is my favorite adhesive, I find that it shows slight glue lines on top unless I apply it in a very thin and smooth layer, so I use SNAIL just to be safe. I know this is pretty picky as it is hard usually to even see the glue lines, but I’d rather be safe than sorry. (One exception to this is if the Whisper White layer is textured with an embossing folder and the Big Shot…then I still use Multipurpose Liquid Glue.)
8. Punch a Small Oval from the DSP. Fold it around the layered focal point. Punch a hole with the 1/16″ Circle Punch* and put a Candy Dot Brad Base through it. Bend the prongs outward and attach a Crumb Cake Candy Dot from the Neutrals Candy Dots to the center of it.
9. Cut two small pieces of 1/4″ Whisper White Stitched Grosgrain (while supplies last only) and attach with Glue Dots.
10. Finally attach the main focal point with Stampin’ Dimensionals! You’re done!
This post is probably the most picture-heavy post you’ve ever seen on my blog! 🙂 I’ve gone to Convention for the past six years and admired the display boards stamped by talented stampers from all over North America. This year, I’m throwing my hat in the ring to be a display stamper. We were asked to gather up three cards, two 3D items, and one scrapbook page to show examples of our work. First my cards:
Label Love – I’ve included extra pictures to show some of the details on this card.
The first closeup shows a bit of the ruffled ribbon detail, as well as the dry embossing done with the Big Shot and Modern Mosaic Textured Impressions Embossing Folder.

The second closeup shows the main image embossed with White Stampin’ Emboss Powder onto Bermuda Bay Cardstock, as well as the paper piercing on the circle, done with the Essentials Paper Piercing Pack.
Gently Falling, Sketch & Outline Alphabets – This card uses some of my favorite things! A great two-step stamping set, the Chalk Talk Framelits, paper piercing, and a background stamp! Check out my original post about this card to see the video I filmed on making your own custom die cuts (in this case I wanted to shorten) as well as how to use the Envelope Liner Framelits Dies (how I made the matching envelope liner in the first picture).
The second picture is the decorated inside of the card. I kept the design of the inside super simple since I like to write a lot! 
So Very Grateful – I used Gold Stampin’ Emboss Powder to make the stamped images really pop! I also used it to turn one of our 1/8″ Silver Mini Brads into gold! The main image is stamped onto watercolor paper and was colored using the Aqua Painter and our Classic Stampin’ Pads.
This picture shows a closeup of the dry embossing, again with the Big Shot, but this time using the Scalloped Textured Impressions Embossing Folder. You can also see the Gold Foil Paper under the sentiment and as the scalloped accent. I love that stuff but boy is it hard to photograph! 🙂 You can also see the silver brad turned gold here too!
Just a closeup of the gold embossed and watercolored image! I love this stamp set!!!
Ok…on to my 3D items!
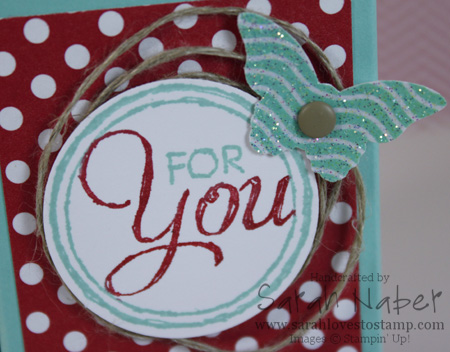
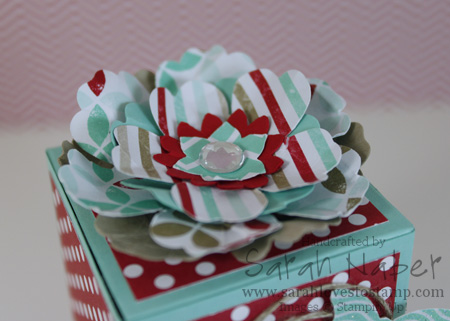
Candy Dispenser Box – I was able to make this by adapting a basic template I found online (no measurements so it was a tad tricky) to fit this entire box on a sheet of 8-1/2″ x 11″ cardstock! I love this combination of colors, taken from the Fresh Prints Designer Series Paper Stack!

The front of the box is decorated with a sentiment from the Chalk Talk stamp set. I also added a Bitty Butterfly punched out of designer series paper I first heat embossed with Iridescent Ice Embossing Powder to give it a great, glittery shine! The butterfly is topped off with a Crumb Cake Candy Dot…LOVE those! Loops of Linen Thread add to the whimsy!
The flower atop the candy dispenser is made with oodles of punches. I punched two from each punch, the bottom layer from cardstock and the top from the Fresh Prints Designer Series Paper Stack. The punches I used, from largest to smallest are: Blossom Punch, Pansy Punch, and Boho Blossoms Punch. A Large Rhinestone Jewel added a bit of flair to the center after I crumpled the papers up to give them a bit more life.
Dream Banner – The second of my 3Ds is one of my favorite projects I’ve ever made! It is 10 times more beautiful in real life!!! I used the Pennants Framelits Dies to cut out both the black and vanilla Modern Medley Designer Series Paper (largest pennant die), and the Gold Foil Designer Vellum (2nd largest). The pennant toppers were cut from the largest Deco Labels Collection Framelits Dies.
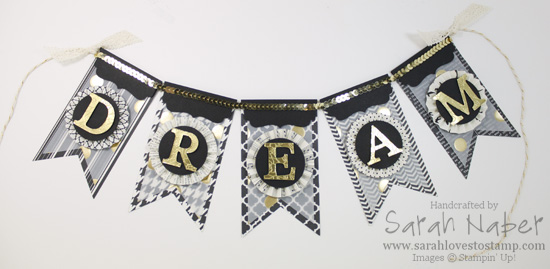
You can get a bit more detail in this picture. The letters are Gold Foil Paper with the So Very Grateful largest floral image (the one I used on the blue/gold card above) heat embossed on it with Gold Stampin’ Emboss Powder. It is so striking in real life! The rosettes were made by scoring every 1/4″ on the Simply Scored Scoring Tool. I strung them together with the Gold Baker’s Twine, used Sticky Strip to attach the Gold Sequin Trim and tied a knot of Victoria Crochet Trim at either end. Voila! 
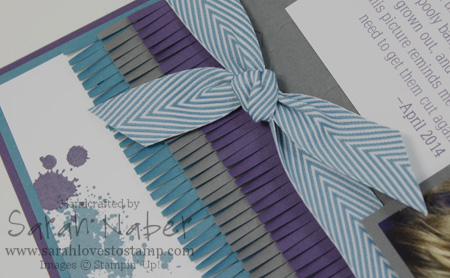
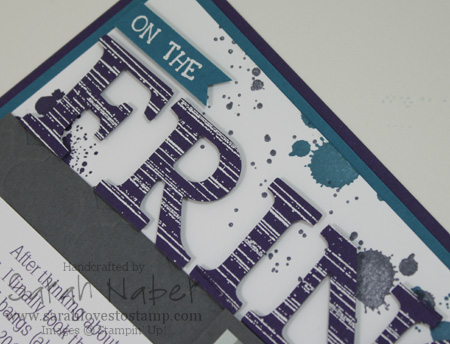
Gorgeous Grunge Scrapbook Page – On to the final entry! The splatters are all from my favorite stamp set of all time, Gorgeous Grunge. The letters are also heat embossed with White Stampin’ Emboss Powder – the large ones again using a stamp from Gorgeous Grunge. The large gray portion in the background is embossed with the Modern Mosaic folder, but it is super hard to tell in my photos!
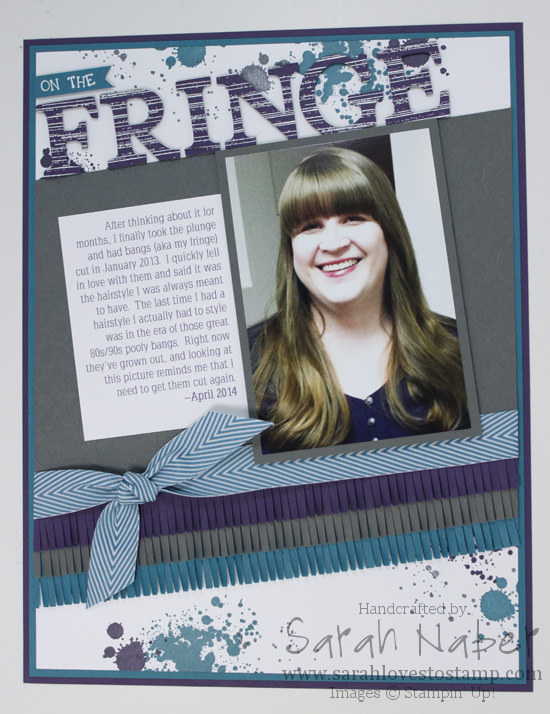
This picture shows the fun fringe I created with the Fringe Scissors. I thought it was the perfect touch on a page all about my much loved bangs! 🙂
Here’s a closeup of the letters embossed with White Stampin’ Emboss Powder.
I hope you enjoyed looking at my projects! I sure had a great time pulling together some favorites and making some new projects to enter into the selection for Convention 2014 Display Stampers. Thanks for sticking with me through this long post!

Hi there!
Combining my Design Team project from the As You See It Challenge today with a sketch from Freshly Made Sketches and the color combo from Dynamic Duos (last week’s) has resulted in the card you see above.
Come on over to the As You See It Challenge and play along with us this week! We’re switching it up with theme week this week…anything ANIMALS! 🙂 I chose to use this super cute bunny from the adorable Baby, We’ve Grown stamp set from the Occasions Catalog! Love this little guy!

I got a little excited about this sketch and made a whole bunch of these cards in different color combos. I also filmed a video for you on how to watercolor. The sentiments on all 4 cards are different, showing how versatile this little image can be. The main card above says “Happy Easter,” whereas the other 3 cards are baby themed with “for your shower,” “hello, baby,” and “thank you.” Think of what a great gift a set of the “thank you” ones would be for a new mom!

I also showed some variety in the backgrounds. One is Designer Series Paper, one is dry embossed cardstock and the other two are (surprise, surprise) my favorite, Core’dinations cardstock!!! (Seriously, can I even make a project without it?)
I’ll be back with the video as well as the How To and Supply List soon!

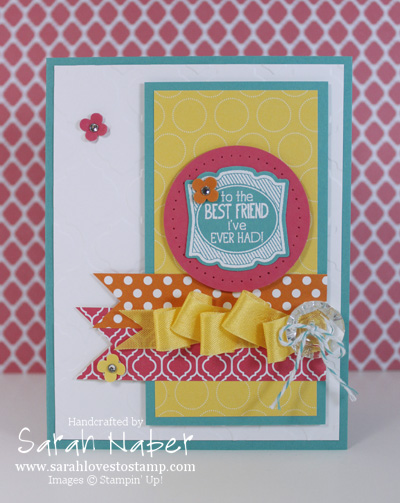
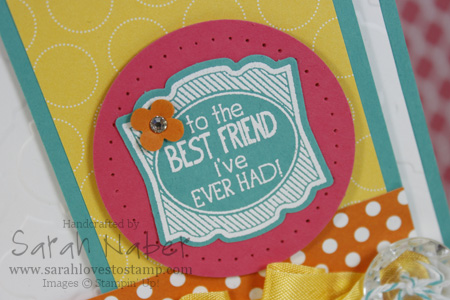
Back again today with a challenge card for the As You See It Design Team! This sketch was a bit tricky for me as I had the main image part done and had to figure out what to do with the circle elements. I ended up using buttons to mimic the circles on the sketch as well as to create a visual triangle around my main focal point piece.
The color combo and actually even the square inspiration came from an old Colour Q challenge that I’ll post below. The image doesn’t show that you should use black, but I thought the black really made the other colors pop! 🙂
Please head on over to the As You See It Challenge Blog and check out what the rest of the Design Team has to share with you! Then, before next Wednesday, play along and link your card on the blog so we can all check out your creation!!!

Because my card base was Basic Black, I also added a Whisper White layer to the inside to write on. I decorated it with a few of my extra squares from the front too. Check it out below.

*Full instructions to come!*

Our As You See It Challenge for the week is a double challenge. You must use shades of blue and try to finish your project in under 10 minutes!!! It’s a fun one and I really encourage you to give it a try! As inspiration, here’s a video of my process from start to finish (I did fast forward while I was at my Big Shot).
How To
1. Cut Midnight Muse cardstock to 5-1/2″ x 8-1/2″ and score at 4-1/4″. Cut Whisper White cardstock to 4″ x 5-1/4″. Cut 2 pieces of each of Soft Sky and Marina Mist cardstock and 1 piece of Midnight Muse all to 3-3/4″ x 15/16″.
2. Use Multipurpose Liquid Glue to adhere the cardstock strips in an ombre pattern. *TIP: Multipurpose Liquid Glue is essential when you want to have a minute or two to slide paper pieces exactly where you want them.
3. Stamp this piece with the World Map background stamp in VersaMark ink. Glue it onto the Midnight Muse cardstock.
4. Stamp the sentiment from Starburst Sayings onto Whisper White cardstock with Midnight Muse ink.
5. Cut the sentiment out with the matching Starburst Framelits Dies, using the Magnetic Platform to hold your framelit in place on your stamped sentiment. Attach it with Stampin’ Dimensionals.

I’m so in love with this sketch from our As You See It Challenge Blog! Head over there and check out what the rest of the Design Team has to share with you!!! (AND…play along, of course!!!) My color combo this week is from the Colour Q Challenge…but I changed it up to use current SU! colors Smoky Slate, So Saffron, Coastal Cabana, and Calypso Coral! I LOVE this color combo and will be using it again soon!
I’ve used the Sale-A-Bration sets, Petal Parade and See Ya Later on this project, as well as the Sale-A-Bration embossing folder, Decorative Dots. Monday, March 31 is the last day that you can earn any of these items (as well as the other Sale-A-Bration) choices FREE with every $50 increment you spend! Man, am I going to miss this year’s offerings!!! 🙂
The polka dotted background was a total DIY patterned paper, using the Eye-Catching Ikat Photopolymer Set! I sure am addicted to it! I love the look of these imperfect circles. I also cut a tag out of Smoky Slate Core’Dinations Cardstock (from the Neutrals Core’Dinations Pack) and ran it through my Big Shot with the Sale-A-Bration Decorative Dots Textured Impressions Embossing Folder. Then I sanded it with my Stampin’ Sanding Block. HOWEVER…the color that showed through was very vanilla…creamy…not fitting with my crisp, fresh color palette including white…SO…I just sponged on a bit of So Saffron ink with a Stamping Sponge wedge (be careful if you use a sponge dauber, as you want VERY light coverage here) to slightly tint the raised, sanded dots.
Here’s a closeup of the glittery beauty that adding Iridescent Ice Stampin’ Emboss Powder creates!!! Man, I LOVE how pretty these look! 🙂

I’ll be back later today with a full supply list and some other details for you! 🙂

Hi there! Finally back with a fun, new sketch from As You See It Challenges! I used a technique from the Stampin’ Up! demonstrator-only magazine, Stampin’ Success that came out in the Nov/Dec issue! I’ll film a video on it soon because it was super easy and you only have to do it once and you have a template you can use over and over again on lots of different projects! Gotta love that!
How To
1. Make your sunburst template (I’ll embed the video below when it’s finished) and sponge Daffodil Delight ink onto a Whisper White cardstock layer measuring 3-1/2″ x 4-3/4″.
2. Rub an Embossing Buddy over the card layer from Step 1 to remove the static and help the embossing powder only stick to the stamped image. Using a Stamp-a-ma-jig, position the greeting from Feel Goods and stamp it in VersaMark ink. Pour on Black Stampin’ Emboss Powder and use the Heat Tool to melt it.
3. Repeat the steps above with a scrap of Whisper White cardstock and the butterfly from Backyard Basics.
4. Color the butterfly in with a Blender Pen and Daffodil Delight, Pumpkin Pie, and Strawberry Slush Classic Stampin’ Pads.
5. Use the Two Way Glue Pen to apply glue in between the sponged sunburst rays and pour on Dazzling Diamonds glitter. Tap off excess glitter (sometimes I also use a paintbrush to really brush off the excess glitter so it doesn’t fall off later).
6. Use the Multipurpose Liquid Glue to attach the main panel onto a piece of 3-3/4″ x 5″ Basic Black cardstock. Glue that onto a Strawberry Slush card base, cut at 8-1/2″ x 5-1/2″ and scored at 4-1/4″.
7. Cut the butterfly out with Paper Snips. *TIP: Move the cardstock around, not the scissors. Attach it with a half Stampin’ Dimensional onto the center of the sunburst. *TIP: Use a Basic Black Stampin’ Write Marker to run around the Whisper White edges to really finish the look and hide any cutting mistakes.
Supply List
STAMPS:
Backyard Basics (Wood-Mount 130514, Clear-Mount 130517) ***Buy the Backyard Basics Bundle and save 15% on the stamp set and matching Backyard Basics Framelits Dies. Wood-Mount Bundle 132729, Clear-Mount Bundle 132728***
Feel Goods (Wood-Mount 131916, Clear-Mount 129684)
PAPER:
8-1/2″ x 11″ Whisper White Cardstock (100730)
8-1/2″ x 11″ Basic Black Cardstock (121045)
8-1/2″ x 11″ Strawberry Slush Cardstock (131295)
INK:
Daffodil Delight Classic Stampin’ Pad (126944)
Pumpkin Pie Classic Stampin’ Pad (126945)
Strawberry Slush Classic Stampin’ Pad (131178)
VersaMark (102283)
ACCESSORIES:
Black Stampin’ Emboss Powder (109133)
Multipurpose Liquid Glue (110755)
2-Way Glue Pen (100425)
Stampin’ Dimensionals (104430)
TOOLS:
Stampin’ Trimmer (126889)
Simply Scored Scoring Tool (122334)
Bone Folder (102300)
Paper Snips (103579)
Blender Pens – set of 3 (102845)
Heat Tool (129053)
Stamp-a-ma-jig (101049)
Grid Paper (102787)
Stampin’ Scrub (126200)
Stampin’ Mist (102394)

I’m really excited about how the banners came together on this card! I had originally planned on using Banner Blast (from Sale-A-Bration) when I first saw this sketch, but I left it in Kansas City at my upline’s home when we had a meeting a few weeks ago! I’m kind of glad I did, because it gave me the opportunity to think about what else I could use and I’m wild about the results!
I had written down a similar color combo (it had Cajun Craze instead of Tangerine Tango) but I felt like Cajun Craze gave it a fall feel so I substituted in Tangerine Tango! I will be using this color combo again – it isn’t typical me, but I LOVE it!!! I hope you do too!
I’ll be back with the supply list and instructions later! 🙂 And with the weekly challenges I’m going to enter the card in too. Check out the other creations by the Design Team at the As You See It Challenge Blog! And, OF COURSE, play along!!!


Hi there! It’s Friday and that means a new challenge over at the As You See It Challenge Blog! Check out the creations by the other AYSI Design Team Members too! I also combined it with the color challenge from Colour Q Challenges this week. I wasn’t sure about these colors to begin with but loved the final result. I hope you do too!
How To
1. Cut your Pool Party cardstock to 8-1/2″ x 5-1/2″ for your card base and score it at 4-1/4″. Cut the Pacific Point to 4″ x 5-1/4″. Cut a piece of Whisper White to 1-7/8″ x 5″. Cut a piece of Real Red to 2″ x 5-1/4″ – see Step 3 for why!
2. Ink up the Dictionary Background Stamp in Soft Sky ink, stamp off onto a scrap paper once and then stamp it onto the Whisper White piece. (This is super hard to see in the photo but is gorgeous in real life!) Then use the Petal Parade stamp set (FREE Sale-A-Bration exclusive stamp set with any $50 purchase!) and Pacific Point, Pool Party, and Real Red inks to stamp the rest of the white panel.
3. Run the Real Red piece through the Big Shot with the Arrows Textured Impressions Embossing Folder. Cut the final piece down to 1-7/8″ x 5″. *TIP: Cut your piece of cardstock a bit larger than you want it (usually 1/8″ is plenty depending on how intricate the embossing folder design is) and trim it down to the size you want AFTER embossing! The embossing “shrinks” the paper a bit so this is a great idea when you need an exact size or to match up with another piece like I needed on my card.
4. Use the Multipurpose Liquid Adhesive to adhere both the Whisper White and Real Red strips side-by-side onto the Pacific Point layer.
5. Tie the Real Red and Whisper White 1/4″ Stitched Grosgrain Ribbons around the Pacific Point layer. Adhere this to the card base.
6. Stamp the “Happy Big Day” from the Chalk Talk Stamp Set (LOVE!) in Pacific Point ink onto a scrap of Whisper White. Die cut it out with the Big Shot and the matching Chalk Talk Framelits Dies.
7. Die cut two more of the same label shape out of a scrap of Pool Party cardstock. Cut one set in half horizontally and one set in half vertically and glue behind the sentiment to make a custom mat! *TIP: This is one of my favorite tricks to do with punches and die cuts that may not have a nesting shape! Make your own! Works fabulously with the Decorative Label Punch among others.
I hope you love this card! This sketch was a great one to work with. Head on over to the As You See It Challenge Blog and play along! 🙂 We’re always excited to see what you have created!!!
This card was entered into challenges at: ColourQ, polkadoodles, Crafting from the Heart, Challenges 4 Everybody, and Word Art Wednesday.

Supply List
STAMPS:
Petal Parade (Wood-Mount 133599, Clear-Mount 133602)***FREE Sale-A-Bration Choice with $50 Order***
Chalk Talk (Wood-Mount 130631, Clear-Mount 130634) *Get the stamp set with the matching framelits and save 15% with the Chalk Talk Bundle: Wood-Mount 132731, Clear-Mount 132730!*
Dictionary Background (Wood-Mount 130348, Clear-Mount 130351)
PAPER:
8-1/2″ x 11″ Whisper White Cardstock (100730)
8-1/2″ x 11″ Pacific Point Cardstock (111350)
8-1/2″ x 11″ Pool Party Cardstock (122924)
8-1/2″ x 11″ Real Red Cardstock (102482)
INK:
Pacific Point Classic Stampin’ Pad (126951)
Pool Party Classic Stampin’ Pad (126982)
Real Red Classic Stampin’ Pad (126949)
Soft Sky Classic Stampin’ Pad (131181)
ACCESSORIES:
Real Red 1/4″ Stitched Grosgrain Ribbon (126875)
Whisper White 1/4″ Stitched Grosgrain Ribbon (126877)
SNAIL Adhesive (104332)
Multipurpose Liquid Glue (110755)
Stampin’ Dimensionals (104430)
TOOLS:
Stampin’ Trimmer (126889)
Simply Scored Scoring Tool (122334)
Bone Folder (102300)
Paper Snips (103579)
Craft Scissors (108360)
Big Shot Die-Cutting Machine (113439)
Big Shot Magnetic Platform (130658)
Chalk Talk Framelits Dies (129983) *Get the stamp set with the matching framelits and save 15% with the Chalk Talk Bundle: Wood-Mount 132731, Clear-Mount 132730!*
Arrows Textured Impressions Embossing Folders (132187)
Grid Paper (102787)
Stampin’ Scrub (126200)
Stampin’ Mist (102394)

Hi Stampin’ Friends! Did you think I’d forgotten about you? Oh, no! Of course not! I was supposed to post this card on Friday as a part of the As You See It Design Team but I’m just finally getting around to it today! Technical difficulties followed by more illness – I’m headed to my doctor next week so hopefully whatever is making me sick all the time can get taken care of!
Ok! So on to the fun stuff! This is my FAVORITE type of challenge we do over at As You See It Challenges! Check the graphic below for the items you need to include on your project to play along. You have until Wednesday at midnight! 🙂 While I used purples on this card to meet the challenge, you could do it in virtually any color combo! Red & pink for traditional Valentine’s Day colors, or your main squeeze’s favorite colors for an anniversary card, or the wedding colors of a couple for a personalized, super sweet wedding card! I also used the Retro Sketch #99, but the deadline to play along in their challenge has passed – I still LOVE this sketch though!
I LOVE the background with the super trendy ikat chevron border from the Eye-Catching Ikat Photopolymer Stamp Set. I alternated inking them up in Wisteria Wonder and Elegant Eggplant and stamped them onto a piece of 2-1/2″ x 4-1/2″ Whisper White cardstock. *TIP: Clean the ikat chevron border stamp in between each color with the Stampin’ Scrub and Stampin’ Mist for a quicker, cleaner process!!! (You could try stamping all of one color first but it is easier to insure perfect placement by stamping it how you want the finished product to look.) Love that piece – my favorite thing about the card! One of the Circles Collection Framelits Dies cut out the partial circle perfectly. The Full Heart Punch and Small Heart Punch are a perfect match for the Language of Love Stamp Set! The larger heart was stamped in Elegant Eggplant on Whisper White Cardstock, while the smaller heart was stamped using Versamark ink onto Wisteria Wonder cardstock and heat embossed in Gold Stampin’ Emboss Powder!
Do you love that tiny little banner? That’s from one of the 2014 Sale-A-Bration EXCLUSIVE stamp sets, Banner Blast! It has a matching punch that is also a choice with any $50 purchase! Gotta love that! The dotted border is stamped in VersaMark ink on Wisteria Wonder cardstock and heat embossed with Gold Stampin’ Emboss Powder! I used my trusty Stamp-a-ma-jig to line the little heart from Banner Blast up right in the center and stamped it in Elegant Eggplant.
How about the gold bling details? The button is actually one from the Regals Designer Button Collection (Garden Green!). I pressed it into the VersaMark pad, sprinkled it with some Gold Stampin’ Emboss Powder and heated it with the Heat Tool until it melted! Then I did that same thing two more times to get an even coat on it. I also repeated the process on the edges. Slipped it on the card with a bit of White Baker’s Twine tied through the holes! Once I had assembled the card (before I added the hearts), I diluted a blob of my Multipurpose Liquid Glue with water and used a paint brush to spatter it onto the card. I sprinkled some fine gold glitter on for some sparkle! I also cut apart the Gold Sequin Trim and added a few of these pretties with Multipurpose Liquid Glue.
The Elegant Eggplant Layer (4″ x 5-1/4″) was embossed with the Perfect Polka Dots folder and the Big Shot. The stamped ikat chevron piece has some extra effect thanks to the Stampin’ Dimensionals underneath! I also added Stampin’ Dimensionals to the hearts after gluing the smaller one to the larger one. 🙂
Come on over to the As You See It Challenge Blog and play along! You still have plenty of time before Wednesday night rolls around! If you’re in the midwest like me, you might have a snow day tomorrow to get a bit inky and try this challenge! We’re supposed to get 10″ – can you believe that?


Hi there! I’m sorry for my extended absence! I have been sick sick sick over here at the casa de Naber! Yuck!!! Thankfully, I’m finally feeling on the mend and was very excited to get back into my stamp room and create for you! Check out my card using the super cute, Baby Prints Stamp Set! This one is an oldie but a goodie, debuting about a year ago and ending up in our fantastic 2013-2014 Annual Catalog! I used the sketch from the As You See It Challenge Blog and a color combo perfect for a baby boy from over at Cupcake Inspirations!
This card came together pretty quickly! I stamped the feet in Soft Sky ink, then stamped the splatters from Gorgeous Grunge over the top in Pear Pizzazz. I used my Stamp-a-ma-jig to insure perfect placement of my sentiment which I stamped in Pear Pizzazz. You’ll notice the sketch has a banner below it – I totally planned to do that until I was assembling my final card which is when I realized my focal point was so large there wasn’t room for the sentiment below it! So technically, I stamped the sentiment last! 🙂 Had I known this would be an issue, I would’ve “stamped off” the Pear Pizzazz splatters before stamping them onto my project so the sentiment would stand out even more. As it was, the splatters were done full strength so I actually left my handy Stamp-a-ma-jig handle where it was after stamping the sentiment the first time and stamped it again, in exactly the same spot, to make it just a tad darker! Maybe that’s a new trick for you! It’s like the opposite of stamping off! Double inking let’s call it!
Anyway, I cut it out with the 4th largest Square framelit and then used the largest Square framelit that is scalloped to make a smaller scalloped square. I’ll have to make a video for that soon! I’ll insert it into this post when I do! I just cut the square that mats that one to be a tiny bit larger. Then I took a piece of Pear Pizzazz Core’dinations Cardstock (from the Subtles Collection Pack) measuring 1-1/2″ x 5″ and flagged the ends (I wanted a super shallow “V” or I would’ve just used the Banner Framelits Dies from the Occasions catalog.) Then I sanded it down to reveal some of that lighter inner core. I took the Gold Baker’s Twine and peeled the gold striping off of it (super easy to do) to reveal the Vanilla twine underneath! Wrapped this around the banner piece, tied a bow and attached it to the rest of the card! The layer I attached it to is a piece of Very Vanilla Cardstock cut to 4″ x 5-1/4″ and embossed in the Big Shot Die Cutting Machine with the Alphabet Embossing Folder (one of my favorites)! I attached that to a Soft Sky base measuring 5-1/2″ x 8-1/2″ that I scored at 4-1/4″. The sanded banner piece was popped up on Stampin’ Dimensionals and the main focal point was popped up with double Stampin’ Dimensionals to reach the embossed piece and just one layer of Stampin’ Dimensionals where it was adhered to the sanded banner piece.
I hope you like it! It would be SUPER simple to make this card into a great girl or gender neutral card too!!! It’s a great sketch, so please play along with us over at the As You See It Challenge Blog! You have until Wednesday evening to get your entry in! Come check out what the other Design Team members have made too!!!


Hi! It’s Black Friday! Are you doing any crazy shopping with your family or friends today? Today’s As You See It Challenge is all about making a project with your favorite stamp set. For me, that’s Gorgeous Grunge…however, you’ll notice neither of my cards uses that stamp set. Why? I decided that, with the holiday season closing in on us fast, I’d show you my favorite stamp set from the Holiday Catalog. Calm Christmas is a great set and with that large, bold image, it makes it SUPER simple to stamp bunches of great cards in a flash! Yay!

Two very different looks for you today. One traditional and one not. I hope you can see how versatile this set is!
This is a super easy challenge to play along with…you only have to make one project with your favorite stamp set (only the Design Team had to make two  ) and you could be the winner of the challenge. Check it out here, at the As You See It Blog!
Also, did you know I’m doing FREE Shipping on orders of $40 or more from TODAY, November 29th, 2013 until Monday, December 2nd, 2013? If you didn’t know, you’ve got to get on my mailing list…NOW, so you don’t miss out on anything else. Just put your info in the box to the right, hit the “get my free video” button, and wait for an email to come to your inbox with the link to click to confirm that you want to be added! I am also offering a DOORBUSTER of at least $50 in retired product to the first 5 people to place $40 orders on Black Friday!!! You can also enter your name into the Mystery Hostess drawing that I’m doing by entering the Hostess Code KJ2A3S37 in the box in the lower left hand corner of your Shopping Cart screen. (*Do not do this if you’re placing an order over $150 as you’ll get hostess benefits automatically!) Remember that SU! still has their Holiday Sale going on until Monday, December 2nd with items discounted up to 50% off! HERE’S the link to the Holiday Sale in my Online Store!!! Don’t forget that there are also Weekly Deals – SEE HERE 🙂 as well as the Clearance Rack (CLICK HERE) and of course, our other fabulous lineup of regularly priced products too!!!

Hi there! Coming at you today with a Color Challenge from the As You See It Design Team! We’re on Challenge #011! Can you believe it? Join us over at the As You See It Challenge Blog!!!
I also combined the fab color combo of So Saffron, Pistachio Pudding, and Blushing Bride with a Sketch Challenge from over at the Clean & Simple Stamping Challenge Blog. I was so excited to use the Zoo Babies stamp set for the first time! I also used the “it’s a girl” sentiment from Baby Prints because the sketch called for a larger sentiment. The sentiment was stamped in Blushing Bride ink onto a piece of Whisper White Cardstock. I die cut a 2″ Whisper White circle from the Circles Originals Die and stamped the elephant from Zoo Babies in Pistachio Pudding onto it. I also stamped the elephant again on a scrap and snipped the ear out with my Paper Snips. Popped that up onto a Stampin’ Dimensional and stuck it onto the elephant. I layered more Stampin’ Dimensionals between the elephant and the 2-3/8″ Scallop Circle Punch (out of Blushing Bride). I offset another one of the 2-3/8″ Scallop Circle Punches out of So Saffron cardstock.
Otherwise the card is pretty simple. The sentiment panel measures 3″ x 1″ and the So Saffron mat behind it is 3″ x 1-1/4″. The 3″ x 4-1/4″ Pistachio Pudding layer was embossed with the Big Shot and the Argyle Textured Impressions Embossing Folder. The Blushing Bride layer behind it measures 3-1/4″ x 4-1/2″ and the whole thing was mounted on a So Saffron card base measuring 8-1/2″ x 5-1/2″ (scored at 4-1/4″). A couple of the largest pearls from the Basic Pearl Jewels finished off the sentiment panel.

This card was entered into challenges at: Clean & Simple Stamping, Aud Sentiments, Pile It On (Big Shot, Embossing Folder, Punches, Paper Snips), Sister Act, and Through the Craftroom Door.
Connect with Me!


