
Currently viewing the tag: "Edgelits"
I fell in love with this technique when I saw my demo friend, Jen do it in shades of blue. I wanted to use this amazing edgelits set (RETIRING) as I’d just gotten it recently. The sketch was an As You See It Challenge a few weeks ago but I got sick so I just got around to editing the pictures and SURPRISE, a video too so I’m sharing those today! Check out the current challenge HERE!
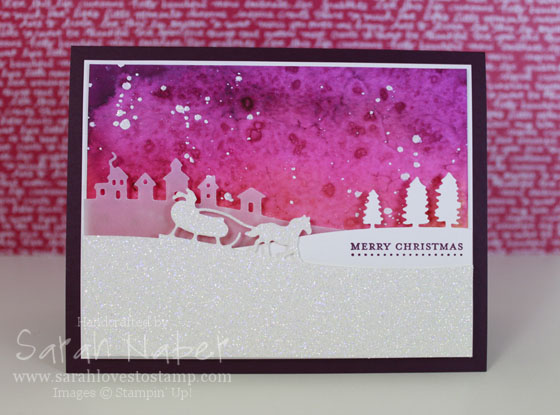
The best thing about this technique is that you can do it with items you already have! Can’t beat that. 🙂 I love the color combo here of Pumpkin Pie (you can’t really see it except for at the very bottom of the colored part), Melon Mambo, Rich Razzleberry and Blackberry Bliss. I find doing things like this just really make me feel like a true artist!
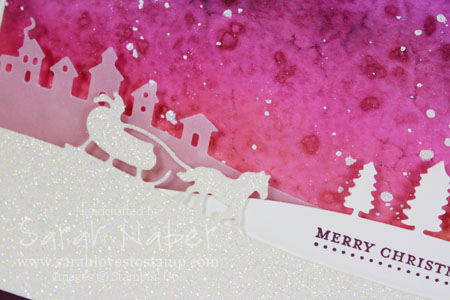
I layered all 3 of the framelits here with the village in Vellum Cardstock, the trees in regular Whisper White and the sleigh in Dazzling Diamonds Glitter Paper. EACH layer was popped up with Stampin’ Dimensionals so this is a VERY dimensional card. I would not recommend sending it in a regular envelope.
A note about the white splatters. I did them to tie all the white together with the technique piece. However, I would do them differently next time. I mixed a bit of Whisper White Craft Ink and water and splattered it on with a paintbrush. 14 hours later it wasn’t dry! So I tried to add White Stampin’ Emboss Powder to the wet splatters. When I heated it, it was almost like the powder went to the edges and melted normally while the wet ink bubbled up through the center of the splatter. Next, I tried 2 separate rounds of Iridescent Ice Embossing Powder. It still wasn’t perfect (I could touch the splatters and still had a tiny amount of ink transfer onto my fingers) but it was as close as I thought it would get. Next time, I plan to try splattering with a mixture of Multipurpose Liquid Glue and water and then embossing with either white or a mix of white and iridescent ice since I ended up loving the touch of sparkle in the sky. Anyway, that’s how crafting goes…sometimes it works, sometimes it doesn’t! Hopefully, you can learn from my mistake.
So here’s the video. I’ll also add the closeup picture, as well as the measurements and supplies below! 🙂
I used As You See It Challenge 113 for this card!

Cut List
Blackberry Bliss: 5-1/2″ x 8-1/2″, scored at 4-1/4″
Whisper White: 5-1/8″ x 4-7/8″
Watercolor piece (trimmed after technique was finished): 5″ x 4-3/4″
Village edge is 2″ from the bottom of the watercolor piece.
Built for Free Using: My Stampin Blog

Hi there! Another one of my Convention swaps today, but this one is a Christmas card! How many of you make your own Christmas cards? I’ve never gotten it done before (always great intentions), but this year I’m going to do it!!! For a lot of us, that means starting early! I’m going to start next month with a series of card making classes – I plan to make the same ones as my customers and then get them done right after the class is over! You know what they say, “Failing to plan is planning to fail.” so I’ve made a plan!
Anyway, back to the card! It uses the gorgeous new In Color, Gumball Green with a favorite of mine, Cherry Cobbler! The color combination was “stolen” from the Be of Good Cheer Designer Series Paper in the 2012-2013 Catalog. This card would look gorgeous in many other color combos as well! You could even add some glitter too! The Very Vanilla panel is embossed with the Argyle Textured Impressions Embossing Folder – I apologize that you can’t see it very well in the photo! I added 2 of my favorite things that I use on nearly every card to finish it off: Basic Rhinestone Jewels and ribbon! In this case I did a really simple ribbon treatment, just tie a knot in your Cherry Cobbler 1/2″ Scallop Dots Ribbon about 2″ down and then measure it against the panel and cut it to the right length. Wrap the ends around the back of the panel and scotch tape them onto the card stock so they don’t move! So easy, especially if you’re mass-producing and struggle with tying bows or knots. (Check out my “Tying the Perfect Knot” Video from this week for help if you struggle with that!)
If you’re lurking on this blog, don’t forget to sign up for my Email Newsletter on the right! (You’ll get a free 15 minute video on Shimmer Paints immediately after clicking the link that will come in your email, too!!!)
Supply List
STAMPS:
Delightful Decorations (Wood-Mount 116517, Clear-Mount 127787)
PAPER:
8-1/2″ x 11″ Very Vanilla Card Stock (101650)
8-1/2″ x 11″ Gumball Green Card Stock (126840)
8-1/2″ x 11″ Cherry Cobbler Card Stock (119685)
Be of Good Cheer Designer Series Paper (126896)
INK:
Gumball Green Classic Stampin’ Pad (126861)
Cherry Cobbler Classic Stampin’ Pad (126966)
ACCESSORIES:
Cherry Cobbler 1/2″ Scallop Dots Ribbon (124138)
Basic Rhinestone Jewels (119246)
SNAIL Adhesive (104332)
Multipurpose Liquid Glue (110755)
Stampin’ Dimensionals (104430)
TOOLS:
Tabletop Paper Cutter (106959)
Simply Scored Scoring Tool (122334)
Bone Folder (102300)
Craft Scissors (108360)
Ornament Punch (119847)
3/4″ Circle Punch (119873)
2-1/2″ Circle Punch (120906)
2-3/8″ Scallop Circle Punch (118874)
Big Shot Die-Cutting Machine (113439)
Finishing Touches Edgelits Dies (127010)
Argyle Textured Impressions Embossing Folders (127750)
Grid Paper (102787)
Stampin’ Scrub (126200)
Stampin’ Mist (102394)
Connect with Me!


