
Currently viewing the tag: "Framelits"
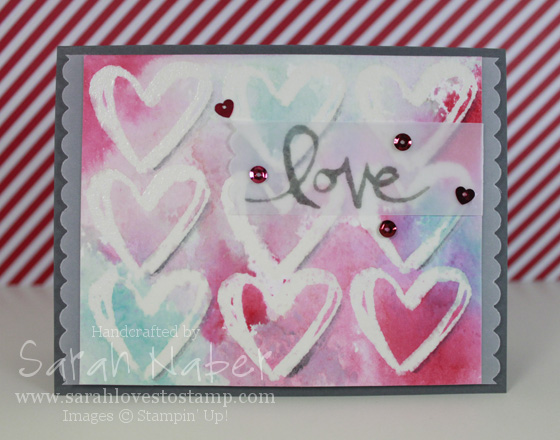
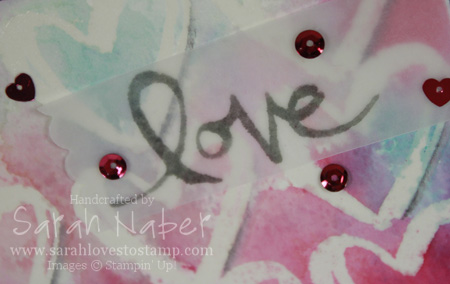
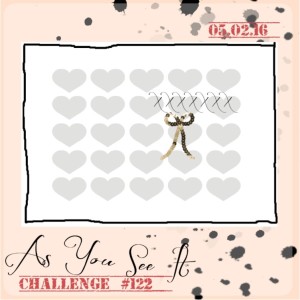
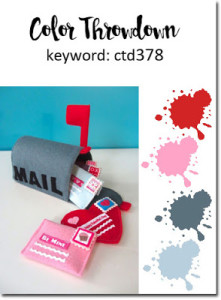
Hello! Today I have a new challenge coming at you from As You See It Challenges! LOVED this sketch. I obviously took it VERY literally but of course, you can do any repeated image! I also used a technique called watercolor smooshing. It is so easy and beautiful! Click to go check out the challenge over at the As You See It Challenge blog! I hope you can join us this week. The colors I used are from the Color Throwdown challenge. I actually used their colors in last week’s card but was too late to enter it by the time I got the blog post written!
If you read my last blog post, you’ll know that I’m participating in the The Daily Marker’s 30 Day Coloring Challenge. This card was a 2 day process. After it dried the first day, I ended up adding more color and decided to tie in the Basic Grey by adding it with an Aquapainter on one side of the heart for a shadow. *TIP: Our new Archival Ink pads in Basic Black and Basic Grey are not made for watercoloring and will dye the ends of your brush. They also don’t move as well as our regular inks as they aren’t water-based.
Here’s the sketch and color challenge I used this week!
Cut List
Basic Gray Cardstock: 8-1/2″ x 5-1/2″, scored at 4-1/4″
Watercolor Paper: I recommend using a larger piece and cutting it down after everything was dry. It ended up being 4-3/4″ x 3-15/16″ but I didn’t even measure it to get that. I just cut where I liked how the edges looked with the pattern.
Cardstock Vellum: 1-1/8″ x 3″ (to edge of scallop, the original piece was larger) Scallops were cut using the Squares Collection Framelits Dies.
Built for Free Using: My Stampin Blog

Hi there! It’s Friday and that means a new challenge over at the As You See It Challenge Blog! Check out the creations by the other AYSI Design Team Members too! I also combined it with the color challenge from Colour Q Challenges this week. I wasn’t sure about these colors to begin with but loved the final result. I hope you do too!
How To
1. Cut your Pool Party cardstock to 8-1/2″ x 5-1/2″ for your card base and score it at 4-1/4″. Cut the Pacific Point to 4″ x 5-1/4″. Cut a piece of Whisper White to 1-7/8″ x 5″. Cut a piece of Real Red to 2″ x 5-1/4″ – see Step 3 for why!
2. Ink up the Dictionary Background Stamp in Soft Sky ink, stamp off onto a scrap paper once and then stamp it onto the Whisper White piece. (This is super hard to see in the photo but is gorgeous in real life!) Then use the Petal Parade stamp set (FREE Sale-A-Bration exclusive stamp set with any $50 purchase!) and Pacific Point, Pool Party, and Real Red inks to stamp the rest of the white panel.
3. Run the Real Red piece through the Big Shot with the Arrows Textured Impressions Embossing Folder. Cut the final piece down to 1-7/8″ x 5″. *TIP: Cut your piece of cardstock a bit larger than you want it (usually 1/8″ is plenty depending on how intricate the embossing folder design is) and trim it down to the size you want AFTER embossing! The embossing “shrinks” the paper a bit so this is a great idea when you need an exact size or to match up with another piece like I needed on my card.
4. Use the Multipurpose Liquid Adhesive to adhere both the Whisper White and Real Red strips side-by-side onto the Pacific Point layer.
5. Tie the Real Red and Whisper White 1/4″ Stitched Grosgrain Ribbons around the Pacific Point layer. Adhere this to the card base.
6. Stamp the “Happy Big Day” from the Chalk Talk Stamp Set (LOVE!) in Pacific Point ink onto a scrap of Whisper White. Die cut it out with the Big Shot and the matching Chalk Talk Framelits Dies.
7. Die cut two more of the same label shape out of a scrap of Pool Party cardstock. Cut one set in half horizontally and one set in half vertically and glue behind the sentiment to make a custom mat! *TIP: This is one of my favorite tricks to do with punches and die cuts that may not have a nesting shape! Make your own! Works fabulously with the Decorative Label Punch among others.
I hope you love this card! This sketch was a great one to work with. Head on over to the As You See It Challenge Blog and play along! 🙂 We’re always excited to see what you have created!!!
This card was entered into challenges at: ColourQ, polkadoodles, Crafting from the Heart, Challenges 4 Everybody, and Word Art Wednesday.

Supply List
STAMPS:
Petal Parade (Wood-Mount 133599, Clear-Mount 133602)***FREE Sale-A-Bration Choice with $50 Order***
Chalk Talk (Wood-Mount 130631, Clear-Mount 130634) *Get the stamp set with the matching framelits and save 15% with the Chalk Talk Bundle: Wood-Mount 132731, Clear-Mount 132730!*
Dictionary Background (Wood-Mount 130348, Clear-Mount 130351)
PAPER:
8-1/2″ x 11″ Whisper White Cardstock (100730)
8-1/2″ x 11″ Pacific Point Cardstock (111350)
8-1/2″ x 11″ Pool Party Cardstock (122924)
8-1/2″ x 11″ Real Red Cardstock (102482)
INK:
Pacific Point Classic Stampin’ Pad (126951)
Pool Party Classic Stampin’ Pad (126982)
Real Red Classic Stampin’ Pad (126949)
Soft Sky Classic Stampin’ Pad (131181)
ACCESSORIES:
Real Red 1/4″ Stitched Grosgrain Ribbon (126875)
Whisper White 1/4″ Stitched Grosgrain Ribbon (126877)
SNAIL Adhesive (104332)
Multipurpose Liquid Glue (110755)
Stampin’ Dimensionals (104430)
TOOLS:
Stampin’ Trimmer (126889)
Simply Scored Scoring Tool (122334)
Bone Folder (102300)
Paper Snips (103579)
Craft Scissors (108360)
Big Shot Die-Cutting Machine (113439)
Big Shot Magnetic Platform (130658)
Chalk Talk Framelits Dies (129983) *Get the stamp set with the matching framelits and save 15% with the Chalk Talk Bundle: Wood-Mount 132731, Clear-Mount 132730!*
Arrows Textured Impressions Embossing Folders (132187)
Grid Paper (102787)
Stampin’ Scrub (126200)
Stampin’ Mist (102394)

Hi there! I’m sorry for my extended absence! I have been sick sick sick over here at the casa de Naber! Yuck!!! Thankfully, I’m finally feeling on the mend and was very excited to get back into my stamp room and create for you! Check out my card using the super cute, Baby Prints Stamp Set! This one is an oldie but a goodie, debuting about a year ago and ending up in our fantastic 2013-2014 Annual Catalog! I used the sketch from the As You See It Challenge Blog and a color combo perfect for a baby boy from over at Cupcake Inspirations!
This card came together pretty quickly! I stamped the feet in Soft Sky ink, then stamped the splatters from Gorgeous Grunge over the top in Pear Pizzazz. I used my Stamp-a-ma-jig to insure perfect placement of my sentiment which I stamped in Pear Pizzazz. You’ll notice the sketch has a banner below it – I totally planned to do that until I was assembling my final card which is when I realized my focal point was so large there wasn’t room for the sentiment below it! So technically, I stamped the sentiment last! 🙂 Had I known this would be an issue, I would’ve “stamped off” the Pear Pizzazz splatters before stamping them onto my project so the sentiment would stand out even more. As it was, the splatters were done full strength so I actually left my handy Stamp-a-ma-jig handle where it was after stamping the sentiment the first time and stamped it again, in exactly the same spot, to make it just a tad darker! Maybe that’s a new trick for you! It’s like the opposite of stamping off! Double inking let’s call it!
Anyway, I cut it out with the 4th largest Square framelit and then used the largest Square framelit that is scalloped to make a smaller scalloped square. I’ll have to make a video for that soon! I’ll insert it into this post when I do! I just cut the square that mats that one to be a tiny bit larger. Then I took a piece of Pear Pizzazz Core’dinations Cardstock (from the Subtles Collection Pack) measuring 1-1/2″ x 5″ and flagged the ends (I wanted a super shallow “V” or I would’ve just used the Banner Framelits Dies from the Occasions catalog.) Then I sanded it down to reveal some of that lighter inner core. I took the Gold Baker’s Twine and peeled the gold striping off of it (super easy to do) to reveal the Vanilla twine underneath! Wrapped this around the banner piece, tied a bow and attached it to the rest of the card! The layer I attached it to is a piece of Very Vanilla Cardstock cut to 4″ x 5-1/4″ and embossed in the Big Shot Die Cutting Machine with the Alphabet Embossing Folder (one of my favorites)! I attached that to a Soft Sky base measuring 5-1/2″ x 8-1/2″ that I scored at 4-1/4″. The sanded banner piece was popped up on Stampin’ Dimensionals and the main focal point was popped up with double Stampin’ Dimensionals to reach the embossed piece and just one layer of Stampin’ Dimensionals where it was adhered to the sanded banner piece.
I hope you like it! It would be SUPER simple to make this card into a great girl or gender neutral card too!!! It’s a great sketch, so please play along with us over at the As You See It Challenge Blog! You have until Wednesday evening to get your entry in! Come check out what the other Design Team members have made too!!!


Hi! I’m so excited to get back to blogging and what better reason than some exciting news!!! I’ve been asked to be a part of the Design Team for the brand new challenge blog, As You See It Challenges! We’ll have a new challenge every week and I’m super excited because there are different types of challenges depending on the week. So sometimes you’ll have a sketch to work with, sometimes you’ll have a color combination, and other fun challenges yet to come. I’ve seen a sneaky peek of some of the first ones and I cannot wait to create using them!!! The first challenge begins on September 6th so stay tuned for that! You can get to know the Design Team up until we begin and my day for the Q&A is today. So head on over to www.AsYouSeeItChallenge.com and check it out…
Here’s the project I’m sharing over at the As You See It Challenge Blog in conjunction with my Q&A today:
![]()
One of my favorite cards I’ve made lately! I found this color combo on a polka dotted dress at JCPenney! This stamp set (Regarding Dahlias) was my first MUST HAVE stamp set in the new 2013-2014 Stampin’ Up! Annual Catalog. Pair that with chevrons and I’m a happy girl! (Side note: If you don’t have the Chevron Background Stamp, you need it! Chevron patterned paper in whatever color you want!!! Yes, please!) I also love the half circle element on the right side with layers and texture created with my beloved Big Shot Die-Cutting Machine! I am also constantly using a HOT trend in paper crafting, flagged ends! Love love love doing that on my sentiment layers. Of course, I had to put some ribbon on there and there are oodles of Stampin’ Dimensionals popping pieces up and creating depth in my project. Hope you enjoy it as much as I do!!! Check out below for the full supply list. If you click on an item, it will show you that item in my Stampin’ Up! Online Store. Please let me know if you have any questions or need anything! 🙂 Can’t wait to share more crafty goodness with you in the coming days!!!
STAMPS:
Regarding Dahlias (Wood-Mount 130324, Clear-Mount 130327)
Positively Chevron Background Stamp (Wood-Mount 130496, Clear-Mount 130499)
PAPER:
8-1/2″ x 11″ Whisper White Card Stock (100730)
8-1/2″ x 11″ Calypso Coral Card Stock (122925)
8-1/2″ x 11″ Crisp Cantaloupe Card Stock (131298)
8-1/2″ x 11″ Night of Navy Card Stock (100867)
INK:
Calypso Coral Classic Stampin’ Pad (126983)
Night of Navy Classic Stampin’ Pad (126970)
ACCESSORIES:
Whisper White 1/4″ Stitched Grosgrain Ribbon (126877)
SNAIL Adhesive (104332)
Multipurpose Liquid Glue (110755)
Stampin’ Dimensionals (104430)
TOOLS:
Stampin’ Trimmer (126889)
Simply Scored Scoring Tool (122334)
Bone Folder (102300)
Paper Snips (103579)
Craft Scissors (108360)
Stamp-a-ma-jig (101049)
Paper Piercing Tool (126189)
Stampin’ Pierce Mat (126199)
Essentials Paper-Piercing Pack (126187)
Big Shot Die-Cutting Machine (113439)
Circles Collection Framelits Dies (130911)
Circles #2 Originals Die (114526)
Perfect Pennants Bigz L Die (123126)
Perfect Polka Dots Textured Impressions Embossing Folders (117335)
Grid Paper (130148)
Stampin’ Scrub (126200)
Stampin’ Mist (102394)

Hi there! I hope you all had a wonderful and restful day with friends and family yesterday if you live here in the U.S. Thanksgiving this year more than any other year has really allowed me to reflect on what I am thankful for! One of the things I am most thankful is for each of you, my blog readers, customers, and friends – you have made it possible for me to live out my dreams with Stampin’ Up! I cannot thank you enough! I am so so richly blessed!
Stampin’ Up!’s Online Extravaganza is going on and today’s card uses a favorite of mine – Button Buddies. It is on sale 50% off until Wednesday, November 28th, so don’t miss out! Although the stamp set is intended to be used with buttons, I probably use it more without them than I do with. However, it is simply darling with buttons and the Brights Collection Designer Buttons (my favorite collection) are 30% off during the sale too!
Also, here’s a bonus Button Buddies card that I posted before…CLICK HERE if you want to be taken to the original post!

Continue to check back in the next 6 days for more ideas using items on sale during the Online Extravaganza! If you haven’t yet, you can click here to download the 3 page list of Stampin’ Up! products that are on sale up to 50% off!
I hope you enjoyed both cards using this FABULOUS stamp set! I CASEd the layout of the snowman card from my friend, Pam Steckman.
CLICK HERE to shop in my Online Store now and lock in these awesome prices!
Supply List for Button Buddies Snowman Card
STAMPS:
Button Buddies (Wood-Mount 122735, Clear-Mount 122737) 50% OFF!!!
Teeny Tiny Wishes (Wood-Mount 115370, Clear-Mount 127802)
PAPER:
8-1/2″ x 11″ Very Vanilla Card Stock (101650)
8-1/2″ x 11″ Cherry Cobbler Card Stock (119685)
8-1/2″ x 11″ Crumb Cake Card Stock (120953)
Festival of Prints Designer Series Paper Stack (126904)
INK:
Island Indigo Classic Stampin’ Pad (126986)
Basic Black Stampin’ Write Marker (100082)
Subtles Collection Stampin’ Write Markers (119700) – Bashful Blue
Cherry Cobbler Stampin’ Write Marker (119681)
Pumpkin Pie Stampin’ Write Marker (105115)
2011-2013 Stampin’ Write Markers (123002) – Island Indigo
OR Many Marvelous Markers (119806) – includes all markers, except the In Color Markers
ACCESSORIES:
Basic Rhinestone Jewels (119246) 30% OFF!!! $3.47 NOW!!!
Island Indigo Baker’s Twine (125575)
Multipurpose Liquid Glue (110755)
Stampin’ Dimensionals (104430)
TOOLS:
Tabletop Paper Cutter (106959) 30% OFF!!!
Simply Scored Scoring Tool (122334)
Bone Folder (102300)
Craft Scissors (108360)
Word Window Punch (119857)
Modern Label Punch (119849)
Big Shot Die-Cutting Machine (113439)
Window Frames Collection Framelits Dies (129021)
Grid Paper (102787)
Stampin’ Scrub (126200)
Stampin’ Mist (102394)

Hi there! Hope you’re all having a wonderful Halloween! I made a card to share with you that fits a lot of challenges online this week. Sure fun to get some ideas from other places – my favorite are sketches and color challenges and I used BOTH on this card. I would’ve NEVER thought to put So Saffron & Daffodil Delight together, but I LOVED them together. I stamped the “Happy Halloween” from the hostess set Wacky Wishes randomly on my So Saffron card stock in Daffodil Delight ink and that really helped pull those two yellows together! I also did a challenge that meant that you had to include bling, so I took my Stampin’ Up! Basic Rhinestone Jewels and colored them with a permanent black marker. Another fun challenge requires you to use supplies that are more than 6 months old – mine were my neglected colors So Saffron and Tangerine Tango, as well as the Whisper White Baker’s Twine and all of the circle punches!
One other tip is about the Candy Corn – I made it with a Whisper White 1/2″ circle punch, Tangerine Tango 1″ circle punch, and Daffodil Delight 1-3/8″ circle punch, centered and layered together. Then you cut wedges to make the individual Candy Corn pieces! So so simple! I also rounded all 3 corners so they looked even more like Candy Corn. Then I put them on Dimensionals and popped them in my little jar! I just love the Perfectly Preserved stamp set and Cannery framelits in the Holiday Catalog!!! There are so so many things that aren’t even in the stamp set, that you can fill that little jar with! 🙂
I hope you enjoy this project, as well as the Quick Tip Tuesday on using your embossing folders without the Big Shot. Such a fun technique! Give it a try and send me a picture of your creation! If you use all Stampin’ Up! goodies, I’d love to feature you and your project here as a guest stamper!
This card was entered into challenges at: Colour Q, Papertake Weekly, Brown Sugar, Fussy & Fancy Friday, Card Makin’ Mamas, Digistamps 4 Joy (vertical line 1), Stampin’ for the Weekend, Crafts and Me, Party Time Tuesdays, Fab n Funky, Scrappy Frogs, Inspire Me Fridays, A Gem of a Challenge, Frosted Designs Fabulous Friday, 2 Sisters, My Time to Craft, Oldie But a Goodie, Wags n Whiskers, The Artistic Stamper, The Sisterhood of Crafters, Dream Valley, Paper Pretties, and Creative Craft Challenges!
Supply List
STAMPS:
Perfectly Preserved (Wood-Mount 126690, Clear-Mount 126692)
Teeny Tiny Wishes (Wood-Mount 115370, Clear-Mount 127802)
Wacky Wishes Hostess Set (Wood-Mount 126410, Clear-Mount 126412) – available with a $150 party or order!
PAPER:
8-1/2″ x 11″ Whisper White Card Stock (100730)
8-1/2″ x 11″ Basic Black Card Stock (121045)
8-1/2″ x 11″ Daffodil Delight Card Stock (119683)
8-1/2″ x 11″ So Saffron Card Stock (105118)
8-1/2″ x 11″ Tangerine Tango Card Stock (111349)
Howlstooth & Scaringbone Designer Series Paper (126906)
INK:
Daffodil Delight Classic Stampin’ Pad (126944)
Tangerine Tango Classic Stampin’ Pad (126946)
Jet Black StazOn Ink Pad (101406)
ACCESSORIES:
Whisper White Baker’s Twine (124262)
Basic Rhinestone Jewels (119246)
Multipurpose Liquid Glue (110755)
Stampin’ Dimensionals (104430)
TOOLS:
Tabletop Paper Cutter (106959)
Simply Scored Scoring Tool (122334)
Bone Folder (102300)
Paper Snips (103579)
Craft Scissors (108360)
Brayer (102395)
1/2″ Circle Punch (119869)
1″ Circle Punch (119868)
1-3/8″ Circle Punch (119860)
Big Shot Die-Cutting Machine (113439)
Cannery Set Framelits Dies (127822)
Bitty Banners Framelits Dies (129267)
Perfect Polka Dots Textured Impressions Embossing Folder (117335)
Stripes Textured Impressions Embossing Folder (123128)
Grid Paper (102787)
Stampin’ Scrub (126200)
Stampin’ Mist (102394)
StazOn Cleaner (109196)
Permanent Black Marker (non-SU!)

Hey! Today’s card is not my own design – I totally copied it from the Stampin’ Up! home office team. I’ve seen a few of them floating around thanking demonstrators for presenting at Convention or our more recent Regional Conferences. I changed VERY little as I LOVED it exactly how it was. The original card used Sassy Salutations which I don’t own, so I substituted the Hostess-only stamp set Wacky Wishes. (I also thought that the “Thank You” from Curly Cute would also work but hadn’t used Wacky Wishes yet!) Also, the sentiment on the original seems to be stamped in Basic Black, where I just stuck with the color scheme and used Midnight Muse. One of my favorite things about this card? That it uses the fabulous polka dot leftovers from the Daydream Medallions stamp set (see what I mean in THIS VIDEO). I also wanted to show you the Crumb Cake envelope that I stamped to match too! And don’t forget, this ribbon is just one of five colors you can choose from with this month’s Back to Spool promotion where you’ll get a FREE roll with every $40 spent!!!
Supply List
STAMPS:
Daydream Medallions (Wood-Mount 126465, Clear-Mount 126467)
Wacky Wishes (Wood-Mount 126410, Clear-Mount 126412)
PAPER:
8-1/2″ x 11″ Crumb Cake Card Stock (120953)
8-1/2″ x 11″ More Mustard Card Stock (100946)
8-1/2″ x 11″ Primrose Petals Card Stock (126841)
First Edition Designer Series Paper (121878)
Crumb Cake Medium Envelopes (107297)
INK:
Daffodil Delight Classic Stampin’ Pad (126944)
Midnight Muse Classic Stampin’ Pad (126860)
More Mustard Classic Stampin’ Pad (126964)
Primrose Petals Classic Stampin’ Pad (126858)
VersaMark (102283)
ACCESSORIES:
In Color Dahlias (127556)
Midnight Muse 3/8″ Stitched Satin Ribbon (126847)
SNAIL Adhesive (104332)
Multipurpose Liquid Glue (110755)
Mini Glue Dots (103683)
Stampin’ Dimensionals (104430)
TOOLS:
Tabletop Paper Cutter (106959)
Simply Scored Scoring Tool (122334)
Bone Folder (102300)
Craft Scissors (108360)
Elegant Butterfly Punch (127526)
1-3/8 Square Punch (119877)
Big Shot Die-Cutting Machine (113439)
Floral Frames Framelits Dies (127012)
Grid Paper (102787)
Stampin’ Scrub (126200)
Stampin’ Mist (102394)
Hi there! Today’s belated Quick Tip Tuesday is just my take on a super cute project idea from Stampin’ Up! Convention 2012. September is a perfect month for it as you can choose a roll of our 3/8″ Stitched Satin Ribbon for every $40 increment you spend. Get out those ribbon scraps and make some fun ribbon cards or scrapbook pages incorporating this technique today!!!

Hi there! I hadn’t used my Ornament Keepsakes stamp set from Stampin’ Up!’s Holiday Catalog so I inked that up for this Christmas card, featuring the Be of Good Cheer Designer Series Paper. The paper coordinates with Gumball Green, Cherry Cobbler, and Very Vanilla so those are the main colors I used, but I also added in some Certainly Celery which I picked up from the polka dotted pattern. After I’d already glued the patterned papers down, I wished I had put the polka dotted paper in front but too late! There is also a bit of glitter on the main image – I used my Two-Way Glue Pen to apply dots within the ornament’s design and then put some of the Dazzling Diamonds glitter on it before the glue dried! So pretty in real life – sorry you can’t see it in the picture very well. Also I attached the tiny sentiment with a Vintage Trinket safety pin – I’ve had them for a while but I’ve used the brads and not the pins…gotta use the pins more as I LOVE the look on this card! I pinned it through the seam binding ribbon, which is my favorite ribbon to tie into a bow – very easy to manipulate and not heavy so this card should still be mailable. However, the number of layers on this card might make it over the weight limit!!! 🙂 I hope you enjoyed my first challenge card I’ve done since having a blog. Combining so many challenges, really forced me to stretch my creativity and I LOVED it!!! But I didn’t get my Tool Time Thursday video done yet so I’ll work on that!
This card was entered into challenges at: My Time to Craft, Papertake Weekly, Mojo Monday, Forever Friends, 365 Cards, Stamp-n-Doodle, House of Gilli, Craft Your Days Away, Whimsy Inspirations, No Matter Which, Whoopsie Daisy, Just Some Lines, and Paper Crafting Journey.
Supply List
STAMPS:
Ornament Keepsakes Bundle (Wood-Mount 129949, Clear-Mount 129950) – includes matching Holiday Ornaments Framelits!!! (You can buy the stamp set solo, but you get a 15% discount if you buy them together!)
Tiny Tags (Wood-Mount 118091, Clear-Mount 118592)
PAPER:
8-1/2″ x 11″ Very Vanilla Card Stock (101650)
8-1/2″ x 11″ Certainly Celery Card Stock (105125)
8-1/2″ x 11″ Cherry Cobbler Card Stock (119685)
8-1/2″ x 11″ Gumball Green Card Stock (126840)
Be of Good Cheer Designer Series Paper (126896)
INK:
Gumball Green Classic Stampin’ Pad (126861)
ACCESSORIES:
Dazzling Diamonds Stampin’ Glitter (102023)
Vintage Trinkets Button Brads & Safety Pins (118764)
1/2″ Cherry Cobbler Seam Binding (120992)
Multipurpose Liquid Glue (110755)
2-Way Glue Pen (100425)
Stampin’ Dimensionals (104430)
TOOLS:
Tabletop Paper Cutter (106959)
Simply Scored Scoring Tool (122334)
Bone Folder (102300)
Craft Scissors (108360)
Paper Piercing Tool (126189)
Stampin’ Pierce Mat (126199)
Festive Paper-Piercing Pack (127857)
Jewelry Tag Punch (117190)
Scallop Edge Border Punch (119882)
Big Shot Die-Cutting Machine (113439)
Ornament Keepsakes Bundle (Wood-Mount 129949, Clear-Mount 129950) – includes matching Ornament Keepsakes stamp set!!! (You can buy the framelits solo, but you get a 15% discount if you buy them together!)
Window Frames Collection Framelits Dies (129021)
Grid Paper (102787)
Stampin’ Scrub (126200)
Stampin’ Mist (102394)
I hope you enjoy today’s video on how to cut out a stamped image with a Framelits Die and the Big Shot. Many of our Stampin’ Up! stamps are designed to coordinate with Framelits dies and I couldn’t be more thrilled to see a 15% discount on the Bundles that include a stamp set and matching Framelits dies in the Holiday Catalog! I’ll list all the bundles that are discounted below, and highlight the 4 that are stamp sets and matching Framelits. My other favorite bundle: the Ghoulish Googlies bundle! You’ll see that in an upcoming post soon! (You can click on any of the links to see the products in my online store.) Leave a comment below and let me know what your favorite bundle is!!! 🙂
Holiday Catalog Bundles
Ornament Keepsakes Bundle (Wood-Mount 129949, Clear-Mount 129950)
Scentsational Season Bundle (Wood-Mount 129945, Clear-Mount 129946)
Noel Notes Bundle (129909)
Everyday Happenings Bundle (129936)
Ghoulish Googlies Bundle (Wood-Mount 129852, Clear-Mount 129853)
Perfectly Preserved Bundle (Wood-Mount 129943, Clear-Mount 129944)
Friendship Preserves Bundle (Wood-Mount 129947, Clear-Mount 129948)
Remember December Digital Collection Disc (129836)
Haunts & Harvest Digital Collection Disc (129835)
Connect with Me!


