
Currently viewing the tag: "As You See It Challenge"
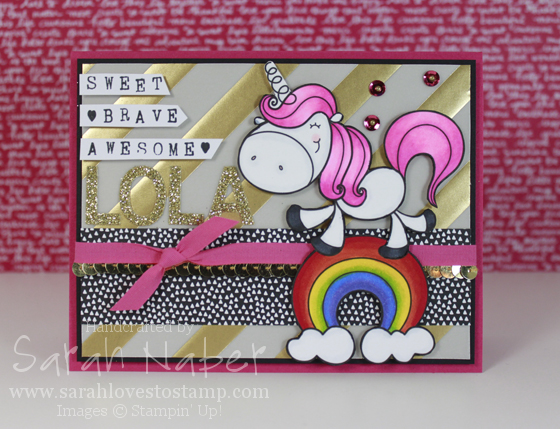
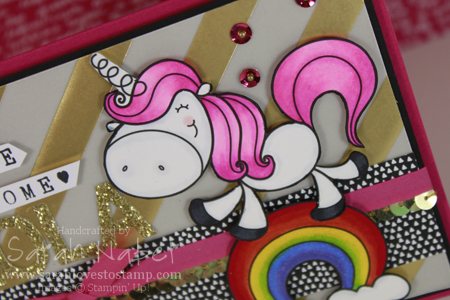
This is an extra special week of the As You See It Challenge! I’m honored to be participating in Lola’s Challenge! My best friend, Tara, has a sweet niece named Lola who has been battling cancer for several years now. She just had a stem cell transplant and was in the ICU when we decided to do something special for her. Since she was in the ICU, we decided a virtual card shower would be better than sending her cards…possibly with bad germs!
So here’s the challenge…before Wednesday, October 21st make a card with something for Lola. Gold for Childhood Cancer Awareness. Unicorns, fairies and pink are all things Lola loves! CLICK HERE to head on over to the As You See It Challenge site! Check out the other Design Team cards and PLEASE make and enter your own card for Lola! It’s so simple – you can pretty much put it anywhere online (as long as it’s public) and then just paste the link to enter your card! I set a goal of 100 cards for Lola so please share with everyone you know!

So that brings me to the card. I knew I wanted to include an image of one of Lola’s favorite things but I didn’t have any stamps with a unicorn or fairy…so I turned to the internet. A few searches and some really great things popped up! I chose this adorable Lucky Unicorn image from the Etsy shop 2CuteInk! Love it! I also found some great paper piecing files if you love to fussy cut or have a digital cutter. Or go with the fairy punch art route. If you want to play along, you can also use a FREE digi stamp too!
Besides the digi stamp and Copics I colored it with, everything is Stampin’ Up! I even used my new alphabet rotary stamp for the first time on this project! (Thanks for telling me I *had* to buy it, Amy!)
*I’ll be back with the supply list and measurements soon! 🙂

Hi there! I’m sorry for my extended absence! I have been sick sick sick over here at the casa de Naber! Yuck!!! Thankfully, I’m finally feeling on the mend and was very excited to get back into my stamp room and create for you! Check out my card using the super cute, Baby Prints Stamp Set! This one is an oldie but a goodie, debuting about a year ago and ending up in our fantastic 2013-2014 Annual Catalog! I used the sketch from the As You See It Challenge Blog and a color combo perfect for a baby boy from over at Cupcake Inspirations!
This card came together pretty quickly! I stamped the feet in Soft Sky ink, then stamped the splatters from Gorgeous Grunge over the top in Pear Pizzazz. I used my Stamp-a-ma-jig to insure perfect placement of my sentiment which I stamped in Pear Pizzazz. You’ll notice the sketch has a banner below it – I totally planned to do that until I was assembling my final card which is when I realized my focal point was so large there wasn’t room for the sentiment below it! So technically, I stamped the sentiment last! 🙂 Had I known this would be an issue, I would’ve “stamped off” the Pear Pizzazz splatters before stamping them onto my project so the sentiment would stand out even more. As it was, the splatters were done full strength so I actually left my handy Stamp-a-ma-jig handle where it was after stamping the sentiment the first time and stamped it again, in exactly the same spot, to make it just a tad darker! Maybe that’s a new trick for you! It’s like the opposite of stamping off! Double inking let’s call it!
Anyway, I cut it out with the 4th largest Square framelit and then used the largest Square framelit that is scalloped to make a smaller scalloped square. I’ll have to make a video for that soon! I’ll insert it into this post when I do! I just cut the square that mats that one to be a tiny bit larger. Then I took a piece of Pear Pizzazz Core’dinations Cardstock (from the Subtles Collection Pack) measuring 1-1/2″ x 5″ and flagged the ends (I wanted a super shallow “V” or I would’ve just used the Banner Framelits Dies from the Occasions catalog.) Then I sanded it down to reveal some of that lighter inner core. I took the Gold Baker’s Twine and peeled the gold striping off of it (super easy to do) to reveal the Vanilla twine underneath! Wrapped this around the banner piece, tied a bow and attached it to the rest of the card! The layer I attached it to is a piece of Very Vanilla Cardstock cut to 4″ x 5-1/4″ and embossed in the Big Shot Die Cutting Machine with the Alphabet Embossing Folder (one of my favorites)! I attached that to a Soft Sky base measuring 5-1/2″ x 8-1/2″ that I scored at 4-1/4″. The sanded banner piece was popped up on Stampin’ Dimensionals and the main focal point was popped up with double Stampin’ Dimensionals to reach the embossed piece and just one layer of Stampin’ Dimensionals where it was adhered to the sanded banner piece.
I hope you like it! It would be SUPER simple to make this card into a great girl or gender neutral card too!!! It’s a great sketch, so please play along with us over at the As You See It Challenge Blog! You have until Wednesday evening to get your entry in! Come check out what the other Design Team members have made too!!!


Hi there!!! Are you enjoying my Friday posts for the As You See It Design Team? I’m sure enjoying making these projects with the awesome inspiration from the challenge blog. I combined this week’s color challenge with a few other ones so I’ll list those below. 🙂
Super simple card for you today! I LOVE the sketch from over at Retro Sketches and I thought a simple layout would be best for this bright and funky color combination of Pumpkin Pie, Crushed Curry, and Gumball Green. I only used ONE stamp set on this project! (Ok, that’s like, a miracle for me!) I’ve been loving the fun and surprise of getting a new Best of set each month featuring a theme and best selling stamps fitting that theme from the 25 years SU! has been in business!!! The set I used here was the Best of Autumn! LOVE, LOVE, LOVE! *Side Note: The Best of Christmas released on October 1st and is going to have to be mine!!! It’s so awesome!
As far as details, I have just a couple here. The greeting was stamped in VersaMark and heat embossed with White Stampin’ Emboss Powder onto the Gumball Green cardstock. I added a couple of pearls to mimic the dots in the sketch. Then I used a temporary adhesive to layer the Gumball Green cardstock piece onto my leaf stamped Whisper White panel and used straight piercing template from the Essentials Paper-Piercing Pack (along with a Paper Piercer and Stampin’ Pierce Mat) to pierce holes that would outline the Gumball Green piece. It’s easier to see in person. Then I popped the Gumball Green piece up on Stampin’ Dimensionals and onto the Whisper White piece. This whole panel then was glued to a Pumpkin Pie card base. I tied some Whisper White Stitched Grosgrain Ribbon around the top to finish it off! (I did a bow instead of a knot this time to add a little more weight on the left side of the card to balance it a bit more.)
Head on over to the As You See It Challenge Blog and play along!!!

This card was entered into challenges at: Retro Sketches, Tuesday Throwdown, Dream Valley Challenges, Moving Along with the Times, Creative Craft Challenges 2, Pile It On Challenge, and Loves Rubber Stamps.
Supply List
STAMPS:
Best of Autumn (Clear-Mount ONLY 134390)
***Note: Buy 6 of the Best of… Stamp Sets and get any set $14.95 or under for FREE!***
PAPER:
8-1/2″ x 11″ Whisper White Cardstock (100730)
8-1/2″ x 11″ Gumball Green Cardstock (126840)
8-1/2″ x 11″ Pumpkin Pie Cardstock (105117)
INK:
Crushed Curry Classic Stampin’ Pad (131173)
Gumball Green Classic Stampin’ Pad (126861)
Pumpkin Pie Classic Stampin’ Pad (126945)
VersaMark (102283)
ACCESSORIES:
Basic Pearl Jewels (119247)
1/4″ Whisper White Stitched Grosgrain Ribbon (126877)
Multipurpose Liquid Glue (110755)
Stampin’ Dimensionals (104430)
TOOLS:
Stampin’ Trimmer (126889)
Simply Scored Scoring Tool (122334)
Bone Folder (102300)
Craft Scissors (108360)
Stamp-a-ma-jig (101049)
Paper Piercing Tool (126189)
Stampin’ Pierce Mat (126199)
Essentials Paper-Piercing Pack (126187)
White Stampin’ Emboss Powder (109132)
Heat Tool (129053)
Grid Paper (102787)
Stampin’ Scrub (126200)
Stampin’ Mist (102394)

I have a little bit of a double feature for you today! I started to make the Thank You card first and it just wasn’t working out for me, so I scrapped it and made the Thanksgiving card. I had the idea to replicate the space in the strip on the sketch with a punch and this punch and stamp set from the Holiday Catalog were a perfect match for the idea I had! I LOVED our sketch this week over at As You See It Challenges, so I hope you’ll join in and be inspired for our 2nd challenge EVER! 🙂 Click here and bookmark http://www.asyouseeitchallenge.com for new challenges every Friday! 🙂
A couple of little details about the first card…I used the Sweater Weather Designer Series Paper for the snappy, masculine-friendly patterned papers. I also stamped the outline oak leaf Gently Falling stamp (Love this versatile stamp set! Use just the solid parts, just the outlines or use them together!) in VersaMark and embossed with clear embossing powder. I stamped the main focal point from the Tags 4 You stamp set in the Holiday Catalog in Chocolate Chip ink on Crushed Curry card stock. If you look closely, you can see it’s shiny! Why? Because I used clear embossing powder and embossed quickly, before the ink could dry. Traditionally, you can’t emboss with dye based inks, but our new ink pad design (updated in June 2012) makes for juicy, but still fairly quick drying images that will accept the embossing powder! Just heat it up quick and you’re good to go! I cropped it out with the matching punch. The final touch was two Tangerine Tango Candy Dots and Candy Dot Brad Bases! I LOVE these!!!

On to my 2nd card…the problem card! I so badly wanted to use Stippled Blossoms as I’ve had it for about a year and never used it! (*GASP*) The sentiment is embossed with Pool Party Embossing Powder and the edges of the stamped panels are sponged with Pool Party ink to make them stand out against the Whisper White background. In the moments before I was going to throw it away, I had a brain wave to add the Perfect Polka Dots Textured Impressions Embossing Folder to the front of the card and the Whisper White taffeta ribbon too! I ended up with a card that I really, really like! *Crafting lesson: If a project isn’t going the way you’d like it to, put it down and move on to something else! Pick it up later and try to rework it into something you’re happy with! 🙂
Now for the sketch!

Supply List – Thanksgiving Card
STAMPS:
Gently Falling (Wood-Mount 128430, Clear-Mount 123804)
Tags 4 You (Wood-Mount 131820, Clear-Mount 131823) *Holiday Catalog*
Buy the Tags 4 You stamp set with the Label Bracket Punch in a Bundle and save 15%! (Wood-Mount Bundle 133293, Clear-Mount Bundle 133294)
PAPER:
8-1/2″ x 11″ Chocolate Chip Card Stock (102128)
8-1/2″ x 11″ Crushed Curry Card Stock (131199)
8-1/2″ x 11″ Tangerine Tango Card Stock (111349)
Sweater Weather Designer Series Paper (132184) *Holiday Catalog*
INK:
Chocolate Chip Classic Stampin’ Pad (126979)
VersaMark (102283)
ACCESSORIES:
Brights Candy Dots (130931)
Candy Dots Brad Bases (132293)
Clear Stampin’ Emboss Powder (109130)
Multipurpose Liquid Glue (110755)
Stampin’ Dimensionals (104430)
TOOLS:
Stampin’ Trimmer (126889)
Simply Scored Scoring Tool (122334)
Bone Folder (102300)
Heat Tool (129053)
Paper Piercing Tool (126189)
Stampin’ Pierce Mat (126199)
Label Bracket Punch (132153) *Holiday Catalog*
Grid Paper (102787)
Stampin’ Scrub (126200)
Stampin’ Mist (102394)
Supply List – Thank You Card
STAMPS:
Stippled Blossoms (Wood-Mount 132076, Clear-Mount 126747)
Perfectly Penned (Wood-Mount 128703, Clear-Mount 122892)
PAPER:
8-1/2″ x 11″ Whisper White Card Stock (100730)
8-1/2″ x 11″ Pool Party Card Stock (122294)
INK:
Coastal Cabana Classic Stampin’ Pad (131175)
Pool Party Classic Stampin’ Pad (126982)
VersaMark (102283)
ACCESSORIES:
3/8″ Whisper White Taffeta Ribbon (109070)
Pool Party Stampin’ Emboss Powder (129398)
Stampin’ Dimensionals (104430)
TOOLS:
Stampin’ Trimmer (126889)
Simply Scored Scoring Tool (122334)
Bone Folder (102300)
Heat Tool (129053)
Craft Scissors (108360)
Stamping Sponges (101610)
Big Shot Die-Cutting Machine (113439)
Perfect Polka Dots Textured Impressions Embossing Folders (117335)
Grid Paper (102787)
Stampin’ Scrub (126200)
Stampin’ Mist (102394)

The day is finally here! Our first sketch from the As You See It Challenge site is up, as well as all of the Design Team Members creations with it!!! I hope you’ll take the time this weekend to play along! We cannot wait to see what you’ve created. (If you have no idea what I’m talking about, check out my announcement HERE.)
If you read my Design Team Q&A, you know I said that my favorite stamp set is Gorgeous Grunge, but that I hadn’t actually inked it up! Sounds crazy, right? Well, I couldn’t wait to use it for this challenge!!! I paired up the sketch from our As You See It Challenge #001 with a color combination from the Stampin’ Up! Color Coach of Island Indigo, Basic Gray, and Elegant Eggplant.
Some details: I sponged some Whisper White Craft Ink around the edges of the Basic Gray mat and the Island Indigo flags to really make them pop. I also dyed some Whisper White Baker’s Twine with a mixture of Basic Gray Classic Ink Refill and rubbing alcohol. Stay tuned for a video on how to do this! Another little detail – the diagonal stripe stamp is stamped in Island Indigo, then onto a scratch piece of paper then onto the project. This technique, called stamping off, makes the image a little less bold and is great for collage stamping like this. The sentiment, from Hello, Lovely, was stamped on Whisper White and cut out with the Paper Snips. Did you see the Elegant Eggplant button? It’s from the brand new, redesigned Regals Collection Designer Buttons! They are better than ever! LOVE them!!! Also, the Gray and White chevron pattern (used for the flags) are from the I Am Me Designer Series Paper – one of my favorites in the 2013-2014 Annual Catalog! Lastly, the Island Indigo flags were embossed with the Alphabet Press Embossing Folder and the Big Shot. It’s a bit difficult to see in the picture but it’s beautiful in real life.
Check out the sketch I used to create my project below! The full supply list with links to the items in my Stampin’ Up! Store are below the sketch. I really hope you play along at the first ever As You See It Challenge! Check it out at the As You See It Challenge Blog!!!

Supply List
STAMPS:
Gorgeous Grunge (Wood-Mount 130514, Clear-Mount 130517)
Hello, Lovely (Wood-Mount 130240, Clear-Mount 130243)
PAPER:
8-1/2″ x 11″ Whisper White Card Stock (100730)
8-1/2″ x 11″ Basic Gray Card Stock (121044)
8-1/2″ x 11″ Elegant Eggplant Card Stock (105126)
8-1/2″ x 11″ Island Indigo Card Stock (122923)
I Am Me Designer Series Paper (130138)
INK:
Basic Gray Classic Stampin’ Pad (126981)
Elegant Eggplant Classic Stampin’ Pad (126969)
Island Indigo Classic Stampin’ Pad (126986)
Whisper White Craft Stampin’ Pad (101731)
Basic Gray Classic Ink Refill (109121)
ACCESSORIES:
Regals Collection Designer Buttons (130029)
Whisper White Baker’s Twine (124262)
SNAIL Adhesive (104332)
Multipurpose Liquid Glue (110755)
Mini Glue Dots (103683)
Stampin’ Dimensionals (104430)
TOOLS:
Stampin’ Trimmer (126889)
Simply Scored Scoring Tool (122334)
Bone Folder (102300)
Paper Snips (103579)
Craft Scissors (108360)
Stamping Sponges (101610)
Big Shot Die-Cutting Machine (113439)
Alphabet Press Textured Impressions Embossing Folders (130916)
Grid Paper (102787)
Stampin’ Scrub (126200)
Stampin’ Mist (102394)
Rubbing Alcohol
Connect with Me!


