
Currently viewing the tag: "Background Stamps"
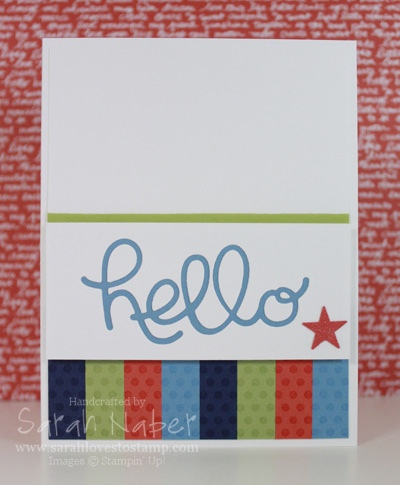
This bright card was a creation that blended the challenges from Colour Q Challenges and Retro Sketches this week! I LOVED both and wanted to make one more project to show at a mini tool demonstration I did at a team meeting last night. My tips were all about die cuts, specifically ones with more than just 2 pieces when the cut is complete. I’m planning on filming some videos on the tips I shared so those will go up on the blog as soon as I get them done (I’m nursing some dry, broken cuticles back to health before I can film).
 I’ve still been loving fun foam for popping up larger panels. I still use Stampin’ Dimensionals for most things but I know the fun foam for large panels holds up better if the card is going to be mailed. I’ve rediscovered my love for my ATG (Advanced Tape Glider) so I use that to adhere the fun foam to my cardstock, but any strong adhesive should work well. I have used Stampin’ Up!’s Tear & Tape, as well as Fast Fuse with good results!
Cut List
Thick Whisper White Cardstock: 8-1/2″ x 5-1/2″, scored at 4-1/4″; 4″ x 1-3/4″
Whisper White Cardstock: 4″ x 5-1/4″ (no reason you couldn’t use the Thick here – I already had panels cut to this size)
Marina Mist Cardstock: 3-3/4″ x 1-1/2″, 2 strips at 1/2″ x 1-3/4″
Tangerine Tango, Pear Pizzazz, and Night of Navy Cardstock: 2 strips each at 1/2″ x 1-3/4″
How To
1.Die cut Whisper White strip with ‘hello’ die from Hello You Thinlits Dies. Adhere a piece of Marina Mist cardstock to the back of strip.
2. Place regular word die cut (positive image) back into the cut strip to guide where to glue missing pieces in (the loops of the ‘h’ and both ‘l’s, and centers into the ‘e’ and ‘o’). *TIP: I use Multipurpose Liquid Glue (and a tweezers) for this but it is VERY important that you don’t get too much on the small pieces or it’ll squish out and adhere the positive image onto the Marina Mist too!
3. Adhere small colored cardstock strips to the bottom of Whisper White layer. Stamp Dots for Days Background Stamp (RETIRING) in VersaMark ink. Here’s another card using the Dots for Days Background Stamp!
4. Use SNAIL to adhere 1/4″ Pear Pizzazz Cotton Ribbon (RETIRING) about 3″ above the bottom of the card. Fold ends onto back. *TIP: I much prefer folding the ends of the ribbon onto the back of the card and securing them with Scotch tape to trimming the ribbon off at the edges. It often frays if it’s trimmed so taping it onto the back prevents this.
5. Adhere panel onto card base (I used Fast Fuse).
6. Use fun foam to pop up sentiment panel onto card front.
7. Cover a small area of a Tangerine Tango cardstock scrap with the clear Wink of Stella Glitter Brush pen. Punch star from Itty Bitty Accents Punch Pack (RETIRING) and adhere to card.
It’s really a pretty simple bright card, great for a masculine or kid’s card. It would also be super easy to make this into a more feminine card with a different color combo and a little heart (like in the original sketch). I was tempted to add some Candy Dots (RETIRING) or sequins to it but didn’t want to disrupt the white space, as I LOVE this sketch. I think I’ll have to use it again.
I have made all the retiring items in red letters, just so you don’t miss out on something you love! The Stampin’ Up! Retiring List is while supplies last for everything except stamps (they’ll be produced until May 22nd) and the last day to order these products will be May 31st. I’m a collector of background stamps and I think the Dots for Days is simply a MUST HAVE!
If you’re interested in checking out the retiring products in my Online Store,
simply CLICK HERE!
Hello! Today I’m getting my As You See It Challenge card posted! A few days late but I’m getting closer to getting back on schedule! This one was tricky as Stampin’ Up! has retired our edgelits and edge punches so I had several ideas swirling around on how to create the “ruffled” look. Check out the other Design Team gals’ creations at the As You See It Challenge Blog HERE! Check out Amy’s use of the fringe scissors…she’s a total genius! As for me, I ended up using the Envelope Punch Board to make my zig zag/ric rac look. Watch for a video on that coming soon!
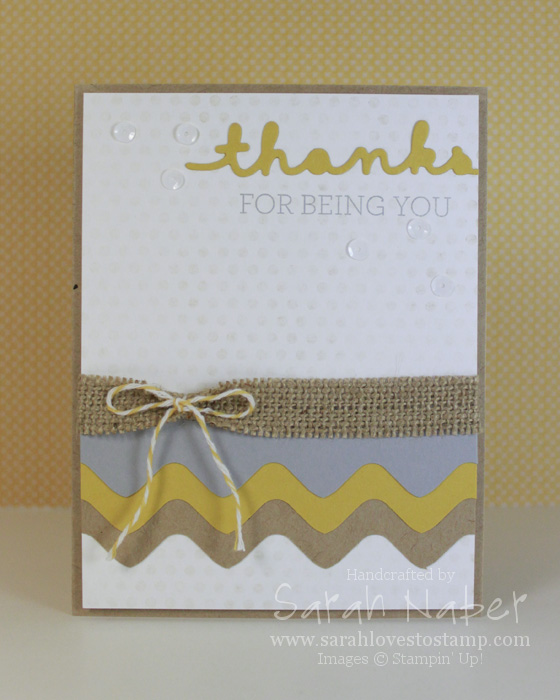
I also combined the sketch challenge from AYSI with the Color Throwdown Challenge for this week! I LOVE the color combination here – I normally never do browns with blacks or greys so this really was a challenge for me! A tricky detail to see is the white sequins I’ve used to really draw the eye to the sentiment. I’m obsessed with these Greetings Thinlits Dies! They are fantastic – wonderful size and great font!
Cut List
Kraft 12″x12″ Cardstock: 8-1/2″ x 5-1/2″, scored at 4-1/4″, scrap 2″ x 5-1/2″ (cut to width after punching)
Whisper White Cardstock: 4″ x 5-1/4″
Delightful Dijon Cardstock: scrap 2″ x 5-1/2″ (cut to width after punching)
Smoky Slate Cardstock: scrap 2″ x 5-1/2″ (cut to width after punching)
Built for Free Using: My Stampin Blog
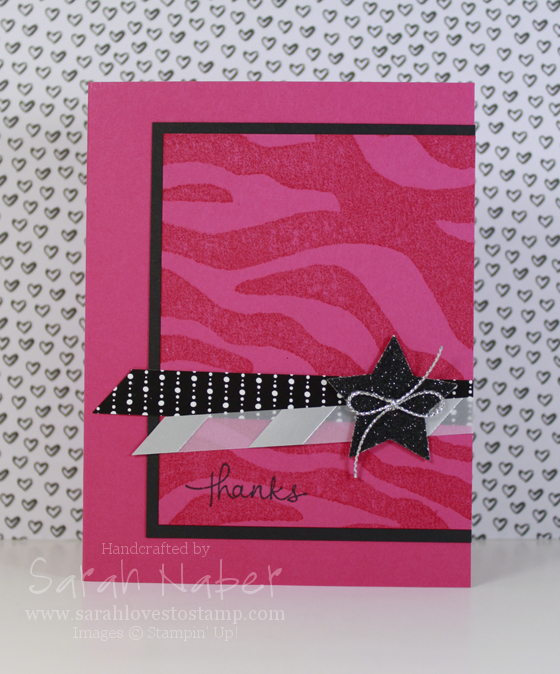
Oh how I love this sketch! I hope you’ll play along! I needed a thank you for my customers so I’m creating this card in a few different colors. I’ll post a picture of the finished cards later, or check out my Facebook and Instagram for an instant look!
Anyway, this card is pretty simple. Melon Mambo layer is stamped with the It’s Wild Background Stamp in Melon Mambo ink. The sentiment is from Endless Thanks and is stamped in Memento Tuxedo Black. And that’s all the stamping on this one!
The medium star punch was used to crop it out of the Black Glimmer Paper. It’s retiring! Did you see that? I’m so so sad! I LOVE it for so much more than Halloween. A piece of the Wonderland DSP (see how versatile it is?) and Silver Foil Vellum were added and then the star popped on top with Stampin’ Dimensionals. Check below for the cut list, as well as the supplies too!
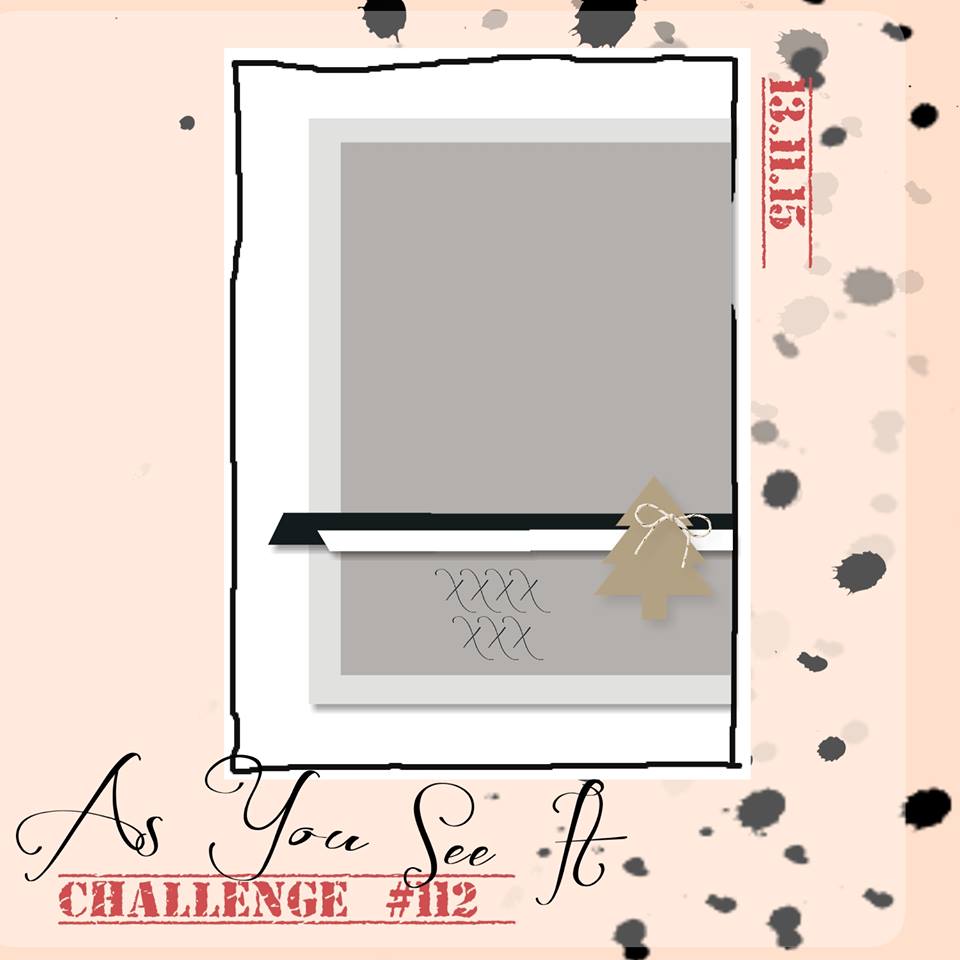
I hope you’ll play along with us this week at the As You See It Challenge! This sketch is a great, simple one for ANY card! Lots of Christmas inspiration from the Design Team so head on over to the As You See It Challenge Blog and check it out!
Cut List
Melon Mambo: 5-1/2″ x 8-1/2″, scored at 4-1/4″; 3-3/8″ x 4-1/4″
Basic Black: 3-1/2″ x 4-1/2″
Silver Foil Vellum: 3/8″ wide
Black DSP: 1/2″ wide
Built for Free Using: My Stampin Blog
Hi! I’m so excited to get back to blogging and what better reason than some exciting news!!! I’ve been asked to be a part of the Design Team for the brand new challenge blog, As You See It Challenges! We’ll have a new challenge every week and I’m super excited because there are different types of challenges depending on the week. So sometimes you’ll have a sketch to work with, sometimes you’ll have a color combination, and other fun challenges yet to come. I’ve seen a sneaky peek of some of the first ones and I cannot wait to create using them!!! The first challenge begins on September 6th so stay tuned for that! You can get to know the Design Team up until we begin and my day for the Q&A is today. So head on over to www.AsYouSeeItChallenge.com and check it out…
Here’s the project I’m sharing over at the As You See It Challenge Blog in conjunction with my Q&A today:
![]()
One of my favorite cards I’ve made lately! I found this color combo on a polka dotted dress at JCPenney! This stamp set (Regarding Dahlias) was my first MUST HAVE stamp set in the new 2013-2014 Stampin’ Up! Annual Catalog. Pair that with chevrons and I’m a happy girl! (Side note: If you don’t have the Chevron Background Stamp, you need it! Chevron patterned paper in whatever color you want!!! Yes, please!) I also love the half circle element on the right side with layers and texture created with my beloved Big Shot Die-Cutting Machine! I am also constantly using a HOT trend in paper crafting, flagged ends! Love love love doing that on my sentiment layers. Of course, I had to put some ribbon on there and there are oodles of Stampin’ Dimensionals popping pieces up and creating depth in my project. Hope you enjoy it as much as I do!!! Check out below for the full supply list. If you click on an item, it will show you that item in my Stampin’ Up! Online Store. Please let me know if you have any questions or need anything! 🙂 Can’t wait to share more crafty goodness with you in the coming days!!!
STAMPS:
Regarding Dahlias (Wood-Mount 130324, Clear-Mount 130327)
Positively Chevron Background Stamp (Wood-Mount 130496, Clear-Mount 130499)
PAPER:
8-1/2″ x 11″ Whisper White Card Stock (100730)
8-1/2″ x 11″ Calypso Coral Card Stock (122925)
8-1/2″ x 11″ Crisp Cantaloupe Card Stock (131298)
8-1/2″ x 11″ Night of Navy Card Stock (100867)
INK:
Calypso Coral Classic Stampin’ Pad (126983)
Night of Navy Classic Stampin’ Pad (126970)
ACCESSORIES:
Whisper White 1/4″ Stitched Grosgrain Ribbon (126877)
SNAIL Adhesive (104332)
Multipurpose Liquid Glue (110755)
Stampin’ Dimensionals (104430)
TOOLS:
Stampin’ Trimmer (126889)
Simply Scored Scoring Tool (122334)
Bone Folder (102300)
Paper Snips (103579)
Craft Scissors (108360)
Stamp-a-ma-jig (101049)
Paper Piercing Tool (126189)
Stampin’ Pierce Mat (126199)
Essentials Paper-Piercing Pack (126187)
Big Shot Die-Cutting Machine (113439)
Circles Collection Framelits Dies (130911)
Circles #2 Originals Die (114526)
Perfect Pennants Bigz L Die (123126)
Perfect Polka Dots Textured Impressions Embossing Folders (117335)
Grid Paper (130148)
Stampin’ Scrub (126200)
Stampin’ Mist (102394)

“But I’m not creative…” That short phrase is probably one I hear more than any other as a demonstrator! I hear it at classes I teach, at workshops, and in the community when I tell people what I do and say they can do it too! Creativity is a tricky thing – I understand not feeling creative! I know some of my peers have more creativity in their pinky finger than I do in my entire body. But I love doing what I do, so my response is always the same! You don’t have to be creative to create things and to enjoy the process!
This card is a GREAT example of that! I used a color combination from the Stampin’ Up! Color Coach #120148 (a GREAT tool – in fact I did a video on it a while ago that I will link HERE): Perfect Plum, Wild Wasabi, and So Saffron!!! Gorgeous! This ended up being my favorite swap card I made for Stampin’ Up! Convention 2012! We also made this card shortly before I left for Convention in my Crazy about Techniques class as it uses the Faux Linen technique! This technique is an oldy but a goody!!! You use glossy card stock and sand it horizontally and vertically until the gloss is worn off, then sponge and stamp it and sand it more if you want until you get the desired result!!! LOVE IT! The layout is one I took from an old Mojo Monday challenge (I LOVE to print their monthly ones and then page through them when I’m creating – I rarely participate in a challenge in real time. I just found it and it was from Week 2 of Mojo Monday!!! Really really old!) I also LOVE the Field Flowers stamp set! (I do wish I had it in Wood-Mount though so I could make permanent vellum sheets to use with the Stamp-a-ma-jig!) And I used Teeny Tiny Wishes – my go-to stamp set as it includes every greeting I could need! (This card would be great for any occasion – just switch out the greeting!!!) I most always punch it out with the Word Window punch as I have here – super easy, cute and will fit anywhere on any card!!! I used another favorite of mine from SU! – background stamps!!! I LOVE them and they are a favorite of mine. I almost always make a card with either a background stamp or a background embossed with a Textured Impressions Embossing Folder and the Big Shot! Anyway enjoy!!! Let me know if you have any questions!!!
Supply List
STAMPS:
Field Flowers (Wood-Mount 122760, Clear-Mount 122762)
Teeny Tiny Wishes (Wood-Mount 115370, Clear-Mount 127802)
Netting Background Stamp (122655)
Distressed Dots Background Stamp (122815)
PAPER:
8-1/2″ x 11″ Glossy White Card Stock (102599)
8-1/2″ x 11″ Very Vanilla Card Stock (101650)
8-1/2″ x 11″ Perfect Plum Card Stock (101889)
8-1/2″ x 11″ So Saffron Card Stock (105118)
8-1/2″ x 11″ Wild Wasabi Card Stock (108641)
INK:
Perfect Plum Classic Stampin’ Pad (126963)
So Saffron Classic Stampin’ Pad (126957)
Wild Wasabi Classic Stampin’ Pad (126959)
ACCESSORIES:
Victoria 5/8″ Crochet Trim (118481)
Vintage Trinkets (118764)
SNAIL Adhesive (104332)
Multipurpose Liquid Glue (110755)
Stampin’ Dimensionals (104430)
TOOLS:
Tabletop Paper Cutter (106959)
Simply Scored Scoring Tool (122334)
Color Coach (120148)
2012-2014 In Color Color Coach Cards (126890)
2011-2013 In Color Color Coach Cards (124886)
Bone Folder (102300)
Craft Scissors (108360)
Stamp-a-ma-jig (101049)
Paper Piercing Tool (126189)
Stampin’ Pierce Mat (126199)
3/16″ Corner Rounder Punch (119871)
Word Window Punch (119857)
Big Shot Die-Cutting Machine (113439)
Labels Collection Framelits Dies (125598)
Grid Paper (102787)
Stampin’ Scrub (126200)
Stampin’ Mist (102394)
Connect with Me!


