
Currently viewing the tag: "Birthday card"
I thought I’d better get this Tap Tap Tap birthday card post up as the Tap Tap Tap stamp set is one that will be retiring this month! I found this post in my drafts folder so I actually created this card close to a year ago!
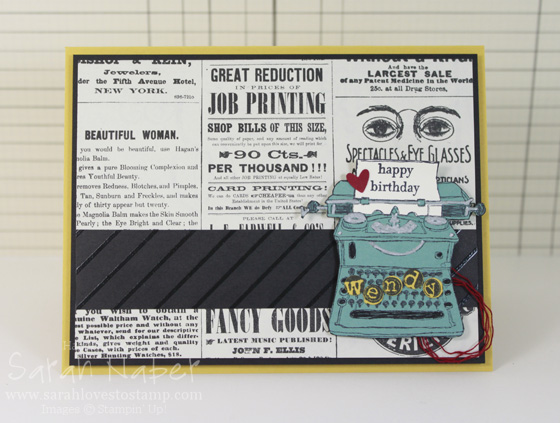
I cannot believe how long I’ve owned this stamp set and not used it! My sweet friend Allison is a huge fan of this stamp set and has constantly inspired me with her adorable uses for this versatile set. SO…I finally pulled it out to make a vintage-loving friend of mine a birthday card. Allison had colored a Lost Lagoon typewriter on one of her Tap Tap Tap cards in a similar way so that’s what I did – not sure if we used the same supplies, but hers was the look I was going for.
Cut List
Hello Honey Cardstock: 5-1/2″ x 8-1/2″, scored at 4-1/4″
Basic Black Cardstock: 5-1/4″ x 4″
Typeset Designer Series Paper: 5-1/8″ x 3-7/8″
Color Me Irresistable Designer Series Paper: 5-1/8″ x 1″
Lost Lagoon, Hello Honey, Cherry Cobbler, and Very Vanilla Cardstock scraps
How To
1. Stamp typewriter onto Lost Lagoon cardstock (RETIRING) and the paper portion of the typewriter onto Very Vanilla.
2. Stamp sentiment from Teeny Tiny Wishes onto Very Vanilla “typewriter paper”. I used post it notes to mask the sentiment to make it two lines (watch for a video on that coming soon). Cut out paper (two separate pieces).
3. Color typewriter parts with Basic Gray Stampin’ Write Marker and Silver Stampin’ Dazzle Marker (retired but any silver marker will do). Cut it out using the Paper Snips.
4. Stamp alphabet stamp on Hello Honey paper (RETIRING) with black ink. Punch out selected letters with the 1/4″ Handheld Circle Punch (RETIRING).
5. Punch heart from Owl Builder punch out of Cherry Cobbler scrap.
6. Adhere typewriter paper, letters and heart onto typewriter. Place Stampin’ Dimensionals on back.
7. Adhere black embossed stripe from Color Me Irresistable Specialty Designer Series Paper (RETIRING) onto Typeset Specialty Designer Series Paper (RETIRING). Adhere that onto black layer and then onto card base. *TIP: With this Typeset paper, they are much thinner (this is NOT true of all specialty DSPs but of the 24/pack ones), so use a dry adhesive instead of a liquid.
8. Unravel Cherry Cobbler Thick Baker’s Twine (RETIRING) and make a messy nest of a few strands. Stick it to the back of the typewriter, onto one of the Stampin’ Dimensionals.
9. Attach typewriter to card.
This was a card I created for the As You See It Challenge #101. Obviously it’s over now, but you can play along with the current challenge or use any past challenges to inspire you too!!!
I hope you enjoyed this birthday card made with the Tap Tap Tap stamp set! It’s one of my favorites and I think I’ll really miss it when it’s retired! The color combo of Lost Lagoon, Hello Honey, Cherry Cobbler, Basic Black, and Very Vanilla also includes two retiring In Colors too.
CLICK HERE to get your
Typeset Specialty Designer Series Paper, while supplies last!!!
The Remarkable You stamp set is probably my favorite line art set I own! The images are a great size, wonderful to stand on their own on a simple notecard, to be the focal point of a larger card, or even for larger scrapbooking or 3D items. They’re fun to color, but also look stunning stamped in black ink on white cardstock or tone-on-tone with matching ink and cardstock too!
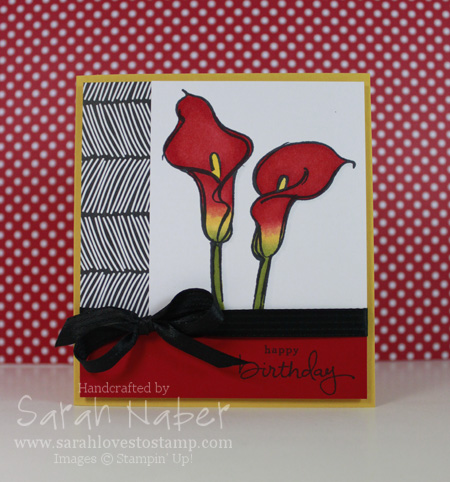
I used a bold color palette on this birthday card for my good friend, Sara (I hope she loved it as much as I did!). The mixed font greeting is from the awesome set, Endless Birthday Wishes. I LOVE that it’s a photopolymer set so it makes mixing and matching the sentiments especially easy. I would say it’s my 2nd most used set right behind Teeny Tiny Wishes!
The image was one I colored for the 30 day coloring challenge (I’m behind by a couple of days right now). I colored it with Copic markers. I’ve had them for a long time, but rarely used them as I started only using Stampin’ Up! products for several years now. You may or may not know, but Stampin’ Up! introduced our own alcohol-based markers a few years ago and I remembered how much I love coloring with this particular medium. The SU! ones had some issues from the manufacturer and were discontinued, but my love for alcohol-based marker coloring was rekindled! So I pulled them out, googled an image of a calla lily, and took inspiration from there to blend the green, yellow and red. I ended up really pleased with it.
Here’s a link to another card I did with a sketch that’s been a long time
favorite, as well as colored with alcohol-based markers!
I’m always saying that cardmaking is a process. This card was no different. I’d stumbled upon a sketch I loved when I was researching ideas with the Tap Tap Tap stamp set and wanted to try it with this image. The sketch I was inspired by had the main portion (focal image and vertical and horizontal strip) going from edge to edge on the card. I thought my image was plenty large enough and just started cutting. Before I knew it, it was too narrow to span to the edge and have the vertical strip be the 1″ that I planned. I tried it on a regular A2 card but just didn’t love it with the skinny border on two sides and larger at the top and bottom. So I ended up with a very unique sized card. 4-1/4″ x 4-3/4″ was the finished measurement. I may retry making it another day and cutting the focal image piece 1/4″ larger (width) to see how it would compare to this one!
Anyway, I think the rest of the card is pretty simple, so I’ll just get on to the Cut List and Supplies!
If you haven’t already, join my mailing list by entering your info into the box to the right. I send out an exclusive project PDF filled with ideas once a month to my subscribers!
Cut List
Crushed Curry Cardstock: 8-1/2″ x 4-3/4″, scored at 4-1/4″
Whisper White Cardstock: 4″ x 4-1/2″ (base I glued other pieces to)
White Copic-friendly Cardstock: 3″ x 3-1/2″
Everyday Chic Designer Series Paper: 1″ x 3-1/2″
Real Red Cardstock: 1″ x 4″
Built for Free Using: My Stampin Blog
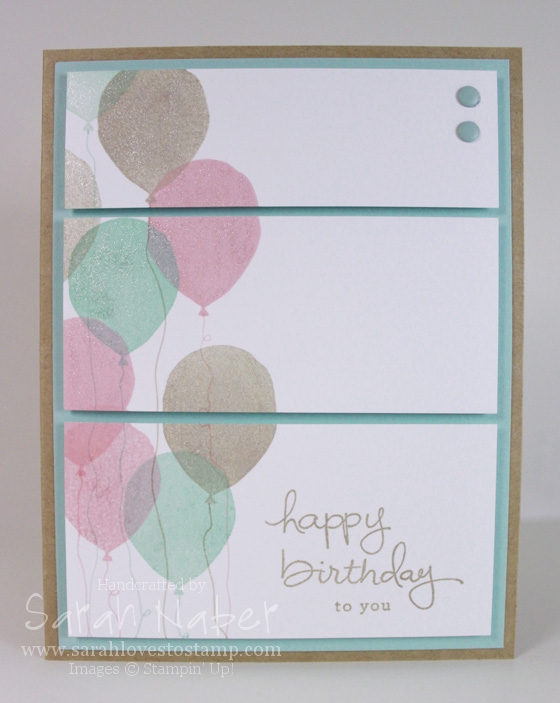
Hi there! I’m back with my favorite stamp set, Balloon Celebration, from the Occasions Catalog! It’s live now and I couldn’t be more thrilled!!! Love this catalog! If you want to see another sample with it, subscribe to my newsletter. (Over there on the right —> )
I’m loving this sketch as well. It’s last Friday’s challenge from over at As You See It!!! I had it done by Friday but have been sick for over a week so I didn’t get the photos edited and the post written. I apologize for that!
My sweet baby girl also turned one so be on the lookout for a series of the party themed paper crafty things I made for her party! 🙂
The star of this card? The Wink of Stella Clear Glitter Brush Pen! I’m obsessed with it! I colored over every balloon with it and it is just gorgeous in real life!
Cut List
Kraft 12″ x 12″ Cardstock: 8-1/2″ x 5-1/2″, scored at 4-1/4″
Pool Party Cardstock: 4″ x 5-1/4″
Whisper White Cardstock: 3-3/4″ x 4-3/4″, cut after stamped at 1-3/8″ (top piece) and 1-5/8″ (middle piece)
Built for Free Using: My Stampin Blog
Hi there! Found a bit of time to create this week while little Miss Izzy was sleeping! That was pretty exciting for me – to steal away and do something fun just for me, instead of doing laundry or dishes while she slept.
I hope you love the card this week. It’s made with my VERY favorite stamp set from the Occasions 2015 Catalog. Coincidentally, there’s something else I love about it…matching framelits! Genius! Another genius thing? The stamp set and framelits are a bundle, so ordering them together saves you 15%. Love that! Anyway, on to the card details.
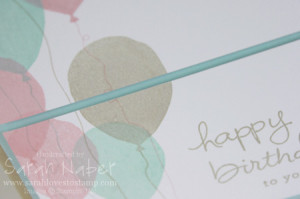
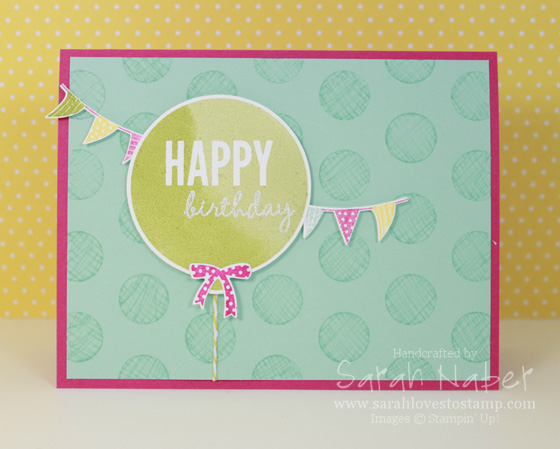
The balloon was stamped into a Pear Pizzazz Classic Stampin’ Pad first. Then I used a sponge dauber to sponge Old Olive ink onto the left half of the balloon. I think I could have done a better job at blurring the line between the two but oh well.
The “birthday” sentiment is stamped with VersaMark after dusting the balloon with the Embossing Buddy. Then I used a combination of White and Iridescent Ice Stampin’ Emboss Powder (I believe my ratio was 1:1) and the Heat Tool to emboss it.
The banners were inked up with Melon Mambo, Old Olive, Daffodil Delight and Pool Party Stampin’ Write Markers. The bow was inked up with a Melon Mambo Classic Stampin’ Pad. Then all the pieces were cut out with the corresponding framelits dies.
The background is my FAVORITE part! We learned this technique at Convention last summer, but this was the first time I tried it! I placed the dots mask from the Dots & Stripes Decorative Masks onto a 4″ x 5-1/4″ piece of Pool Party Cardstock. Then I used the fine point of the Pool Party Stampin’ Write Marker to trace the circle and then fill it in with scribbles in one direction and then in the other direction. It creates a really neat, crosshatch-like pattern.
A tad bit of Crushed Curry Baker’s Twine acts as the balloon string and the bow and banners were attached to the main balloon and Stampin’ Dimensionals applied to that group before attaching to the Pool Party piece. Then that was attached to the Melon Mambo card base – cut at 5-1/2″ x 8-1/2″ and scored at 4-1/4″.
I hope you’ll play along with us at the As You See It Challenge this week. This was a GREAT sketch with a myriad of options! I also used the color combination from Colour Q Challenges.

I’m having a customer appreciation event tomorrow night, including Make-and-Takes (the card above is one), a prize drawing for over $100 worth of SU! goodies, handmade items for sale, my Stampin’ Stash Sale, as well as an opportunity to get FREE SHIPPING on the orders placed tomorrow only (read on for more info). It’s the LAST day of Sale-A-Bration tomorrow so it is the FINAL opportunity to get in on the Exclusive, FREE products with every $50 you spend.
The card above uses 4 of our Sale-A-Bration items!!! Can you tell I’m a fan of this year’s offerings? I used the stamp set See Ya Later for the greeting and Banner Blast for the banners. I then punched out the banners with the fabulous, matching Banner Punch. I ran the Whisper White layer through the Big Shot (AFTER stamping) with the 4th SAB item, the Decorative Dots Embossing Folder.
I also wanted to share the Envelope Punch Board with my crafters, so we’re making the 3D Open Box too! This was a fantastic idea from SU! Demo, Sam! LOVE it!

Out of town customer? You can be entered into the drawing for placing an order before the event. If you are placing an order under $150, use the Hostess Code 666UFGFP to qualify for the FREE shipping offer (I will have to PayPal you the money back or send you a check if you live out of town). If you are placing an order over $150, I will still offer the FREE shipping, but do not enter the Hostess Code as you qualify for Hostess Benefits on your order alone.
Anyone in the Saint Joseph, Missouri area is welcome to come to my event tomorrow night! Feel free to send me an email at Sarah@SarahLovesToStamp.com or call/text 816.341.0208 if you’d like directions to my house! You can also call, text or email if you have other questions but my event runs from 6:30-9:30 pm tomorrow night so I will answer everything after that! Orders must be in by 11:30 pm Central Time so I can get everything entered in before Sale-A-Bration ends. I’m sad it’s coming to an end, as it’s my favorite time of year, but glad that there’s one more day! I don’t want you to miss out! 🙂

Hi there! It’s Friday and that means a new challenge over at the As You See It Challenge Blog! Check out the creations by the other AYSI Design Team Members too! I also combined it with the color challenge from Colour Q Challenges this week. I wasn’t sure about these colors to begin with but loved the final result. I hope you do too!
How To
1. Cut your Pool Party cardstock to 8-1/2″ x 5-1/2″ for your card base and score it at 4-1/4″. Cut the Pacific Point to 4″ x 5-1/4″. Cut a piece of Whisper White to 1-7/8″ x 5″. Cut a piece of Real Red to 2″ x 5-1/4″ – see Step 3 for why!
2. Ink up the Dictionary Background Stamp in Soft Sky ink, stamp off onto a scrap paper once and then stamp it onto the Whisper White piece. (This is super hard to see in the photo but is gorgeous in real life!) Then use the Petal Parade stamp set (FREE Sale-A-Bration exclusive stamp set with any $50 purchase!) and Pacific Point, Pool Party, and Real Red inks to stamp the rest of the white panel.
3. Run the Real Red piece through the Big Shot with the Arrows Textured Impressions Embossing Folder. Cut the final piece down to 1-7/8″ x 5″. *TIP: Cut your piece of cardstock a bit larger than you want it (usually 1/8″ is plenty depending on how intricate the embossing folder design is) and trim it down to the size you want AFTER embossing! The embossing “shrinks” the paper a bit so this is a great idea when you need an exact size or to match up with another piece like I needed on my card.
4. Use the Multipurpose Liquid Adhesive to adhere both the Whisper White and Real Red strips side-by-side onto the Pacific Point layer.
5. Tie the Real Red and Whisper White 1/4″ Stitched Grosgrain Ribbons around the Pacific Point layer. Adhere this to the card base.
6. Stamp the “Happy Big Day” from the Chalk Talk Stamp Set (LOVE!) in Pacific Point ink onto a scrap of Whisper White. Die cut it out with the Big Shot and the matching Chalk Talk Framelits Dies.
7. Die cut two more of the same label shape out of a scrap of Pool Party cardstock. Cut one set in half horizontally and one set in half vertically and glue behind the sentiment to make a custom mat! *TIP: This is one of my favorite tricks to do with punches and die cuts that may not have a nesting shape! Make your own! Works fabulously with the Decorative Label Punch among others.
I hope you love this card! This sketch was a great one to work with. Head on over to the As You See It Challenge Blog and play along! 🙂 We’re always excited to see what you have created!!!
This card was entered into challenges at: ColourQ, polkadoodles, Crafting from the Heart, Challenges 4 Everybody, and Word Art Wednesday.

Supply List
STAMPS:
Petal Parade (Wood-Mount 133599, Clear-Mount 133602)***FREE Sale-A-Bration Choice with $50 Order***
Chalk Talk (Wood-Mount 130631, Clear-Mount 130634) *Get the stamp set with the matching framelits and save 15% with the Chalk Talk Bundle: Wood-Mount 132731, Clear-Mount 132730!*
Dictionary Background (Wood-Mount 130348, Clear-Mount 130351)
PAPER:
8-1/2″ x 11″ Whisper White Cardstock (100730)
8-1/2″ x 11″ Pacific Point Cardstock (111350)
8-1/2″ x 11″ Pool Party Cardstock (122924)
8-1/2″ x 11″ Real Red Cardstock (102482)
INK:
Pacific Point Classic Stampin’ Pad (126951)
Pool Party Classic Stampin’ Pad (126982)
Real Red Classic Stampin’ Pad (126949)
Soft Sky Classic Stampin’ Pad (131181)
ACCESSORIES:
Real Red 1/4″ Stitched Grosgrain Ribbon (126875)
Whisper White 1/4″ Stitched Grosgrain Ribbon (126877)
SNAIL Adhesive (104332)
Multipurpose Liquid Glue (110755)
Stampin’ Dimensionals (104430)
TOOLS:
Stampin’ Trimmer (126889)
Simply Scored Scoring Tool (122334)
Bone Folder (102300)
Paper Snips (103579)
Craft Scissors (108360)
Big Shot Die-Cutting Machine (113439)
Big Shot Magnetic Platform (130658)
Chalk Talk Framelits Dies (129983) *Get the stamp set with the matching framelits and save 15% with the Chalk Talk Bundle: Wood-Mount 132731, Clear-Mount 132730!*
Arrows Textured Impressions Embossing Folders (132187)
Grid Paper (102787)
Stampin’ Scrub (126200)
Stampin’ Mist (102394)

Where do I start? So so many things I love about this card!!! Silver Glimmer Paper makes me swoon! So beautiful, glittery, simple, mess-less (am I making up words again?)…and you can get it free with a party or $150 order during Sale-A-Bration! Speaking of Stampin’ Up!’s best sale of the year, Sale-A-Bration 2013, do you see that fabulous stamp? It’s from my favorite SAB stamp set, Vintage Verses!!! (The “Thanks” in the set is to die for as well!) I also love the new Honeycomb Textured Impressions Embossing Folder that is in the Spring Catalog. Here I’ve embossed it onto Pool Party Core’dinations Card Stock and then sanded with the Stampin’ Sanding Block to reveal the lighter color on the inside of the paper. Oh, did I mention the ribbon? Or that doily? Read on…
The ribbon is ANOTHER free option during SAB with any $50 order! The Sycamore Street Ribbon & Button Pack is so so awesome, it contains 3 spools of gorgeous 1/4″ ribbon in 3 colors: Island Indigo, Pool Party, and Tangerine Tango, as well as buttons in Rich Razzleberry, Pool Party, and Tangerine Tango! Seriously, ALL of that!!! Wowza! I am seriously hoping this pretty ribbon is offered in more fabulous colors in our next Annual Catalog!
The Paper Doily is from the Spring Catalog! These things are a steal at $2.95 for 24 of them! That’s right, I said 24!!! For this card, I folded it in half (not perfectly) so it would add more dimension to the card, but if you’re going for more bang for your buck, simply cut these pretties in half and have twice as many! YAY!
I used the Bitty Butterfly punch (again Spring Catalog) and punched a few out of the Silver Glimmer Paper to add some sparkle and shine to the card. Did I tell you yet how excited I am about this punch? I probably did – but I’ll tell you again! It coordinates with one of my all time favorite stamp sets, Papillon Potpourri!!! Are you kidding me? A punch for the large butterfly and the small one now too?!? Oh, double yay! This punch also matches the FREE SAB stamp set Bloomin’ Marvelous!!! (It’s pretty too! I bet you’re surprised that I think that!) I finished off the card with a couple of adhesive rhinestones to accent the beauty of the stamp – and let’s not kid ourselves, add a little more sparkle and shine, because who doesn’t love that? 🙂
Now, let’s talk about the color combo! Put any lighter color with Basic Gray and BAM, you’ve got yourself a beautiful monochromatic card! Other favorites besides Pool Party – Summer Starfruit or Pretty in Pink or Pink Pirouette or Certainly Celery…and oh, Calypso Coral would look pretty! See it works with brighter colors too, just a little less contrast! Give it a try!
This fabulous card was a complete CASE of my friend Desiree Spenst, who I believe CASEd it from someone else. That’s how we roll in the stamp world! Share and stamp, stamp and share!
If you haven’t already, place your Sale-A-Bration order today to start playing with many of these fun goodies! As always, if you have questions, don’t hesitate – that’s what I’m here for!!!
CHECK OUT the Simplified Sale-A-Bration Brochure HERE! It is a viewer friendly format of everything you can earn free with each increment of $50 you spend (before tax & shipping).
Supplies
STAMPS:
Vintage Verses (Wood-Mount 129633, Clear-Mount 129636) *FREE during Sale-A-Bration with any $50 order!!!
PAPER:
8-1/2″ x 11″ Whisper White Card Stock (100730)
8-1/2″ x 11″ Basic Gray Card Stock (121044)
12″ x 12″ Pool Party Core’dinations Card Stock (129321)
12″ x 12″ Silver Glimmer Paper (124005)
INK:
Basic Gray Classic Stampin’ Pad (126981)
ACCESSORIES:
Sycamore Street Ribbon & Button Pack (130812) *FREE during Sale-A-Bration with any $50 order!!!
Basic Rhinestone Jewels (119246)
Paper Doilies (129399)
SNAIL Adhesive (104332)
Multipurpose Liquid Glue (110755)
Mini Glue Dots (103683)
Stampin’ Dimensionals (104430)
TOOLS:
Tabletop Paper Cutter (106959)
Simply Scored Scoring Tool (122334)
Bone Folder (102300)
Craft Scissors (108360)
Stampin’ Sanding Block (129367)
Bitty Butterfly Punch (129406)
2-1/2″ Circle Punch (120906)
Big Shot Die-Cutting Machine (113439)
Labels Collection Framelits Dies (125598)
Honeycomb Textured Impressions Embossing Folder (129378)
Grid Paper (102787)
Stampin’ Scrub (126200)
Stampin’ Mist (102394)
Connect with Me!


