
Currently viewing the tag: "Heat Embossing"
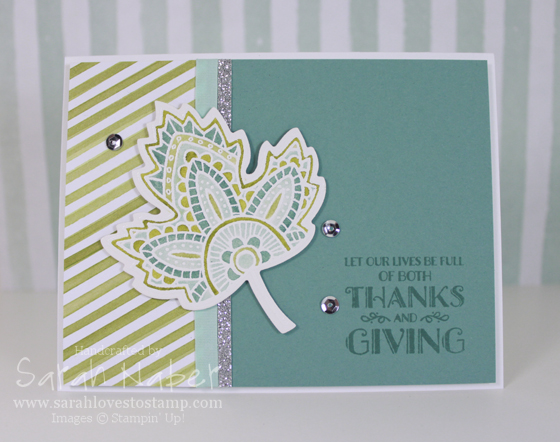
Here’s this week’s As You See It Challenge card! I hope you’ll hop on over to the challenge blog at www.AsYouSeeItChallenge.com and check out what the rest of the design team has to share, as well as join in on the challenge yourself! Lighthearted Leaves is my stamp obsession for fall and when I saw this color combo from fellow demonstrator, Teneale, I had to try it out! It may be my new favorite color combo!
The leaf is definitely the star of the card. I kept the rest very simple to let it shine! That’s really where all the time is on this card. It is stamped in VersaMark and white heat embossed onto Shimmery White cardstock. I LOVE how this paper takes watercoloring and also the shimmery shine that shows through as well.
Let’s talk dimension! I’ve become obsessed with the tip from Jennifer McGuire to use Fun Foam (yes, like the kind kids love!) behind large layers. She did a comparison with regular foam adhesive and with the Fun Foam where she actually mailed them to herself. The results were pretty interesting; regular foam adhesive really smashed in the mail, leaving any areas without foam adhesive sunken in while the fun foam card looked perfect. I ordered Fun Foam that day! So it is behind the main panel. I still LOVE Stampin’ Dimensionals for the smaller pieces on cards, like my leaf here.
The silver sequins were glued on with the new Fine-Tip Glue Pen in the Holiday Catalog. The sentiment was stamped with Lost Lagoon ink onto the Lost Lagoon cardstock. This tone-on-tone effect is striking and provides a bit deeper color than the VersaMark watermark look.
I’m going to try making my blog posts a bit shorter by not doing the full How To list. I’ve also added in a great feature that shows the products on my card – simply click on an item to see it in my Online Store. However, I am always thrilled when I find a card I love and the measurements to make it are given so I’ll continue that. As always, if you have any questions about the project, feel free to leave a comment and I’ll reply with the answer!
Cut List
Whisper White Thick Cardstock: 5 1/2″ x 8 1/2″, scored at 4 1/4″
Lost Lagoon Cardstock: 5 1/4″ x 4″
Season of Cheer DSP (Old Olive Pattern): 1 3/4″ x 4″
Silver Glimmer Paper: 1/8″ x 4″
Built for Free Using: My Stampin Blog
Hi there! Found a bit of time to create this week while little Miss Izzy was sleeping! That was pretty exciting for me – to steal away and do something fun just for me, instead of doing laundry or dishes while she slept.
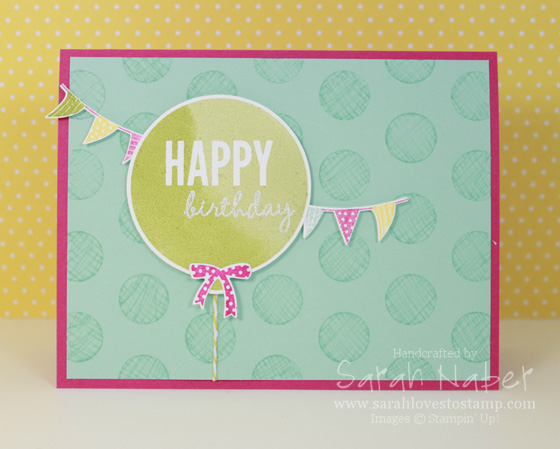
I hope you love the card this week. It’s made with my VERY favorite stamp set from the Occasions 2015 Catalog. Coincidentally, there’s something else I love about it…matching framelits! Genius! Another genius thing? The stamp set and framelits are a bundle, so ordering them together saves you 15%. Love that! Anyway, on to the card details.
The balloon was stamped into a Pear Pizzazz Classic Stampin’ Pad first. Then I used a sponge dauber to sponge Old Olive ink onto the left half of the balloon. I think I could have done a better job at blurring the line between the two but oh well.
The “birthday” sentiment is stamped with VersaMark after dusting the balloon with the Embossing Buddy. Then I used a combination of White and Iridescent Ice Stampin’ Emboss Powder (I believe my ratio was 1:1) and the Heat Tool to emboss it.
The banners were inked up with Melon Mambo, Old Olive, Daffodil Delight and Pool Party Stampin’ Write Markers. The bow was inked up with a Melon Mambo Classic Stampin’ Pad. Then all the pieces were cut out with the corresponding framelits dies.
The background is my FAVORITE part! We learned this technique at Convention last summer, but this was the first time I tried it! I placed the dots mask from the Dots & Stripes Decorative Masks onto a 4″ x 5-1/4″ piece of Pool Party Cardstock. Then I used the fine point of the Pool Party Stampin’ Write Marker to trace the circle and then fill it in with scribbles in one direction and then in the other direction. It creates a really neat, crosshatch-like pattern.
A tad bit of Crushed Curry Baker’s Twine acts as the balloon string and the bow and banners were attached to the main balloon and Stampin’ Dimensionals applied to that group before attaching to the Pool Party piece. Then that was attached to the Melon Mambo card base – cut at 5-1/2″ x 8-1/2″ and scored at 4-1/4″.
I hope you’ll play along with us at the As You See It Challenge this week. This was a GREAT sketch with a myriad of options! I also used the color combination from Colour Q Challenges.
Connect with Me!


