
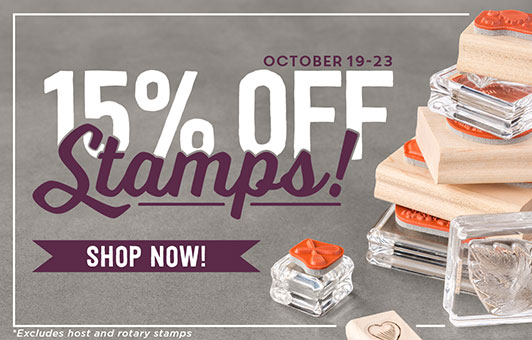
 Awesome sale began today! 15% off STAMPS! Gotta love that. The only exclusions are the rotary stamps, hostess stamps, clearance rack stamps and the bundles (remember that bundles get you 15% off of both the stamp set and die/folder/punch).
SO…I thought I’d share my top 10 stamp sets!
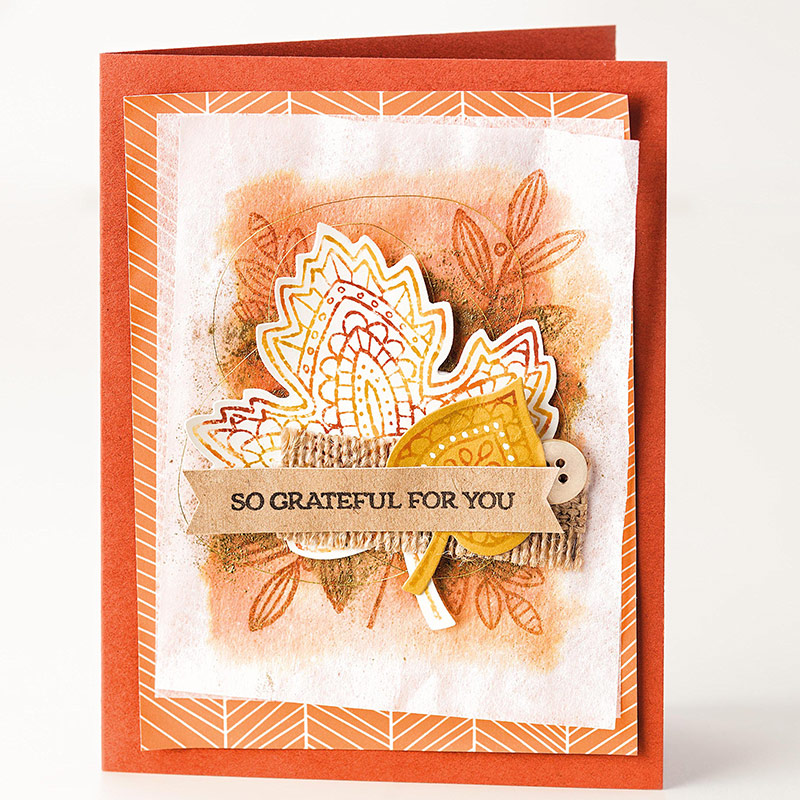
Picture from Stampin’ Up!
1. Lighthearted Leaves (Holiday Catalog p. 44)
Photopolymer (#139712) $26.00 $22.10
2. Your Presents (Holiday Catalog p. 32)
Wood-Mount (#139803) $27.00 $22.95
Clear-Mount (#139806) $19.00 $16.15

3. Gorgeous Grunge (Annual Catalog p. 123)
Wood-Mount (#130514) $25.00 $21.25
Clear-Mount (#130517) $18.00 $15.30
4. Endless Birthday Wishes (Annual Catalog p. 6)
Photopolymer (#140273) $16.00 $13.60
5. Words of Truth (Annual Catalog p. 41)
Wood-Mount (#138758) $23.00 $19.55
Clear-Mount (#139397) $17.00 $14.45
6. Kinda Eclectic (Annual Catalog p. 127)
Wood-Mount (#139803) $28.00 $23.80
Clear-Mount (#139806) $20.00 $17.00
7. Teeny Tiny Wishes (Annual Catalog p. 95)
Wood-Mount (#128748) $37.00 $31.45
Clear-Mount (#127802) $27.00 $22.95
8. Petite Pairs (Annual Catalog p. 99)
Wood-Mount (#128706) $29.00 $24.65
Clear-Mount (#122497) $21.00 $22.95

9. Tin of Cards (Annual Catalog p. 110)
Photopolymer (#138946) $17.00 $14.45
10. Remarkable You (Annual Catalog p. 112)
Wood-Mount (#139891) $45.00 $38.25
Clear-Mount (#139894) $33.00 $28.05
BONUS: Epic Alphabet (Annual Catalog p. 132)
Photopolymer (#133663) $26.00 $22.10
CLICK HERE to head to my Online Store! Sale ends Friday!
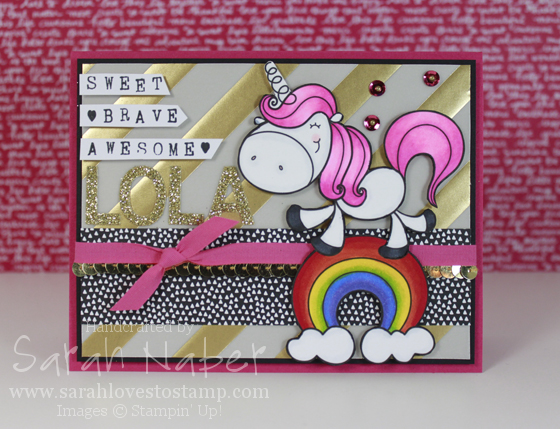
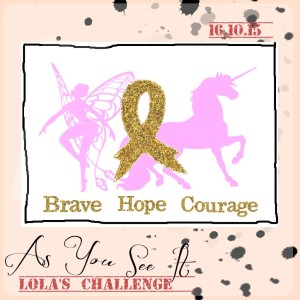
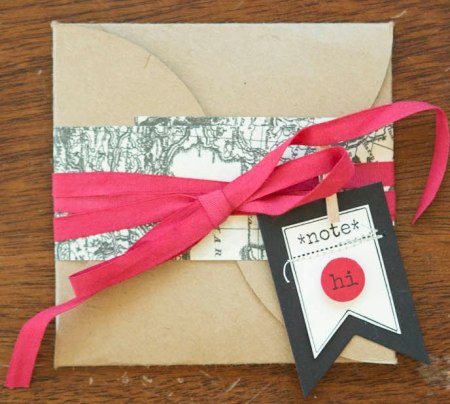
This is an extra special week of the As You See It Challenge! I’m honored to be participating in Lola’s Challenge! My best friend, Tara, has a sweet niece named Lola who has been battling cancer for several years now. She just had a stem cell transplant and was in the ICU when we decided to do something special for her. Since she was in the ICU, we decided a virtual card shower would be better than sending her cards…possibly with bad germs!
So here’s the challenge…before Wednesday, October 21st make a card with something for Lola. Gold for Childhood Cancer Awareness. Unicorns, fairies and pink are all things Lola loves! CLICK HERE to head on over to the As You See It Challenge site! Check out the other Design Team cards and PLEASE make and enter your own card for Lola! It’s so simple – you can pretty much put it anywhere online (as long as it’s public) and then just paste the link to enter your card! I set a goal of 100 cards for Lola so please share with everyone you know!
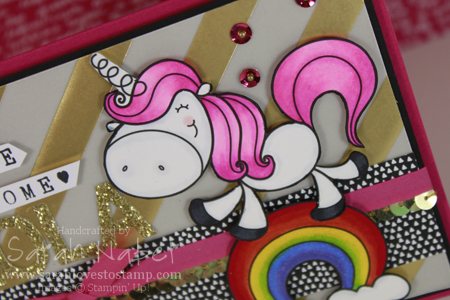
So that brings me to the card. I knew I wanted to include an image of one of Lola’s favorite things but I didn’t have any stamps with a unicorn or fairy…so I turned to the internet. A few searches and some really great things popped up! I chose this adorable Lucky Unicorn image from the Etsy shop 2CuteInk! Love it! I also found some great paper piecing files if you love to fussy cut or have a digital cutter. Or go with the fairy punch art route. If you want to play along, you can also use a FREE digi stamp too!
Besides the digi stamp and Copics I colored it with, everything is Stampin’ Up! I even used my new alphabet rotary stamp for the first time on this project! (Thanks for telling me I *had* to buy it, Amy!)
*I’ll be back with the supply list and measurements soon! 🙂
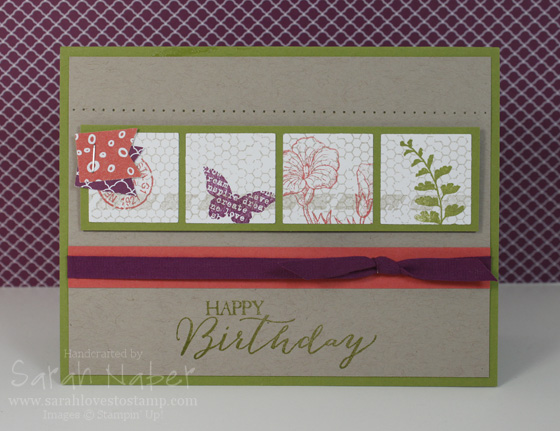
My hubby had his birthday this week so this is the card I made him. I used the fantastic Vintage Leaves stamp set, along with the sketch challenge from the As You See It Challenge this week and a fantastic color combo I dug up when googling fall color combinations.
I’ll try to come back and add more details soon! The duo-toned leaves are all stamped in the center color and then I used a sponge dauber to apply a different color to the edges. Very similar to the Rock and Roll Technique I used to do A LOT but it doesn’t work as well with the firm foam ink pads because they’re so juicy and have more squish to them than our old linen style ones. 🙂
Hi friends! I’ve been posting my weekly cards to our As You See It Challenge blog for my role in the Design Team over there but just haven’t gotten posts written here! Well here we go! I’ll try to get the posts up about the past challenge cards soon!
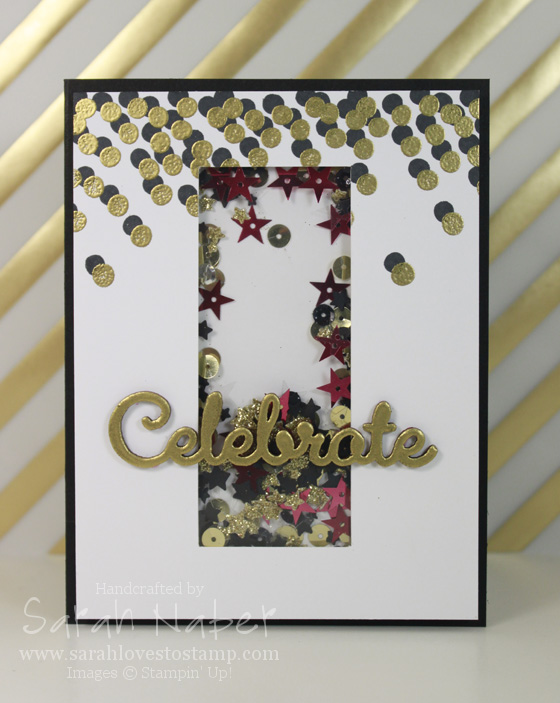
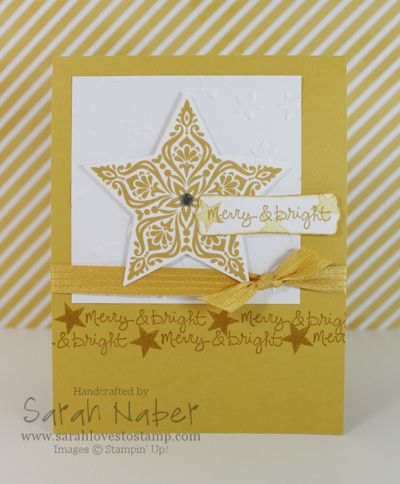
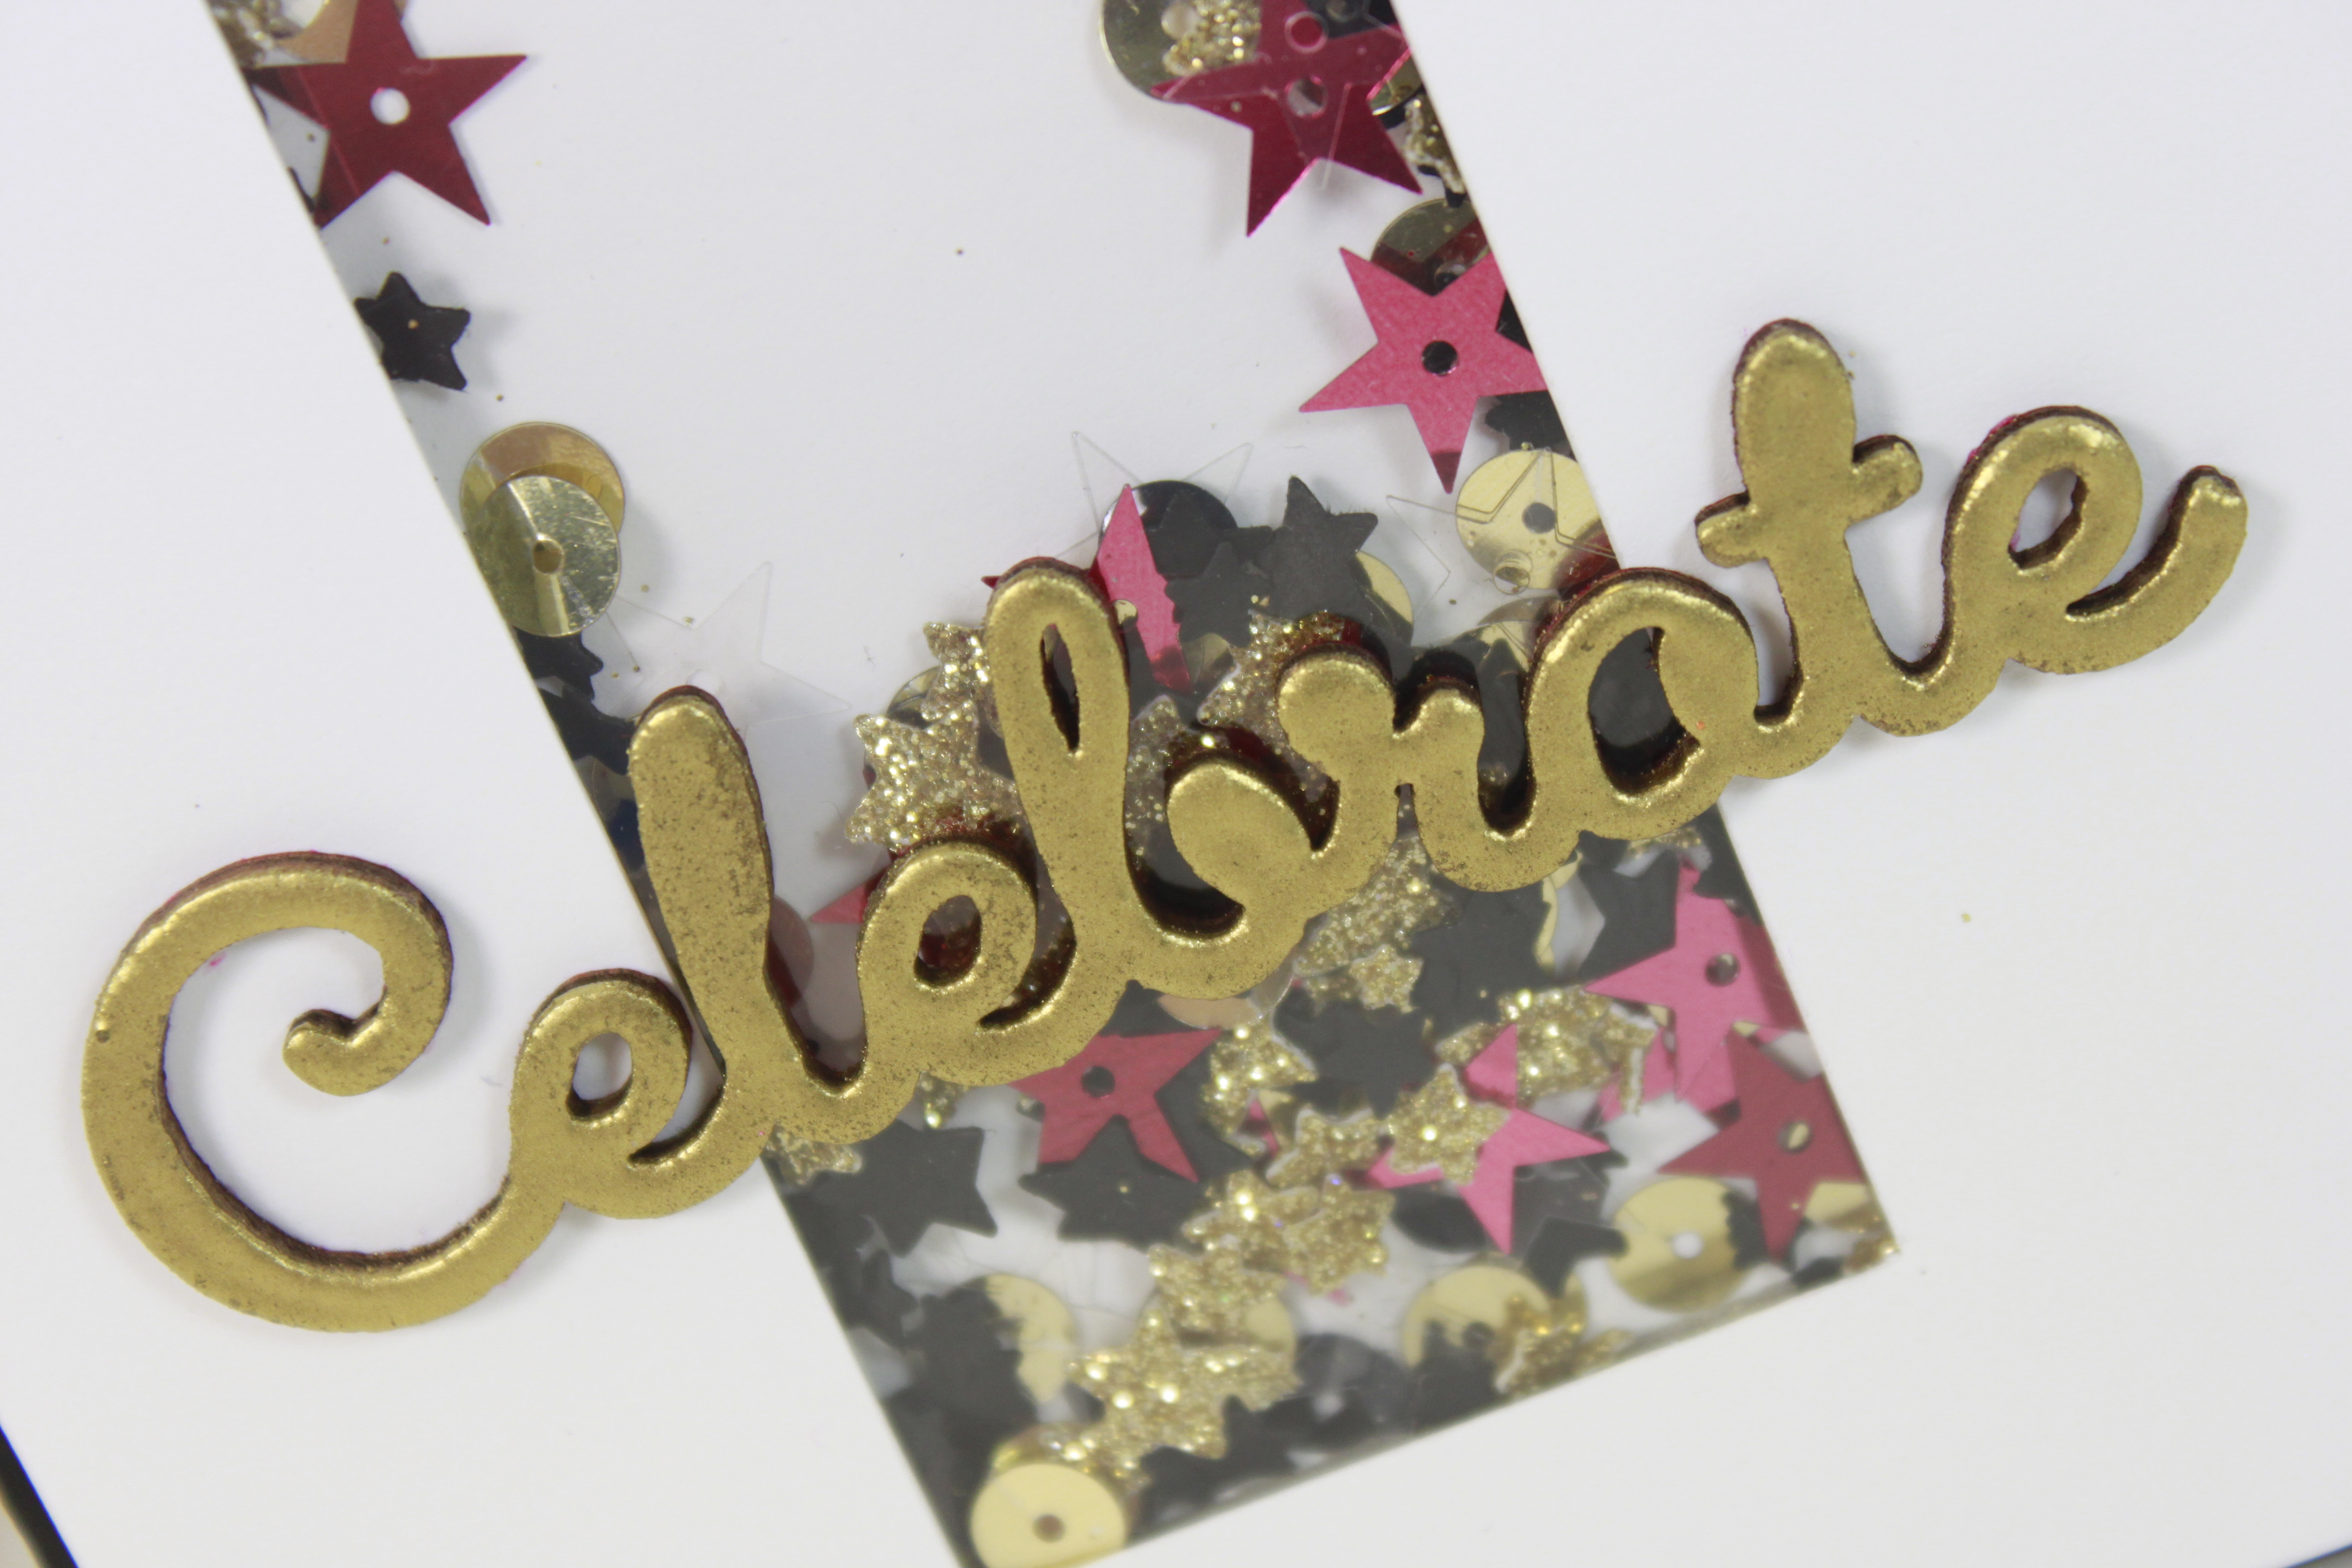
So it’s the 100th Challenge! I can’t believe it! I hope you’ll play along – you have TWO weeks to do so for this special challenge and there’s BLOG CANDY too!!! The only requirement? Celebrate is the theme!
I chose to make a fun shaker card for this challenge and use one of the new wood element words. I simply smooshed VersaMark on its front and covered it with Gold Stampin’ Emboss Powder. I repeated that process a second time to really make it look like it was coated in gold. 🙂
The shaker card “bits” are a mix of punched stars from the Confetti Star Punch (both in Basic Black cardstock and Gold Glitter Paper), Star Sequins (clear from the Neutrals Sequin Assortment and pink from the Brights Sequin Assortment), and round sequins (black from the Neutrals Sequin Assortment and gold pulled off of the Gold Sequin Trim).
I also have a video to go with this card that will be up next week!!!
Hi there! Found a bit of time to create this week while little Miss Izzy was sleeping! That was pretty exciting for me – to steal away and do something fun just for me, instead of doing laundry or dishes while she slept.
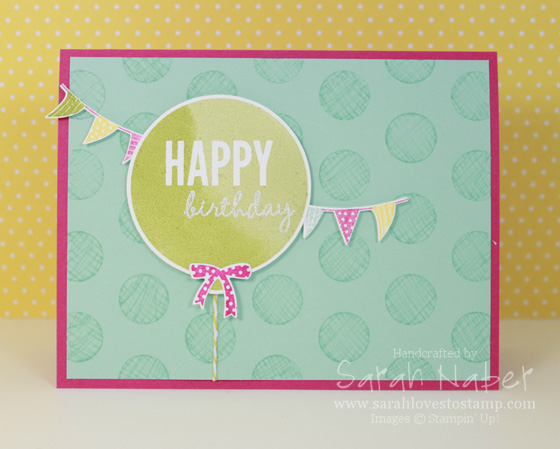
I hope you love the card this week. It’s made with my VERY favorite stamp set from the Occasions 2015 Catalog. Coincidentally, there’s something else I love about it…matching framelits! Genius! Another genius thing? The stamp set and framelits are a bundle, so ordering them together saves you 15%. Love that! Anyway, on to the card details.
The balloon was stamped into a Pear Pizzazz Classic Stampin’ Pad first. Then I used a sponge dauber to sponge Old Olive ink onto the left half of the balloon. I think I could have done a better job at blurring the line between the two but oh well.
The “birthday” sentiment is stamped with VersaMark after dusting the balloon with the Embossing Buddy. Then I used a combination of White and Iridescent Ice Stampin’ Emboss Powder (I believe my ratio was 1:1) and the Heat Tool to emboss it.
The banners were inked up with Melon Mambo, Old Olive, Daffodil Delight and Pool Party Stampin’ Write Markers. The bow was inked up with a Melon Mambo Classic Stampin’ Pad. Then all the pieces were cut out with the corresponding framelits dies.
The background is my FAVORITE part! We learned this technique at Convention last summer, but this was the first time I tried it! I placed the dots mask from the Dots & Stripes Decorative Masks onto a 4″ x 5-1/4″ piece of Pool Party Cardstock. Then I used the fine point of the Pool Party Stampin’ Write Marker to trace the circle and then fill it in with scribbles in one direction and then in the other direction. It creates a really neat, crosshatch-like pattern.
A tad bit of Crushed Curry Baker’s Twine acts as the balloon string and the bow and banners were attached to the main balloon and Stampin’ Dimensionals applied to that group before attaching to the Pool Party piece. Then that was attached to the Melon Mambo card base – cut at 5-1/2″ x 8-1/2″ and scored at 4-1/4″.
I hope you’ll play along with us at the As You See It Challenge this week. This was a GREAT sketch with a myriad of options! I also used the color combination from Colour Q Challenges.
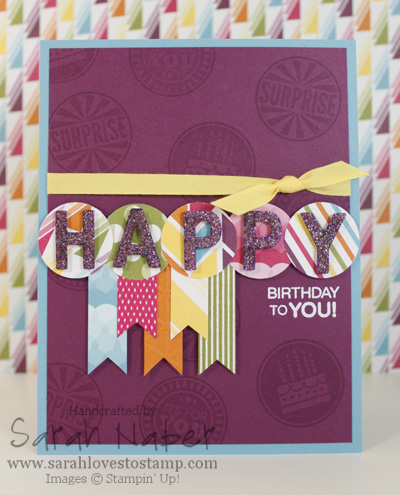
Hi there! I’m finally back! My sweet baby girl is almost 7 weeks old now. I enjoyed creating this card at an overnight crop at my church. It took me a ridiculous amount of time as I probably hadn’t created in 3 months with my pregnancy challenges and then having a newborn. 🙂 But…although it took a long time, I enjoyed it SO much and really liked the end result. I hope you do too!
I think the instructions are pretty straight forward this time. How much do you love those cute little banners stapled on the edge of the main focal point? LOVE! I used the fantastic photopolymer set so I didn’t even need my Stamp-a-ma-jig to get perfect positioning of the sentiment!
Supply List
STAMPS:
Butterfly Basics (Wood 138813, Clear 138816, Photopolymer 137154)
*Save 15% and buy it as a bundle with the Butterfly Thinlits Dies (Wood 139322, Clear 139323, Photopolymer 138865)
PAPER:
8-1/2″ x 11″ Whisper White Cardstock (100730)
8-1/2″ x 11″ Calypso Coral Cardstock (122925)
8-1/2″ x 11″ Crumb Cake Cardstock (120953)
8-1/2″ x 11″ Old Olive Cardstock (100702)
Brights Collection Backgrounds Designer Series Paper Stack (130134)
Park Lane Designer Series Paper (133694)
INK:
Calypso Coral Classic Stampin’ Pad (126983)
Crumb Cake Classic Stampin’ Pad (126975)
Old Olive Classic Stampin’ Pad (126953)
Rich Razzleberry Classic Stampin’ Pad (126950)
ACCESSORIES:
1/4″ Rich Razzleberry Cotton Ribbon (134564)
Multipurpose Liquid Glue (110755)
Stampin’ Dimensionals (104430)
TOOLS:
Stampin’ Trimmer (126889)
Bone Folder (102300)
Craft Scissors (108360)
Paper Piercing Tool (126189)
Stampin’ Pierce Mat (126199)
Essentials Piercing Pack (126187)
Handheld Stapler (139083)
Silver Mini Staples (135847)
Banner Punch (133519)
Here’s a card I made for a challenge over at part of being on the As You See It Design Team! It was several weeks ago but I have some news to share…I’m pregnant! It seems the first trimester exhaustion has spilled over into my second trimester, so I apologize for my absence! I am just, at 24 weeks, feeling more like myself again so hopefully that’ll mean good things for you if you’d like to see more from me! 🙂 I don’t mean it at all as complaining because we couldn’t feel more excited or blessed to add the first little person to our family in January, but I thought some explanation for my extended absences was in order! 🙂
Anyway, I liked this card so I thought I’d share anyway. It also shows you that you can use previous challenges from any challenge site to inspire your creativity!!! New challenges on As You See It post on Friday mornings and you have until the following Wednesday night to complete the challenge! Check it out here at the As You See It Challenge Blog (and feel free to dive into the archives to check out some of the past challenges by our fabulous team leader, Amanda to inspire you)!
Hi there!
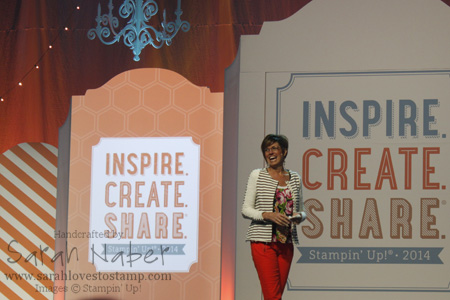
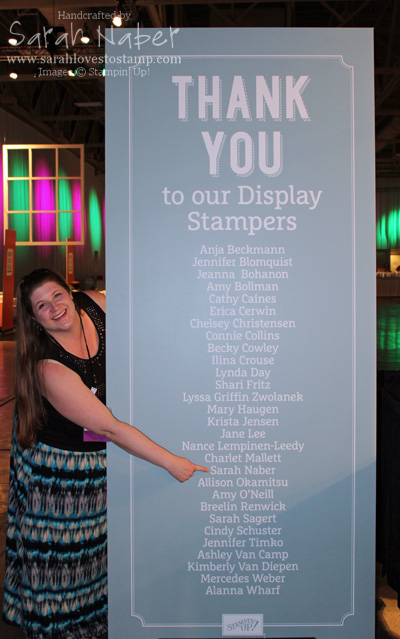
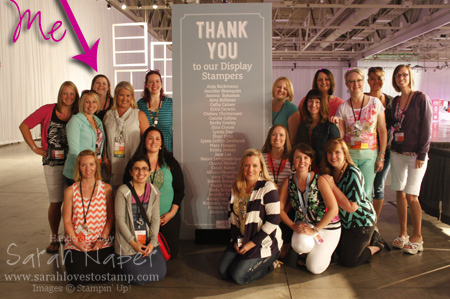
Finally home and able to update you all on the exciting happenings of Stampin’ Up! Convention 2014, as well as beginning to share a few of my 24 Convention Display Stamper samples as well. I was SO honored to be chosen by the company (check out my submission I was chosen from HERE) and to be able to create some projects I was really proud of to hopefully inspire the thousands of demonstrators that attended Convention with the three stamp sets all Convention attendees received free as the stamp sets to complete our Convention Make & Takes!
The three sets we received were Amazing Birthday, Kinda Eclectic and Seasonally Scattered (not in the Online Store yet as it’s in the Holiday Catalog)! They were so fun to work with and I hope you enjoy seeing my contributions to the board (with 27 other amazing women) in upcoming posts! Click the button below to check out our Pinterest Board with our creations!
Here’s a quick closeup of the details! I’ll put the instructions and supply list below my Convention Day 1 Recap! 🙂
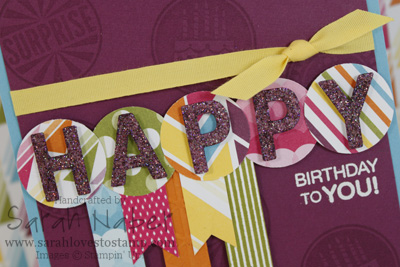
***My favorite part about this card? Coloring the Dazzling Diamonds Glimmer Paper with one of the Rich Razzleberry Stampin’ Blendabilities trio! However, I also chose this card as my swap with my other Display Stampers, and ended up using Rich Razzleberry Classic Ink Refill and 70% Rubbing Alcohol in a Stampin’ Spritzer to color it! (The paper is pretty “gritty” so I was worried about what coloring over 20 sets of these letters would do to the tip of my Blendabilities marker.) Check out below the Convention Recap for the Instructions on how to make this card. 🙂
Convention Day 1 Recap
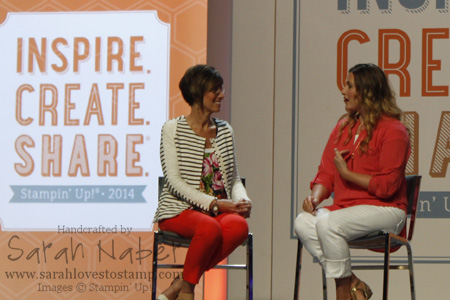
Thursday, July 17th, 2014 was the first official day of the Stampin’ Up! Inspire.Create.Share. 2014 (previously called Convention…old habits die hard, right?). Our CEO and Co-Founder Shelli Gardner kicked us off. She is so sweet and I always love to hear her speak!
Shelli was joined onstage by the creator of Project Life, Becky Higgins, to talk a bit about Stampin’ Up!’s newest partnership: Project Life by Stampin’ Up! It was fun to hear a little of the story of the creation of Project Life, as well as what her favorite Project Life by Stampin’ Up! offering is! (If you’re wondering, she said that the needs of the person depends on which kit is best for them, but that she loves the Everyday Adventure Card Collection & Accessory Pack for it’s fresh colors! I’m a fan too!)
After our first General Session, the Display Stampers met near our creations on the display boards and swapped our favorite cards we created, as well as took a few pictures! 🙂 It was so exciting to meet the gals I’d been chatting with for months on Facebook!
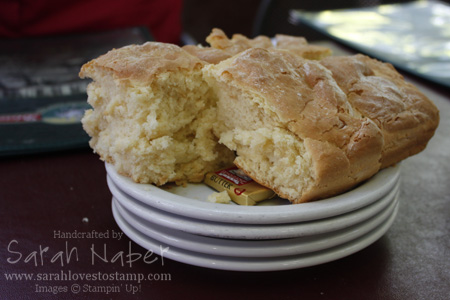
 A few of us had met up the day before at the fabulous Ruth’s Diner in Emigration Canyon, so I got to chat with those gals a bit longer than our quick meetup to swap and take a picture before heading off to our classes! You’ll probably laugh but the only picture I took that day was of the biscuits! They are famous at Ruth’s Diner and they call them their Mile High Biscuits…check out how teeny that pat of butter is and it’ll give you an idea how very huge the biscuits actually are! 🙂
How To
1. Spritz a 1″ strip of Dazzling Diamonds Glimmer Paper with a mix of Rich Razzleberry Classic Stampin’ Ink Refill and water (into a Stampin’ Spritzer). Set aside to dry. *TIP: I use an old cardboard (aka Stampin’ Up!) box to spritz into so I don’t make a mess in my crafting area.
2. Cut Tempting Turquoise Cardstock to 5-1/2″ x 8-1/2″. Score it at 4-1/4″ and crease with a Bone Folder.
3. Cut Rich Razzleberry Cardstock to 4″ x 5-1/4″.
4. Run the Embossing Buddy over the Rich Razzleberry Cardstock. Mask off the top “Happy happy happy happy” from the Amazing Birthday sentiment and only stamp the “Birthday to You!” in VersaMark ink about 2/3 of the way down on the right side of the cardstock. Cover with White Stampin’ Emboss Powder and heat just until the powder melts with the Heat Tool. *TIP: I used a Stamp-a-ma-jig for perfect positioning and alignment.
5. Stamp the 3 circular images from Amazing Birthday randomly onto the Rich Razzleberry layer.
6. Cut a variety of banners from DSP, embossed cardstock and Whisper White Cardstock. The shorter ones measure 1/2″ x 1-1/4″ and the longer ones measure 1/2″ x 1-3/4″. I used a pair of Paper Snips to cut the notched/ribbon ends but you can also use the 1″ square punch.
- Tempting Turquoise banner: Sweet Taffy DSP
- Melon Mambo banner: Whisper White Cardstock stamped with the stripe stamp from Amazing Birthday diagonally in both directions to create a crossed/diamond pattern
- Pumpkin Pie banner: Pumpkin Pie Cardstock dry embossed with the Tiny Triangles Textured Impressions Embossing Folder
- Daffodil Delight banner: Sweet Taffy DSP
- Old Olive banner: Whisper White Cardstock stamped with the stripe stamp from Amazing Birthday
7. Glue the banners together (they will look exactly like this if you align the top straight edges with one another) and attach with Stampin’ Dimensionals as pictured.
8. Use the 1″ Circle Punch to punch out 5 circles from the Sweet Taffy DSP. Use Stampin’ Dimensionals to attach them to the Rich Razzleberry layer.
9. Use the Big Shot Die-Cutting Machine and the Little Letters Thinlits Dies to cut out the letters for “HAPPY” from the dyed glimmer paper from Step 1. Attach with tiny pieces of Stampin’ Dimensionals for this look (remember, I made only ONE of these cards for the display boards) or use Multipurpose Liquid Adhesive for a simpler option (my Display Stamper Swap cards used the regular adhesive option).
10. Tie the 1/4″ Daffodil Delight Cotton Ribbon (are you loving this ribbon? I AM!) around the Rich Razzleberry Cardstock piece and attach to the card base! You’re done! The directions sound a LOT more complicated than this card actually is so I hope you’ll give it a try!
Supply List
STAMPS:
Amazing Birthday (Wood-Mount 134225, Clear-Mount 134228)
PAPER:
8-1/2″ x 11″ Whisper White Cardstock (100730)
8-1/2″ x 11″ Pumpkin Pie Cardstock (104117)
8-1/2″ x 11″ Rich Razzleberry Cardstock (115316)
8-1/2″ x 11″ Tempting Turquoise Cardstock (102067)
Sweet Taffy Designer Series Paper (133693)
Dazzling Diamonds Glimmer Paper (135315)
INK:
Melon Mambo Classic Stampin’ Pad (126948)
Old Olive Classic Stampin’ Pad (126953)
Rich Razzleberry Classic Stampin’ Ink Refill (115664)
VersaMark (102283)
ACCESSORIES:
1/4″ Daffodil Delight Cotton Ribbon (134559)
SNAIL Adhesive (104332)
Multipurpose Liquid Glue (110755)
Stampin’ Dimensionals (104430)
TOOLS:
Stampin’ Trimmer (126889)
Simply Scored Scoring Tool (122334)
Bone Folder (102300)
Paper Snips (103579)
Craft Scissors (108360)
Stamp-a-ma-jig (101049)
Heat Tool (129053)
White Stampin’ Emboss Powder (109132)
Embossing Buddy (103083)
1″ Circle Punch (119868)
Big Shot Die-Cutting Machine (113439)
Big Shot Magnetic Platform (130658)
Little Letters Thinlits Dies (133730)
Tiny Triangles Textured Impressions Embossing Folder (133740)
Grid Paper (102787)
Stampin’ Scrub (126200)
Stampin’ Mist (102394)
Hi there! I’m in Salt Lake City at Stampin’ Up!’s Inspire.Create.Share. Convention as I type this! I’m in for a few days of fun, friends, free products and a sneak peek of the upcoming Holiday Catalog! YAY!
So…while I’m gone, I wanted to do something for my customers. I know I LOVE getting free shipping while ordering online so that’s what I settled on! FREE SHIPPING from Thursday, July 17, 2014 until 11:50 pm Central time on Monday, July 21, 2014! Just place your $50+ order (before tax and shipping) in my online store by clicking HERE and I’ll send your shipping cost back to you via Paypal or snail mail (whichever you prefer)!
I hope you are able to take advantage of this offer and enjoy some products from the new 2014-2015 Annual Catalog! 🙂 This offer is from ME to you, not the company, so it isn’t available through other Stampin’ Up! Demonstrators!
Have a great day! We’re headed out NOW for the official start of Convention this morning!!! Stay tuned to my blog for daily updates, as well as my Facebook, Twitter, and Instagram accounts!
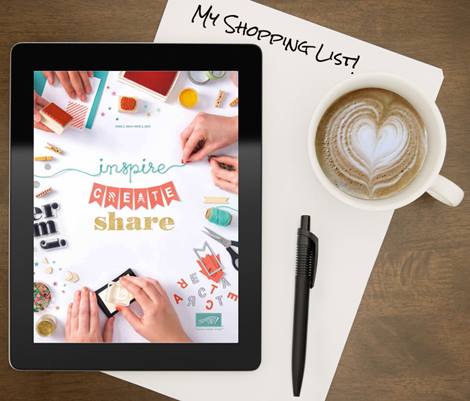
Hi there! Today is a GOOD day! Why? Because the BRAND NEW 2014-2015 Annual Catalog is LIVE! Oh yay! I’m LOVING SO many of the fantastic things found within it’s pages!
HERE is the link to download the 2014-2015 Annual Catalog PDF.
I’m also doing a free gift with any order before June 11th. To qualify, simply enter the hostess code HNNWTY6B in the box in the lower left hand corner of the shopping bag screen!
(Please do not use the Hostess Code if your order is $150 or more, as you qualify for Hostess Benefits of your own! Don’t worry – I’ll still send you a gift or two!)
If you haven’t ordered from me before, I’ll mail you a catalog with your order of $50 or more. I’ll also include a Wish List and New In Color Bookmark, as well as the gift info below.
CLICK HERE to Shop in My Online Store!
CLICK HERE for information on my Product Shares!
An apology in advance for this lengthy post! 🙂 I also apologize for my long hiatus! I’m working on 24 samples for display for our Stampin’ Up! Convention in July so I’m really trying to get those done. Bonus…in July, I’ll have 24 pretty sweet projects to share! 🙂
A new catalog is always exciting and brings a great variety of new things everyone wants to try out! I’m doing my first catalog shares to help you try everything you want at a MUCH lower cost than buying it all yourself. 🙂 A share means several people are splitting the 10 yard rolls of ribbon into 2 yard segments and getting every color OR cutting the Designer Series Paper into 6″x6″ pieces and having every pattern right now!
Here’s how the 2014-2015 Stampin’ Up! Product Shares work:
-Sign up for a spot in the product share(s) you’d like to receive
-As soon as the share is full, you’ll receive a Paypal invoice for the total amount
-Once I’ve collected payment from all people in the share, I will place the order for the product (SU! policy says I cannot order it and collect payment later)
-I will order the first round, if full, on June 2nd, and will plan to ship it out the week of June 9th (estimated arrival time is two weeks allowing for time for it to ship to me, get packaged and ship out to you)
-Designer Series Paper (DSP) Shares & I WANT IT ALL Shares will come packaged in a cello bag (to protect from water damage) in a Flat Rate Priority Bubble Mailer. Ribbon Shares will come wrapped and secured to chipboard for wrinkle free use and packaged in a cello bag in a bubble mailer.
-If you are local to me (St. Joseph, MO area), you can pick up your share(s) at my home instead of paying the shipping cost.
Pictures of shares will be added as soon as products are received.
PAPER SHARES
Designer Series Paper Share: 60 sheets 6″x6″ double-sided
$15.99 (+$5.95 Priority Shipping)
-Designer Series Paper (DSP) – 48 sheets
-Specialty Designer Series Paper (DSP) – 12 sheets
-If you wanted to buy full packages of all of this DSP, it would cost you $113.50 + shipping & tax!
***Are you a scrapbooker?***
***Would you rather have a 6″x12″ pieces?***
Do a double share of the above Designer Series Paper Share for $31.75
Background DSP Stacks Paper Share: 100 sheets 6″x6″ double-sided
$16.50 (+$5.95 Priority Shipping)
-Brights DSP stack – 20 sheets
-Subtles DSP stack – 20 sheets
-Regals DSP stack – 20 sheets
-Neutrals DSP stack – 20 sheets
-2013-2015 In Color Stack – 10 sheets
-2014-2016 In Color Stack – 10 sheets
-If you wanted to buy full stacks of all of this DSP, it would cost you $131.70 + shipping & tax!
RIBBON SHARES
NEW 5/8″ Satin Ribbon Share: $6.95 (+$3.00 shipping)
-Approximately 2 yards each of 4 colors = 8 yards total
-Gold, Silver, Very Vanilla, Whisper White
-Picture to follow.
-If you wanted to buy rolls of all of this ribbon, it would cost you $27.80 + shipping & tax!
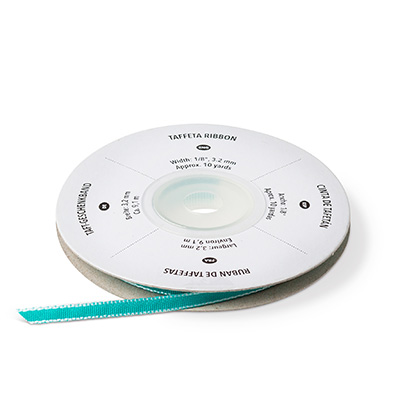
1/8″ Taffeta Ribbon: $13.95 (+$3.00 shipping)
-Approximately 2 yards of each of 10 colors = 20 yards total
-Gold, Silver, Basic Black, Bermuda Bay, Crushed Curry, Melon Mambo, Old Olive, Real Red, Smoky Slate, Soft Sky
-If you wanted to buy rolls of all of this ribbon, it would cost you $57.50 + shipping & tax!
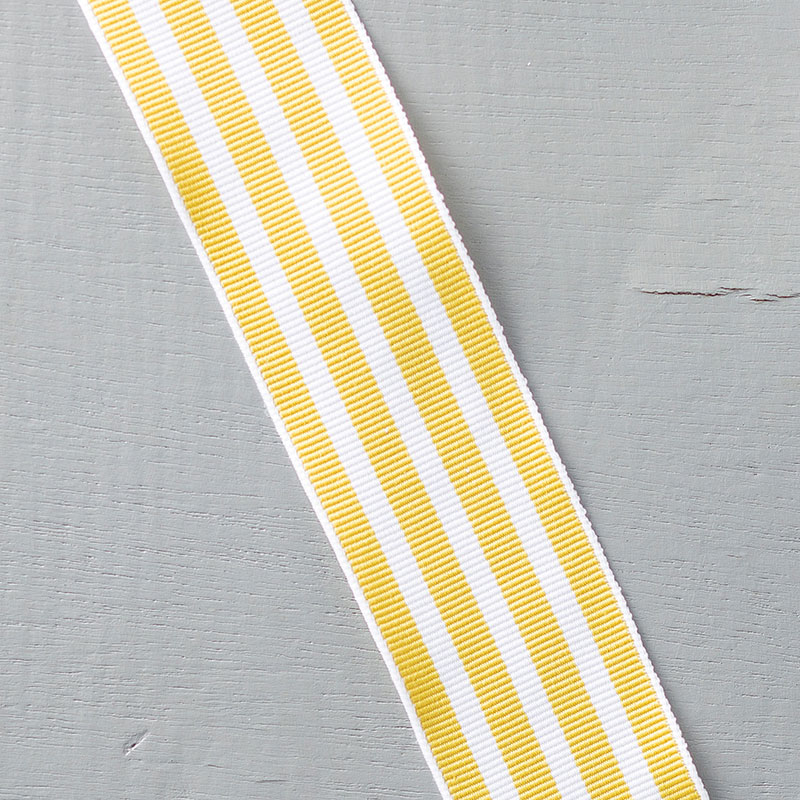
NEW 1-1/4″ Striped Grosgrain Ribbon Share: $10.95 (+$3.00 shipping)
-Approximately 2 yards of each of 5 colors = 10 yards total
-Bermuda Bay, Blushing Bride, Cherry Cobbler, Crumb Cake, Crushed Curry
-If you wanted to buy rolls of all of this ribbon, it would cost you $44.75 + shipping & tax!

NEW In Color 3/8″ Stitched Ribbon Share: $10.95 (+$3.00 shipping)
-Approximately 2 yards of each of 5 colors = 10 yards total
-Blackberry Bliss, Hello Honey, Lost Lagoon, Mossy Meadow, Tangelo Twist
-If you wanted to buy rolls of all of this ribbon, it would cost you $44.75 + shipping & tax!
*Project from Shelli Gardner, SU! CEO & Co-founder
NEW 1/4″ Cotton Ribbon Share: $17.50 (+$3.00 shipping)
-Approximately 2 yards of each of 12 colors = 24 yards total
-Blushing Bride, Daffodil Delight, Early Espresso, Island Indigo, Marina Mist, Melon Mambo, Pear Pizzazz, Pool Party, Pumpkin Pie, Real Red, Rich Razzleberry, Whisper White
-If you wanted to buy rolls of all of this ribbon, it would cost you $71.40 + shipping & tax!
*Project from Shelli Gardner, SU! CEO and Co-founder – At our catalog premiere, Shelli kept talking about how nicely it ties and how soft it feels. I can’t wait to have this in hand!!! 🙂
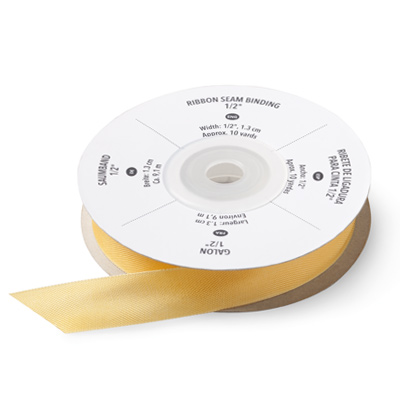
1/2″ Seam Binding Ribbon Share: $19.95 (+$3.00 shipping)
-Approximately 2 yards of each of 12 colors = 24 yards total
-Calypso Coral, Cherry Cobbler, Crumb Cake, Daffodil Delight, Early Espresso, Night of Navy, Pink Pirouette, Soft Sky, Very Vanilla, Whisper White, Wild Wasabi, Wisteria Wonder
-If you wanted to buy rolls of all of this ribbon, it would cost you $83.40 + shipping & tax!
![]()
3/4″ Chevron Ribbon Share: $25.95 (+$3.00 shipping)
-Approximately 2 yards of each of 12 colors = 24 yards total
-Basic Black, Blushing Bride, Calypso Coral, Cherry Cobbler, Chocolate Chip, Crushed Curry, Island Indigo, Marina Mist, Pear Pizzazz, Pumpkin Pie, Smoky Slate, Wisteria Wonder
-If you wanted to buy rolls of all of this ribbon, it would cost you $107.40 + shipping & tax!
I WANT IT ALL!!!
“I’m a Ribbon Addict!” – ALL ribbons listed above!!!
$104.50 + FREE SHIPPING
That’s 120 yards of glorious, SU! exclusive ribbon!
Total, if you bought ALL of the rolls of ribbon instead, $427.10!!!
“I WANT IT ALL!” – EVERYTHING listed above!!!
$136.95 + FREE SHIPPING.
That’s 160 6″x6″ sheets of DSP and 120 yards of ribbon!
Total cost if you were to buy it all in full packs, stacks and rolls…a whopping $672.30!!!
Hi there! I’m LOVING the partnership of Becky Higgins and Stampin’ Up! to bring you Project Life in Stampin’ Up!’s exclusive colors! There are lots of great products to this line that you can purchase now! Here’s my unboxing and first impressions of the first part of my Project Life order (I’m totally going to have to make another to get those awesome dies).
I posted this video to YouTube last week and forgot that I hadn’t put it onto the blog so that’s why the date on the video is before this post! Don’t want that to happen again? Subscribe to my YouTube channel and get notified when I upload new videos!
Here are the Project Life products that are currently available! More will be available in the new catalog on June 2nd! Did you know? I’m sending out the brand new 2014-2015 Annual Catalog NOW to anyone who places a $50 order (before shipping and tax) in May! If you’re ordering under $150, please use the hostess code RGSHXDMM and you receive a free gift along with your brand new catalog! (If you’re ordering over $150, please don’t use the hostess code as you’re eligible for your own hostess benefits. OF COURSE, I will still send you a catalog and a free gift (or two)! 🙂 Ok, whoops! I’m excited about that info…back to the Project Life products! CLICK on any of the product photos to see them in my online store (you can also click on them in the store to see them larger)!

Variety Pack 12″ x 12″ Project Life Photo
Pocket Pages (135294) $6.95
12 pages: 2 ea. of 6 designs.

Everyday Adventure Project Life Card Collection (135298) $15.95
100 double-sided, color -coordinated cards in 3 sizes:
4″ x 6″, 4″ x 4″, and 3″ x 4″

Everyday Adventure Project Life Accessory Pack (135301) $9.95
4 3″ x 4″ specialty cards; 8 sticker sheets;
1 acetate accents sheet; 8 wood accents;
2 epoxy stickers; 4 arrow paperclips;
1 roll washi tape (5 yds.)

Project Life Journaling Pens (135304) $4.95
2 pens (01 and 05)

Project Life Corner Punch (135346) $7.95

Cards & Labels Project Life Framelits Dies (135707) $24.95
5 dies

Project Life Day to Day Photopolymer Stamp Set (135785) $25.95
42 stamps

Project Life Au jour le jour (Day to Day Set in French) (136706) $25.95

Project Life Point & Click Photopolymer Stamp Set (135787) $15.95
26 stamps
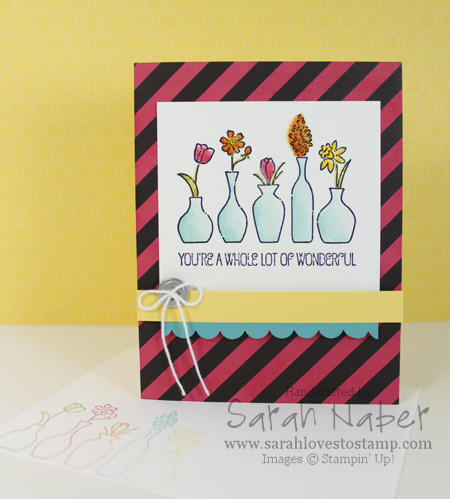
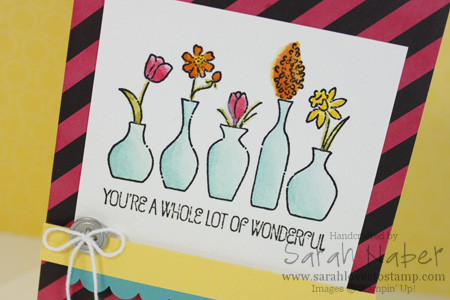
I LOVED this card made with the Vivid Vases single stamp! It was designed as one of our Make and Take projects for Stampin’ Up! Leadership 2014 this past January. This project is also what inspired me to make my video the other day about coloring black and white Designer Series Paper to custom match it to your project. (Check that out below.)
In particular, in this project, I thought coloring Designer Series Paper was a good solution as the Whisper White in the Designer Series Paper looked super bright next to the more muted white of the Watercolor Paper. It can also work well if your Designer Series Paper is Whisper White and your project features Very Vanilla or vice versa.
How To
1. Cut a piece of Daffodil Delight cardstock to 5-1/2″ x 8-1/2″. Score it at 4-1/4″ and crease with a Bone Folder.
2. Cut a piece of the black & white diagonal striped paper from the Kaleidoscope Designer Series Paper pack to 4-1/4″ x 5-1/2″. Color it with the Strawberry Slush Classic Stampin’ Pad using one of the techniques in the video below. Adhere it to the front of the card base with Multipurpose Liquid Glue.
3. Cut Watercolor Paper to 3-1/2″ x 3-1/4″. Stamp the Vivid Vases single stamp on it with the Jet Black StazOn Ink Pad. *TIP: For perfect placement, use the Stamp-a-ma-jig.
4. Watercolor the images with the fine tipped Aqua Painter and the Strawberry Slush, Pumpkin Pie, Daffodil Delight, Old Olive, and Bermuda Bay Classic Stampin’ Pads. (I’ll add my Watercoloring Basics Video below.) Adhere it to the card using Multipurpose Liquid Glue.
5. Cut a strip of Daffodil Delight cardstock to 4-1/4″ x 1/2″ and a piece of Bermuda Bay cardstock to 3-1/2″ x 3/4″. Punch the Bermuda Bay strip with the Scallop Edge punch, attach it to the Daffodil Delight strip and attach them both to the card with Stampin’ Dimensionals.
6. Thread a metal button with Whisper White Baker’s Twine, tie a bow and attach it to the card with a Glue Dot.
7. Use Stampin’ Write Markers to ink up each vase in a different color and stamp them onto the envelope. I used a Stamp-a-ma-jig for perfect placement (and to eliminate the sentiment on the envelope). You can see the stamped envelope in the first picture.
Related Videos
*Check out below the videos for the full supply list for this card.
Adding Color to Black & White Paper
Easy Watercolor Tips
Supply List
STAMPS:
Vivid Vases (Wood-Mount Only 133818)
PAPER:
8-1/2″ x 11″ Bermuda Bay Cardstock (131197)
8-1/2″ x 11″ Daffodil Delight Cardstock (119683)
Kaleidoscope Designer Series Paper (132995)
Watercolor Paper (122959)
INK:
Bermuda Bay Classic Stampin’ Pad (131171)
Daffodil Delight Classic Stampin’ Pad (126944)
Old Olive Classic Stampin’ Pad (126953)
Pumpkin Pie Classic Stampin’ Pad (126945)
Strawberry Slush Classic Stampin’ Pad (131178)
Jet Black StazOn Ink Pad (101406)
ACCESSORIES:
Basic Metal Buttons (133319)
Whisper White Baker’s Twine (124262)
Multipurpose Liquid Glue (110755)
Mini Glue Dots (103683)
Stampin’ Dimensionals (104430)
TOOLS:
Stampin’ Trimmer (126889)
Simply Scored Scoring Tool (122334)
Bone Folder (102300)
Craft Scissors (108360)
Aqua Painters (103954)
Stamp-a-ma-jig (101049)
Scallop Edge Border Punch (119882)
Grid Paper (102787)
Stampin’ Scrub (126200)
Stampin’ Mist (102394)
StazOn Cleaner (109196)
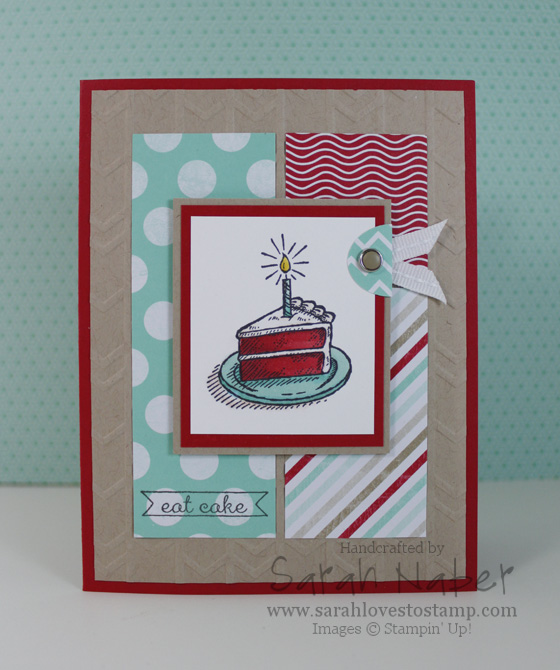
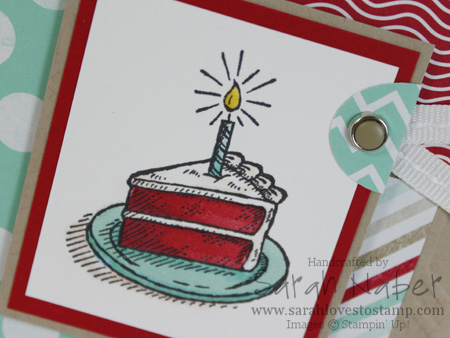
I’m so excited to show you my very first creation with Stampin’ Up!’s brand new alcohol-based markers, Blendabilities! They’re beyond fantastic and I’m loving that they come in SU!’s exclusive colors and are totally fool proof as they come in sets of 3 with a light, medium and dark of the same hue! I thought…if I’m using the piece of cake image from Sketched Birthday, why not make it Red Velvet? YUM!
What else do I love? THIS SKETCH! It’s out of this world! Won’t you please play along with us at the As You See It Challenge? Head over there by clicking the link and check out what the other Design Team members have to share today! I can’t wait to see what you’ll create!
I also used some favorites that will be gone after May 31st as they are in the Occasions Catalog. The Fresh Prints Designer Series Paper Stack is so darn cute! I’m obsessed with this color combo! I used the Cherry Cobbler Blendabilities and used a tiny amount of the darkest color to add the shading without using too much so that it would retain the brightness it needed to in order to look good with the Real Red in the Fresh Prints Designer Series Paper Stack.
Here’s a closeup of the focal image. 🙂 Again, it isn’t perfect coloring but I was still pretty happy with the end result.
 How To
1. Cut Real Red Cardstock to 5-1/2″ x 8-1/2″. Score and fold at 4-1/4″
2. Cut Crumb Cake Cardstock to 4″ x 5-1/4″. Run through the Big Shot Die-Cutting Machine with the Arrows Textured Impressions Embossing Folder. Adhere to card base with Multipurpose Liquid Adhesive. *TIP: Anytime you want to adhere a textured piece of cardstock to another piece of cardstock, Multipurpose Liquid Adhesive is the best way to do it! The liquid glue is able to seep into the nooks and crannies and provide an excellent bond between the two paper layers.
3. Cut Fresh Prints Designer Series Paper (retiring May 31st) patterns to 1-1/2″ x 4-1/4″, 1-1/2″ x 2-5/8″ and 1-1/2″ x 1-1/2″. Stamp the greeting from Sketched Birthday on the bottom of the largest DSP piece with Memento Tuxedo Black Ink*. *TIP: I used my Stamp-a-ma-jig to get perfect positioning of the sentiment on the DSP. LOVE that Stamp-a-ma-jig!!!
4. Cut Crumb Cake Cardstock layer to 2-1/4″ x 2-5/8″, Real Red Cardstock to 2-1/8″ x 2-1/2″, and Whisper White Cardstock to 1-7/8″ x 2-1/4″.
5. Stamp the birthday cake image from Sketched Birthday onto the Whisper White piece from Step 4.
6. Color with Cherry Cobbler, Coastal Cabana and Daffodil Delight Blendabilities* trios. Add a bit of the lightest color from the Blendabilities Skin Tone Assortment* to the frosting and underneath the plate to add some extra dimension and realism (frosting isn’t truly white). *TIP: To better match my Real Red in the color combination (from the DSP), I used a LOT more of the light and medium markers in the Cherry Cobbler trio than the darkest. I used a tiny bit of the darkest color to add the shading I needed.
7. Attach the 3 cardstock focal-point layers from Step 4 together. *Tip: I use SNAIL to adhere Whisper White to other cardstock. Although Multipurpose Liquid Glue is my favorite adhesive, I find that it shows slight glue lines on top unless I apply it in a very thin and smooth layer, so I use SNAIL just to be safe. I know this is pretty picky as it is hard usually to even see the glue lines, but I’d rather be safe than sorry. (One exception to this is if the Whisper White layer is textured with an embossing folder and the Big Shot…then I still use Multipurpose Liquid Glue.)
8. Punch a Small Oval from the DSP. Fold it around the layered focal point. Punch a hole with the 1/16″ Circle Punch* and put a Candy Dot Brad Base through it. Bend the prongs outward and attach a Crumb Cake Candy Dot from the Neutrals Candy Dots to the center of it.
9. Cut two small pieces of 1/4″ Whisper White Stitched Grosgrain (while supplies last only) and attach with Glue Dots.
10. Finally attach the main focal point with Stampin’ Dimensionals! You’re done!
Hi there! Back with a new Quick Tip Tuesday for you on how to add color to black & white or black & vanilla paper! While the two options I show in the video will soon be gone, there are 2 new options in the 2014-2015 Annual Catalog! 🙂 I LOVE to do this technique and I think the easiest to get great results turned out to be the brayering option. Check out the video and let me know what you think. Have you tried this before? If not, will you try it now? Feel free to send me your projects that you’ve made using this technique! I’d love to see them and maybe feature you on the old blog-o if you’re alright with that!
I’ll be back later to add in the edited pictures of the project I show during the video. Oh how I LOVE that card!!!
Connect with Me!


