
Currently viewing the tag: "Video"
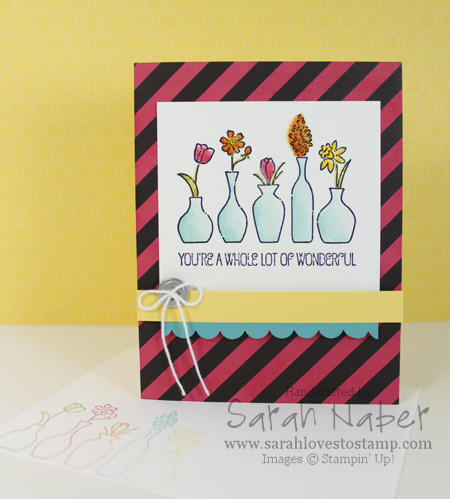
I LOVED this card made with the Vivid Vases single stamp! It was designed as one of our Make and Take projects for Stampin’ Up! Leadership 2014 this past January. This project is also what inspired me to make my video the other day about coloring black and white Designer Series Paper to custom match it to your project. (Check that out below.)
In particular, in this project, I thought coloring Designer Series Paper was a good solution as the Whisper White in the Designer Series Paper looked super bright next to the more muted white of the Watercolor Paper. It can also work well if your Designer Series Paper is Whisper White and your project features Very Vanilla or vice versa.
How To
1. Cut a piece of Daffodil Delight cardstock to 5-1/2″ x 8-1/2″. Score it at 4-1/4″ and crease with a Bone Folder.
2. Cut a piece of the black & white diagonal striped paper from the Kaleidoscope Designer Series Paper pack to 4-1/4″ x 5-1/2″. Color it with the Strawberry Slush Classic Stampin’ Pad using one of the techniques in the video below. Adhere it to the front of the card base with Multipurpose Liquid Glue.
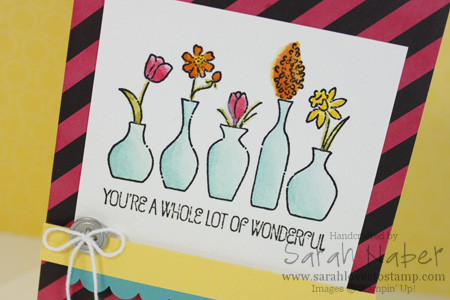
3. Cut Watercolor Paper to 3-1/2″ x 3-1/4″. Stamp the Vivid Vases single stamp on it with the Jet Black StazOn Ink Pad. *TIP: For perfect placement, use the Stamp-a-ma-jig.
4. Watercolor the images with the fine tipped Aqua Painter and the Strawberry Slush, Pumpkin Pie, Daffodil Delight, Old Olive, and Bermuda Bay Classic Stampin’ Pads. (I’ll add my Watercoloring Basics Video below.) Adhere it to the card using Multipurpose Liquid Glue.
5. Cut a strip of Daffodil Delight cardstock to 4-1/4″ x 1/2″ and a piece of Bermuda Bay cardstock to 3-1/2″ x 3/4″. Punch the Bermuda Bay strip with the Scallop Edge punch, attach it to the Daffodil Delight strip and attach them both to the card with Stampin’ Dimensionals.
6. Thread a metal button with Whisper White Baker’s Twine, tie a bow and attach it to the card with a Glue Dot.
7. Use Stampin’ Write Markers to ink up each vase in a different color and stamp them onto the envelope. I used a Stamp-a-ma-jig for perfect placement (and to eliminate the sentiment on the envelope). You can see the stamped envelope in the first picture.
Related Videos
*Check out below the videos for the full supply list for this card.
Adding Color to Black & White Paper
Easy Watercolor Tips
Supply List
STAMPS:
Vivid Vases (Wood-Mount Only 133818)
PAPER:
8-1/2″ x 11″ Bermuda Bay Cardstock (131197)
8-1/2″ x 11″ Daffodil Delight Cardstock (119683)
Kaleidoscope Designer Series Paper (132995)
Watercolor Paper (122959)
INK:
Bermuda Bay Classic Stampin’ Pad (131171)
Daffodil Delight Classic Stampin’ Pad (126944)
Old Olive Classic Stampin’ Pad (126953)
Pumpkin Pie Classic Stampin’ Pad (126945)
Strawberry Slush Classic Stampin’ Pad (131178)
Jet Black StazOn Ink Pad (101406)
ACCESSORIES:
Basic Metal Buttons (133319)
Whisper White Baker’s Twine (124262)
Multipurpose Liquid Glue (110755)
Mini Glue Dots (103683)
Stampin’ Dimensionals (104430)
TOOLS:
Stampin’ Trimmer (126889)
Simply Scored Scoring Tool (122334)
Bone Folder (102300)
Craft Scissors (108360)
Aqua Painters (103954)
Stamp-a-ma-jig (101049)
Scallop Edge Border Punch (119882)
Grid Paper (102787)
Stampin’ Scrub (126200)
Stampin’ Mist (102394)
StazOn Cleaner (109196)

Hello! Today I have a super easy, quick card! 🙂 I participated in the 10 Minute Craft Dash and interpreted their colors for the challenge as Stampin’ Up!’s Tangerine Tango, Basic Black, and Wild Wasabi! I totally encourage anyone to play along with these challenges! They are truly that, a challenge!!! I LOVE that it forces me to make a quick and simple card, although I wish I had had more time to add some black rhinestones to this card.

I also filmed a video as I was making this card so you could see the somewhat crazy process! 🙂 I’m proud to say it took me 9 minutes 45 seconds!!! Barely made it! I’ll embed the video here as soon as it uploads to YouTube. I also combined this challenge with the sketch over at Freshly Made Sketches, although I did take a tad bit of creative license and put something in the upper left corner. I also made the sketch into a regular card as I don’t make square cards, except once in a blue moon.
Below is the supply list! Click on any item to see it in my online store and order it now! 🙂 Or CLICK HERE for easy shopping 24/7!

Supply List
STAMPS:
Tags 4 You (Wood-Mount 131820, Clear-Mount 131823)
***Save 15% and buy the Tags 4 You Stamp Set and matching Label Bracket Punch as bundle! Wood-Mount 133293, Clear-Mount 133294***
Gorgeous Grunge (Wood-Mount 130514, Clear-Mount 130517)
Off the Grid (Wood-Mount Only 130736)
PAPER:
8-1/2″ x 11″ Whisper White Cardstock (100730)
8-1/2″ x 11″ Basic Black Cardstock (121045)
8-1/2″ x 11″ Tangerine Tango Cardstock (111349)
INK:
Tangerine Tango Classic Stampin’ Pad (126946)
Wild Wasabi Classic Stampin’ Pad (126959)
Jet Black StazOn Ink Pad (101406)
***Note: The Tangerine Tango & Wild Wasabi markers are not available individually.***
Basic Black Stampin’ Write Marker (100082)
Brights Collection Stampin’ Write Markers (131259) – Tangerine Tango
Subtles Collection Stampin’ Write Markers (131263) – Wild Wasabi
OR get ALL 38 Core Colors in our Color Collections (not Whisper White or Very Vanilla) in the Many Marvelous Markers (131264)
ACCESSORIES:
SNAIL Adhesive (104332)
Multipurpose Liquid Glue (110755)
Stampin’ Dimensionals (104430)
TOOLS:
Stampin’ Trimmer (126889)
Simply Scored Scoring Tool (122334)
Bone Folder (102300)
Blender Pens (102845)
Label Bracket Punch (132153)
***Save 15% and buy the Label Bracket Punch and matching Tags 4 You Stamp Set as bundle! Wood-Mount 133293, Clear-Mount 133294***
Grid Paper (102787)
Stampin’ Scrub (126200)
Stampin’ Mist (102394)
StazOn Cleaner (109196)
ruler
Hello! Our new Firm Foam Pads need to be reinked a bit differently than the old felt style ones, so hopefully this video will help you to reink your awesome new Firm Foam Pads successfully! It’s super easy and one reinker should last you a very long time! Let me know if you have questions.
Hi there! My 5th and final video in my Big Shot series covering how to run all the different Sizzix items Stampin’ Up! offers through the Big Shot! Check out THIS playlist for the rest of the videos, as well as a few other videos that show how I used them on my projects. Let me know if you have questions on how to use the Big Shot after watching these videos!!!
I hope you enjoy today’s video! Embosslits are tiny but pack a lot of punch as they cut and emboss at the same time! I LOVE to use these on any of my projects! The perfect accent!
In other news, do any of you watch the X Factor? I’m loving the talent this season, especially that Tate Stevens! I was on the edge of my seat last night because he was in the third group, after the first gotten the good news and the second the bad. Man, I love that show!
Anyway, hope you’re all having a great week! If you haven’t signed up for my mailing list yet, get that done so you don’t miss out on the 2nd Week of Christmas, which will be out next Wednesday.

Today’s video is a long one as I ended up making the entire card on camera! I hope you enjoy it! I show a little bonus tip about how I add Dazzling Diamonds Stampin’ Glitter to my projects as well. I’ll be back later today to edit this post with a full supply list, as well as a photo of the card I made in the video. I apologize that the video didn’t get posted until today – I didn’t notice (for a long time) that my YouTube upload had completely stalled out and I had to restart it! Sorry!
Supply List
STAMPS:
Ornament Keepsakes Bundle (Wood-Mount 128048, Clear-Mount 128051) OR the October Promotion, CLICK HERE!
Delightful Dozen (Wood-Mount 122650, Clear-Mount 122652)
PAPER:
8-1/2″ x 11″ Whisper White Card Stock (100730)
8-1/2″ x 11″ Pool Party Card Stock (122924)
INK:
Lucky Limeade Classic Stampin’ Pad (126984)
Pool Party Classic Stampin’ Pad (126982)
Real Red Classic Stampin’ Pad (126949)
Real Red Stampin’ Write Marker (100052)
ACCESSORIES:
Lucky Limeade Baker’s Twine (125572)
Dazzling Diamonds Stampin’ Glitter (102023)
Multipurpose Liquid Glue (110755)
2-Way Glue Pen (100425)
Mini Glue Dots (103683)
Stampin’ Dimensionals (104430)
TOOLS:
Tabletop Paper Cutter (106959)
Simply Scored Scoring Tool (122334)
Bone Folder (102300)
Craft Scissors (108360)
Stamp-a-ma-jig (101049)
Paper Piercing Tool (126189)
Stampin’ Pierce Mat (126199)
Essentials Paper-Piercing Pack (126187)
3/4″ Circle Punch (119873)
1″ Circle Punch (119868)
Big Shot Die-Cutting Machine (113439)
Grid Paper (102787)
Stampin’ Scrub (126200)
Stampin’ Mist (102394)
Hi there! Quick video today showing some comparisons between the new, fabulous Illuminate Glimmer Watermark Stampin’ Pad that debuted in the 2012 Holiday Catalog and the long-time stamping essential, VersaMark!!! I LOVE both of these products and hope you enjoy seeing a bit of how they compare to one another. As always, I recommend buying the refill ink (or reinker) at the time that your purchase the pad so that you have that reinker when you need it! Also, I have no idea if the Illuminate Glimmer Watermark Ink will be available after the Holiday Catalog is over so get it now so you don’t forget! Leave a comment below!
Hi there! Today’s belated Quick Tip Tuesday is just my take on a super cute project idea from Stampin’ Up! Convention 2012. September is a perfect month for it as you can choose a roll of our 3/8″ Stitched Satin Ribbon for every $40 increment you spend. Get out those ribbon scraps and make some fun ribbon cards or scrapbook pages incorporating this technique today!!!
Hi there! Sorry I missed posting for a few days – we were home for the long weekend here in the US. I did get the audio dubbed into that video I was talking about in my last post so that’s what I have for you today! Check back later for the Quick Tip Tuesday using the ribbon in the new “Back to Spool” September promotion!!!
I hope you enjoy the video today! This is probably the way I use my Big Shot most and my favorite thing to add to my project – TEXTURE with the embossing folders! 🙂 I show a few different ways to use them, as well as what “sandwich” you need for each type of folder.
See you again soon!!!
I’m pretty late on the video posting tonight! I apologize but I haven’t felt well for the past couple of days. I hope you enjoy this tip – I know it sure helps me!!! The tip is important as it is how I keep from losing or misplacing any of my stamps! I also give you a tiny peek into my Stamp Studio to show you how and where I store my stamps as well (please excuse the video at that point…it looks a little like I filmed it onboard a ship! I will get my better/taller tripod next time I need to do this type of video). Having well-organized stamp storage will help you cut down on the amount of time you spend crafting, card making, or scrapbooking as you can find your stamps so easily!
I spent quite a few of my office hours working on bringing you some fresh ideas and new projects through challenges! I hope for it to be something you all really enjoy as it will get me to expand my creativity. Check back for that – hopefully tomorrow!!! 🙂
I hope you enjoy today’s video on how to cut out a stamped image with a Framelits Die and the Big Shot. Many of our Stampin’ Up! stamps are designed to coordinate with Framelits dies and I couldn’t be more thrilled to see a 15% discount on the Bundles that include a stamp set and matching Framelits dies in the Holiday Catalog! I’ll list all the bundles that are discounted below, and highlight the 4 that are stamp sets and matching Framelits. My other favorite bundle: the Ghoulish Googlies bundle! You’ll see that in an upcoming post soon! (You can click on any of the links to see the products in my online store.) Leave a comment below and let me know what your favorite bundle is!!! 🙂
Holiday Catalog Bundles
Ornament Keepsakes Bundle (Wood-Mount 129949, Clear-Mount 129950)
Scentsational Season Bundle (Wood-Mount 129945, Clear-Mount 129946)
Noel Notes Bundle (129909)
Everyday Happenings Bundle (129936)
Ghoulish Googlies Bundle (Wood-Mount 129852, Clear-Mount 129853)
Perfectly Preserved Bundle (Wood-Mount 129943, Clear-Mount 129944)
Friendship Preserves Bundle (Wood-Mount 129947, Clear-Mount 129948)
Remember December Digital Collection Disc (129836)
Haunts & Harvest Digital Collection Disc (129835)
Being able to tie the perfect knot is all about practice, practice, practice! In this video, I show you how to tie a knot around a card three different times. Pause the video and practice along. The third time, I even show you what to do if your ribbon is one-sided and you want a certain side only to show. Enjoy!
Connect with Me!


