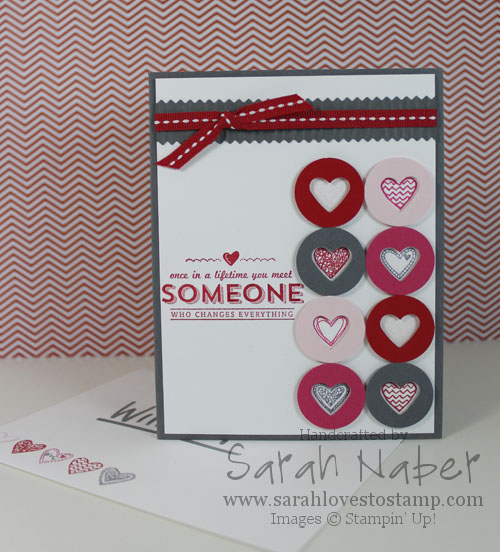
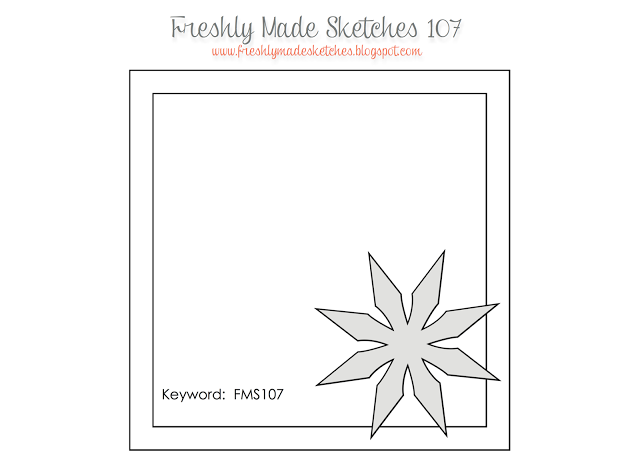
Hi there! Today I have my husband’s Valentine’s Day card to share with you! I combined a few great challenges to bring a fun, masculine card to you (at least my hubby says it is still masculine with the pink since it was for V-day and he says ribbon is ok too). Loving this lovey combo of colors from the Color Throwdown Challenge and the FABULOUS sketch from Freshly Made Sketches! I can tell you I will be using this layout again soon! LOVE!
I received the Language of Love stamp set (Wood-Mount 133074, Clear-Mount 133077) at Stampin’ Up! Leadership in Houston in January (FREE perk for attendees! Woohoo!) and had NO idea I’d fall in love with it (no pun intended…honestly) this much!!! I combined it with the perfect sentiment from the FREE Sale-A-Bration exclusive stamp set, See Ya Later (Wood-Mount 133533, Clear-Mount 133536)! LOVE IT! This sentiment is also GREAT for any love card: Valentine’s Day (obviously), weddings, anniversaries, best friends, and even for adopted parents/children too (I instantly thought of how much my parents changed my life when they adopted me).
One tiny detail you can’t see well from the picture? I used markers to ink up the 5 Heart Strip stamp from Language of Love in the 4 different colors I used and stamped it in the bottom left corner of my envelope. I used the Basic Gray Stampin’ Write Marker to put a tiny “W + S” in one of the open hearts on the envelope for a personalized touch for my hubby, William. I also used the Envelope Liners Framelits Dies (132172) to line the envelope with some Real Red patterned paper from the Brights Designer Series Paper Stack (130134).
You can earn See Ya Later, or any of the other 12 SAB exclusive choices, FREE with any $50 product order! Don’t miss out on this awesome opportunity! Click here, or any of the links below to visit my Online Store!
How To
1. Cut Basic Gray cardstock to 8-1/2″ x 5-1/2″ and score in half at 4-1/4″. Cut a strip of Basic Gray to 4-1/4″ x 1″. Cut Whisper White cardstock to 4″ x 5-1/4″.
2. Using Small Heart Punch, punch 2 hearts out of scraps of each of Basic Gray, Melon Mambo, Pink Pirouette, and Real Red cardstocks. Push the punch in as far as it will go and leave space between the 2 punched hearts for the next step! (Set aside the hearts you punched out, as you actually want the negative image for this project!)
3. Using the 1″ Circle Punch upside down (so you can see where you’re punching), center it around each of the punched hearts from Step 2. Punch all 8 of these out and decide on how you want to arrange them! 🙂
4. Stamp the 5 Heart Strip stamp from Language of Love on 1″ strips of Whisper White cardstock in each of the following colors: Basic Gray, Melon Mambo, Pink Pirouette and Real Red. Use the 3/4″ Circle Punch to punch out 2 hearts from each color. The hearts that look white above are actually Pink Pirouette. This color is VERY pale and hard to pick up in the photo. Sorry about that! *TIP: The hearts are close enough together that you will punch an edge of the heart next to it. This is not a big deal at all because you won’t see that through the little circle/heart windows we made in Step 3.
5. Use Stampin’ Dimensionals (cut apart) to adhere the circle/heart windows from Step 3 onto the stamped heart circles from Step 4. I put my dimensionals on the back of the circle/heart windows – a half dimensional at the top of the heart point and a quarter dimensional on each side of the bottom point of the heart. Then I lined it up over the top of the heart I wanted behind the window and pressed down.
6. Next I laid out where I wanted the circles to be and made a mark between the 2nd and 3rd set of circles so the sentiment could be right in the void between the circles. I then used my Stamp-a-ma-jig to position the “Someone” sentiment from the Sale-A-Bration choice See Ya Later stamp set in Real Red ink. Earn it FREE with a $50 purchase from now until March 31, 2014.
7. I used the Multipurpose Liquid Adhesive to adhere the circle hearts down to the white layer. *TIP: Use the Multipurpose Liquid Adhesive anytime you need a bit of time to move things around a titch. That’s the beauty of a liquid adhesive – it’s a total life saver for my perfectionist nature!
8. Run the strip of Basic Gray cardstock through the Big Shot Die-Cutting Machine with the pinked edge from the Finishing Touches Edgelits Dies. You’ll have to run it through once for one edge and a second time for the second edge.
9. Run the strip of Basic Gray through the Big Shot again using the Woodgrain Embossing Folder to give it a bit extra oomph and add some texture to the card! It is rare that I can make a card without these things!!! *TIP: Do all embossing LAST! If you have any cutting to do with the Big Shot, running an embossed piece through the machine will flatten the embossing a bit.
10. Glue the Basic Gray strip to the top of the card. Trim the excess off of the edges. *TIP: I shared this yesterday, but when I’m going to emboss and I need it to be a specific size (this strip needed to be 4″ wide), I cut it a bit bigger and trim it after embossing, either on my paper cutter or with Paper Snips if it is a strip that will overhang the edge like this one.
11. Finally, tie a knot of ribbon around the white layer and adhere the layer to the card base! 🙂 *TIP: Whisper White and Very Vanilla are a bit thinner than our other cardstocks and thus I have trouble with them buckling when I go to tie my ribbon around a single layer of these cardstocks, so I used my favorite ribbon tying trick on this card. Check out the video posted below for how I do this. On this project, as I mentioned in the video, I used a Glue Dot (Stampin’ Up!’s are mini sized) in the center of my knot to put it exactly where I wanted it. Also, in the video, I used our regular Stampin’ Mist bottle. Since the ribbon needed to span 4″ (plus some to tape on the back) on this card, I used the Stampin’ Mist Refill bottle as my cylinder (it is larger). I taped the edges to the back before adhering it to the card base.
*BONUS TIP: The ribbon tip in this video will also help you use a little less ribbon too – stretching your roll to make even more projects before it runs out! Just by a couple of inches of course so not huge but if you’re using a specific color tons or mass producing cards, you’ll notice a difference.
Supply List
STAMPS:
- Language of Love (Wood-Mount 133074, Clear-Mount 133077)
- See Ya Later (Wood-Mount 133533, Clear-Mount 133536) *Earn it FREE with a $50 product order during Stampin’ Up! Sale-A-Bration. Offer ends March 31, 2014.*
PAPER:
- 8-1/2″ x 11″ Whisper White Cardstock (100730)
- 8-1/2″ x 11″ Basic Gray Cardstock (121044)
- 8-1/2″ x 11″ Melon Mambo Cardstock (115320)
- 8-1/2″ x 11″ Pink Pirouette Cardstock (111351)
- 8-1/2″ x 11″ Real Red Cardstock (102482)
INK:
- Basic Gray Classic Stampin’ Pad (126981)
- Melon Mambo Classic Stampin’ Pad (126948)
- Pink Pirouette Classic Stampin’ Pad (126956)
- Real Red Classic Stampin’ Pad (126949)
ACCESSORIES:
- Real Red 1/4″ Stitched Grosgrain Ribbon (126875)
- SNAIL Adhesive (104332)
- Multipurpose Liquid Glue (110755)
- Mini Glue Dots (103683)
- Stampin’ Dimensionals (104430)
TOOLS:
- Stampin’ Trimmer (126889)
- Simply Scored Scoring Tool (122334)
- Bone Folder (102300)
- Paper Snips (103579)
- Craft Scissors (108360)
- Stamp-a-ma-jig (101049)
- Small Heart Punch (117193)
- 3/4″ Circle Punch (119873)
- 1″ Circle Punch (119868)
- Big Shot Die-Cutting Machine (113439)
- Big Shot Magnetic Platform (130658)
- Finishing Touches Edgelits Dies (127010)
- Woodgrain Textured Impressions Embossing Folders (127821)
- Grid Paper (102787)
- Stampin’ Scrub (126200)
- Stampin’ Mist (102394)
This card was entered into challenge at: Color Throwdown, Cupcake Inspirations, Freshly Made Sketches, Artistic Inspirations, Crafting from the Heart, Challenges 4 Everybody, Cuttin and Stampin, Digistamps4Joy, Lexi’s Creations, Lady Bug Crafts, Oldie But a Goodie (Woodgrain folder, Edgelits, Punches, Pink Pirouette), Paper Pretties, and Splitcoaststampers Ways to Use It (Red, Red, Red). 🙂
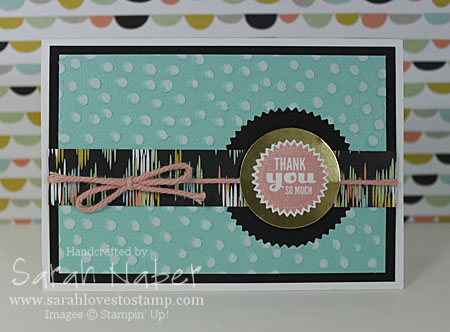
Hi there! I hope you’re having a great start to your weekend! Today I have a SUPER fun project to share with you using LOTS of new goodies!!! This card uses a stamp set from the upcoming Occasions Catalog, Starburst Sayings, as well as the matching Starburst Framelits Dies. Of course, Stampin’ Up! is being amazing and offering bundles again so you can get the stamp set and framelits at a 15% discount.
I also used the same Designer Series Paper as my project yesterday – the new Sale-A-Bration offering, Sweet Sorbet DSP. Starting January 31, 2014, you’ll be able to get this package of fantastic DSP for free with a $50 purchase! Oh yay! I also used the same twine too that is from the SAB Sweet Sorbet Accessory Pack. AND…a BRAND NEW Sale-A-Bration Decorative Dots embossing folder too!!! Could this year’s Sale-A-Bration get any better?!?
I’m sure you also noticed my piece of 3″ x 4-1/2″ Core’dinations cardstock (can I even make a project without it?) that I cut the starburst shape out of using the 2nd smallest Starburst Framelits Die. Then I embossed and then sanded with the Stampin’ Sanding Block to reveal that lighter inner core. *TIP: Remember to do all of your cutting with framelits or other dies before you emboss. Otherwise the embossing will be flattened because of running the embossed piece through the machine without its folder. I then glued it down with the Multipurpose Liquid Adhesive to a piece of 3-1/4″ x 4-3/4″ Basic Black Cardstock. A 3/4″ x 4-3/4″ strip of my favorite pattern from the Sweet Sorbet DSP is layered over the top. I tied a bow of the Crisp Cantaloupe twine from the Sweet Sorbet Accessory Pack over the top of the DSP and glued it down to the Whisper White Note Card base (they come pre-cut and pre-scored with matching envelopes…easy peasy!).
I stamped the “Thank You So Much” stamp in Crisp Cantaloupe ink onto a scrap of Whisper White Cardstock and used the matching framelit to cut it out (the smallest one). *TIP: I actually stamped this first and ran it through the Big Shot at the same time as the Core’dinations piece with the 2nd smallest framelit. I try to always run all of my framelits for one project through at the same time if possible to save time! Super easy, especially with the Magnetic Platform to hold each piece in place. I layered that onto a circle of Gold Foil Sheet punched out with the 1-3/8″ Circle Punch. Finally, I cut a Stampin’ Dimensional in half and put one half on the top and one half on the bottom then stuck it onto the card! *TIP: Placing your dimensionals so they adhere straight to the card (not the twine) will insure that everything lays flat. If the dimensionals were on top of the twine, then the focal point may bow around the twine a bit. Not too big of a deal, but just a little idea to add that extra professional look to your projects.
Supply List
STAMPS:
Starburst Sayings (Wood-Mount 133182, Clear-Mount 133185)*
-Also available as a bundle with the Starburst Framelits Dies at a 15% discount! Wood-Mount 134817, Clear-Mount 134818*
PAPER:
Whisper White Note Cards & Envelopes (131527)
8-1/2″ x 11″ Whisper White Cardstock (100730)
8-1/2″ x 11″ Basic Black Cardstock (121045)
12″ x 12″ Gold Foil Sheets (132622)
In Color 2012-2014 Core’dinations Cardstock (129957)
SAB Sweet Sorbet DSP (133521)**
INK:
Crisp Cantaloupe Classic Stampin’ Pad (131176)
ACCESSORIES:
SAB Sweet Sorbet Accessory Pack (133522)**
SNAIL Adhesive (104332)
Multipurpose Liquid Glue (110755)
Stampin’ Dimensionals (104430)
TOOLS:
Stampin’ Trimmer (126889)
Simply Scored Scoring Tool (122334)
Bone Folder (102300)
Craft Scissors (108360)
Stampin’ Sanding Block (129367)
Core’dinations Dust Buddy (129366)
1-3/8″ Circle Punch (119860)
Big Shot Die-Cutting Machine (113439)
Big Shot Magnetic Platform (130658)
Starburst Framelits Dies (132967)*
-Also available as a bundle with the Starburst Framelits Dies at a 15% discount! Wood-Mount 134817, Clear-Mount 134818*
SAB Decorative Dots Textured Impressions Embossing Folders (133520)**
Grid Paper (102787)
Stampin’ Scrub (126200)
Stampin’ Mist (102394)
*Available January 3, 2014 when the Stampin’ Up! Occasions Catalog begins!
**Exclusive Sale-A-Bration item FREE with each $50 purchase from January 28, 2014-March 31, 2014!
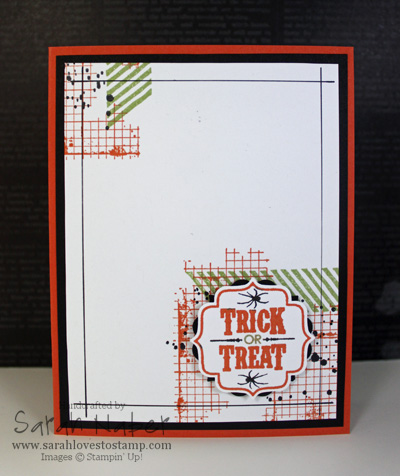
Hello! Today I have a super easy, quick card! 🙂 I participated in the 10 Minute Craft Dash and interpreted their colors for the challenge as Stampin’ Up!’s Tangerine Tango, Basic Black, and Wild Wasabi! I totally encourage anyone to play along with these challenges! They are truly that, a challenge!!! I LOVE that it forces me to make a quick and simple card, although I wish I had had more time to add some black rhinestones to this card.
I also filmed a video as I was making this card so you could see the somewhat crazy process! 🙂 I’m proud to say it took me 9 minutes 45 seconds!!! Barely made it! I’ll embed the video here as soon as it uploads to YouTube. I also combined this challenge with the sketch over at Freshly Made Sketches, although I did take a tad bit of creative license and put something in the upper left corner. I also made the sketch into a regular card as I don’t make square cards, except once in a blue moon.
Below is the supply list! Click on any item to see it in my online store and order it now! 🙂 Or CLICK HERE for easy shopping 24/7!
Supply List
STAMPS:
Tags 4 You (Wood-Mount 131820, Clear-Mount 131823)
***Save 15% and buy the Tags 4 You Stamp Set and matching Label Bracket Punch as bundle! Wood-Mount 133293, Clear-Mount 133294***
Gorgeous Grunge (Wood-Mount 130514, Clear-Mount 130517)
Off the Grid (Wood-Mount Only 130736)
PAPER:
8-1/2″ x 11″ Whisper White Cardstock (100730)
8-1/2″ x 11″ Basic Black Cardstock (121045)
8-1/2″ x 11″ Tangerine Tango Cardstock (111349)
INK:
Tangerine Tango Classic Stampin’ Pad (126946)
Wild Wasabi Classic Stampin’ Pad (126959)
Jet Black StazOn Ink Pad (101406)
***Note: The Tangerine Tango & Wild Wasabi markers are not available individually.***
Basic Black Stampin’ Write Marker (100082)
Brights Collection Stampin’ Write Markers (131259) – Tangerine Tango
Subtles Collection Stampin’ Write Markers (131263) – Wild Wasabi
OR get ALL 38 Core Colors in our Color Collections (not Whisper White or Very Vanilla) in the Many Marvelous Markers (131264)
ACCESSORIES:
SNAIL Adhesive (104332)
Multipurpose Liquid Glue (110755)
Stampin’ Dimensionals (104430)
TOOLS:
Stampin’ Trimmer (126889)
Simply Scored Scoring Tool (122334)
Bone Folder (102300)
Blender Pens (102845)
Label Bracket Punch (132153)
***Save 15% and buy the Label Bracket Punch and matching Tags 4 You Stamp Set as bundle! Wood-Mount 133293, Clear-Mount 133294***
Grid Paper (102787)
Stampin’ Scrub (126200)
Stampin’ Mist (102394)
StazOn Cleaner (109196)
ruler
Vintage Papillon Potpourri Card
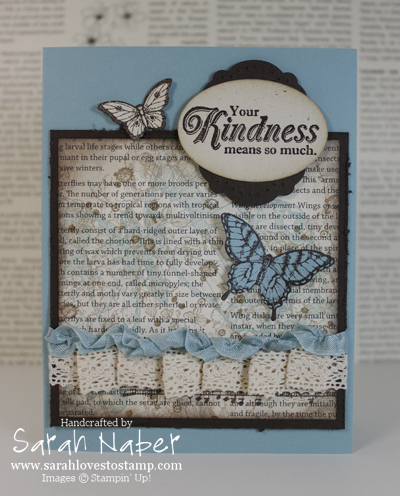
Hello! I hope today’s card reminds you that spring is just around the corner. I’ve layered tons of images onto the First Edition Designer Series Paper by stamping in different colors. It may be hard to see in the photo, but in real life, it looks really, really cool. One other thing I LOVE about this card is the butterflies from Papillon Potpourri – they were probably the simplest thing I did on this page because of their matching punches!!! I was beyond excited when I saw that the smaller butterfly had a matching punch in the new Spring Catalog! (FYI: The Bitty Butterfly Punch also matches the butterfly in the FREE Sale-A-Bration offering, Bloomin’ Marvelous.) YAY!!! Anyway, I love the vintage style and don’t typically gravitate to making cards of that style myself so I signed up for a Vintage Swap at Leadership Conference for a bit of a challenge! 🙂 I love the final result and it makes me want to try vintage more often!
You may be thinking that this card looks familiar! That’s because I showed you a few of the pieces of how I made it in two of my recent videos HERE and HERE! If you haven’t watched those yet, I hope you do! A few other details – the Label Framelit layered behind the Oval Punch is turned 90 degrees from how you typically see it. It is also pierced with its matching template from the Festive Paper-Piercing Pack and then flipped over to the other side so you see the rough sides of the holes instead of the clean ones. Again, a little vintage touch! I also really like to do that to masculine cards to give them more of a rough feel.
You may have been thinking, wait, I thought that paper-piercing pack was in the Holiday Catalog? You’d be right! It did debut there but it is in the Spring Catalog on page 36 with the other selection of items that were in the Holiday Catalog and are still available for order. The stamp sets are listed on the side (please let me know if you don’t have a Holiday Catalog if you’d like to see the images) and then the rest of the goodies are pictured on that page. One item that is still available but missed making it onto the page is the Champagne Glimmer Paper! I LOVE all of the Glimmer Papers so I was pretty excited about this! If you want to order it, just punch in item 127885!
Ok, finally, I’ll give you a rundown of what those “tons of images” that are stamped on the First Edition DSP so you can recreate this card! 🙂 It doesn’t really matter the order you do these things in – although I normally go from your lightest ink to darkest so you can best see what and where you’re stamping. I stamped the large floral image from Elements of Style several times in Crumb Cake ink over the entire piece to cover it. The Swallowtail butterfly is stamped in Baja Breeze ink. Then I stamped the paint splatter image (LOVE IT! This is a must-have stamp for me!) several times in Soft Suede ink. Finally I stamped my Music Notes wheel in Early Espresso ink towards the bottom. I unmount my wheels (see a video of that HERE) and I didn’t want to have a harsh edge so I used a torn post it note to mask off the left side of the wheel so it would look gradual with the torn edge instead of harsh with a straight edge. If I had it to do over again, I would either stamp my Music Notes wheel all the way to the bottom or move my ribbon up a bit. In the video showing you how to gather your ribbon like I did on this swap, you see why this happened to me as my ribbon hung down much farther than where I originally applied my sticky strip. (I knew this would happen but didn’t compensate for it as much as I should’ve to show the music notes a bit more.) I layered this piece onto my distressed Espresso piece (see that video HERE), and then applied the ribbon treatment on top of that so I could tape the ends onto the back. The butterflies were added with glue dots and the sentiment and Espresso pierced framelit were layered together with Multipurpose Liquid Adhesive and then added onto the card with Stampin’ Dimensionals!
I hope you enjoyed this project! It’s one of my favorites that I’ve made in a long, long time! If you don’t want to miss out on a single post, please subscribe to my blog! 🙂
Supplies
STAMPS:
Papillon Potpourri (Wood-Mount 123757, Clear-Mount 123759)
From My Heart (Wood-Mount 126555, Clear-Mount 126557)
Swallowtail (Wood-Mount 129213, Clear-Mount 129216) – Spring Catalog pg. 18
French Foliage (Wood-Mount 120845, Clear-Mount 121166)
Elements of Style (Wood-Mount 118611, Clear-Mount 120045)
Music Notes Wheel (120327)
PAPER:
8-1/2″ x 11″ Naturals Ivory Card Stock (101849)
8-1/2″ x 11″ Baja Breeze Card Stock (111352)
8-1/2″ x 11″ Early Espresso Card Stock (119686)
First Edition Specialty Designer Paper (121878)
INK:
Baja Breeze Classic Stampin’ Pad (126960)
Crumb Cake Classic Stampin’ Pad (126975)
Early Espresso Classic Stampin’ Pad (126974)
Soft Suede Classic Stampin’ Pad (126978)
ACCESSORIES:
5/8″ Victoria Crochet Trim (118481)
Baja Breeze 1/2″ Seam Binding Ribbon (122331)
SNAIL Adhesive (104332)
Multipurpose Liquid Glue (110755)
Mini Glue Dots (103683)
Stampin’ Dimensionals (104430)
Anywhere Glue Sticks (104045)
Sticky Strip (104294)
TOOLS:
Tabletop Paper Cutter (106959)
Simply Scored Scoring Tool (122334)
Bone Folder (102300)
Craft Scissors (108360)
Stampin’ Distress Tool (127562) – Spring Catalog pg. 14
Paper Piercing Tool (126189)
Stampin’ Pierce Mat (126199)
Festive Paper-Piercing Pack (127857) – Spring Catalog pg. 36
Extra-Large Oval Punch (119859)
Elegant Butterfly Punch (127526)
Bitty Butterfly Punch (129406)
Big Shot Die-Cutting Machine (113439)
Labels Collection Framelits Dies (125598)
Grid Paper (102787)
Stampin’ Scrub (126200)
Stampin’ Mist (102394)
I LOVE the In Colors released last June. They are so so pretty together, whether you use all of them or just two as I have here. The bright, fun colors in the Patio Party Designer Series Paper gave me a fun jumping off point for this color combo of Midnight Muse, Primrose Petals, and Whisper White. I paired this with one of my favorite stamp sets, Mixed Bunch and its matching Blossom Punch! It is such a fun set because you can use it with the punch, stamp it directly to paper without punching (like I’ve done in the background here), or use the punch alone too!!! I usually use the stamp set with the punch, so it’s a totally different look when you use them separate from each other! Love that! I’m sure I CASEd this card from someone, somewhere but I have no idea who! Nine times out of ten that’s what happens with me!!! 🙂
Tip of the Day: Any time you’re stumped about a color combination, find one of your Designer Series Papers and use the colors in the paper! You don’t even have to use the paper, so check out even the DSPs you don’t own in our catalogs! 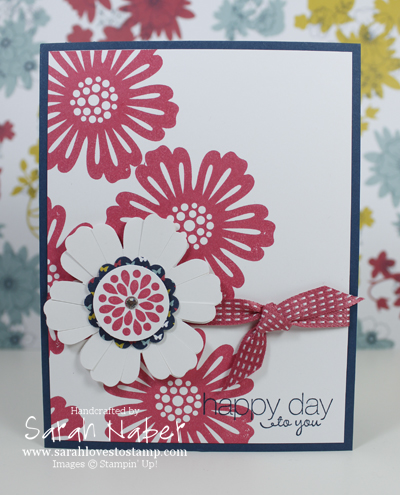
Supplies
STAMPS:
Mixed Bunch (Wood-Mount 125535, Clear-Mount 125537)
Friendly Phrases (Wood-Mount 126149, Clear-Mount 126151)
PAPER:
8-1/2″ x 11″ Whisper White Card Stock (100730)
8-1/2″ x 11″ Midnight Muse Card Stock (126843)
Patio Party Designer Series Paper (126916)
INK:
Midnight Muse Classic Stampin’ Pad (126860)
Primrose Petals Classic Stampin’ Pad (126858)
ACCESSORIES:
3/8″ Primrose Petals Stitched Satin Ribbon (126844)
Basic Rhinestone Jewels (119246)
SNAIL Adhesive (104332)
Multipurpose Liquid Glue (110755)
Stampin’ Dimensionals (104430)
TOOLS:
Tabletop Paper Cutter (106959)
Simply Scored Scoring Tool (122334)
Bone Folder (102300)
Paper Snips (103579)
Craft Scissors (108360)
Stamp-a-ma-jig (101049)
Blossom Punch (125603)
1″ Circle Punch (119868)
1-1/4″ Scallop Circle Punch (127811)
Grid Paper (102787)
Stampin’ Scrub (126200)
Stampin’ Mist (102394)
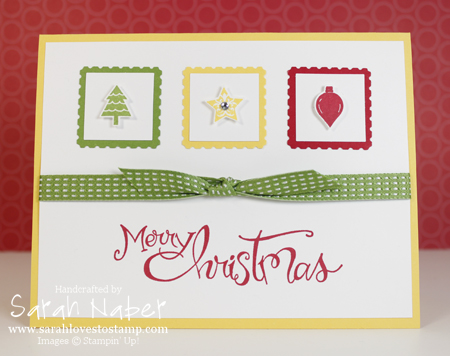
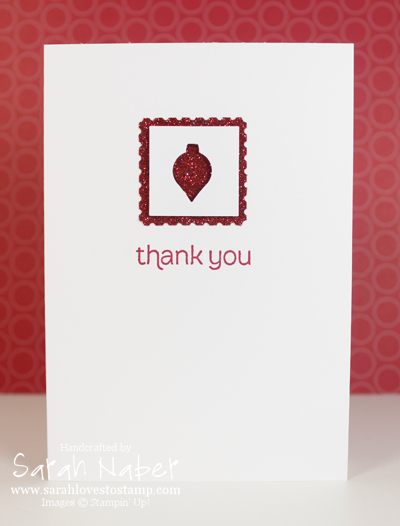
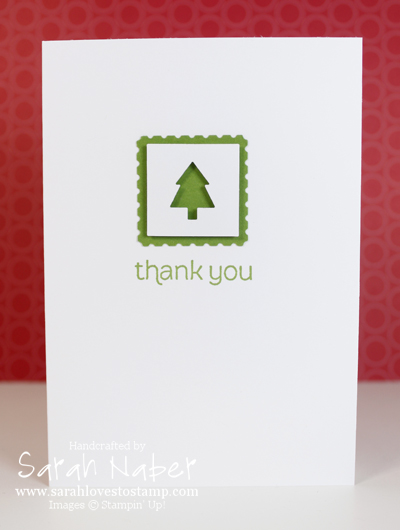
Hi there! Today is the FINAL day of the Online Extravaganza! If you haven’t taken advantage of the best sale Stampin’ Up! offers all year, you have just a few more hours until it closes at 11:50 pm Mountain Time. In the spirit of sharing cards made with products on the sale, here is a card we made last week at my Intro to Stamping Class! Super fun and cute! I love layering the little punches on top of the 1″ Square Punch (on sale) and then onto the Postage Stamp Punch! The smaller, simple note cards below this info use many of the same supplies, but do not use the stamp set, just the punches. These are going to be my Christmas thank yous that I send out to friends and family. For these cards, punch the smaller punch first (Merry Minis Punch Pack) and then it is much easier to center the larger one (1″ Square Punch) around it. I CASEd both the little thank yous, as well as the card above from the fantastic Julie Davison!!!
I used a favorite of mine, the Basic Rhinestone Jewels (30% off) yet again! The Gumball Green 3/8″ Stitched Satin Ribbon is in a bundle with the Raspberry Ripple & Summer Starfruit (30% off too) for $18.81 – that’s 30 yards of ribbon total! That’s just under $0.63 per yard! WOW!
Supply List for Tri-color Merry Christmas Card
STAMPS:
Merry Minis (Wood-Mount 127916, Clear-Mount 127919)
Sassy Salutations (Wood-Mount 126705, Clear-Mount 126707)
PAPER:
8-1/2″ x 11″ Whisper White Card Stock (100730)
8-1/2″ x 11″ Daffodil Delight Card Stock (119683)
8-1/2″ x 11″ Gumball Green Card Stock (126840)
8-1/2″ x 11″ Real Red Card Stock (102482)
INK:
Daffodil Delight Classic Stampin’ Pad (126944)
Gumball Green Classic Stampin’ Pad (126861)
Real Red Classic Stampin’ Pad (126949)
ACCESSORIES:
In Color Ribbon Bundle: Gumball Green, Raspberry Ripple, & Summer Starfruit (132701) 30% OFF!!!
Basic Rhinestone Jewels (119246) 30% OFF!!!
SNAIL Adhesive (104332)
Multipurpose Liquid Glue (110755)
Stampin’ Dimensionals (104430)
TOOLS:
Tabletop Paper Cutter (106959) 30% OFF!!!
Simply Scored Scoring Tool (122334)
Bone Folder (102300)
Craft Scissors (108360)
Merry Minis Punch Pack (126882)
1″ Square Punch (124094) 30% OFF!!!
Postage Stamp Punch (122344)
Grid Paper (102787)
Stampin’ Scrub (126200)
Stampin’ Mist (102394)
Supply List for Christmas Thank You Note Cards
STAMPS:
Made for You (Wood-Mount 126340, Clear-Mount 126342)
PAPER:
8-1/2″ x 11″ Whisper White Card Stock (100730)
8-1/2″ x 11″ Gumball Green Card Stock (126840)
12″ x 12″ Red Glimmer Paper (121790)
Note Cards & Envelopes (107311)
INK:
Real Red Classic Stampin’ Pad (126949)
Gumball Green Classic Stampin’ Pad (126861)
ACCESSORIES:
Multipurpose Liquid Glue (110755)
Stampin’ Dimensionals (104430)
TOOLS:
Tabletop Paper Cutter (106959) 30% OFF!!!
Bone Folder (102300)
Merry Minis Punch Pack (126882)
1″ Square Punch (124094) 30% OFF!!!
Postage Stamp Punch (122344)
Grid Paper (102787)
Stampin’ Scrub (126200)
Stampin’ Mist (102394)
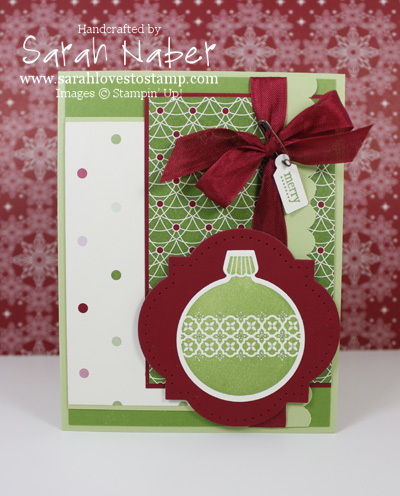
Hi there! I hadn’t used my Ornament Keepsakes stamp set from Stampin’ Up!’s Holiday Catalog so I inked that up for this Christmas card, featuring the Be of Good Cheer Designer Series Paper. The paper coordinates with Gumball Green, Cherry Cobbler, and Very Vanilla so those are the main colors I used, but I also added in some Certainly Celery which I picked up from the polka dotted pattern. After I’d already glued the patterned papers down, I wished I had put the polka dotted paper in front but too late! There is also a bit of glitter on the main image – I used my Two-Way Glue Pen to apply dots within the ornament’s design and then put some of the Dazzling Diamonds glitter on it before the glue dried! So pretty in real life – sorry you can’t see it in the picture very well. Also I attached the tiny sentiment with a Vintage Trinket safety pin – I’ve had them for a while but I’ve used the brads and not the pins…gotta use the pins more as I LOVE the look on this card! I pinned it through the seam binding ribbon, which is my favorite ribbon to tie into a bow – very easy to manipulate and not heavy so this card should still be mailable. However, the number of layers on this card might make it over the weight limit!!! 🙂 I hope you enjoyed my first challenge card I’ve done since having a blog. Combining so many challenges, really forced me to stretch my creativity and I LOVED it!!! But I didn’t get my Tool Time Thursday video done yet so I’ll work on that!
This card was entered into challenges at: My Time to Craft, Papertake Weekly, Mojo Monday, Forever Friends, 365 Cards, Stamp-n-Doodle, House of Gilli, Craft Your Days Away, Whimsy Inspirations, No Matter Which, Whoopsie Daisy, Just Some Lines, and Paper Crafting Journey.
Supply List
STAMPS:
Ornament Keepsakes Bundle (Wood-Mount 129949, Clear-Mount 129950) – includes matching Holiday Ornaments Framelits!!! (You can buy the stamp set solo, but you get a 15% discount if you buy them together!)
Tiny Tags (Wood-Mount 118091, Clear-Mount 118592)
PAPER:
8-1/2″ x 11″ Very Vanilla Card Stock (101650)
8-1/2″ x 11″ Certainly Celery Card Stock (105125)
8-1/2″ x 11″ Cherry Cobbler Card Stock (119685)
8-1/2″ x 11″ Gumball Green Card Stock (126840)
Be of Good Cheer Designer Series Paper (126896)
INK:
Gumball Green Classic Stampin’ Pad (126861)
ACCESSORIES:
Dazzling Diamonds Stampin’ Glitter (102023)
Vintage Trinkets Button Brads & Safety Pins (118764)
1/2″ Cherry Cobbler Seam Binding (120992)
Multipurpose Liquid Glue (110755)
2-Way Glue Pen (100425)
Stampin’ Dimensionals (104430)
TOOLS:
Tabletop Paper Cutter (106959)
Simply Scored Scoring Tool (122334)
Bone Folder (102300)
Craft Scissors (108360)
Paper Piercing Tool (126189)
Stampin’ Pierce Mat (126199)
Festive Paper-Piercing Pack (127857)
Jewelry Tag Punch (117190)
Scallop Edge Border Punch (119882)
Big Shot Die-Cutting Machine (113439)
Ornament Keepsakes Bundle (Wood-Mount 129949, Clear-Mount 129950) – includes matching Ornament Keepsakes stamp set!!! (You can buy the framelits solo, but you get a 15% discount if you buy them together!)
Window Frames Collection Framelits Dies (129021)
Grid Paper (102787)
Stampin’ Scrub (126200)
Stampin’ Mist (102394)
Field Flowers Faux Linen Technique Swap for Convention 2012
“But I’m not creative…” That short phrase is probably one I hear more than any other as a demonstrator! I hear it at classes I teach, at workshops, and in the community when I tell people what I do and say they can do it too! Creativity is a tricky thing – I understand not feeling creative! I know some of my peers have more creativity in their pinky finger than I do in my entire body. But I love doing what I do, so my response is always the same! You don’t have to be creative to create things and to enjoy the process!
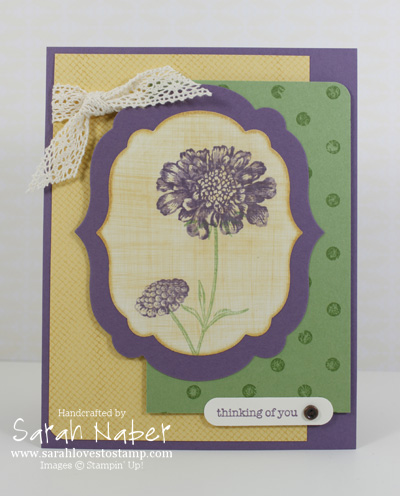
This card is a GREAT example of that! I used a color combination from the Stampin’ Up! Color Coach #120148 (a GREAT tool – in fact I did a video on it a while ago that I will link HERE): Perfect Plum, Wild Wasabi, and So Saffron!!! Gorgeous! This ended up being my favorite swap card I made for Stampin’ Up! Convention 2012! We also made this card shortly before I left for Convention in my Crazy about Techniques class as it uses the Faux Linen technique! This technique is an oldy but a goody!!! You use glossy card stock and sand it horizontally and vertically until the gloss is worn off, then sponge and stamp it and sand it more if you want until you get the desired result!!! LOVE IT! The layout is one I took from an old Mojo Monday challenge (I LOVE to print their monthly ones and then page through them when I’m creating – I rarely participate in a challenge in real time. I just found it and it was from Week 2 of Mojo Monday!!! Really really old!) I also LOVE the Field Flowers stamp set! (I do wish I had it in Wood-Mount though so I could make permanent vellum sheets to use with the Stamp-a-ma-jig!) And I used Teeny Tiny Wishes – my go-to stamp set as it includes every greeting I could need! (This card would be great for any occasion – just switch out the greeting!!!) I most always punch it out with the Word Window punch as I have here – super easy, cute and will fit anywhere on any card!!! I used another favorite of mine from SU! – background stamps!!! I LOVE them and they are a favorite of mine. I almost always make a card with either a background stamp or a background embossed with a Textured Impressions Embossing Folder and the Big Shot! Anyway enjoy!!! Let me know if you have any questions!!!
Supply List
STAMPS:
Field Flowers (Wood-Mount 122760, Clear-Mount 122762)
Teeny Tiny Wishes (Wood-Mount 115370, Clear-Mount 127802)
Netting Background Stamp (122655)
Distressed Dots Background Stamp (122815)
PAPER:
8-1/2″ x 11″ Glossy White Card Stock (102599)
8-1/2″ x 11″ Very Vanilla Card Stock (101650)
8-1/2″ x 11″ Perfect Plum Card Stock (101889)
8-1/2″ x 11″ So Saffron Card Stock (105118)
8-1/2″ x 11″ Wild Wasabi Card Stock (108641)
INK:
Perfect Plum Classic Stampin’ Pad (126963)
So Saffron Classic Stampin’ Pad (126957)
Wild Wasabi Classic Stampin’ Pad (126959)
ACCESSORIES:
Victoria 5/8″ Crochet Trim (118481)
Vintage Trinkets (118764)
SNAIL Adhesive (104332)
Multipurpose Liquid Glue (110755)
Stampin’ Dimensionals (104430)
TOOLS:
Tabletop Paper Cutter (106959)
Simply Scored Scoring Tool (122334)
Color Coach (120148)
2012-2014 In Color Color Coach Cards (126890)
2011-2013 In Color Color Coach Cards (124886)
Bone Folder (102300)
Craft Scissors (108360)
Stamp-a-ma-jig (101049)
Paper Piercing Tool (126189)
Stampin’ Pierce Mat (126199)
3/16″ Corner Rounder Punch (119871)
Word Window Punch (119857)
Big Shot Die-Cutting Machine (113439)
Labels Collection Framelits Dies (125598)
Grid Paper (102787)
Stampin’ Scrub (126200)
Stampin’ Mist (102394)
Hi there! Another one of my Convention swaps today, but this one is a Christmas card! How many of you make your own Christmas cards? I’ve never gotten it done before (always great intentions), but this year I’m going to do it!!! For a lot of us, that means starting early! I’m going to start next month with a series of card making classes – I plan to make the same ones as my customers and then get them done right after the class is over! You know what they say, “Failing to plan is planning to fail.” so I’ve made a plan!
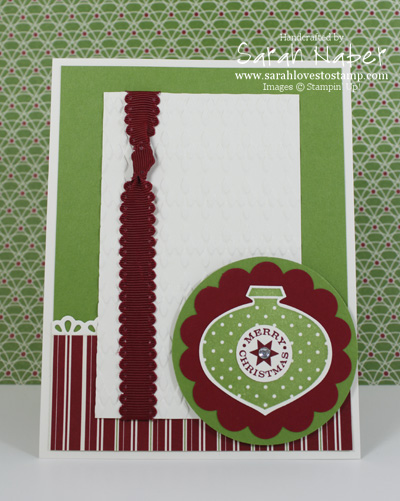
Anyway, back to the card! It uses the gorgeous new In Color, Gumball Green with a favorite of mine, Cherry Cobbler! The color combination was “stolen” from the Be of Good Cheer Designer Series Paper in the 2012-2013 Catalog. This card would look gorgeous in many other color combos as well! You could even add some glitter too! The Very Vanilla panel is embossed with the Argyle Textured Impressions Embossing Folder – I apologize that you can’t see it very well in the photo! I added 2 of my favorite things that I use on nearly every card to finish it off: Basic Rhinestone Jewels and ribbon! In this case I did a really simple ribbon treatment, just tie a knot in your Cherry Cobbler 1/2″ Scallop Dots Ribbon about 2″ down and then measure it against the panel and cut it to the right length. Wrap the ends around the back of the panel and scotch tape them onto the card stock so they don’t move! So easy, especially if you’re mass-producing and struggle with tying bows or knots. (Check out my “Tying the Perfect Knot” Video from this week for help if you struggle with that!)
If you’re lurking on this blog, don’t forget to sign up for my Email Newsletter on the right! (You’ll get a free 15 minute video on Shimmer Paints immediately after clicking the link that will come in your email, too!!!)
Supply List
STAMPS:
Delightful Decorations (Wood-Mount 116517, Clear-Mount 127787)
PAPER:
8-1/2″ x 11″ Very Vanilla Card Stock (101650)
8-1/2″ x 11″ Gumball Green Card Stock (126840)
8-1/2″ x 11″ Cherry Cobbler Card Stock (119685)
Be of Good Cheer Designer Series Paper (126896)
INK:
Gumball Green Classic Stampin’ Pad (126861)
Cherry Cobbler Classic Stampin’ Pad (126966)
ACCESSORIES:
Cherry Cobbler 1/2″ Scallop Dots Ribbon (124138)
Basic Rhinestone Jewels (119246)
SNAIL Adhesive (104332)
Multipurpose Liquid Glue (110755)
Stampin’ Dimensionals (104430)
TOOLS:
Tabletop Paper Cutter (106959)
Simply Scored Scoring Tool (122334)
Bone Folder (102300)
Craft Scissors (108360)
Ornament Punch (119847)
3/4″ Circle Punch (119873)
2-1/2″ Circle Punch (120906)
2-3/8″ Scallop Circle Punch (118874)
Big Shot Die-Cutting Machine (113439)
Finishing Touches Edgelits Dies (127010)
Argyle Textured Impressions Embossing Folders (127750)
Grid Paper (102787)
Stampin’ Scrub (126200)
Stampin’ Mist (102394)
Connect with Me!
Categories
Archives
Copyright Info
Copyright Info All Images © Stampin' Up! 2011 Sarah Naber, Independent Stampin' Up! Demonstrator The content of this blog is my sole responsibility as an independent Stampin' Up! demonstrator and the use of, and content of, the classes, services, or products offered on this blog is not endorsed by Stampin' Up!

