Sale-A-Bration Petal Parade
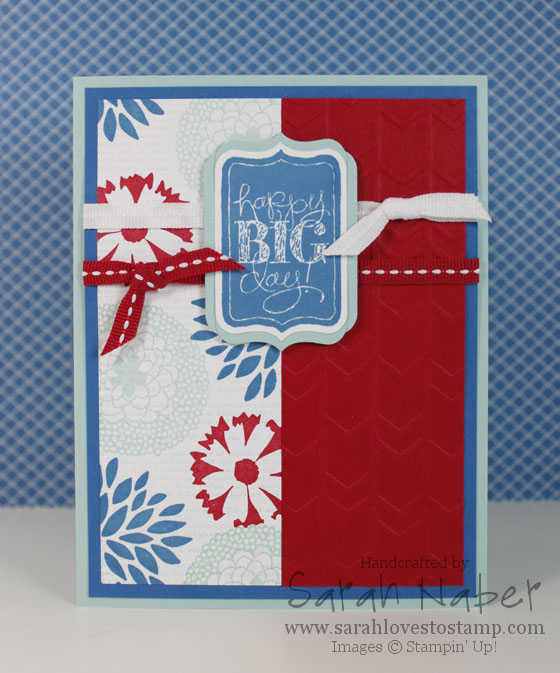
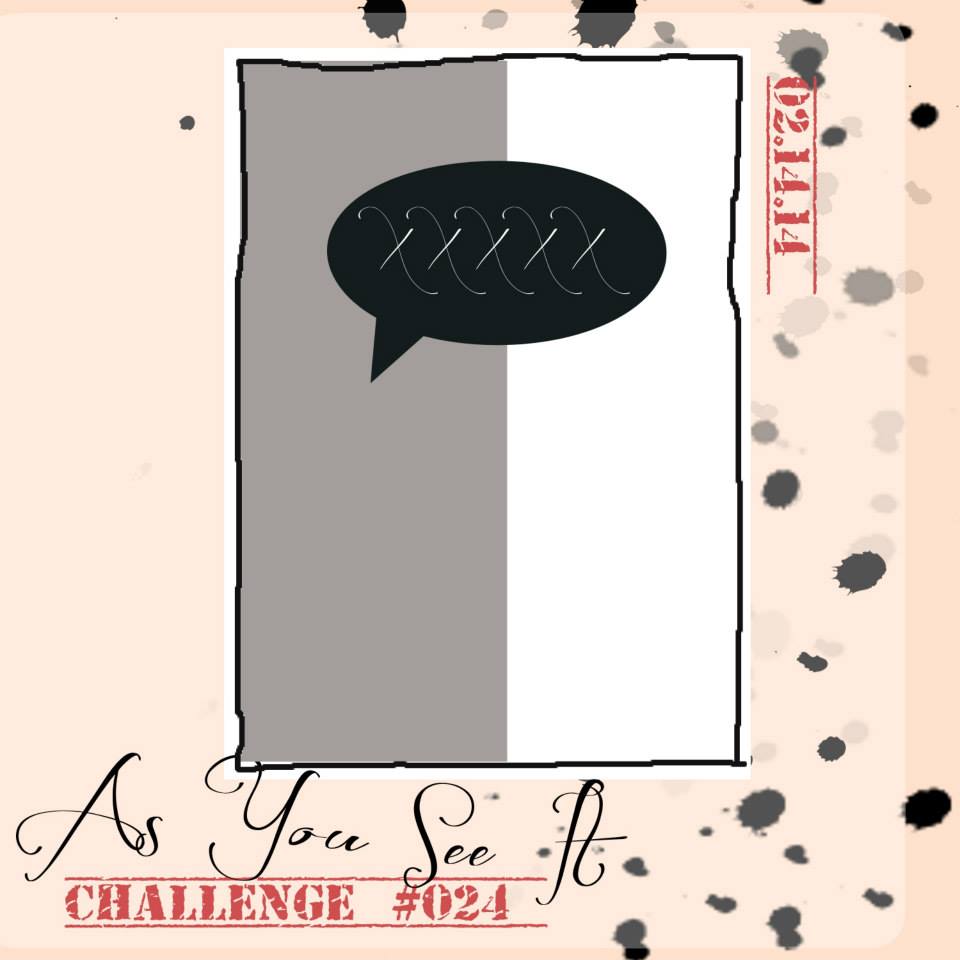
Hi there! It’s Friday and that means a new challenge over at the As You See It Challenge Blog! Check out the creations by the other AYSI Design Team Members too! I also combined it with the color challenge from Colour Q Challenges this week. I wasn’t sure about these colors to begin with but loved the final result. I hope you do too!
How To
1. Cut your Pool Party cardstock to 8-1/2″ x 5-1/2″ for your card base and score it at 4-1/4″. Cut the Pacific Point to 4″ x 5-1/4″. Cut a piece of Whisper White to 1-7/8″ x 5″. Cut a piece of Real Red to 2″ x 5-1/4″ – see Step 3 for why!
2. Ink up the Dictionary Background Stamp in Soft Sky ink, stamp off onto a scrap paper once and then stamp it onto the Whisper White piece. (This is super hard to see in the photo but is gorgeous in real life!) Then use the Petal Parade stamp set (FREE Sale-A-Bration exclusive stamp set with any $50 purchase!) and Pacific Point, Pool Party, and Real Red inks to stamp the rest of the white panel.
3. Run the Real Red piece through the Big Shot with the Arrows Textured Impressions Embossing Folder. Cut the final piece down to 1-7/8″ x 5″. *TIP: Cut your piece of cardstock a bit larger than you want it (usually 1/8″ is plenty depending on how intricate the embossing folder design is) and trim it down to the size you want AFTER embossing! The embossing “shrinks” the paper a bit so this is a great idea when you need an exact size or to match up with another piece like I needed on my card.
4. Use the Multipurpose Liquid Adhesive to adhere both the Whisper White and Real Red strips side-by-side onto the Pacific Point layer.
5. Tie the Real Red and Whisper White 1/4″ Stitched Grosgrain Ribbons around the Pacific Point layer. Adhere this to the card base.
6. Stamp the “Happy Big Day” from the Chalk Talk Stamp Set (LOVE!) in Pacific Point ink onto a scrap of Whisper White. Die cut it out with the Big Shot and the matching Chalk Talk Framelits Dies.
7. Die cut two more of the same label shape out of a scrap of Pool Party cardstock. Cut one set in half horizontally and one set in half vertically and glue behind the sentiment to make a custom mat! *TIP: This is one of my favorite tricks to do with punches and die cuts that may not have a nesting shape! Make your own! Works fabulously with the Decorative Label Punch among others.
I hope you love this card! This sketch was a great one to work with. Head on over to the As You See It Challenge Blog and play along! 🙂 We’re always excited to see what you have created!!!
This card was entered into challenges at: ColourQ, polkadoodles, Crafting from the Heart, Challenges 4 Everybody, and Word Art Wednesday.
Supply List
STAMPS:
Petal Parade (Wood-Mount 133599, Clear-Mount 133602)***FREE Sale-A-Bration Choice with $50 Order***
Chalk Talk (Wood-Mount 130631, Clear-Mount 130634) *Get the stamp set with the matching framelits and save 15% with the Chalk Talk Bundle: Wood-Mount 132731, Clear-Mount 132730!*
Dictionary Background (Wood-Mount 130348, Clear-Mount 130351)
PAPER:
8-1/2″ x 11″ Whisper White Cardstock (100730)
8-1/2″ x 11″ Pacific Point Cardstock (111350)
8-1/2″ x 11″ Pool Party Cardstock (122924)
8-1/2″ x 11″ Real Red Cardstock (102482)
INK:
Pacific Point Classic Stampin’ Pad (126951)
Pool Party Classic Stampin’ Pad (126982)
Real Red Classic Stampin’ Pad (126949)
Soft Sky Classic Stampin’ Pad (131181)
ACCESSORIES:
Real Red 1/4″ Stitched Grosgrain Ribbon (126875)
Whisper White 1/4″ Stitched Grosgrain Ribbon (126877)
SNAIL Adhesive (104332)
Multipurpose Liquid Glue (110755)
Stampin’ Dimensionals (104430)
TOOLS:
Stampin’ Trimmer (126889)
Simply Scored Scoring Tool (122334)
Bone Folder (102300)
Paper Snips (103579)
Craft Scissors (108360)
Big Shot Die-Cutting Machine (113439)
Big Shot Magnetic Platform (130658)
Chalk Talk Framelits Dies (129983) *Get the stamp set with the matching framelits and save 15% with the Chalk Talk Bundle: Wood-Mount 132731, Clear-Mount 132730!*
Arrows Textured Impressions Embossing Folders (132187)
Grid Paper (102787)
Stampin’ Scrub (126200)
Stampin’ Mist (102394)
It’s finally here! This is Week #1 in a 10 part series that I’ve promised to my Mailing List Subscribers! I thought I’d share Week #1 with all of you! If you want to make sure you see the rest of the 9 videos to come, just put your name and email in the box over to the right and hit the “Send Me My Video!” button. Don’t forget to click the confirmation link in the email that will come immediately to your inbox or you won’t be added! 🙂
I hope you enjoy this week’s card! It was my favorite sample shown at our Stampin’ Up! Leadership Conference in January!
Language of Love in Purples
Hi Stampin’ Friends! Did you think I’d forgotten about you? Oh, no! Of course not! I was supposed to post this card on Friday as a part of the As You See It Design Team but I’m just finally getting around to it today! Technical difficulties followed by more illness – I’m headed to my doctor next week so hopefully whatever is making me sick all the time can get taken care of!
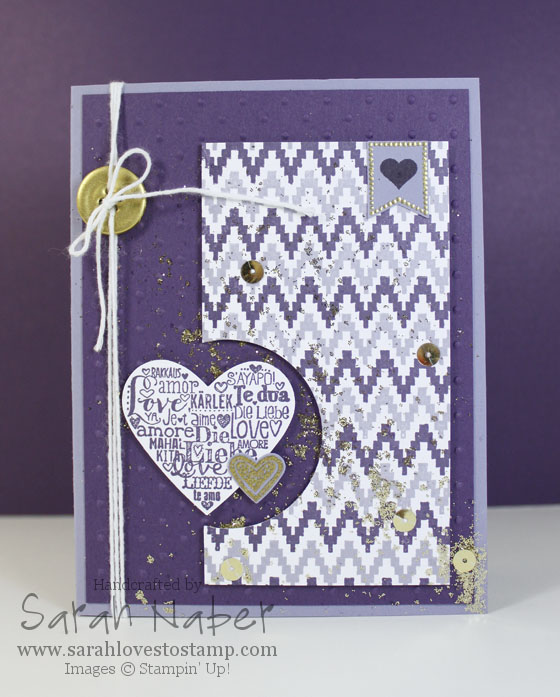
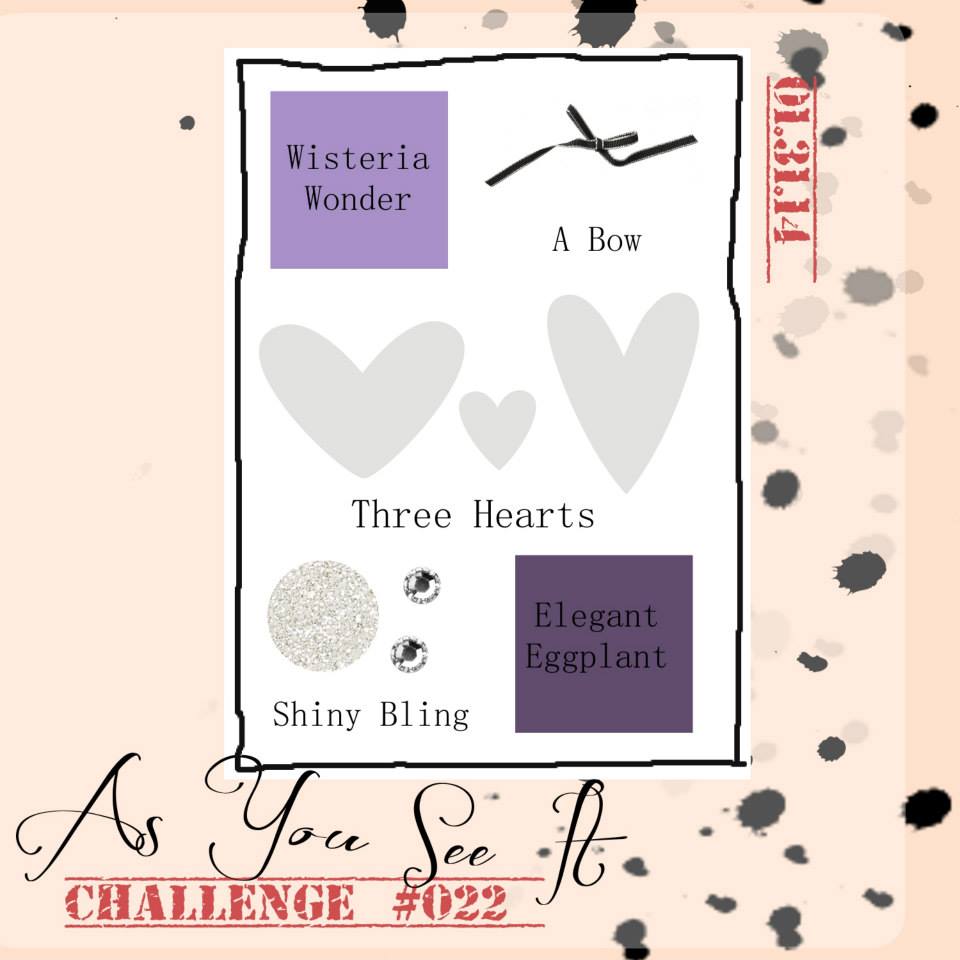
Ok! So on to the fun stuff! This is my FAVORITE type of challenge we do over at As You See It Challenges! Check the graphic below for the items you need to include on your project to play along. You have until Wednesday at midnight! 🙂 While I used purples on this card to meet the challenge, you could do it in virtually any color combo! Red & pink for traditional Valentine’s Day colors, or your main squeeze’s favorite colors for an anniversary card, or the wedding colors of a couple for a personalized, super sweet wedding card! I also used the Retro Sketch #99, but the deadline to play along in their challenge has passed – I still LOVE this sketch though!
I LOVE the background with the super trendy ikat chevron border from the Eye-Catching Ikat Photopolymer Stamp Set. I alternated inking them up in Wisteria Wonder and Elegant Eggplant and stamped them onto a piece of 2-1/2″ x 4-1/2″ Whisper White cardstock. *TIP: Clean the ikat chevron border stamp in between each color with the Stampin’ Scrub and Stampin’ Mist for a quicker, cleaner process!!! (You could try stamping all of one color first but it is easier to insure perfect placement by stamping it how you want the finished product to look.) Love that piece – my favorite thing about the card! One of the Circles Collection Framelits Dies cut out the partial circle perfectly. The Full Heart Punch and Small Heart Punch are a perfect match for the Language of Love Stamp Set! The larger heart was stamped in Elegant Eggplant on Whisper White Cardstock, while the smaller heart was stamped using Versamark ink onto Wisteria Wonder cardstock and heat embossed in Gold Stampin’ Emboss Powder!
Do you love that tiny little banner? That’s from one of the 2014 Sale-A-Bration EXCLUSIVE stamp sets, Banner Blast! It has a matching punch that is also a choice with any $50 purchase! Gotta love that! The dotted border is stamped in VersaMark ink on Wisteria Wonder cardstock and heat embossed with Gold Stampin’ Emboss Powder! I used my trusty Stamp-a-ma-jig to line the little heart from Banner Blast up right in the center and stamped it in Elegant Eggplant.
How about the gold bling details? The button is actually one from the Regals Designer Button Collection (Garden Green!). I pressed it into the VersaMark pad, sprinkled it with some Gold Stampin’ Emboss Powder and heated it with the Heat Tool until it melted! Then I did that same thing two more times to get an even coat on it. I also repeated the process on the edges. Slipped it on the card with a bit of White Baker’s Twine tied through the holes! Once I had assembled the card (before I added the hearts), I diluted a blob of my Multipurpose Liquid Glue with water and used a paint brush to spatter it onto the card. I sprinkled some fine gold glitter on for some sparkle! I also cut apart the Gold Sequin Trim and added a few of these pretties with Multipurpose Liquid Glue.
The Elegant Eggplant Layer (4″ x 5-1/4″) was embossed with the Perfect Polka Dots folder and the Big Shot. The stamped ikat chevron piece has some extra effect thanks to the Stampin’ Dimensionals underneath! I also added Stampin’ Dimensionals to the hearts after gluing the smaller one to the larger one. 🙂
Come on over to the As You See It Challenge Blog and play along! You still have plenty of time before Wednesday night rolls around! If you’re in the midwest like me, you might have a snow day tomorrow to get a bit inky and try this challenge! We’re supposed to get 10″ – can you believe that?
It’s a Boy Card and a New Challenge!
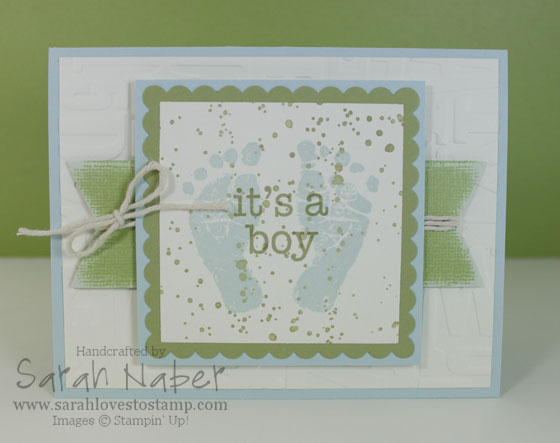
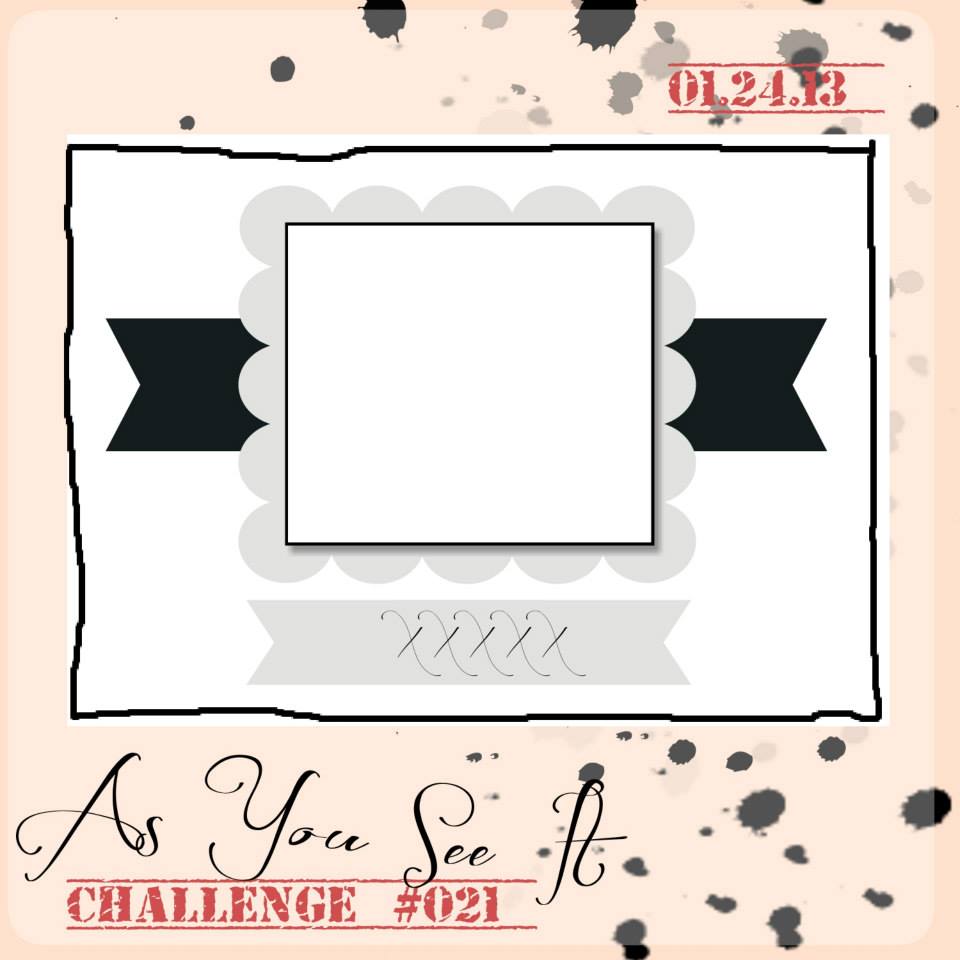
Hi there! I’m sorry for my extended absence! I have been sick sick sick over here at the casa de Naber! Yuck!!! Thankfully, I’m finally feeling on the mend and was very excited to get back into my stamp room and create for you! Check out my card using the super cute, Baby Prints Stamp Set! This one is an oldie but a goodie, debuting about a year ago and ending up in our fantastic 2013-2014 Annual Catalog! I used the sketch from the As You See It Challenge Blog and a color combo perfect for a baby boy from over at Cupcake Inspirations!
This card came together pretty quickly! I stamped the feet in Soft Sky ink, then stamped the splatters from Gorgeous Grunge over the top in Pear Pizzazz. I used my Stamp-a-ma-jig to insure perfect placement of my sentiment which I stamped in Pear Pizzazz. You’ll notice the sketch has a banner below it – I totally planned to do that until I was assembling my final card which is when I realized my focal point was so large there wasn’t room for the sentiment below it! So technically, I stamped the sentiment last! 🙂 Had I known this would be an issue, I would’ve “stamped off” the Pear Pizzazz splatters before stamping them onto my project so the sentiment would stand out even more. As it was, the splatters were done full strength so I actually left my handy Stamp-a-ma-jig handle where it was after stamping the sentiment the first time and stamped it again, in exactly the same spot, to make it just a tad darker! Maybe that’s a new trick for you! It’s like the opposite of stamping off! Double inking let’s call it!
Anyway, I cut it out with the 4th largest Square framelit and then used the largest Square framelit that is scalloped to make a smaller scalloped square. I’ll have to make a video for that soon! I’ll insert it into this post when I do! I just cut the square that mats that one to be a tiny bit larger. Then I took a piece of Pear Pizzazz Core’dinations Cardstock (from the Subtles Collection Pack) measuring 1-1/2″ x 5″ and flagged the ends (I wanted a super shallow “V” or I would’ve just used the Banner Framelits Dies from the Occasions catalog.) Then I sanded it down to reveal some of that lighter inner core. I took the Gold Baker’s Twine and peeled the gold striping off of it (super easy to do) to reveal the Vanilla twine underneath! Wrapped this around the banner piece, tied a bow and attached it to the rest of the card! The layer I attached it to is a piece of Very Vanilla Cardstock cut to 4″ x 5-1/4″ and embossed in the Big Shot Die Cutting Machine with the Alphabet Embossing Folder (one of my favorites)! I attached that to a Soft Sky base measuring 5-1/2″ x 8-1/2″ that I scored at 4-1/4″. The sanded banner piece was popped up on Stampin’ Dimensionals and the main focal point was popped up with double Stampin’ Dimensionals to reach the embossed piece and just one layer of Stampin’ Dimensionals where it was adhered to the sanded banner piece.
I hope you like it! It would be SUPER simple to make this card into a great girl or gender neutral card too!!! It’s a great sketch, so please play along with us over at the As You See It Challenge Blog! You have until Wednesday evening to get your entry in! Come check out what the other Design Team members have made too!!!

Here it is! My first new video for the New Year! Better late than never, right? I’m excited about LOTS of new things that will be coming your way! I hope you enjoy this video – it’s a bit different than my normal cardmaking or tool tips. I LOVE Post It Notes and am constantly reaching for them to jot something down so it’s pretty appropriate for me! 🙂 Thanks for your patience as I took time with family over the holidays and went on a much needed vacation with my hubby in early December! My New Year’s Resolution is to post regularly for you all on my blog and YouTube especially, adding in Facebook, Twitter and Pinterest more too!!! I also still need to blog my AWESOME trip to Houston last week for Stampin’ Up!’s Leadership Conference!!!
Hi there! I’m writing to you from {not so} sunny Houston! I’m at the Stampin’ Up! Leadership Conference and having a GREAT time. Last night, I was able to attend my first ever Manager’s Reception. All I can say is WOW! It was so amazing and I work for such a generous company! I am so blessed. I want to thank each of you, my friends and customers, for helping me get there! Without you, none of this would be possible. I cannot stress that enough! We were at the beautiful Houston Aquarium and I will be posting pictures soon, but it was a night full of fun, food, amusement rides, feeding sting rays, food, mocktails, food…and more food! Seriously, Stampin’ Up! spoils us SO much! Unbelievable!!! I can’t wait to share some fun new things I’ve learned with you all as well!
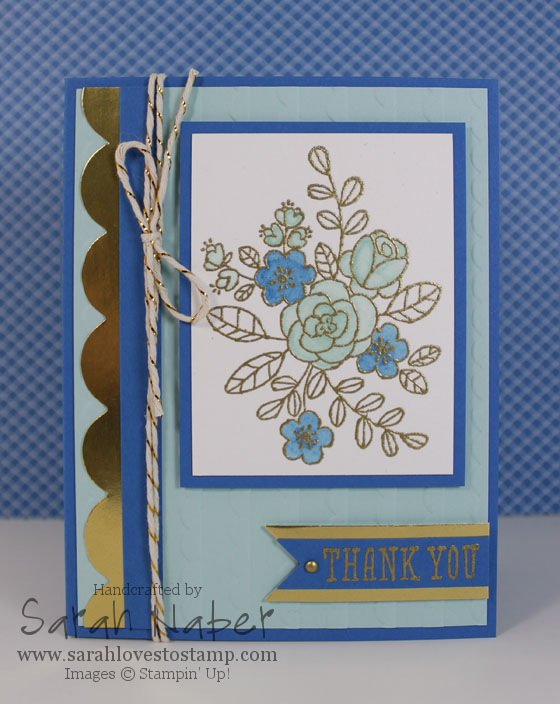
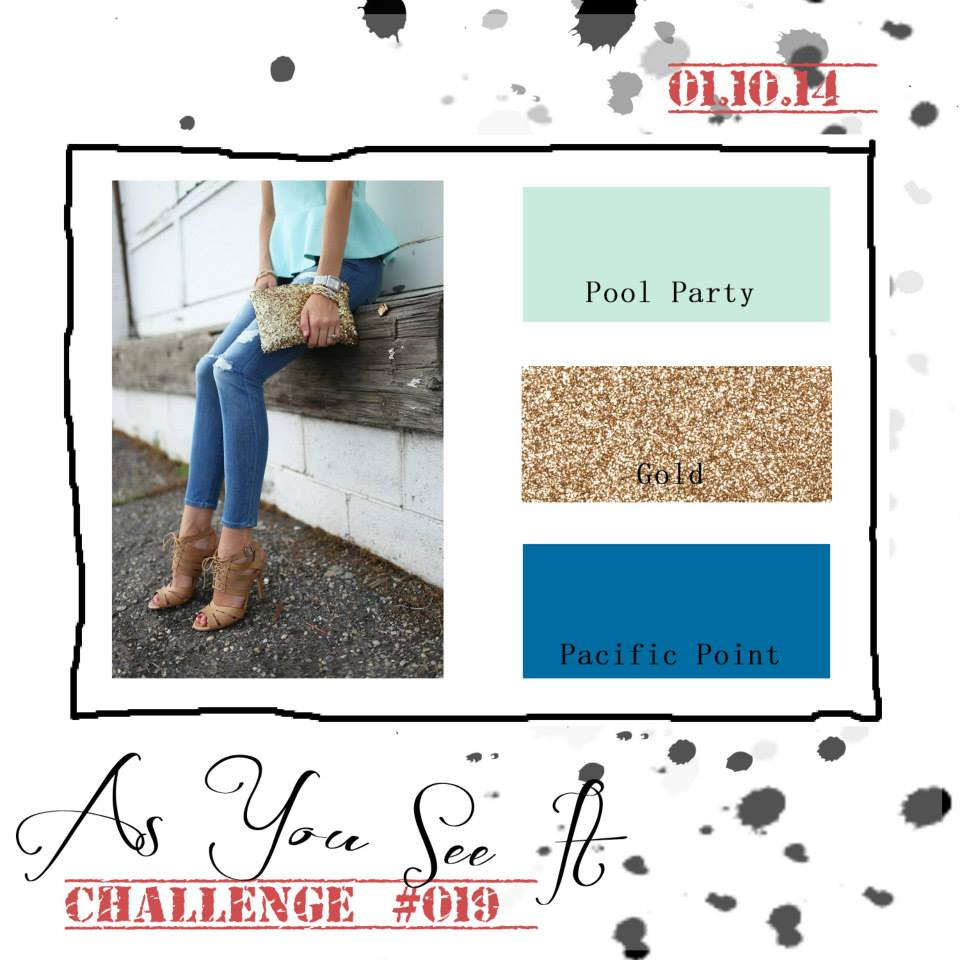
This week’s challenge over at the As You See It Challenge Blog is a color combo. Have you noticed gold popping up everywhere, from jewelry to clothes to papercrafting? This challenge totally embraces that trend with a color combo of Pacific Point, Pool Party and Gold! I LOVE the inspiration photo, but this one was tricky for me. Do you ever have that? Like you are just needing one more color to make your vision come to life? But I stuck with it and was able to make a card that I not only liked, but enjoyed enough to make 16 of for a swap I’m hosting here at Leadership 2014. I hope you enjoy it too!
I just had to have the So Very Grateful stamp set when I saw the fun, line art image of those flowers! So beautiful, fun and versatile, depending on which look you are wanting to achieve. I stamped it onto a piece of Watercolor Paper with VersaMark ink and sprinkled on some Gold Stampin’ Emboss Powder before heating it (where the magic actually happens). I then colored in the flowers with Pool Party and Pacific Point Classic Ink Refills and an Aqua Painter (they come in a pack of 2 – I used the one with the smaller brush). That piece was mounted onto a rectangle of Pacific Point cardstock. The base of the card is a 8-1/2″ x 5-1/2″ piece of Pacific Point cardstock, scored at 4-1/4″. I embossed a piece of 4″ x 5-1/4″ Pool Party cardstock with the Scallops Textured Impressions Embossing Folder and mounted that on top of the base. I followed that with a strip of Gold Foil Sheets cut out with the fantastic Tasteful Trim Bigz XL Die on the larger scallop pattern (there are FOUR 12″ long patterns on this one die). A 3/8″ x 5-1/4″ strip of Pacific Point was adhered on top, followed by a bit of the new Gold Baker’s Twine (LOVE!). To create the sentiment banner, I embossed the “Thank You” sentiment from So Very Grateful onto Pacific Point cardstock, then die cut it out with the largest of the Bitty Banners Framelits. I also cut one of these out of the Gold Foil Sheets and cut it in half to make a little mat for the Pacific Point Piece. I trimmed the right edge to be straight and stuck a Mini Brad through it. Are you wondering how I made a SILVER Mini Brad gold? I took the brad, dabbed it into the VersaMark ink pad and then sprinkled Gold Stampin’ Emboss Powder on and heated it. *TIP: I recommend using a tweezers to heat it up as the brad will get pretty hot! To finish it off and add some sweet dimension, I used Stampin’ Dimensionals to adhere the focal point and the sentiment piece.
I hope you’ll head on over to the As You See It Challenge blog at http://www.AsYouSeeItChallenge.com and give this week’s fun color combo a try!!!
Supply List
STAMPS:
So Very Grateful (Wood-Mount 133050, Clear-Mount 133053)*
PAPER:
8-1/2″ x 11″ Pacific Point Cardstock (111350)
8-1/2″ x 11″ Pool Party Cardstock (122924)
Watercolor Paper (122959)
12″ x 12″ Gold Foil Sheets (132622)*
INK:
Pacific Point Classic Stampin’ Pad (126951)
Pool Party Classic Stampin’ Pad (126982)
VersaMark (102283)
ACCESSORIES:
Gold Baker’s Twine (132975)*
1/8″ Mini Brads (122941)
Gold Stampin’ Emboss Powder (109129)
Multipurpose Liquid Glue (110755)
Stampin’ Dimensionals (104430)
TOOLS:
Stampin’ Trimmer (126889)
Simply Scored Scoring Tool (122334)
Bone Folder (102300)
Paper Snips (103579)
Craft Scissors (108360)
Aqua Painters (103954)
Heat Tool (129053)
Paper-Piercing Tool (126189)
Stampin’ Pierce Mat (126199)
Big Shot Die-Cutting Machine (113439)
Bitty Banners Framelits Dies (129267)
Scallops Textured Impressions Embossing Folder (132971)*
Grid Paper (102787)
Stampin’ Scrub (126200)
Stampin’ Mist (102394)
*Product featured in the 2014 Occasions Catalog! Contact me today at 816.341.0208 or Sarah@SarahLovesToStamp.com if you need a copy!
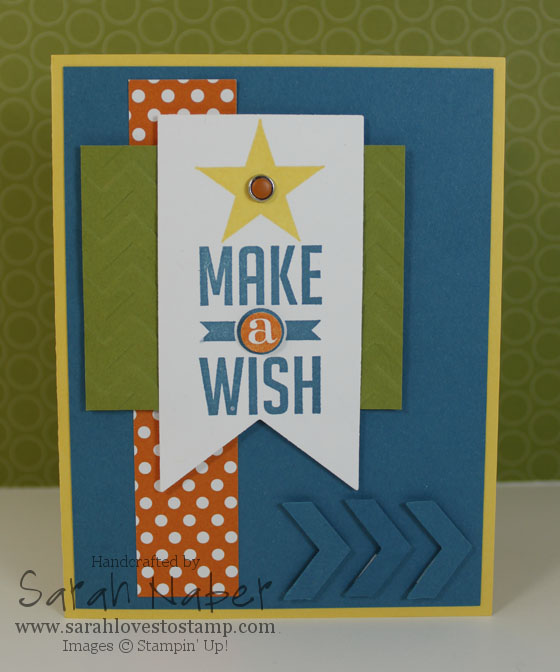
TODAY is the first day of the fabulous Occasions Catalog!!! My first must have item is what I used on this card – the Perfect Pennants Bundle!!! It has great sentiments, a great medium-sized heart and star, as well as some fun border patterned strips too. And to top it all off, it is made to work with the Banner Framelits which come bundled with the stamp set at a 15% discount! You can’t beat that, right? LOVE!
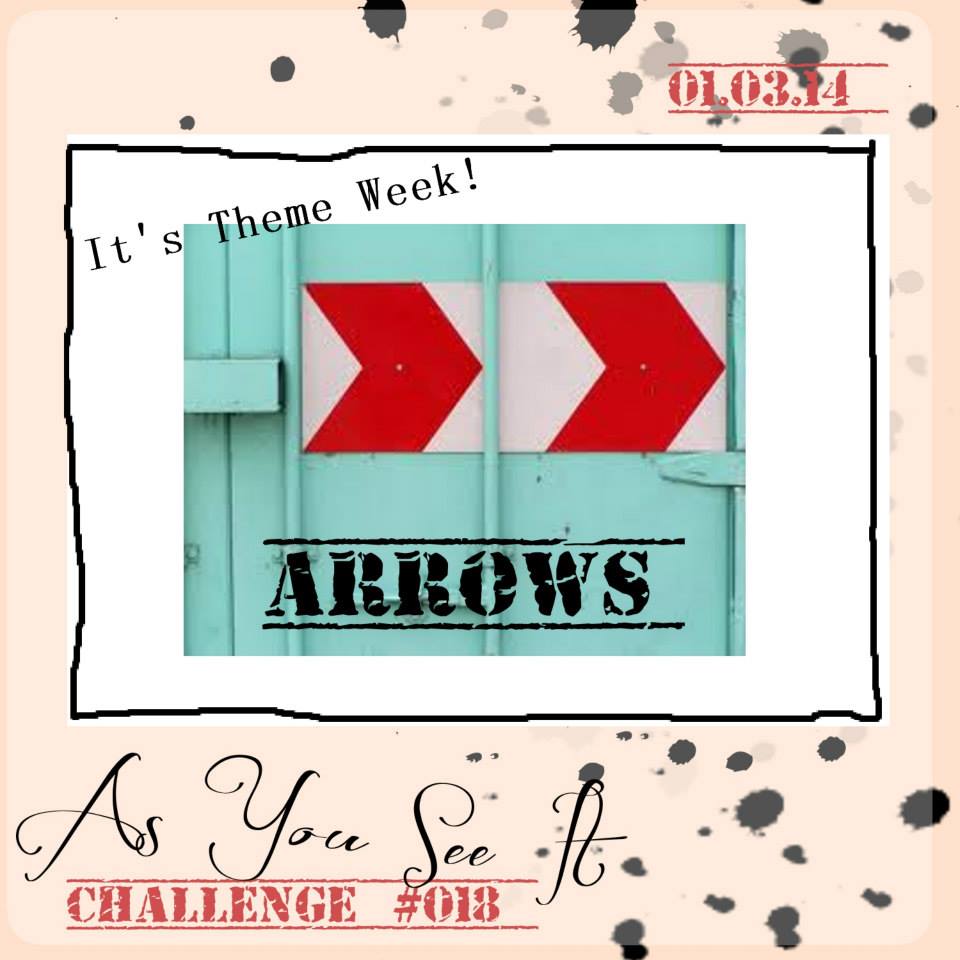
This card is also my Design Team submission for our “Arrows” theme challenge this week over at the As You See It Blog! Hot, hot trend in papercrafting right now and I just love this punch! I did a fun tone on tone effect with it here. I also, loved accenting the center of the star with a Candy Dot Brad Base with a Pumpkin Pie Candy Dot (from the Brights Collection) in the center! The “a” in “Make a Wish” is cropped out with the teeny circle in the Itty Bitty Shapes Punch Pack and popped up on a dimensional (well, a 1/4 of a dimensional anyway) for a bit of extra pizzazz. The other layers are a strip of pumpkin designer series paper from the Polka Dot Parade DSP and a piece of Old Olive cardstock that I textured with the Chevron folder.
I hope you love today’s card. Now, head on over to the As You See It Blog, check out what the other design team members have made and play along with Challenge 018! Can’t wait to see what you’ll create in our very first theme challenge!!!
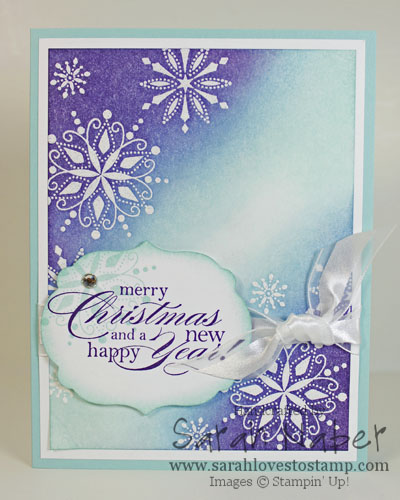 This was a favorite card from last year that I never got around to posting! It’s a total CASE (Copy And Share Everything) of a card Catherine Pooler made, but she brayered and I chose to sponge it instead. 🙂 I’m not sure my colors are the same as hers and I used a different shape for the sentiment, a different ribbon, and different stamp sets too so that hopefully shows you that there are a variety of ways to accomplish a similar card.
First, start by embossing your snowflakes onto a piece of Whisper White Cardstock cut to 3-3/4″ x 5″ with either White Stampin’ Emboss Powder or Clear Stampin’ Emboss Powder. (I believe I used clear here with VersaMark ink, but you could also use the white powder or White Craft Pad too.) *TIP: Rub your cardstock with the Embossing Buddy before you stamp the images you want to emboss. This will remove the static and allow your images to remain crisp and sharp, with no extra embossing powder little pieces left behind. I’ve heard you can make your own, but I’ve had the same one for over 5 years now and it won’t need replacing probably in my lifetime! I’ve also heard a used dryer sheet works too but again, I’ve been using the Embossing Buddy with great results so I haven’t tried that one. (FYI: I did try a brand new dryer sheet and that definitely doesn’t work.) Then I sponged the upper left hand and bottom right hand corner with Elegant Eggplant ink, leaving a large portion of the center blank. I followed that with Marina Mist ink blended into the Elegant Eggplant and used circular motions to move towards the center a tad bit more. I used the same process to add the Pool Party ink. The end result is gorgeous!!!
If you’re sending out your Christmas cards late this year, mailing a joint Christmas/New Years card is a great idea! This sentiment, from Delightful Dozen, is a favorite of mine. It is stamped in Elegant Eggplant, then I added a snowflake to the corner in Pool Party. It was cropped out with a Labels Collection Framelits Die, then the edges were sponged with Pool Party ink. I glued the sponged panel to a piece of Whisper White cardstock cut to 4″ x 5-1/4″, then tied a piece of 5/8″ Whisper White Organza Ribbon around it, and attached it to a 8-1/2″ x 5-1/2″ Pool Party card base, scored at 4-1/4″. I popped the sentiment panel up with Stampin’ Dimensionals and for the very final touch, I added a Rhinestone Basic Jewel to the center of the snowflake on the sentiment panel.
The other great thing about this card is that it is PERFECT for those upcoming winter birthdays in January and February if you just switch out the sentiment! Or you can play with different color combinations to completely change the look of the card (pinks and purples? blues and greens? or just monochromatic aquas?) Super fun! If you give it a try, let me know and send me a picture of it! 🙂
I hope you enjoyed today’s project and that you had a very merry Christmas! I was blessed to take a bit of time off to spend with friends and family. I hope you were able to do the same! See you back here soon!
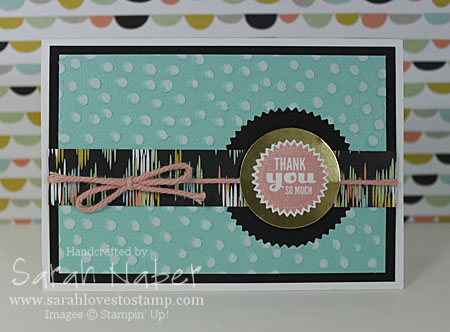
Hi there! I hope you’re having a great start to your weekend! Today I have a SUPER fun project to share with you using LOTS of new goodies!!! This card uses a stamp set from the upcoming Occasions Catalog, Starburst Sayings, as well as the matching Starburst Framelits Dies. Of course, Stampin’ Up! is being amazing and offering bundles again so you can get the stamp set and framelits at a 15% discount.
I also used the same Designer Series Paper as my project yesterday – the new Sale-A-Bration offering, Sweet Sorbet DSP. Starting January 31, 2014, you’ll be able to get this package of fantastic DSP for free with a $50 purchase! Oh yay! I also used the same twine too that is from the SAB Sweet Sorbet Accessory Pack. AND…a BRAND NEW Sale-A-Bration Decorative Dots embossing folder too!!! Could this year’s Sale-A-Bration get any better?!?
I’m sure you also noticed my piece of 3″ x 4-1/2″ Core’dinations cardstock (can I even make a project without it?) that I cut the starburst shape out of using the 2nd smallest Starburst Framelits Die. Then I embossed and then sanded with the Stampin’ Sanding Block to reveal that lighter inner core. *TIP: Remember to do all of your cutting with framelits or other dies before you emboss. Otherwise the embossing will be flattened because of running the embossed piece through the machine without its folder. I then glued it down with the Multipurpose Liquid Adhesive to a piece of 3-1/4″ x 4-3/4″ Basic Black Cardstock. A 3/4″ x 4-3/4″ strip of my favorite pattern from the Sweet Sorbet DSP is layered over the top. I tied a bow of the Crisp Cantaloupe twine from the Sweet Sorbet Accessory Pack over the top of the DSP and glued it down to the Whisper White Note Card base (they come pre-cut and pre-scored with matching envelopes…easy peasy!).
I stamped the “Thank You So Much” stamp in Crisp Cantaloupe ink onto a scrap of Whisper White Cardstock and used the matching framelit to cut it out (the smallest one). *TIP: I actually stamped this first and ran it through the Big Shot at the same time as the Core’dinations piece with the 2nd smallest framelit. I try to always run all of my framelits for one project through at the same time if possible to save time! Super easy, especially with the Magnetic Platform to hold each piece in place. I layered that onto a circle of Gold Foil Sheet punched out with the 1-3/8″ Circle Punch. Finally, I cut a Stampin’ Dimensional in half and put one half on the top and one half on the bottom then stuck it onto the card! *TIP: Placing your dimensionals so they adhere straight to the card (not the twine) will insure that everything lays flat. If the dimensionals were on top of the twine, then the focal point may bow around the twine a bit. Not too big of a deal, but just a little idea to add that extra professional look to your projects.
Supply List
STAMPS:
Starburst Sayings (Wood-Mount 133182, Clear-Mount 133185)*
-Also available as a bundle with the Starburst Framelits Dies at a 15% discount! Wood-Mount 134817, Clear-Mount 134818*
PAPER:
Whisper White Note Cards & Envelopes (131527)
8-1/2″ x 11″ Whisper White Cardstock (100730)
8-1/2″ x 11″ Basic Black Cardstock (121045)
12″ x 12″ Gold Foil Sheets (132622)
In Color 2012-2014 Core’dinations Cardstock (129957)
SAB Sweet Sorbet DSP (133521)**
INK:
Crisp Cantaloupe Classic Stampin’ Pad (131176)
ACCESSORIES:
SAB Sweet Sorbet Accessory Pack (133522)**
SNAIL Adhesive (104332)
Multipurpose Liquid Glue (110755)
Stampin’ Dimensionals (104430)
TOOLS:
Stampin’ Trimmer (126889)
Simply Scored Scoring Tool (122334)
Bone Folder (102300)
Craft Scissors (108360)
Stampin’ Sanding Block (129367)
Core’dinations Dust Buddy (129366)
1-3/8″ Circle Punch (119860)
Big Shot Die-Cutting Machine (113439)
Big Shot Magnetic Platform (130658)
Starburst Framelits Dies (132967)*
-Also available as a bundle with the Starburst Framelits Dies at a 15% discount! Wood-Mount 134817, Clear-Mount 134818*
SAB Decorative Dots Textured Impressions Embossing Folders (133520)**
Grid Paper (102787)
Stampin’ Scrub (126200)
Stampin’ Mist (102394)
*Available January 3, 2014 when the Stampin’ Up! Occasions Catalog begins!
**Exclusive Sale-A-Bration item FREE with each $50 purchase from January 28, 2014-March 31, 2014!
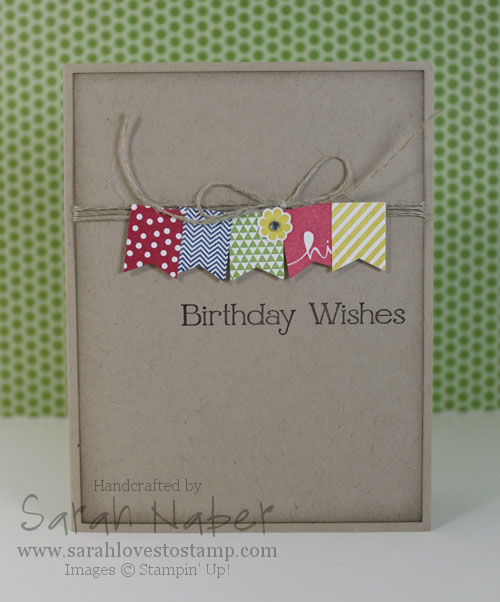
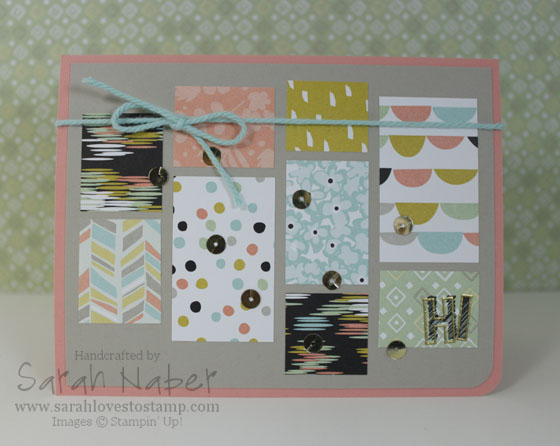
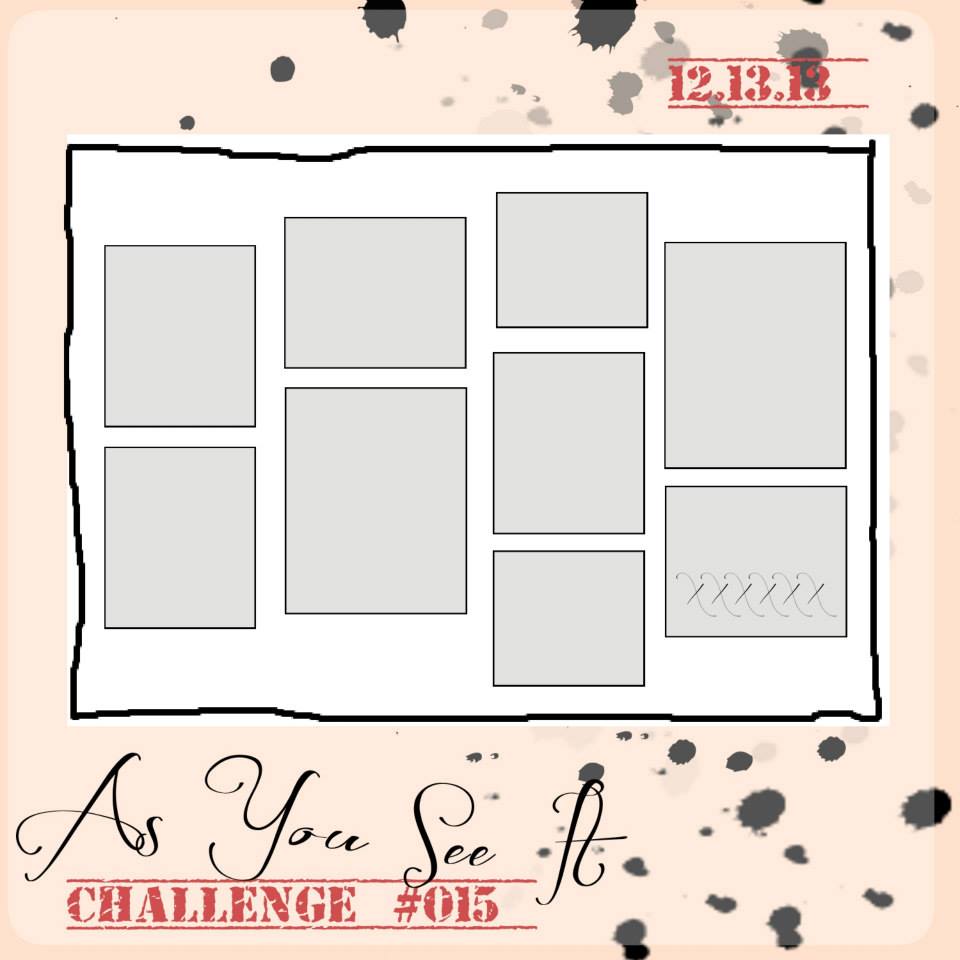
Wow! This one was a toughie for me! I LOVE this sketch now but I sure struggled to get it together for this card. This sketch is a GREAT one for showcasing SU!’s Designer Series Paper (DSP) because the packages come with 12 different double-sided designs (12 sheets 12″ x 12″, 2 of each double-sided design) in our coordinating colors. SO…I picked out the fantastic NEW Sale-A-Bration DSP!!! I’m SO SO SO in love with this paper that it isn’t even funny! The best thing about it? You can get it FREE with a $50 purchase beginning on January 28, 2014! I’m super stoked about this year’s Sale-A-Bration offerings.
Anyway, this color combo of Basic Black, Pistachio Pudding, Sahara Sand, Whisper White, Coastal Cabana, Summer Starfruit, and Crisp Cantaloupe feels SO fresh! Combine that with whimsical scallops, fun florals and interesting ikats and you have a home run!!! I wanted to make the DSP the star of the show so I used a simple Sahara Sand layer behind the papers and added the “Hi” greeting with my favorite Sketch and Outline Alphabets. I stamped the sketch ones in Jet Black Staz On and embossed the Outline ones with Gold Stampin’ Emboss Powder. The twine is also a Sale-A-Bration offering! I LOVE it as it’s a tad weightier than the normal SU! Baker’s Twine. 🙂 Super fun! The twine is specifically designed to coordinate with the DSP and comes in a package of 3 colors, as well as some fun adhesive backed printed cork die cuts. There’s also a stamp set that goes with this suite of products too! Again, each $50 you spend will allow you to pick from our fabulous choices! (From January 28, 2014 – March 31, 2014)
I hope you love today’s card! I couldn’t resist throwing a few sequins on there from an upcoming Sequin Trim that I just pulled apart to get some individual cuties. 🙂
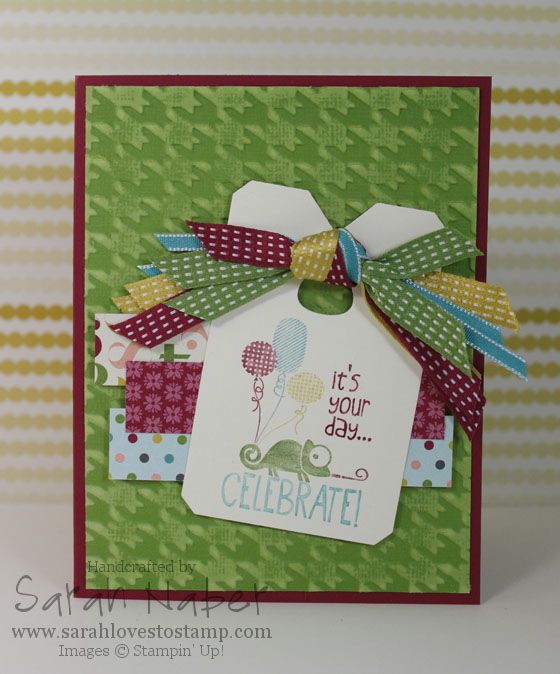
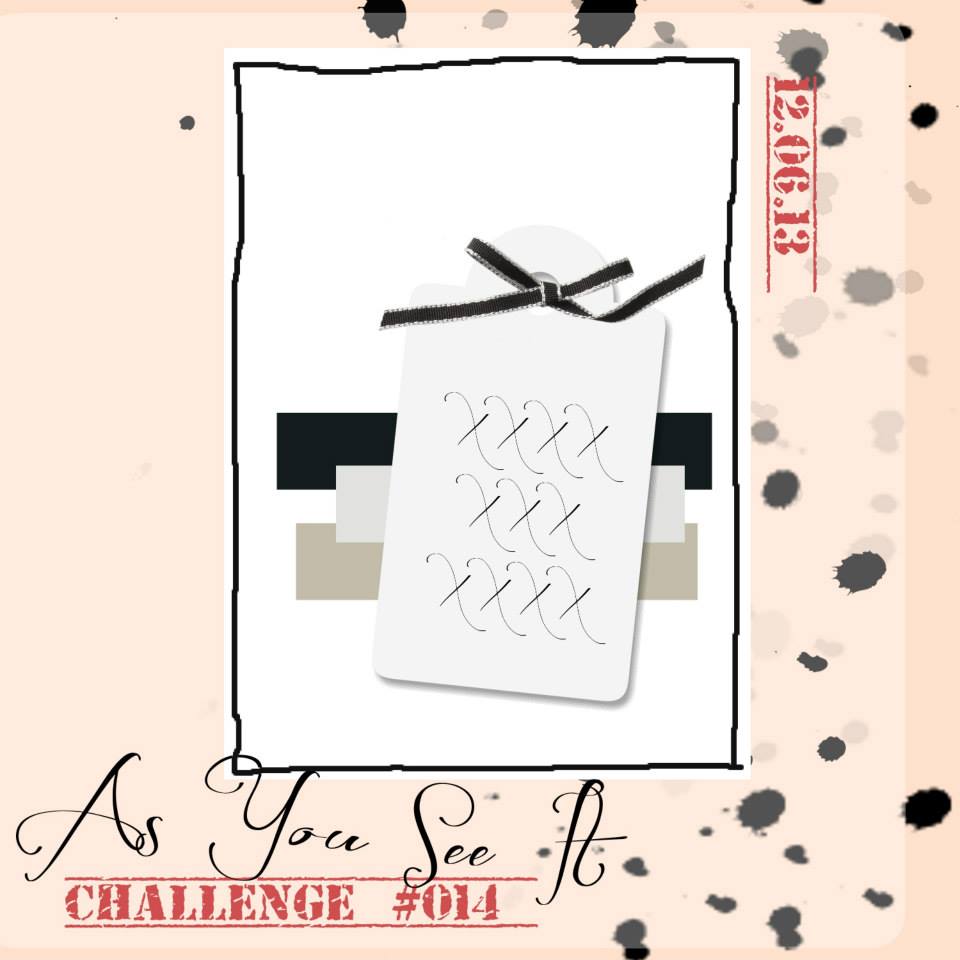
I’m late on this challenge from our As You See It Challenge Blog last week! You still have time to play along today though! I cannot believe how fast December is FLYING by! WOW! Do you have all of your Christmas cards done?
I knew from the sketch, I wanted to use the large tag from the Chalk Talk Framelits and I immediately thought of this super cute lizard from Stampin’ Up!’s Ronald McDonald House Charity Stamp Set this year, Tag It! I LOVE it and it is designed to work with the Chalk Talk Framelits! YAY – gotta love that coordination!
My fav thing about this card? Well, it may be a tie between the Core’dinations Cardstock and the ribbon treatment I did here. I started with 4 different ribbons, 2 pieces each and tied them into a knot. I simply attached it with a dimensional over the hole in the tag. Ohhh…I also LOVE this DSP! Such fun colors and patterns for birthday! Super cheery and fun!
Calm Christmas Two Ways – As You See It Challenge #013
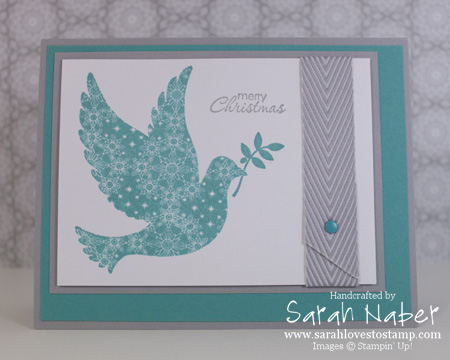
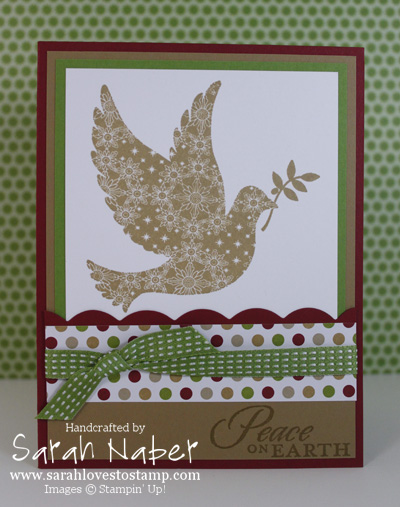
Hi! It’s Black Friday! Are you doing any crazy shopping with your family or friends today? Today’s As You See It Challenge is all about making a project with your favorite stamp set. For me, that’s Gorgeous Grunge…however, you’ll notice neither of my cards uses that stamp set. Why? I decided that, with the holiday season closing in on us fast, I’d show you my favorite stamp set from the Holiday Catalog. Calm Christmas is a great set and with that large, bold image, it makes it SUPER simple to stamp bunches of great cards in a flash! Yay!
Two very different looks for you today. One traditional and one not. I hope you can see how versatile this set is!
This is a super easy challenge to play along with…you only have to make one project with your favorite stamp set (only the Design Team had to make two  ) and you could be the winner of the challenge. Check it out here, at the As You See It Blog!
Also, did you know I’m doing FREE Shipping on orders of $40 or more from TODAY, November 29th, 2013 until Monday, December 2nd, 2013? If you didn’t know, you’ve got to get on my mailing list…NOW, so you don’t miss out on anything else. Just put your info in the box to the right, hit the “get my free video” button, and wait for an email to come to your inbox with the link to click to confirm that you want to be added! I am also offering a DOORBUSTER of at least $50 in retired product to the first 5 people to place $40 orders on Black Friday!!! You can also enter your name into the Mystery Hostess drawing that I’m doing by entering the Hostess Code KJ2A3S37 in the box in the lower left hand corner of your Shopping Cart screen. (*Do not do this if you’re placing an order over $150 as you’ll get hostess benefits automatically!) Remember that SU! still has their Holiday Sale going on until Monday, December 2nd with items discounted up to 50% off! HERE’S the link to the Holiday Sale in my Online Store!!! Don’t forget that there are also Weekly Deals – SEE HERE 🙂 as well as the Clearance Rack (CLICK HERE) and of course, our other fabulous lineup of regularly priced products too!!!
5 Ways to Use Core’dinations Cardstock: Quick Tip Tuesday #23
SU! Color Collection Core’dinations Cardstock
40 sheets of 12″ x 12″ Core’dinations Cardstock in SU!-exclusive colors (4 Sheets of each of 10 colors)
Normally $23.95, ONLY $16.77 until December 2, 2013!
Brights (129953)
Subtles (129954)
Regals (129955)
Neutrals (129956)
In Color Core’dinations Cardstock
20 sheets of 12″ x 12″ Core’dinations Cardstock in SU!-exclusive In Colors (4 sheets of each of 5 colors)
2012-2014 In Color (129957) Normally $11.95, ONLY $8.37 until Dec 2, 2013!
2013-2015 In Color (129958) Regular price NOT on sale $11.95
Clearance Rack Discontinued Core’dinations Cardstock
12 sheets of 12″ x 12″ Core’dinations Cardstock in SU!-exclusive
SINGLE color packs
Normally $6.95, ONLY $2.79 while supplies last!
Cherry Cobbler (127846)
Early Espresso (127848)
Gumball Green (127847)
Primrose Petals (129322)
Hi there!
Today I wanted to let you know about a special I’m doing for my customers and friends! This special is offered by me and is in addition to any specials Stampin’ Up! does!
I am offering FREE shipping on any order of $40 or more from Friday, November 29th until Monday, December 2nd!
How this will work:
-Simply visit my online store (I’ll send out that link early on Friday!) to place your order.
-I will refund you the price of your shipping through Paypal (email me after you place your order with your Paypal address) or if you don’t have a Paypal, I can work out another option of mailing it to you.
Extra Benefits
In addition to FREE shipping, you can also receive:
-DOORBUSTER – The first 5 people to order $40 or more on Black Friday ONLY will get an extra special gift in the mail from me, along with an extra special hand stamped card!!!
-A spot on the 50/50 Board for every $50 you spend. When 50 names are on the board, I’ll draw for a $50 certificate.
-A chance at winning the hostess benefits when you put the hostess code KJ2A3S37 in at checkout. You’ll get an entry for every $25 you spend. (Don’t use this if you’re placing an order of $150 or more – you get your own benefits then!)
–Ordering off of the Holiday Sale with savings of up to 50%! CLICK HERE to check that out! (You can also double dip on sales by getting items off the Clearance Rack HERE and triple dip by getting the Weekly Deals HERE!!! Pretty awesome if you ask me!)
Think of ordering some gifts for yourself to wrap under your tree (your husband will be so thankful that you’re getting things you want) or for crafty friends and family! Who wouldn’t love getting something they love and would use? Your hubby doesn’t want you to buy your own presents? Give him a wishlist of items you want and have him call/text me at 816.341.0208 or email me at Sarah@SarahLovesToStamp.com!
Thanks so much for being the best friends and customers ever! I am so thankful for each of you and the part you play in me getting to have my dream job! 🙂
Connect with Me!
Categories
Archives
Copyright Info
Copyright Info All Images © Stampin' Up! 2011 Sarah Naber, Independent Stampin' Up! Demonstrator The content of this blog is my sole responsibility as an independent Stampin' Up! demonstrator and the use of, and content of, the classes, services, or products offered on this blog is not endorsed by Stampin' Up!

