Hi there! My 5th and final video in my Big Shot series covering how to run all the different Sizzix items Stampin’ Up! offers through the Big Shot! Check out THIS playlist for the rest of the videos, as well as a few other videos that show how I used them on my projects. Let me know if you have questions on how to use the Big Shot after watching these videos!!!
Paper Rosettes Made Easy: Quick Tip Tuesday #17
Hi there! The video is long again – I swear I cannot make a short video to save my life! There are just so many things I want to tell each of you! Check it out! Hope it helps you in your rosette making – I know I struggled to push the center down before the magic secret I show in the vid! 🙂 See you tomorrow – hopefully with a new card!
Using Embosslits with the Big Shot: Tool Time Thursday #16
I hope you enjoy today’s video! Embosslits are tiny but pack a lot of punch as they cut and emboss at the same time! I LOVE to use these on any of my projects! The perfect accent!
In other news, do any of you watch the X Factor? I’m loving the talent this season, especially that Tate Stevens! I was on the edge of my seat last night because he was in the third group, after the first gotten the good news and the second the bad. Man, I love that show!
Anyway, hope you’re all having a great week! If you haven’t signed up for my mailing list yet, get that done so you don’t miss out on the 2nd Week of Christmas, which will be out next Wednesday.
Using Markers with the Piercing Pack: Quick Tip Tuesday #16
Today’s video is a long one as I ended up making the entire card on camera! I hope you enjoy it! I show a little bonus tip about how I add Dazzling Diamonds Stampin’ Glitter to my projects as well. I’ll be back later today to edit this post with a full supply list, as well as a photo of the card I made in the video. I apologize that the video didn’t get posted until today – I didn’t notice (for a long time) that my YouTube upload had completely stalled out and I had to restart it! Sorry!
Supply List
STAMPS:
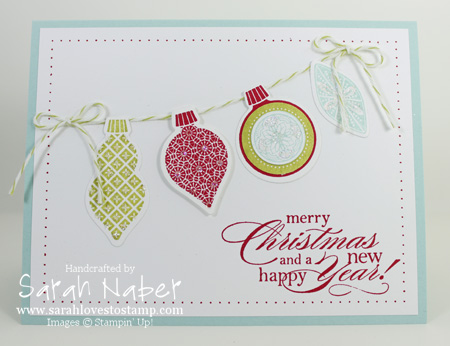
Ornament Keepsakes Bundle (Wood-Mount 128048, Clear-Mount 128051) OR the October Promotion, CLICK HERE!
Delightful Dozen (Wood-Mount 122650, Clear-Mount 122652)
PAPER:
8-1/2″ x 11″ Whisper White Card Stock (100730)
8-1/2″ x 11″ Pool Party Card Stock (122924)
INK:
Lucky Limeade Classic Stampin’ Pad (126984)
Pool Party Classic Stampin’ Pad (126982)
Real Red Classic Stampin’ Pad (126949)
Real Red Stampin’ Write Marker (100052)
ACCESSORIES:
Lucky Limeade Baker’s Twine (125572)
Dazzling Diamonds Stampin’ Glitter (102023)
Multipurpose Liquid Glue (110755)
2-Way Glue Pen (100425)
Mini Glue Dots (103683)
Stampin’ Dimensionals (104430)
TOOLS:
Tabletop Paper Cutter (106959)
Simply Scored Scoring Tool (122334)
Bone Folder (102300)
Craft Scissors (108360)
Stamp-a-ma-jig (101049)
Paper Piercing Tool (126189)
Stampin’ Pierce Mat (126199)
Essentials Paper-Piercing Pack (126187)
3/4″ Circle Punch (119873)
1″ Circle Punch (119868)
Big Shot Die-Cutting Machine (113439)
Grid Paper (102787)
Stampin’ Scrub (126200)
Stampin’ Mist (102394)
Using Originals & Bigz Dies with the Big Shot: Tool Time Thursday #15
The video today is all about our most versatile Big Shot item: the Originals and Bigz dies. Why do I say they are the most versatile? Because they cut through 50 different materials! Here’s a list of all of those materials:
- Thick corkboard
- Thick chipboard (59 mil)
- Colored magnet
- Ruffle board
- Paper wood
- Balsa wood (3/32″)
- Bass wood (1/16″)
- Metal mesh
- Aluminum (.016)
- Tin (.008)
- Adhesive and non-adhesive mat board
- Drawer liner
- Shelf liner
- Vinyl
- Static cling vinyl
- Shrink film
- Fine sandpaper
- Clear acetate (20 mil)
- Vellum
- Card stock
- Patterned paper
- Flocked paper
- Contact paper
- Textured paper
- Metallic paper
- Linen paper
- Suede paper
- Embossed metallic paper
- Basketball embossed paper
- Faux alligator textured paper
- Self-adhesive glitter paper
- Fabric
- Canvas
- Iron-on fabric
- Soft plush fabric
- Burlap
- Velvet
- Corduroy
- Lace
- Heavyweight denim
- Terry cloth
- Funky fur
- Thin leather
- Quilt batting
- Warm & natural batting
- Fusible fleece
- Self-adhesive craft metal
- Self-adhesive cork
- Self-adhesive foam
- Self-adhesive magnet
- Self-adhesive felt
- Adhesive and non-adhesive rubber
- Pop up sponge
- Poly foam
- 100% pure beeswax (cut with parchment paper on top & bottom of beeswax.)
Again, this list is just for those thicker dies! Do not try to cut these materials with Framelits or Sizzlits!!!
I also show you how to use the Bigz dies that have score lines on the die cuts with the Crease Pads. TIP: If you are going to buy an XL die with score lines (like the Designer Rosette Bigz XL die I show in the video), you need the Extended Crease Pad. However, you can use this extra-long crease pad with all of your other dies too! I know it costs more than the Standard one, but you can use it for ALL of these dies whereas the Standard one will only work with the non-XL ones. Depends on your plans…I have both because I had the Standard one first, but if you want to save a bit of money that’s just a tip for you! 🙂
Hi there! Today is a fun and easy way to add some fun glitter to your cards, scrapbook pages and any other projects. My favorite part? The glitter won’t budge when you follow my simple, easy steps! Check it out!!! Leave me a comment (click the link next to the name of the post) and let me know what you think!
Hi there! Quick video today showing some comparisons between the new, fabulous Illuminate Glimmer Watermark Stampin’ Pad that debuted in the 2012 Holiday Catalog and the long-time stamping essential, VersaMark!!! I LOVE both of these products and hope you enjoy seeing a bit of how they compare to one another. As always, I recommend buying the refill ink (or reinker) at the time that your purchase the pad so that you have that reinker when you need it! Also, I have no idea if the Illuminate Glimmer Watermark Ink will be available after the Holiday Catalog is over so get it now so you don’t forget! Leave a comment below!
How to Use Ribbon Scraps: Quick Tip Tuesday #14
Hi there! Today’s belated Quick Tip Tuesday is just my take on a super cute project idea from Stampin’ Up! Convention 2012. September is a perfect month for it as you can choose a roll of our 3/8″ Stitched Satin Ribbon for every $40 increment you spend. Get out those ribbon scraps and make some fun ribbon cards or scrapbook pages incorporating this technique today!!!
How to Dry Emboss With the Big Shot: Tool Time Thursday #13
Hi there! Sorry I missed posting for a few days – we were home for the long weekend here in the US. I did get the audio dubbed into that video I was talking about in my last post so that’s what I have for you today! Check back later for the Quick Tip Tuesday using the ribbon in the new “Back to Spool” September promotion!!!
I hope you enjoy the video today! This is probably the way I use my Big Shot most and my favorite thing to add to my project – TEXTURE with the embossing folders! 🙂 I show a few different ways to use them, as well as what “sandwich” you need for each type of folder.
See you again soon!!!
How to Make a Paper Bow: Quick Tip Tuesday #13
*Note: Scroll down to the next post if you didn’t see my video I posted this morning!
Hi there! A video today all about how to make a paper bow. This is so so cute and hot right now! I noticed it is pretty similar (minus a few things) to the paper bow on the front of the Stampin’ Up! 2012-2013 Catalog! The project I show in the video is one of our many Make & Takes from Convention 2012 , so I can’t take credit for the idea. I LOVE how they told us to keep the punched out rubber circles to use as stamps instead of trash. Upcycling and making my stamp set go from 5 stamps to 8 at no extra cost! WOOHOO! I LOVE this stamp set and was thrilled that it was one of the chosen ones for our Make & Takes (meaning we get it at Convention at no extra cost)! It is so incredible when paired with the Floral Frames Framelits dies too!!! AMAZING!!! (Check out page 116 and 190 in the 2012-2013 Catalog for awesome samples with the Daydream Medallions stamp set and Floral Frames Framelits duo!)
I hope you enjoy the idea and that it comes in handy for you for a birthday gift or even a Christmas gift very soon!!!
Supply List
STAMPS:
Daydream Medallions Stamp Set (Wood-Mount 126465, Clear-Mount 126467)
Affection Collection Stamp Set (Wood-Mount 127946, Clear-Mount 127949)
Daydream Stampin’ Around Jumbo Wheel (126939)
PAPER:
12″ x 12″ Whisper White Card Stock (124302) (cut four at 3″ x 6″, score at 3″)
8-1/2″ x 11″ Primrose Petals Card Stock (126841) (1″ x 8-1/2″, 1″ x 7″, 1 x 5-1/4″, 5/8″ x 2-3/4″)
8-1/2″ x 11″ More Mustard Card Stock (100946)
“Love Note” 3-1/8″ x 3-1/8″ Whisper White Square Envelopes (107309)
Kraft Gift Boxes (124106)
INK:
Daffodil Delight Classic Stampin’ Pad (126944)
Early Espresso Classic Stampin’ Pad (126974)
Midnight Muse Classic Stampin’ Pad (126860)
More Mustard Classic Stampin’ Pad (126964)
Primrose Petals Classic Stampin’ Pad (126858)
VersaMark (102283)
ACCESSORIES:
Primrose Petals 3/8″ Stitched Satin Ribbon (126844)
Linen Thread (104199)
Vintage Faceted Designer Buttons (127554)
Basic Rhinestone Jewels (119246)
Mini Glue Dots (103683)
Sticky Strip (104294)
TOOLS:
Tabletop Paper Cutter (106959)
Simply Scored Scoring Tool (122334)
Bone Folder (102300)
Paper Snips (103579)
Craft & Rubber Scissors (103179)
Stamp-a-ma-jig (101049)
Big Shot Die-Cutting Machine (113439)
Floral Frames Framelits Dies (127012)
Grid Paper (102787)
Stampin’ Scrub (126200)
Stampin’ Mist (102394)
I’m pretty late on the video posting tonight! I apologize but I haven’t felt well for the past couple of days. I hope you enjoy this tip – I know it sure helps me!!! The tip is important as it is how I keep from losing or misplacing any of my stamps! I also give you a tiny peek into my Stamp Studio to show you how and where I store my stamps as well (please excuse the video at that point…it looks a little like I filmed it onboard a ship! I will get my better/taller tripod next time I need to do this type of video). Having well-organized stamp storage will help you cut down on the amount of time you spend crafting, card making, or scrapbooking as you can find your stamps so easily!
I spent quite a few of my office hours working on bringing you some fresh ideas and new projects through challenges! I hope for it to be something you all really enjoy as it will get me to expand my creativity. Check back for that – hopefully tomorrow!!! 🙂
Field Flowers Faux Linen Technique Swap for Convention 2012
“But I’m not creative…” That short phrase is probably one I hear more than any other as a demonstrator! I hear it at classes I teach, at workshops, and in the community when I tell people what I do and say they can do it too! Creativity is a tricky thing – I understand not feeling creative! I know some of my peers have more creativity in their pinky finger than I do in my entire body. But I love doing what I do, so my response is always the same! You don’t have to be creative to create things and to enjoy the process!
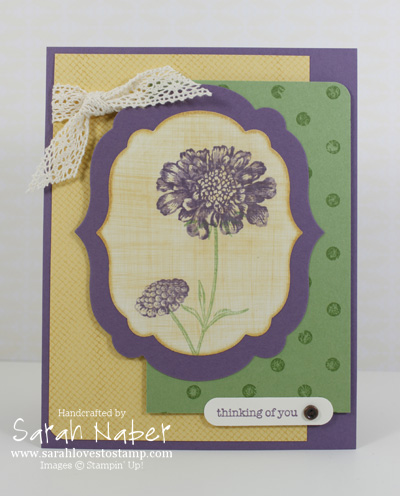
This card is a GREAT example of that! I used a color combination from the Stampin’ Up! Color Coach #120148 (a GREAT tool – in fact I did a video on it a while ago that I will link HERE): Perfect Plum, Wild Wasabi, and So Saffron!!! Gorgeous! This ended up being my favorite swap card I made for Stampin’ Up! Convention 2012! We also made this card shortly before I left for Convention in my Crazy about Techniques class as it uses the Faux Linen technique! This technique is an oldy but a goody!!! You use glossy card stock and sand it horizontally and vertically until the gloss is worn off, then sponge and stamp it and sand it more if you want until you get the desired result!!! LOVE IT! The layout is one I took from an old Mojo Monday challenge (I LOVE to print their monthly ones and then page through them when I’m creating – I rarely participate in a challenge in real time. I just found it and it was from Week 2 of Mojo Monday!!! Really really old!) I also LOVE the Field Flowers stamp set! (I do wish I had it in Wood-Mount though so I could make permanent vellum sheets to use with the Stamp-a-ma-jig!) And I used Teeny Tiny Wishes – my go-to stamp set as it includes every greeting I could need! (This card would be great for any occasion – just switch out the greeting!!!) I most always punch it out with the Word Window punch as I have here – super easy, cute and will fit anywhere on any card!!! I used another favorite of mine from SU! – background stamps!!! I LOVE them and they are a favorite of mine. I almost always make a card with either a background stamp or a background embossed with a Textured Impressions Embossing Folder and the Big Shot! Anyway enjoy!!! Let me know if you have any questions!!!
Supply List
STAMPS:
Field Flowers (Wood-Mount 122760, Clear-Mount 122762)
Teeny Tiny Wishes (Wood-Mount 115370, Clear-Mount 127802)
Netting Background Stamp (122655)
Distressed Dots Background Stamp (122815)
PAPER:
8-1/2″ x 11″ Glossy White Card Stock (102599)
8-1/2″ x 11″ Very Vanilla Card Stock (101650)
8-1/2″ x 11″ Perfect Plum Card Stock (101889)
8-1/2″ x 11″ So Saffron Card Stock (105118)
8-1/2″ x 11″ Wild Wasabi Card Stock (108641)
INK:
Perfect Plum Classic Stampin’ Pad (126963)
So Saffron Classic Stampin’ Pad (126957)
Wild Wasabi Classic Stampin’ Pad (126959)
ACCESSORIES:
Victoria 5/8″ Crochet Trim (118481)
Vintage Trinkets (118764)
SNAIL Adhesive (104332)
Multipurpose Liquid Glue (110755)
Stampin’ Dimensionals (104430)
TOOLS:
Tabletop Paper Cutter (106959)
Simply Scored Scoring Tool (122334)
Color Coach (120148)
2012-2014 In Color Color Coach Cards (126890)
2011-2013 In Color Color Coach Cards (124886)
Bone Folder (102300)
Craft Scissors (108360)
Stamp-a-ma-jig (101049)
Paper Piercing Tool (126189)
Stampin’ Pierce Mat (126199)
3/16″ Corner Rounder Punch (119871)
Word Window Punch (119857)
Big Shot Die-Cutting Machine (113439)
Labels Collection Framelits Dies (125598)
Grid Paper (102787)
Stampin’ Scrub (126200)
Stampin’ Mist (102394)
How to Cut a Framelits Die with the Big Shot: Tool Time Thursday #11
I hope you enjoy today’s video on how to cut out a stamped image with a Framelits Die and the Big Shot. Many of our Stampin’ Up! stamps are designed to coordinate with Framelits dies and I couldn’t be more thrilled to see a 15% discount on the Bundles that include a stamp set and matching Framelits dies in the Holiday Catalog! I’ll list all the bundles that are discounted below, and highlight the 4 that are stamp sets and matching Framelits. My other favorite bundle: the Ghoulish Googlies bundle! You’ll see that in an upcoming post soon! (You can click on any of the links to see the products in my online store.) Leave a comment below and let me know what your favorite bundle is!!! 🙂
Holiday Catalog Bundles
Ornament Keepsakes Bundle (Wood-Mount 129949, Clear-Mount 129950)
Scentsational Season Bundle (Wood-Mount 129945, Clear-Mount 129946)
Noel Notes Bundle (129909)
Everyday Happenings Bundle (129936)
Ghoulish Googlies Bundle (Wood-Mount 129852, Clear-Mount 129853)
Perfectly Preserved Bundle (Wood-Mount 129943, Clear-Mount 129944)
Friendship Preserves Bundle (Wood-Mount 129947, Clear-Mount 129948)
Remember December Digital Collection Disc (129836)
Haunts & Harvest Digital Collection Disc (129835)
Tying Ribbon into the Perfect Knot: Quick Tip Tuesday #11
Being able to tie the perfect knot is all about practice, practice, practice! In this video, I show you how to tie a knot around a card three different times. Pause the video and practice along. The third time, I even show you what to do if your ribbon is one-sided and you want a certain side only to show. Enjoy!
Tool Time Thursday #10: Heat Embossing Tools
Hi there! Make sure you scroll down to see yesterday’s post (AND VIDEO!) as I posted it pretty late at night. I hope you enjoy today’s video – a little comparison between Stampin’ Up!’s New and Improved Heat Tool vs. the old one, as well as a quick and easy tutorial on the very basics of heat embossing! Love that cute, new gingerbread man! Check it out!!! Head on over to my YouTube channel by clicking the YouTube logo in the right sidebar and subscribe so you don’t miss out on a single video!
Connect with Me!
Categories
Archives
Copyright Info
Copyright Info All Images © Stampin' Up! 2011 Sarah Naber, Independent Stampin' Up! Demonstrator The content of this blog is my sole responsibility as an independent Stampin' Up! demonstrator and the use of, and content of, the classes, services, or products offered on this blog is not endorsed by Stampin' Up!


