Sale-A-Bration Everyday Enchantment Scrapbook Page
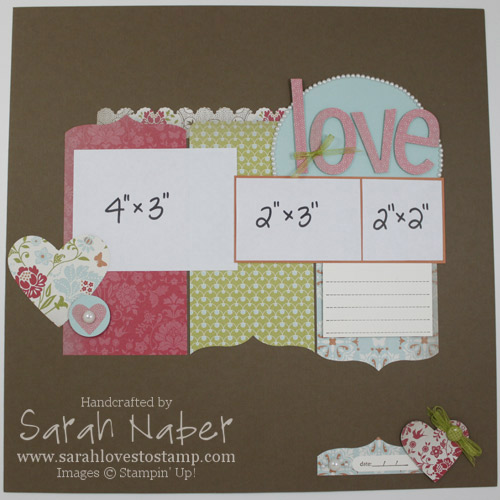
Hello! Today I’m bringing you a 12″ x 12″ Scrapbook Page I made with the Sale-A-Bration exclusive Everyday Enchantment Designer Series Paper! This is my favorite patterned paper that Stampin’ Up! has done in the 4 years that I’ve been a demonstrator!!! I LOVE it! And of course, it doesn’t hurt at all that it is FREE with a $50 order until March 31st (I need to stock up – more than the 3 packs I already have  ). Anyway, I also used a few other fabulous products on this card, including my runaway favorites from the Occasions Mini Catalog – Framelits and Edgelits. I’ll show you in my video tomorrow how I used the Labels Collection Framelits to make a fancy edge as I did on the 3 main panels of DSP behind the photos.
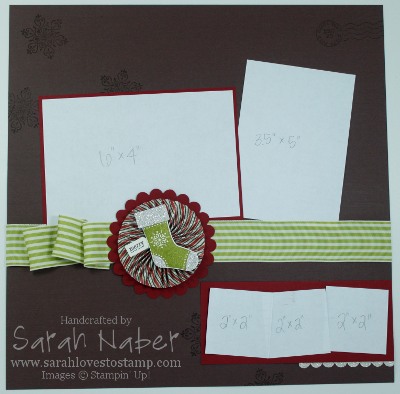
Hello! Today I have another one of our projects from my club meeting on Tuesday. It showcases three of my favorite items from the Stampin’ Up! Holiday Mini Catalog – the Simply Scored Scoring Tool, Stitched Stockings Stamp Set, and Stocking Builder Punch. It also features one of my favorite current trends in papercrafting – rosettes (or medallions or lollies)!
I stamped first on this page with the snowflake and postmark stamps from Winter Post (love it!) with my Chocolate Chip Classic Stampin’ Pad. Craft ink (also known as pigment ink) is recommended for scrapbook pages, but since none of my pictures would actually be touching the places where I stamped, I went ahead and used Classic ink. I wanted to draw the eye diagonally from the upper left hand corner down to the bottom right hand corner (leading the eye over all the photos) so I stamped the snowflakes randomly in that direction. I included a mat for my largest photo to make it the focus of the page, as well as a mat to highlight 3 smaller photos (or journaling) in the lower right hand corner.
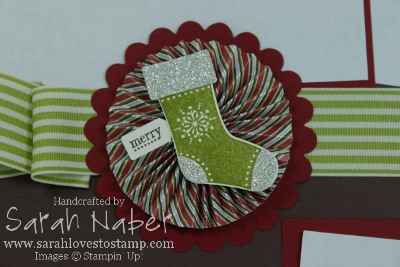
The ribbon is adhered with Sticky Strip, which I use whenever I pleat ribbon or make 3D items. The larger scallop circle from the Scallop Circle #2 die was die cut from Cherry Cobbler Card Stock, then layered with a rosette made out of the Letters to Santa Designer Series Paper (DSP), and of course the stocking from Stitched Stockings and the “merry” greeting from Tiny Tags. See the closeup photo below for more detail, as well as the complete supply list below:
I hope you enjoyed the project today! Make sure to visit my online store and order any items you need to preserve your treasured Christmas memories for generations to come!!!
STAMPS:
Stitched Stockings (Wood – 123782; Clear – 123784)
Tiny Tags (Wood – 118091; Clear – 118592)
Winter Post (Wood only – 111780)
PAPER:
Cherry Cobbler Card Stock (119685)
Very Vanilla Card Stock (101650)
Chocolate Chip 12″x12″ Card Stock (124273)
Silver Glimmer Paper (124005)
Letters to Santa Designer Series Paper (122349)
INK:
Chocolate Chip Classic Stampin’ Pad (100908)
Old Olive Classic Stampin’ Pad (102277)
ACCESSORIES:
Old Olive 1-1/4″ Striped Grosgrain Ribbon (retired)
Dotto Repositionable Adhesive (103305)
Dotto Refill (100902)
Sticky Strip ((104294)
Multipurpose Liquid Glue (110755)
Glue Gun & Glue Sticks
TOOLS:
Tabletop Paper Cutter (106959)
Simply Scored Scoring Tool (122334)
Stitched Stockings Builder Punch (124095)
Jewelry Tag Punch (117190)
Scallop Edge Border Punch (119882)
Big Shot Die-Cutting Machine (113439)
Scallop Circle #2 Bigz Die (113469)
Clear-Mount Block A (118487)
Clear-Mount Block D (118485)
Connect with Me!
Categories
Archives
Copyright Info
Copyright Info All Images © Stampin' Up! 2011 Sarah Naber, Independent Stampin' Up! Demonstrator The content of this blog is my sole responsibility as an independent Stampin' Up! demonstrator and the use of, and content of, the classes, services, or products offered on this blog is not endorsed by Stampin' Up!


