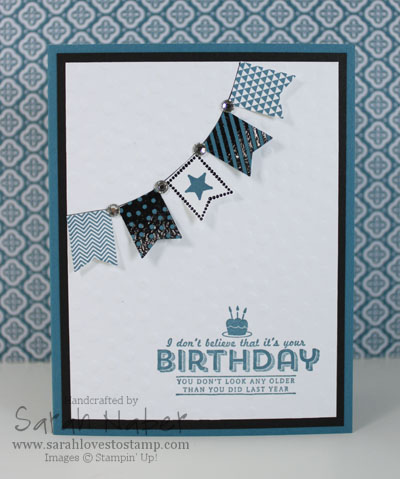
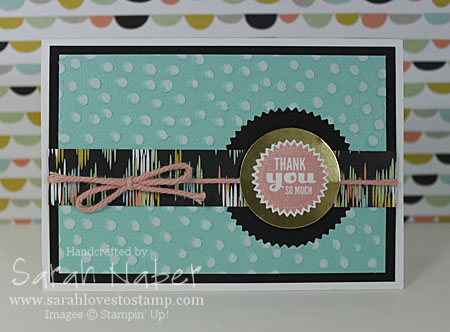
I’m having a customer appreciation event tomorrow night, including Make-and-Takes (the card above is one), a prize drawing for over $100 worth of SU! goodies, handmade items for sale, my Stampin’ Stash Sale, as well as an opportunity to get FREE SHIPPING on the orders placed tomorrow only (read on for more info). It’s the LAST day of Sale-A-Bration tomorrow so it is the FINAL opportunity to get in on the Exclusive, FREE products with every $50 you spend.
The card above uses 4 of our Sale-A-Bration items!!! Can you tell I’m a fan of this year’s offerings? I used the stamp set See Ya Later for the greeting and Banner Blast for the banners. I then punched out the banners with the fabulous, matching Banner Punch. I ran the Whisper White layer through the Big Shot (AFTER stamping) with the 4th SAB item, the Decorative Dots Embossing Folder.
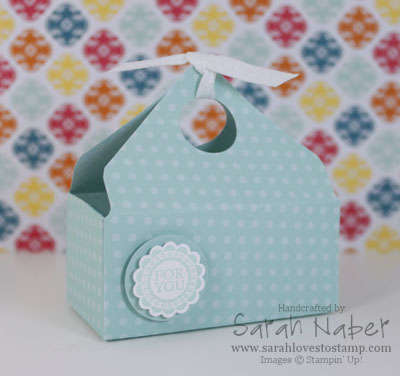
I also wanted to share the Envelope Punch Board with my crafters, so we’re making the 3D Open Box too! This was a fantastic idea from SU! Demo, Sam! LOVE it!
Out of town customer? You can be entered into the drawing for placing an order before the event. If you are placing an order under $150, use the Hostess Code 666UFGFP to qualify for the FREE shipping offer (I will have to PayPal you the money back or send you a check if you live out of town). If you are placing an order over $150, I will still offer the FREE shipping, but do not enter the Hostess Code as you qualify for Hostess Benefits on your order alone.
Anyone in the Saint Joseph, Missouri area is welcome to come to my event tomorrow night! Feel free to send me an email at Sarah@SarahLovesToStamp.com or call/text 816.341.0208 if you’d like directions to my house! You can also call, text or email if you have other questions but my event runs from 6:30-9:30 pm tomorrow night so I will answer everything after that! Orders must be in by 11:30 pm Central Time so I can get everything entered in before Sale-A-Bration ends. I’m sad it’s coming to an end, as it’s my favorite time of year, but glad that there’s one more day! I don’t want you to miss out! 🙂
Sale-A-Bration Petal Parade
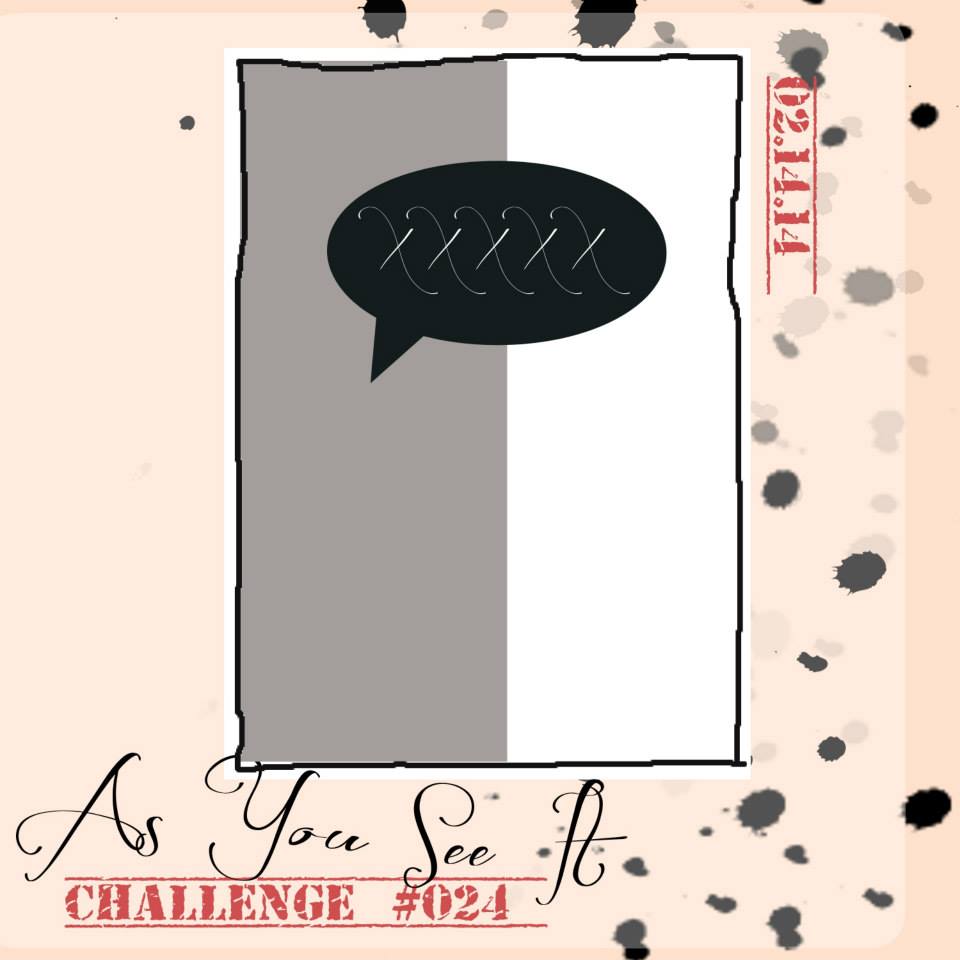
Hi there! It’s Friday and that means a new challenge over at the As You See It Challenge Blog! Check out the creations by the other AYSI Design Team Members too! I also combined it with the color challenge from Colour Q Challenges this week. I wasn’t sure about these colors to begin with but loved the final result. I hope you do too!
How To
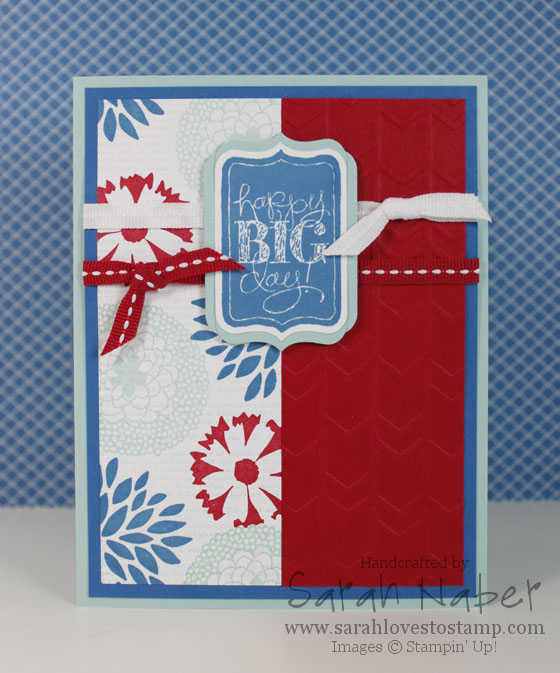
1. Cut your Pool Party cardstock to 8-1/2″ x 5-1/2″ for your card base and score it at 4-1/4″. Cut the Pacific Point to 4″ x 5-1/4″. Cut a piece of Whisper White to 1-7/8″ x 5″. Cut a piece of Real Red to 2″ x 5-1/4″ – see Step 3 for why!
2. Ink up the Dictionary Background Stamp in Soft Sky ink, stamp off onto a scrap paper once and then stamp it onto the Whisper White piece. (This is super hard to see in the photo but is gorgeous in real life!) Then use the Petal Parade stamp set (FREE Sale-A-Bration exclusive stamp set with any $50 purchase!) and Pacific Point, Pool Party, and Real Red inks to stamp the rest of the white panel.
3. Run the Real Red piece through the Big Shot with the Arrows Textured Impressions Embossing Folder. Cut the final piece down to 1-7/8″ x 5″. *TIP: Cut your piece of cardstock a bit larger than you want it (usually 1/8″ is plenty depending on how intricate the embossing folder design is) and trim it down to the size you want AFTER embossing! The embossing “shrinks” the paper a bit so this is a great idea when you need an exact size or to match up with another piece like I needed on my card.
4. Use the Multipurpose Liquid Adhesive to adhere both the Whisper White and Real Red strips side-by-side onto the Pacific Point layer.
5. Tie the Real Red and Whisper White 1/4″ Stitched Grosgrain Ribbons around the Pacific Point layer. Adhere this to the card base.
6. Stamp the “Happy Big Day” from the Chalk Talk Stamp Set (LOVE!) in Pacific Point ink onto a scrap of Whisper White. Die cut it out with the Big Shot and the matching Chalk Talk Framelits Dies.
7. Die cut two more of the same label shape out of a scrap of Pool Party cardstock. Cut one set in half horizontally and one set in half vertically and glue behind the sentiment to make a custom mat! *TIP: This is one of my favorite tricks to do with punches and die cuts that may not have a nesting shape! Make your own! Works fabulously with the Decorative Label Punch among others.
I hope you love this card! This sketch was a great one to work with. Head on over to the As You See It Challenge Blog and play along! 🙂 We’re always excited to see what you have created!!!
This card was entered into challenges at: ColourQ, polkadoodles, Crafting from the Heart, Challenges 4 Everybody, and Word Art Wednesday.
Supply List
STAMPS:
Petal Parade (Wood-Mount 133599, Clear-Mount 133602)***FREE Sale-A-Bration Choice with $50 Order***
Chalk Talk (Wood-Mount 130631, Clear-Mount 130634) *Get the stamp set with the matching framelits and save 15% with the Chalk Talk Bundle: Wood-Mount 132731, Clear-Mount 132730!*
Dictionary Background (Wood-Mount 130348, Clear-Mount 130351)
PAPER:
8-1/2″ x 11″ Whisper White Cardstock (100730)
8-1/2″ x 11″ Pacific Point Cardstock (111350)
8-1/2″ x 11″ Pool Party Cardstock (122924)
8-1/2″ x 11″ Real Red Cardstock (102482)
INK:
Pacific Point Classic Stampin’ Pad (126951)
Pool Party Classic Stampin’ Pad (126982)
Real Red Classic Stampin’ Pad (126949)
Soft Sky Classic Stampin’ Pad (131181)
ACCESSORIES:
Real Red 1/4″ Stitched Grosgrain Ribbon (126875)
Whisper White 1/4″ Stitched Grosgrain Ribbon (126877)
SNAIL Adhesive (104332)
Multipurpose Liquid Glue (110755)
Stampin’ Dimensionals (104430)
TOOLS:
Stampin’ Trimmer (126889)
Simply Scored Scoring Tool (122334)
Bone Folder (102300)
Paper Snips (103579)
Craft Scissors (108360)
Big Shot Die-Cutting Machine (113439)
Big Shot Magnetic Platform (130658)
Chalk Talk Framelits Dies (129983) *Get the stamp set with the matching framelits and save 15% with the Chalk Talk Bundle: Wood-Mount 132731, Clear-Mount 132730!*
Arrows Textured Impressions Embossing Folders (132187)
Grid Paper (102787)
Stampin’ Scrub (126200)
Stampin’ Mist (102394)
Hi there! I hope you’re having a great start to your weekend! Today I have a SUPER fun project to share with you using LOTS of new goodies!!! This card uses a stamp set from the upcoming Occasions Catalog, Starburst Sayings, as well as the matching Starburst Framelits Dies. Of course, Stampin’ Up! is being amazing and offering bundles again so you can get the stamp set and framelits at a 15% discount.
I also used the same Designer Series Paper as my project yesterday – the new Sale-A-Bration offering, Sweet Sorbet DSP. Starting January 31, 2014, you’ll be able to get this package of fantastic DSP for free with a $50 purchase! Oh yay! I also used the same twine too that is from the SAB Sweet Sorbet Accessory Pack. AND…a BRAND NEW Sale-A-Bration Decorative Dots embossing folder too!!! Could this year’s Sale-A-Bration get any better?!?
I’m sure you also noticed my piece of 3″ x 4-1/2″ Core’dinations cardstock (can I even make a project without it?) that I cut the starburst shape out of using the 2nd smallest Starburst Framelits Die. Then I embossed and then sanded with the Stampin’ Sanding Block to reveal that lighter inner core. *TIP: Remember to do all of your cutting with framelits or other dies before you emboss. Otherwise the embossing will be flattened because of running the embossed piece through the machine without its folder. I then glued it down with the Multipurpose Liquid Adhesive to a piece of 3-1/4″ x 4-3/4″ Basic Black Cardstock. A 3/4″ x 4-3/4″ strip of my favorite pattern from the Sweet Sorbet DSP is layered over the top. I tied a bow of the Crisp Cantaloupe twine from the Sweet Sorbet Accessory Pack over the top of the DSP and glued it down to the Whisper White Note Card base (they come pre-cut and pre-scored with matching envelopes…easy peasy!).
I stamped the “Thank You So Much” stamp in Crisp Cantaloupe ink onto a scrap of Whisper White Cardstock and used the matching framelit to cut it out (the smallest one). *TIP: I actually stamped this first and ran it through the Big Shot at the same time as the Core’dinations piece with the 2nd smallest framelit. I try to always run all of my framelits for one project through at the same time if possible to save time! Super easy, especially with the Magnetic Platform to hold each piece in place. I layered that onto a circle of Gold Foil Sheet punched out with the 1-3/8″ Circle Punch. Finally, I cut a Stampin’ Dimensional in half and put one half on the top and one half on the bottom then stuck it onto the card! *TIP: Placing your dimensionals so they adhere straight to the card (not the twine) will insure that everything lays flat. If the dimensionals were on top of the twine, then the focal point may bow around the twine a bit. Not too big of a deal, but just a little idea to add that extra professional look to your projects.
Supply List
STAMPS:
Starburst Sayings (Wood-Mount 133182, Clear-Mount 133185)*
-Also available as a bundle with the Starburst Framelits Dies at a 15% discount! Wood-Mount 134817, Clear-Mount 134818*
PAPER:
Whisper White Note Cards & Envelopes (131527)
8-1/2″ x 11″ Whisper White Cardstock (100730)
8-1/2″ x 11″ Basic Black Cardstock (121045)
12″ x 12″ Gold Foil Sheets (132622)
In Color 2012-2014 Core’dinations Cardstock (129957)
SAB Sweet Sorbet DSP (133521)**
INK:
Crisp Cantaloupe Classic Stampin’ Pad (131176)
ACCESSORIES:
SAB Sweet Sorbet Accessory Pack (133522)**
SNAIL Adhesive (104332)
Multipurpose Liquid Glue (110755)
Stampin’ Dimensionals (104430)
TOOLS:
Stampin’ Trimmer (126889)
Simply Scored Scoring Tool (122334)
Bone Folder (102300)
Craft Scissors (108360)
Stampin’ Sanding Block (129367)
Core’dinations Dust Buddy (129366)
1-3/8″ Circle Punch (119860)
Big Shot Die-Cutting Machine (113439)
Big Shot Magnetic Platform (130658)
Starburst Framelits Dies (132967)*
-Also available as a bundle with the Starburst Framelits Dies at a 15% discount! Wood-Mount 134817, Clear-Mount 134818*
SAB Decorative Dots Textured Impressions Embossing Folders (133520)**
Grid Paper (102787)
Stampin’ Scrub (126200)
Stampin’ Mist (102394)
*Available January 3, 2014 when the Stampin’ Up! Occasions Catalog begins!
**Exclusive Sale-A-Bration item FREE with each $50 purchase from January 28, 2014-March 31, 2014!
Connect with Me!
Categories
Archives
Copyright Info
Copyright Info All Images © Stampin' Up! 2011 Sarah Naber, Independent Stampin' Up! Demonstrator The content of this blog is my sole responsibility as an independent Stampin' Up! demonstrator and the use of, and content of, the classes, services, or products offered on this blog is not endorsed by Stampin' Up!

