Q: How do you make card bases?
A: This is a GREAT question. In the US, the typical finished size of the cards we make (called A2 cards) is 4-1/4″ x 5-1/2″. This is super easy to accomplish by cutting a piece of 8-1/2″ x 11″ cardstock in half either way and folding those pieces in half. One option is to cut it in half to make two 8-1/2″ x 5-1/2″ pieces and score and fold them at 4-1/4″. I do this the most often as your actual fold is longer (5-1/2″) and thus the card seems to be a little more sturdy – especially if you want to stand them up somewhere or know you’re mailing it to someone who likes to stand their cards up. 🙂 The other way is to cut the paper to 4-1/4″ x 11″ and scoring each piece and folding at 5-1/2″.
Send me YOUR Questions and you may see them here at my Q&A feature or in a Q&A video which I hope to start soon! 🙂
The 12 Weeks of Christmas begins in just 48 hours, on WEDNESDAY, October 2nd and is a free gift from me to you every year. Every week, you will receive an email with a FREE Holiday Project – either a card, bag, tag, wrap, or gift you can make!
You can ONLY see these projects if you are on my mailing list! I won’t be posting them to the blog, Facebook or pinning them to Pinterest!
In order to receive this gift, you MUST be on my mailing list by Wednesday, October 3 at 1 pm Central time.
To sign up for my list, simply put your details in the box at the top of the sidebar. It’s the box that says “Subscribe to the Sarah Loves to Stamp Mailing List and Receive…” or it may be popping up on your screen right now! 🙂 Type in your full name and your best email and hit the “Submit” button…but, wait, you’re not done…almost…but not yet!
THEN, check your inbox for an email. This email will contain a link. You MUST click this link to activate your subscription.
I hope you’ll love each project you’ll be getting for the next 12 weeks!
As You See It Challenge #004 with Festive Flurry
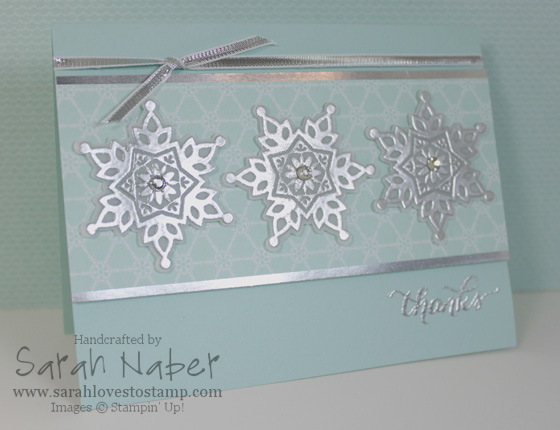
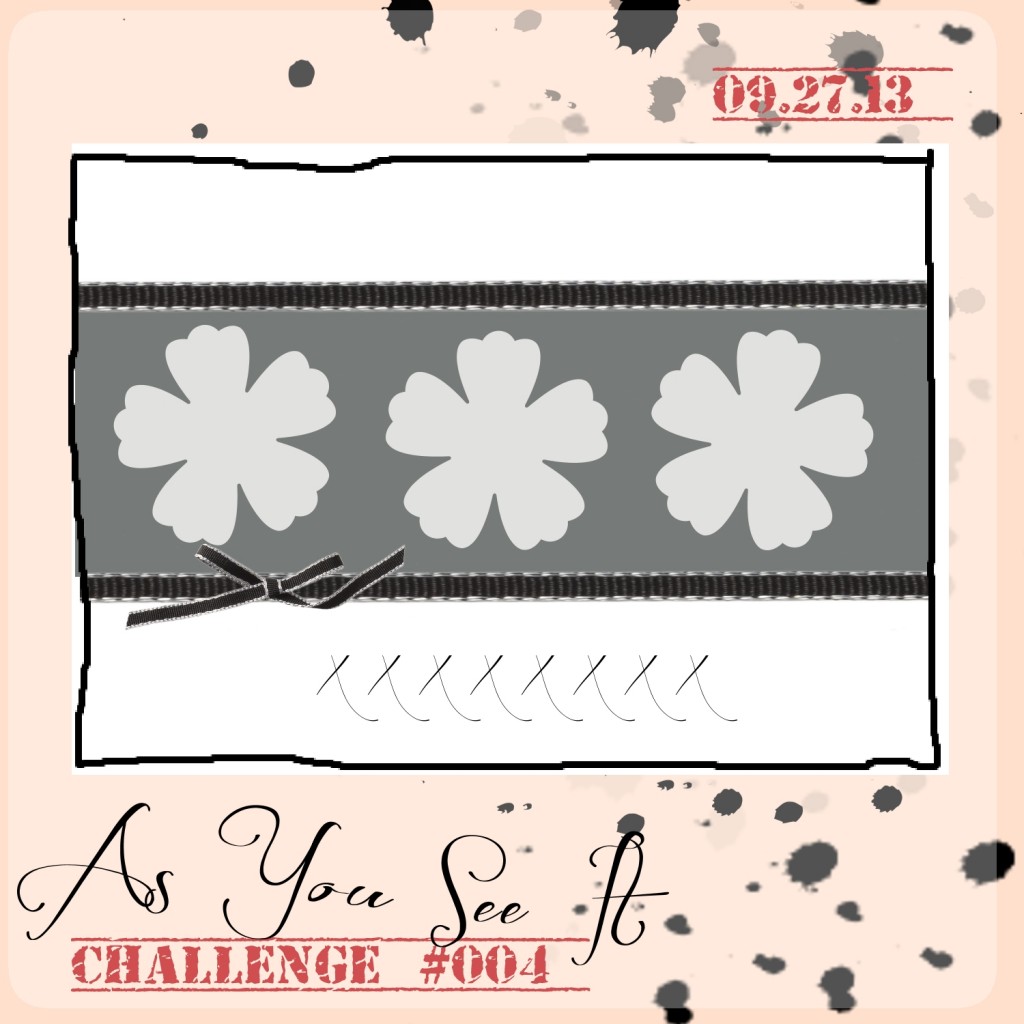
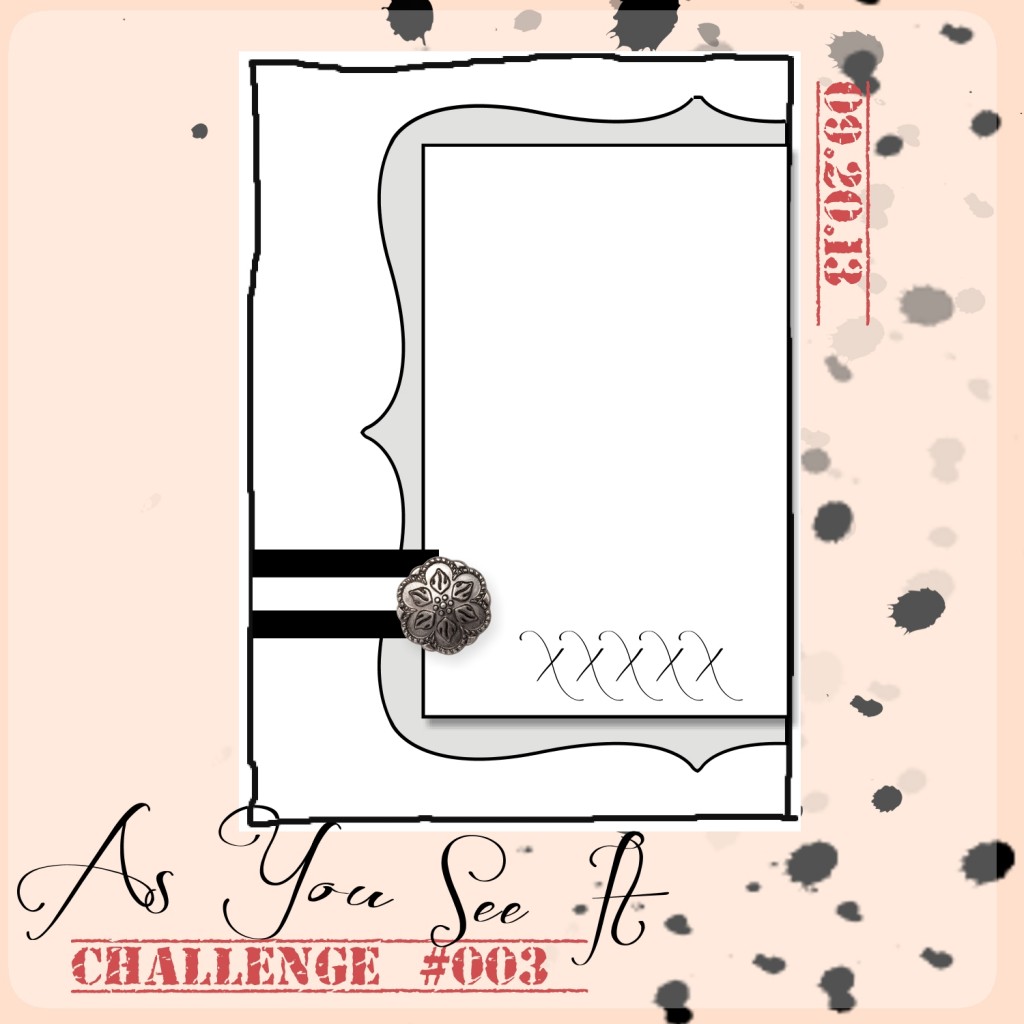
Hi there! Super simple card with the sketch from the As You See It Challenge Blog today! Challenge #004…you’ve gotta hop over there and give it a try! 🙂 Check out what the rest of the AYSI Design Team has for you over at http://www.AsYouSeeItChallenge.com.
Ok, so the card…well I had the idea to use Festive Flurry for the 3 repeated elements you see on the sketch below. And I had tried embossing them on Cardstock Vellum and LOVED how they turned out! So I did that again. Use the Embossing Buddy to remove static from your paper, stamp the image in VersaMark ink, cover with Silver Stampin’ Emboss Powder, and heat until the powder turns shiny! It’s like magic!!! Then I simply used the matching framelit to crop them out. I used Stampin’ Dimensionals to attach them to the Designer Series Paper from the Winter Frost DSP Stack. (If I made the card again, I would just use dots of Multipurpose Liquid Glue as I had to cut the dimensionals into TINY pieces to put them on each end as the embossing made them curl up a bit.) Attach to some of my new favorite Silver Foil Sheets and then to the Pool Party card base! Pretty simple. The sentiment (from one of the BRAND NEW Photopolymer Stamp Sets!) is also heat embossed. I added a bit of the tiny 1/8″ Silver Ribbon to finish it off! True confessions time…if I made the card all over again, I would stamp the sentiment down a bit more and move both the main panel, as well as the ribbon down.
These cards would make FANTASTIC Christmas cards or in my case, I was thinking it would be great for Christmas thank you cards! Join us for the challenge over at As You See It! It’s so much fun and it gets the creativity flowing!!!
Supply List
STAMPS:
Festive Flurry (Wood-Mount 131778, Clear-Mount 131781)
Another Thank You Photopolymer Stamp Set (133454)
*Buy Festive Flurry as a bundle with the matching framelits and SAVE 15%!
Festive Flurry Bundle (Wood-Mount 133284, Clear-Mount 133285)
PAPER:
8-1/2″ x 11″ Pool Party Cardstock (122924)
8-1/2″ x 11″ White Vellum Cardstock (101856)
12″ x 12″ Silver Foil Sheets (132178)
Winter Frost Designer Series Paper Stack (132183)
INK:
VersaMark (102283)
ACCESSORIES:
Basic Rhinestone Jewels (119246)
Silver 1/8″ Ribbon (132137)
Multipurpose Liquid Glue (110755)
Stampin’ Dimensionals (104430)
TOOLS:
Stampin’ Trimmer (126889)
Simply Scored Scoring Tool (122334)
Bone Folder (102300)
Craft Scissors (108360)
Heat Tool (129053)
Silver Stampin’ Emboss Powder (109131)
Big Shot Die-Cutting Machine (113439)
Festive Flurry Framelits Dies (132193)
Grid Paper (102787)
Stampin’ Scrub (126200)
Stampin’ Mist (102394)
Hi there!!! Hope you enjoy this video of a product I’m over the moon about!!! It shows you how to use a simple, easy tool to make your own envelopes out of any paper you want!!! Cardstock, Vellum, Designer Series Paper, Patterned Paper, Newspaper, etc. – the sky is the limit with Stampin’ Up!’s Envelope Punch Board! It makes 66 different sized envelopes, including normal A2 cards, gift cards, as well as custom envelope sizes for square cards and TONS of others as well! This is also a quick and easy way to create pockets for hidden journaling or extra photos on a scrapbook page. As a little bonus, this tool also features a GREAT corner rounder too! Click over to YouTube while you’re at it and Subscribe to my channel so you don’t miss out on a single video!!!
Would you believe me if I told you that Christmas is in just 13 weeks? WOW!
This will be my second year of doing the 12 Weeks of Christmas at Sarah Loves to Stamp! The 12 Weeks of Christmas is a free series of tutorials that, beginning next Wednesday, will send you a Holiday Project for the next 12 weeks. The Holiday Project may be a card, gift, bag, tag, or wrap designed to make your holiday gift giving that much easier!
In the busy holiday season that is approaching, I am so so thankful for you, my awesome customers, and LOVE to provide free special gifts just for you!
In order to receive this gift, you MUST be on my mailing list by Wednesday, October 2 at 1 pm central time.
To sign up for my list, simply put your details in the box at the top of the sidebar. Then be sure to check you inbox for an e-mail. This e-mail will contain a link. You must click this link to activate your subscription.
Q: Which adhesive is your favorite?

A: Tricky question! I use different adhesives for different things BUT my all time favorite is the Multipurpose Liquid Glue #110755. It has a tiny skinny end and a larger applicator for large areas on the other end! It allows me a few seconds to wiggle my piece of paper into place, which I LOVE, especially when I am centering layers. It may take a bit of practice to get the correct pressure so you don’t get a ton of it on your paper, but I promise after you get that down, you’ll love it as much as I do.
*TIP: Don’t put the liquid glue all the way on the edge. Leave about 1/8″ or even 1/4″ between the edge of the paper and where you start to glue. This will allow for the glue to squish under the card stock and get closer to the edge to stick all of your layer down WITHOUT it squishing out the sides.
*TIP: If this glue does squish out the sides, let it dry first then use the Adhesive Remover #103684 to gently rub at the dried glue. It will come off easily and not damage the paper left behind, as long as you rub gently. Rub EXTRA gently with any patterned paper or Designer Series Paper as they are lighter weight and more prone to tearing than card stock.
Hope today’s Q&A makes you want to give Stampin’ Up!’s Multipurpose Liquid Glue a try! Leave a comment with YOUR favorite adhesive!
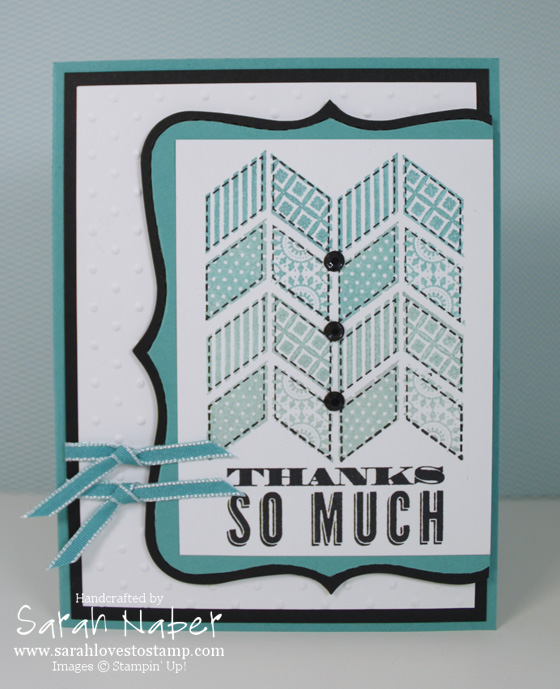
Hi! Are you ready for another amazing challenge from As You See It?!? Loving them so much!!! This one is another sketch challenge so I hope you’ll head over there and play along! You have nearly a week to get your submission in so give it a try!
I made this card unnecessarily hard because I had a brilliant idea that ended up not working out. I stamped the patterned arrow stamp from Oh, Hello twice in the center of the card and then masked off just one part of it to stamp on the outside of each side of that…seriously, if you want to re-create this effect, just stamp the stamp twice and then twice next to it! 🙂 I tried to create an ombré effect with Pool Party, Coastal Cabana, and Bermuda Bay inks. I sponge daubered on Pool Party onto the very bottom two patterned shapes, then Coastal Cabana. Then, when I stamped it the second time, I sponge daubered on Coastal Cabana then sponged Bermuda Bay on over the top of that and on the top two patterned shapes as well. 🙂 The only other technique I tried on this card was to cut the top note out of Bermuda Bay and Basic Black card stock and then cut around it at the stitching line on the Bermuda Bay piece. I sanded the edges with the sanding block and adhered it to the Basic Black piece. The Whisper White panel in the background is embossed with the Perfect Polka Dots folder. Some Basic Rhinestone Jewels colored black highlight the center and tie the black back in.
I hope you enjoyed my project for today and hope that you’ll hop over there to see the rest of the projects by the design team, as well as be inspired to be creative yourself. 🙂
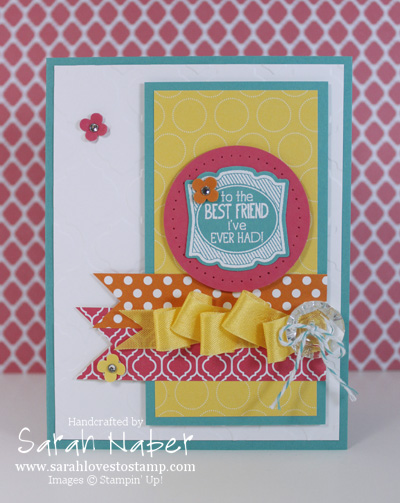
Hi there! Today I have for you another card I made as a swap for Stampin’ Up!’s Convention this summer. This is my FAVORITE color combo! It’s bright, fun and oh, so pretty together! Strawberry Slush (loving those new in colors), Bermuda Bay (loving the color refresh bringing some old favorites back), Daffodil Delight, and Pumpkin Pie. It’s really a pretty simple card – just layers of fun things!
The sentiment from Label Love is embossed with White Embossing Powder onto Bermuda Bay card stock, then easily punched out with the matching Artisan Label punch. Layered onto a 1-3/4″ Circle punched out of Strawberry Slush card stock and pierced with the Paper-Piercing Tool, Piercing Mat, and the Essentials Paper-Piercing Pack. The Designer Series Paper (DSP) is from the Polka Dot Parade DSP (Daffodil Delight large circle dot and Pumpkin Pie small polka dot patterns) and the Quatrefancy Specialty DSP (Strawberry Slush geometric pattern). Oh, and that Bermuda Bay Baker’s Twine!!! It’s from the Tag a Bag Accessory Kit! I love that it comes with 20 feet of each of 3 colors exclusive to the kit. The tragedy of photographs? You totally cannot tell that the background piece of Whisper White is embossed with the Big Shot and the Modern Mosaic Textured Impressions Embossing Folder. You guys know I’m a total ribbon lover, right? I LOVE to do this technique with the Seam Binding Ribbon and will show it in a video super soon!
Check out my über late Quick Tip Tuesday #21 on Custom Dyed Baker’s Twine. The Strawberry Slush Baker’s Twine was actually dyed for this project before I decided that I liked the Bermuda Bay better. 🙂 That post is dated today as well as I had some serious technical issues last night/this morning (uploaded 4 separate times to YouTube).
Supply List
STAMPS:
Label Love (Wood-Mount 130619, Clear-Mount 130622)
***Buy it as a Bundle with the Artisan Label Punch and save 15%. Wood-Mount 132723, Clear-Mount 132722***
PAPER:
8-1/2″ x 11″ Whisper White Card Stock (100730)
8-1/2″ x 11″ Bermuda Bay Card Stock (131197)
8-1/2″ x 11″ Daffodil Delight Card Stock (119683)
8-1/2″ x 11″ Pumpkin Pie Card Stock (105117)
8-1/2″ x 11″ Strawberry Slush Card Stock (131295)
Quatrefancy Specialty Designer Series Paper (130141)
Polka Dot Parade Designer Series Paper (126902)
INK:
VersaMark (102283)
ACCESSORIES:
Basic Rhinestone Jewels (119246)
Vintage Faceted Designer Buttons (127555)
Daffodil Delight 1/2″ Seam Binding Ribbon (125583)
Tag a Bag Accessory Kit (130153)
***Buy it as a Bundle with 2 Options: Tag a Bag Bundle 131371 or Tag a Box Bundle 131372 and save 15%!***
SNAIL Adhesive (104332)
Multipurpose Liquid Glue (110755)
Mini Glue Dots (103683)
Stampin’ Dimensionals (104430)
Sticky Strip (104294)
TOOLS:
Stampin’ Trimmer (126889)
Simply Scored Scoring Tool (122334)
Bone Folder (102300)
Paper Snips (103579)
Craft Scissors (108360)
Paper Piercing Tool (126189)
Stampin’ Pierce Mat (126199)
Essentials Paper-Piercing Pack (126187)
Artisan Label Punch (130920)
Itty Bitty Shapes Punch Pack (118309)
1-3/4″ Circle Punch (119850)
Big Shot Die-Cutting Machine (113439)
Modern Mosaic Textured Impressions Embossing Folders (129984)
Grid Paper (102787)
Stampin’ Scrub (126200)
Stampin’ Mist (102394)
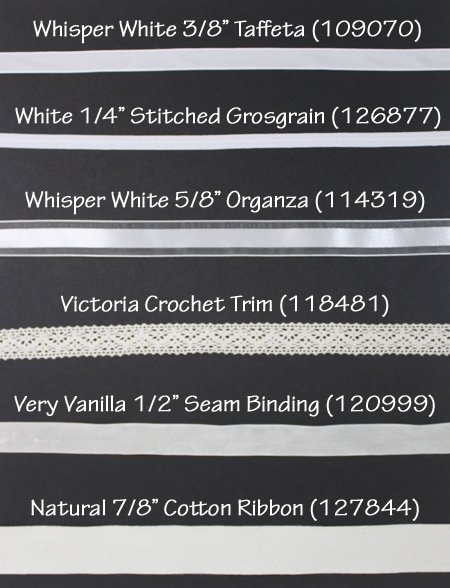
I hope you enjoyed the video today! Here’s the picture that I talked about and showed in the video. These are excellent options (besides the Whisper White Baker’s Twine #124262) for custom dye-to-match ribbons. I plan to do more videos with other techniques, but the one in the video remains my favorite for Baker’s Twine. Enjoy!!!
Q: How can you upcycle your old Blender Pens (102845) when they dry up?
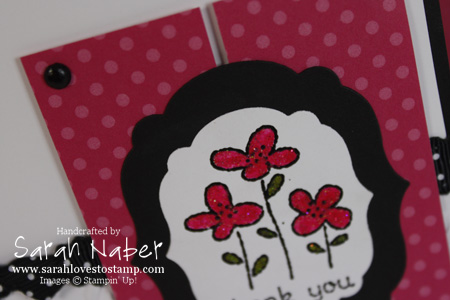
A: First of all, I’ve had the same set of Blender Pens since I signed up for Stampin’ Up! over 5 years ago and they have yet to dry up! If you use them super often, I’m sure it would happen before 5 years has passed. I do have one (they come in a package of 3) that was starting to dry out a bit and the tip was looking especially worn. So…I used it for the Dazzling Watercolor technique (I think it was invented by Julie Davison) where you mix any Stampin’ Up! Classic Ink Refill and the regular, clear Dazzling Details glitter adhesive (124117) to make a sparkly, colored glitter glue that you can paint into an line art image that’s been embossed. *Tip: I mix my ink refill and the glitter together with the Blender Pen on one of our clear blocks. When you’re done, just use a baby wipe to clean the block.* The sample here shows that technique, although several items have been retired. The great thing about Blender Pens is that they have 2 tips so I was able to use one end for Melon Mambo and the other for Old Olive for this sample. Hopefully, in the first picture, you can see how sparkly and beautiful it is!
Another great use is for painting bleach onto your projects. You can flick it on (BE CAREFUL!) to create bleached splatters or paint it into a line art image too! This is a great use for the old Blender Pens because you don’t want to use bleach with your other paintbrushes, as it could eat away the bristles.
I hope you enjoyed this new feature to my blog! I plan on doing one every week! Stay tuned for other new blog features! PLEASE LEAVE A COMMENT with a question you’d like me to answer! Thanks for checking out my blog today!!!
As You See It Challenge #002
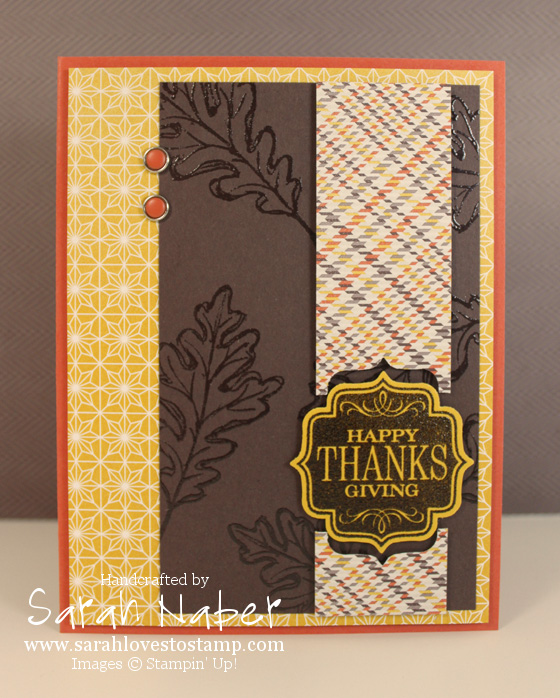
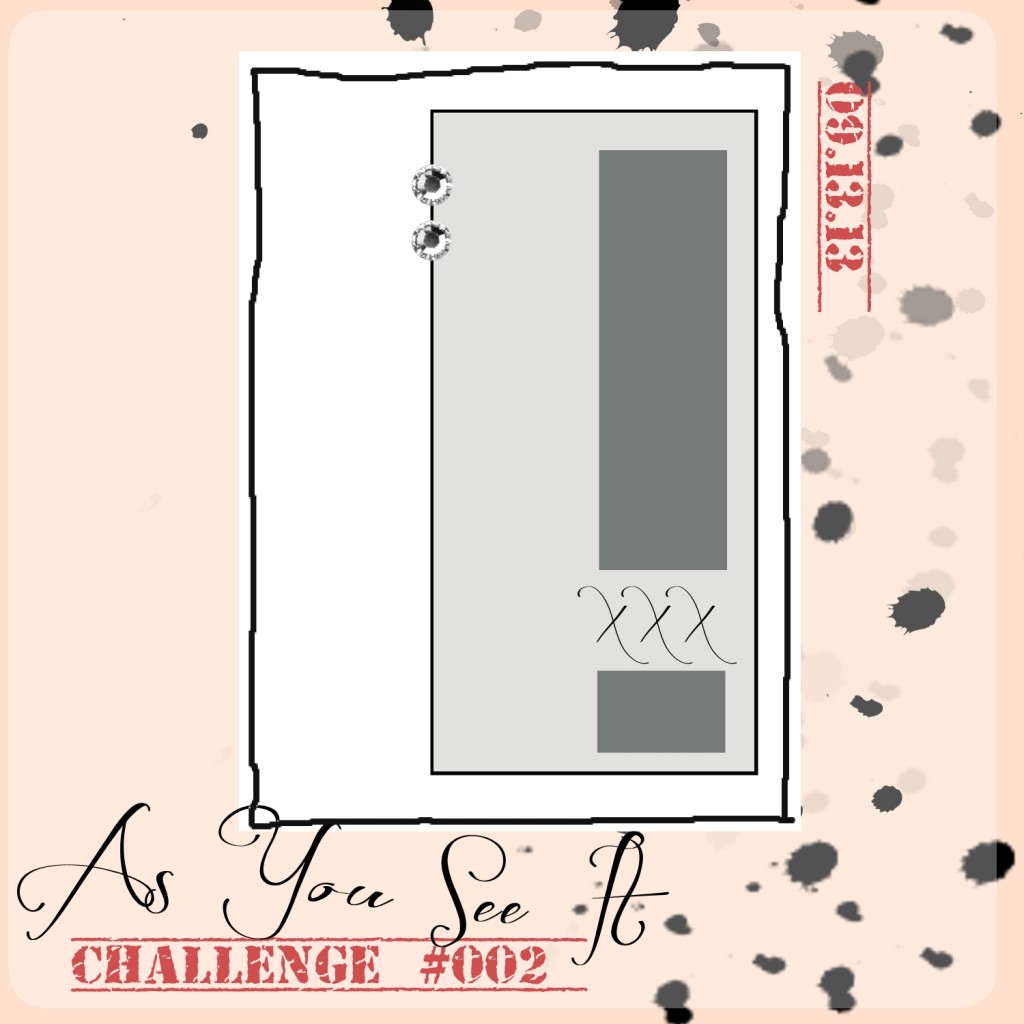
I have a little bit of a double feature for you today! I started to make the Thank You card first and it just wasn’t working out for me, so I scrapped it and made the Thanksgiving card. I had the idea to replicate the space in the strip on the sketch with a punch and this punch and stamp set from the Holiday Catalog were a perfect match for the idea I had! I LOVED our sketch this week over at As You See It Challenges, so I hope you’ll join in and be inspired for our 2nd challenge EVER! 🙂 Click here and bookmark http://www.asyouseeitchallenge.com for new challenges every Friday! 🙂
A couple of little details about the first card…I used the Sweater Weather Designer Series Paper for the snappy, masculine-friendly patterned papers. I also stamped the outline oak leaf Gently Falling stamp (Love this versatile stamp set! Use just the solid parts, just the outlines or use them together!) in VersaMark and embossed with clear embossing powder. I stamped the main focal point from the Tags 4 You stamp set in the Holiday Catalog in Chocolate Chip ink on Crushed Curry card stock. If you look closely, you can see it’s shiny! Why? Because I used clear embossing powder and embossed quickly, before the ink could dry. Traditionally, you can’t emboss with dye based inks, but our new ink pad design (updated in June 2012) makes for juicy, but still fairly quick drying images that will accept the embossing powder! Just heat it up quick and you’re good to go! I cropped it out with the matching punch. The final touch was two Tangerine Tango Candy Dots and Candy Dot Brad Bases! I LOVE these!!!
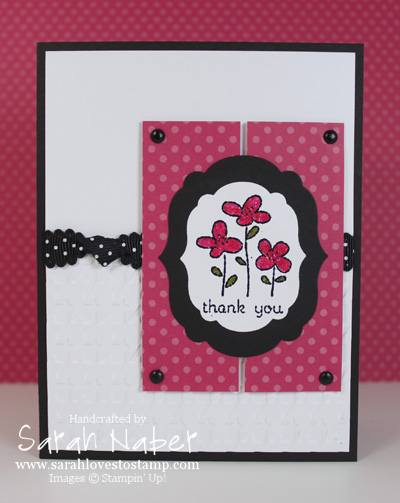
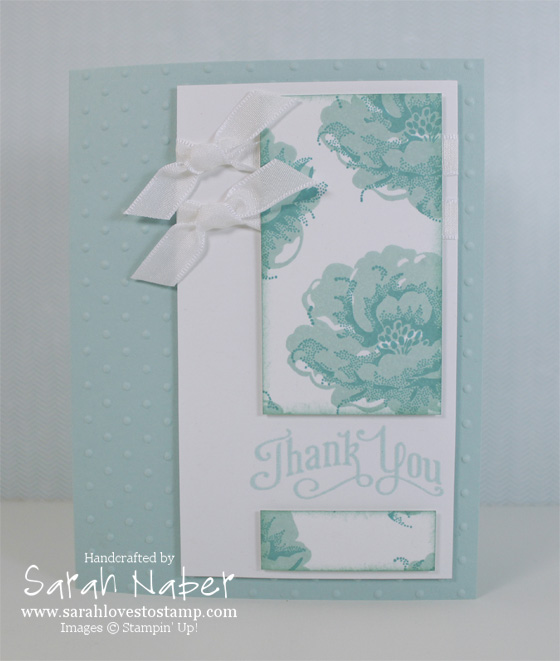
On to my 2nd card…the problem card! I so badly wanted to use Stippled Blossoms as I’ve had it for about a year and never used it! (*GASP*) The sentiment is embossed with Pool Party Embossing Powder and the edges of the stamped panels are sponged with Pool Party ink to make them stand out against the Whisper White background. In the moments before I was going to throw it away, I had a brain wave to add the Perfect Polka Dots Textured Impressions Embossing Folder to the front of the card and the Whisper White taffeta ribbon too! I ended up with a card that I really, really like! *Crafting lesson: If a project isn’t going the way you’d like it to, put it down and move on to something else! Pick it up later and try to rework it into something you’re happy with! 🙂
Now for the sketch!
Supply List – Thanksgiving Card
STAMPS:
Gently Falling (Wood-Mount 128430, Clear-Mount 123804)
Tags 4 You (Wood-Mount 131820, Clear-Mount 131823) *Holiday Catalog*
Buy the Tags 4 You stamp set with the Label Bracket Punch in a Bundle and save 15%! (Wood-Mount Bundle 133293, Clear-Mount Bundle 133294)
PAPER:
8-1/2″ x 11″ Chocolate Chip Card Stock (102128)
8-1/2″ x 11″ Crushed Curry Card Stock (131199)
8-1/2″ x 11″ Tangerine Tango Card Stock (111349)
Sweater Weather Designer Series Paper (132184) *Holiday Catalog*
INK:
Chocolate Chip Classic Stampin’ Pad (126979)
VersaMark (102283)
ACCESSORIES:
Brights Candy Dots (130931)
Candy Dots Brad Bases (132293)
Clear Stampin’ Emboss Powder (109130)
Multipurpose Liquid Glue (110755)
Stampin’ Dimensionals (104430)
TOOLS:
Stampin’ Trimmer (126889)
Simply Scored Scoring Tool (122334)
Bone Folder (102300)
Heat Tool (129053)
Paper Piercing Tool (126189)
Stampin’ Pierce Mat (126199)
Label Bracket Punch (132153) *Holiday Catalog*
Grid Paper (102787)
Stampin’ Scrub (126200)
Stampin’ Mist (102394)
Supply List – Thank You Card
STAMPS:
Stippled Blossoms (Wood-Mount 132076, Clear-Mount 126747)
Perfectly Penned (Wood-Mount 128703, Clear-Mount 122892)
PAPER:
8-1/2″ x 11″ Whisper White Card Stock (100730)
8-1/2″ x 11″ Pool Party Card Stock (122294)
INK:
Coastal Cabana Classic Stampin’ Pad (131175)
Pool Party Classic Stampin’ Pad (126982)
VersaMark (102283)
ACCESSORIES:
3/8″ Whisper White Taffeta Ribbon (109070)
Pool Party Stampin’ Emboss Powder (129398)
Stampin’ Dimensionals (104430)
TOOLS:
Stampin’ Trimmer (126889)
Simply Scored Scoring Tool (122334)
Bone Folder (102300)
Heat Tool (129053)
Craft Scissors (108360)
Stamping Sponges (101610)
Big Shot Die-Cutting Machine (113439)
Perfect Polka Dots Textured Impressions Embossing Folders (117335)
Grid Paper (102787)
Stampin’ Scrub (126200)
Stampin’ Mist (102394)
It’s Finally Here…As You See It Challenge #001
The day is finally here! Our first sketch from the As You See It Challenge site is up, as well as all of the Design Team Members creations with it!!! I hope you’ll take the time this weekend to play along! We cannot wait to see what you’ve created. (If you have no idea what I’m talking about, check out my announcement HERE.)
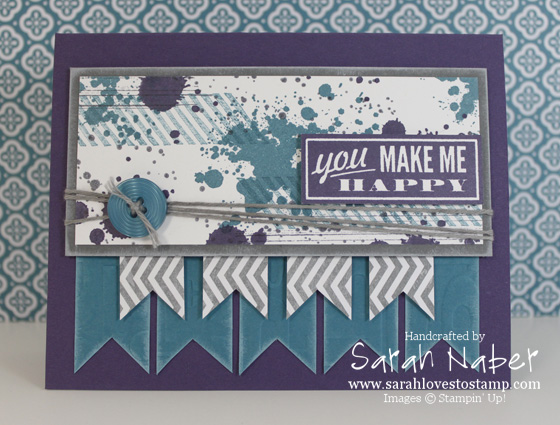
If you read my Design Team Q&A, you know I said that my favorite stamp set is Gorgeous Grunge, but that I hadn’t actually inked it up! Sounds crazy, right? Well, I couldn’t wait to use it for this challenge!!! I paired up the sketch from our As You See It Challenge #001 with a color combination from the Stampin’ Up! Color Coach of Island Indigo, Basic Gray, and Elegant Eggplant.
Some details: I sponged some Whisper White Craft Ink around the edges of the Basic Gray mat and the Island Indigo flags to really make them pop. I also dyed some Whisper White Baker’s Twine with a mixture of Basic Gray Classic Ink Refill and rubbing alcohol. Stay tuned for a video on how to do this! Another little detail – the diagonal stripe stamp is stamped in Island Indigo, then onto a scratch piece of paper then onto the project. This technique, called stamping off, makes the image a little less bold and is great for collage stamping like this. The sentiment, from Hello, Lovely, was stamped on Whisper White and cut out with the Paper Snips. Did you see the Elegant Eggplant button? It’s from the brand new, redesigned Regals Collection Designer Buttons! They are better than ever! LOVE them!!! Also, the Gray and White chevron pattern (used for the flags) are from the I Am Me Designer Series Paper – one of my favorites in the 2013-2014 Annual Catalog! Lastly, the Island Indigo flags were embossed with the Alphabet Press Embossing Folder and the Big Shot. It’s a bit difficult to see in the picture but it’s beautiful in real life.
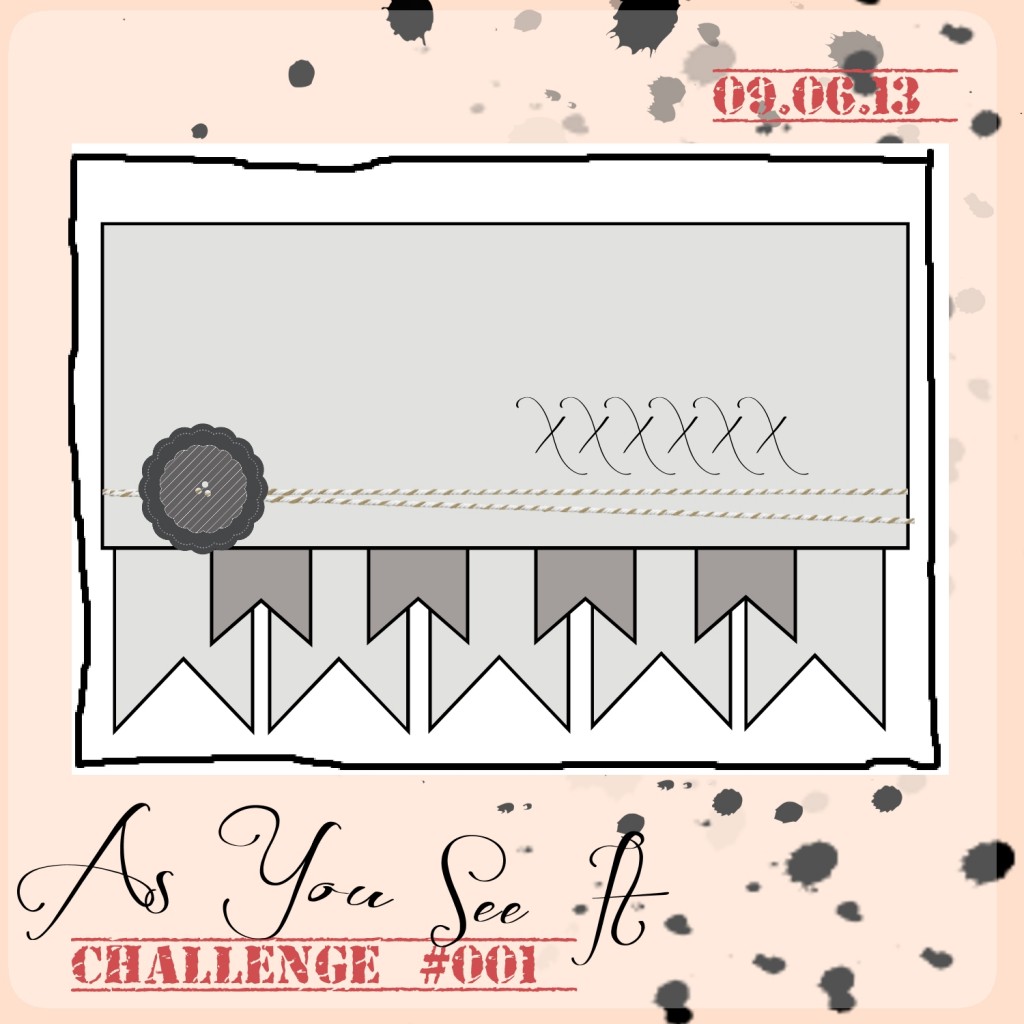
Check out the sketch I used to create my project below! The full supply list with links to the items in my Stampin’ Up! Store are below the sketch. I really hope you play along at the first ever As You See It Challenge! Check it out at the As You See It Challenge Blog!!!
Supply List
STAMPS:
Gorgeous Grunge (Wood-Mount 130514, Clear-Mount 130517)
Hello, Lovely (Wood-Mount 130240, Clear-Mount 130243)
PAPER:
8-1/2″ x 11″ Whisper White Card Stock (100730)
8-1/2″ x 11″ Basic Gray Card Stock (121044)
8-1/2″ x 11″ Elegant Eggplant Card Stock (105126)
8-1/2″ x 11″ Island Indigo Card Stock (122923)
I Am Me Designer Series Paper (130138)
INK:
Basic Gray Classic Stampin’ Pad (126981)
Elegant Eggplant Classic Stampin’ Pad (126969)
Island Indigo Classic Stampin’ Pad (126986)
Whisper White Craft Stampin’ Pad (101731)
Basic Gray Classic Ink Refill (109121)
ACCESSORIES:
Regals Collection Designer Buttons (130029)
Whisper White Baker’s Twine (124262)
SNAIL Adhesive (104332)
Multipurpose Liquid Glue (110755)
Mini Glue Dots (103683)
Stampin’ Dimensionals (104430)
TOOLS:
Stampin’ Trimmer (126889)
Simply Scored Scoring Tool (122334)
Bone Folder (102300)
Paper Snips (103579)
Craft Scissors (108360)
Stamping Sponges (101610)
Big Shot Die-Cutting Machine (113439)
Alphabet Press Textured Impressions Embossing Folders (130916)
Grid Paper (102787)
Stampin’ Scrub (126200)
Stampin’ Mist (102394)
Rubbing Alcohol
Hi! I’m so excited to get back to blogging and what better reason than some exciting news!!! I’ve been asked to be a part of the Design Team for the brand new challenge blog, As You See It Challenges! We’ll have a new challenge every week and I’m super excited because there are different types of challenges depending on the week. So sometimes you’ll have a sketch to work with, sometimes you’ll have a color combination, and other fun challenges yet to come. I’ve seen a sneaky peek of some of the first ones and I cannot wait to create using them!!! The first challenge begins on September 6th so stay tuned for that! You can get to know the Design Team up until we begin and my day for the Q&A is today. So head on over to www.AsYouSeeItChallenge.com and check it out…
Here’s the project I’m sharing over at the As You See It Challenge Blog in conjunction with my Q&A today:
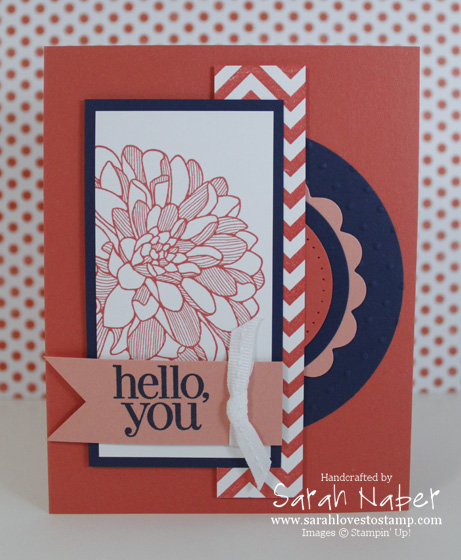
One of my favorite cards I’ve made lately! I found this color combo on a polka dotted dress at JCPenney! This stamp set (Regarding Dahlias) was my first MUST HAVE stamp set in the new 2013-2014 Stampin’ Up! Annual Catalog. Pair that with chevrons and I’m a happy girl! (Side note: If you don’t have the Chevron Background Stamp, you need it! Chevron patterned paper in whatever color you want!!! Yes, please!) I also love the half circle element on the right side with layers and texture created with my beloved Big Shot Die-Cutting Machine! I am also constantly using a HOT trend in paper crafting, flagged ends! Love love love doing that on my sentiment layers. Of course, I had to put some ribbon on there and there are oodles of Stampin’ Dimensionals popping pieces up and creating depth in my project. Hope you enjoy it as much as I do!!! Check out below for the full supply list. If you click on an item, it will show you that item in my Stampin’ Up! Online Store. Please let me know if you have any questions or need anything! 🙂 Can’t wait to share more crafty goodness with you in the coming days!!!
STAMPS:
Regarding Dahlias (Wood-Mount 130324, Clear-Mount 130327)
Positively Chevron Background Stamp (Wood-Mount 130496, Clear-Mount 130499)
PAPER:
8-1/2″ x 11″ Whisper White Card Stock (100730)
8-1/2″ x 11″ Calypso Coral Card Stock (122925)
8-1/2″ x 11″ Crisp Cantaloupe Card Stock (131298)
8-1/2″ x 11″ Night of Navy Card Stock (100867)
INK:
Calypso Coral Classic Stampin’ Pad (126983)
Night of Navy Classic Stampin’ Pad (126970)
ACCESSORIES:
Whisper White 1/4″ Stitched Grosgrain Ribbon (126877)
SNAIL Adhesive (104332)
Multipurpose Liquid Glue (110755)
Stampin’ Dimensionals (104430)
TOOLS:
Stampin’ Trimmer (126889)
Simply Scored Scoring Tool (122334)
Bone Folder (102300)
Paper Snips (103579)
Craft Scissors (108360)
Stamp-a-ma-jig (101049)
Paper Piercing Tool (126189)
Stampin’ Pierce Mat (126199)
Essentials Paper-Piercing Pack (126187)
Big Shot Die-Cutting Machine (113439)
Circles Collection Framelits Dies (130911)
Circles #2 Originals Die (114526)
Perfect Pennants Bigz L Die (123126)
Perfect Polka Dots Textured Impressions Embossing Folders (117335)
Grid Paper (130148)
Stampin’ Scrub (126200)
Stampin’ Mist (102394)
With the BRAND NEW 2013-2014 Annual Catalog, came the introduction of the Big Shot Magnetic Platform (130658). I knew it was supposed to be great for positioning framelits, but had no idea how awesome it was until I saw this video from Stampin’ Up! After I saw this video, the Magnetic Platform soared to the top of my must haves wish list and is now on it’s way from Riverton, Utah to my house!!! I cannot wait to get this amazing product!!! YAY!!! Check it out:
I’ll be back soon with my Top 10 from the BRAND NEW 2013-2014 Annual Catalog! Remember, you can browse it online and/or download it by clicking on my Catalogs tab at the top of the page! 🙂
Hi there! Stampin’ Up!’s 2013-2014 Annual Catalog went live just yesterday! Have you placed your first order from it? Whether you have or haven’t, leave a comment with your favorite NEW product!!! Mine is the fabulous Candy Dots!!!
For the first time EVER, our catalogs have a crossover period so they didn’t end and begin during the weekend when SU!’s Home Office isn’t open. 🙂 So you can order from BOTH catalogs until June 3, 2013!!!
CLICK HERE to check out my Catalog Page to view either catalog online or download them.
Please contact me at 816.341.0208 or Sarah@SarahLovesToStamp.com if you have any questions.
I can’t wait to show you some of the new things I’ve been working on! I’m excited to bring you new blog posts and videos VERY soon! If you haven’t already, sign up for my mailing list as my June newsletter will go out this Tuesday, June 4th at noon Central time. (*It’s easy to do, just put your name and email in the box to the right, click the button and then check your email for a link to click to verify that you want to sign up.) I LOVE sending my newsletter subscribers project ideas each month, as well as information about current promotions and exclusive deals! 🙂
Connect with Me!
Categories
Archives
Copyright Info
Copyright Info All Images © Stampin' Up! 2011 Sarah Naber, Independent Stampin' Up! Demonstrator The content of this blog is my sole responsibility as an independent Stampin' Up! demonstrator and the use of, and content of, the classes, services, or products offered on this blog is not endorsed by Stampin' Up!

