10 Minute Masculine Card
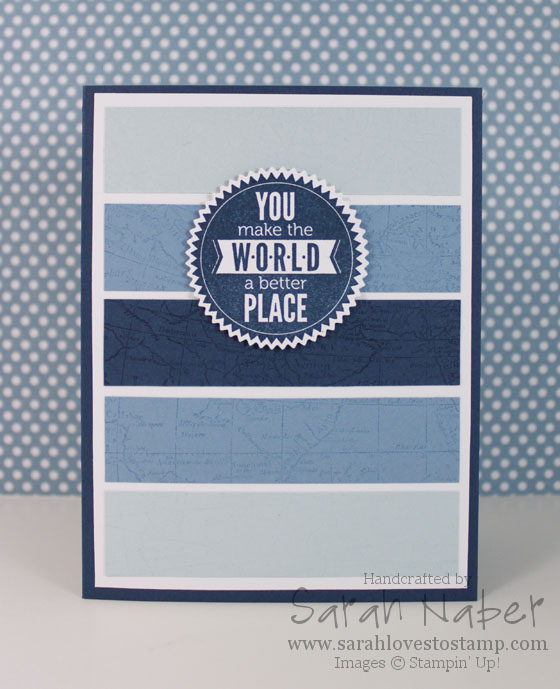
Our As You See It Challenge for the week is a double challenge. You must use shades of blue and try to finish your project in under 10 minutes!!! It’s a fun one and I really encourage you to give it a try! As inspiration, here’s a video of my process from start to finish (I did fast forward while I was at my Big Shot).
How To
1. Cut Midnight Muse cardstock to 5-1/2″ x 8-1/2″ and score at 4-1/4″. Cut Whisper White cardstock to 4″ x 5-1/4″. Cut 2 pieces of each of Soft Sky and Marina Mist cardstock and 1 piece of Midnight Muse all to 3-3/4″ x 15/16″.
2. Use Multipurpose Liquid Glue to adhere the cardstock strips in an ombre pattern. *TIP: Multipurpose Liquid Glue is essential when you want to have a minute or two to slide paper pieces exactly where you want them.
3. Stamp this piece with the World Map background stamp in VersaMark ink. Glue it onto the Midnight Muse cardstock.
4. Stamp the sentiment from Starburst Sayings onto Whisper White cardstock with Midnight Muse ink.
5. Cut the sentiment out with the matching Starburst Framelits Dies, using the Magnetic Platform to hold your framelit in place on your stamped sentiment. Attach it with Stampin’ Dimensionals.
Hi there! I hope you’re having a great start to your weekend! Today I have a SUPER fun project to share with you using LOTS of new goodies!!! This card uses a stamp set from the upcoming Occasions Catalog, Starburst Sayings, as well as the matching Starburst Framelits Dies. Of course, Stampin’ Up! is being amazing and offering bundles again so you can get the stamp set and framelits at a 15% discount.
I also used the same Designer Series Paper as my project yesterday – the new Sale-A-Bration offering, Sweet Sorbet DSP. Starting January 31, 2014, you’ll be able to get this package of fantastic DSP for free with a $50 purchase! Oh yay! I also used the same twine too that is from the SAB Sweet Sorbet Accessory Pack. AND…a BRAND NEW Sale-A-Bration Decorative Dots embossing folder too!!! Could this year’s Sale-A-Bration get any better?!?
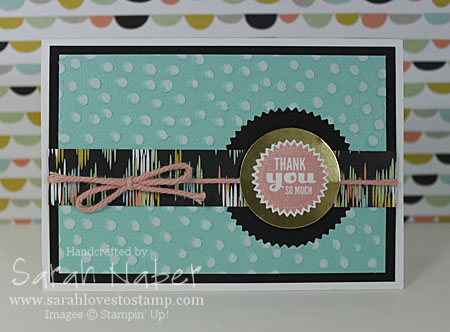
I’m sure you also noticed my piece of 3″ x 4-1/2″ Core’dinations cardstock (can I even make a project without it?) that I cut the starburst shape out of using the 2nd smallest Starburst Framelits Die. Then I embossed and then sanded with the Stampin’ Sanding Block to reveal that lighter inner core. *TIP: Remember to do all of your cutting with framelits or other dies before you emboss. Otherwise the embossing will be flattened because of running the embossed piece through the machine without its folder. I then glued it down with the Multipurpose Liquid Adhesive to a piece of 3-1/4″ x 4-3/4″ Basic Black Cardstock. A 3/4″ x 4-3/4″ strip of my favorite pattern from the Sweet Sorbet DSP is layered over the top. I tied a bow of the Crisp Cantaloupe twine from the Sweet Sorbet Accessory Pack over the top of the DSP and glued it down to the Whisper White Note Card base (they come pre-cut and pre-scored with matching envelopes…easy peasy!).
I stamped the “Thank You So Much” stamp in Crisp Cantaloupe ink onto a scrap of Whisper White Cardstock and used the matching framelit to cut it out (the smallest one). *TIP: I actually stamped this first and ran it through the Big Shot at the same time as the Core’dinations piece with the 2nd smallest framelit. I try to always run all of my framelits for one project through at the same time if possible to save time! Super easy, especially with the Magnetic Platform to hold each piece in place. I layered that onto a circle of Gold Foil Sheet punched out with the 1-3/8″ Circle Punch. Finally, I cut a Stampin’ Dimensional in half and put one half on the top and one half on the bottom then stuck it onto the card! *TIP: Placing your dimensionals so they adhere straight to the card (not the twine) will insure that everything lays flat. If the dimensionals were on top of the twine, then the focal point may bow around the twine a bit. Not too big of a deal, but just a little idea to add that extra professional look to your projects.
Supply List
STAMPS:
Starburst Sayings (Wood-Mount 133182, Clear-Mount 133185)*
-Also available as a bundle with the Starburst Framelits Dies at a 15% discount! Wood-Mount 134817, Clear-Mount 134818*
PAPER:
Whisper White Note Cards & Envelopes (131527)
8-1/2″ x 11″ Whisper White Cardstock (100730)
8-1/2″ x 11″ Basic Black Cardstock (121045)
12″ x 12″ Gold Foil Sheets (132622)
In Color 2012-2014 Core’dinations Cardstock (129957)
SAB Sweet Sorbet DSP (133521)**
INK:
Crisp Cantaloupe Classic Stampin’ Pad (131176)
ACCESSORIES:
SAB Sweet Sorbet Accessory Pack (133522)**
SNAIL Adhesive (104332)
Multipurpose Liquid Glue (110755)
Stampin’ Dimensionals (104430)
TOOLS:
Stampin’ Trimmer (126889)
Simply Scored Scoring Tool (122334)
Bone Folder (102300)
Craft Scissors (108360)
Stampin’ Sanding Block (129367)
Core’dinations Dust Buddy (129366)
1-3/8″ Circle Punch (119860)
Big Shot Die-Cutting Machine (113439)
Big Shot Magnetic Platform (130658)
Starburst Framelits Dies (132967)*
-Also available as a bundle with the Starburst Framelits Dies at a 15% discount! Wood-Mount 134817, Clear-Mount 134818*
SAB Decorative Dots Textured Impressions Embossing Folders (133520)**
Grid Paper (102787)
Stampin’ Scrub (126200)
Stampin’ Mist (102394)
*Available January 3, 2014 when the Stampin’ Up! Occasions Catalog begins!
**Exclusive Sale-A-Bration item FREE with each $50 purchase from January 28, 2014-March 31, 2014!
Connect with Me!
Categories
Archives
Copyright Info
Copyright Info All Images © Stampin' Up! 2011 Sarah Naber, Independent Stampin' Up! Demonstrator The content of this blog is my sole responsibility as an independent Stampin' Up! demonstrator and the use of, and content of, the classes, services, or products offered on this blog is not endorsed by Stampin' Up!


