Hi there!!! Today a video on how I’ve been using my wheels for the past 6 months or so! I use them way more often than I did when they were in the regular wheel form. I just never could get them to ink up evenly or roll in a straight line. The other nice thing is that you don’t need the two different handles and the builder wheel spindle & spacers. The one thing you do need is the Clear-Mount Cling Foam (124236). It costs $10.95 for two 8-1/2″ x 11″ sheets (one side cling & one side adhesive). You’d pay $13.85 for the standard handle, jumbo handle and builder wheel spindle & spacers so it is really about the same price depending on your preference.
Enjoy!!! I LOVE the wheels so choose how you want to stamp with them and head on over to my online store and get some to try today!!!
Products Mentioned in the Video
Clear-Mount Stamp Cases (119105) $5.95 for 4 DVD-sized cases
Clear-Mount Block F (118483) $16.95 OR
Clear-Mount Block Bundle (118491) $66.95 for ALL 9 blocks with a 15% discount!!!
Clear-Mount Cling Foam (124236)$10.95 for two 8-1/2″ x 11″ sheets
Craft & Rubber Scissors (103179) $19.95
Betsy’s Blooms Standard Wheel (126943) $6.50
Hi stampers! Today I’m bringing you a video where I’ve created a card from start to finish. I will do this from time to time (not on a certain day every week like Quick Tip Tuesday) and I’m hoping you enjoy them!!! I LOVE this card – it is not my original design but someone fabulous from the Stampin’ Up! Home Office as this was one of our Leadership Make and Takes this past January. Lots of great products used here – including the Mixed Bunch Stamp set and Blossom Punch from the Occasions Mini Catalog. REMEMBER: The Occasions Mini Catalog ends on April 30, 2012! Only 2 more days! Also I should mention that the original card (you’ll see it at the beginning of the video on the handout we were given with our Make and Take supplies) had a sentiment on a little flagged piece that was tucked in behind the button. Super cute! I was just waiting to see what I’d want to use it for before adding that.
Also, I want to apologize because the video is a little strange. Some of it had to be dubbed over because something went kaflooey with my audio on the video. I also am sorry that I’ve been MIA this week. My hubby and I got back from Florida earlier this week and got sick! 🙁 But I’m better now and planning to bring you lots of great stuff next week!!!
Supply List
STAMPS:
Mixed Bunch Stamp Set (Wood-Mount 125535, Clear-Mount 125537)
PAPER:
8-1/2″ x 11″ Very Vanilla Card Stock (101650)
8-1/2″ x 11″ Lucky Limeade Card Stock (122926)
8-1/2″ x 11″ Poppy Parade Card Stock (119793)
8-1/2″ x 11″ Rich Razzleberry Card Stock (115316)
Very Vanilla Medium Envelopes (107300)
INK:
Lucky Limeade Classic Stampin’ Pad (122935)
Daffodil Delight Classic Stampin’ Pad (119667)
Poppy Parade Classic Stampin’ Pad (119782)
Rich Razzleberry Classic Stampin’ Pad (115658)
ACCESSORIES:
Blossom Builders Designer Printed Kit (125410)
On Board Merry Medley (122958)
Daffodil Delight 1/4″ Grosgrain Ribbon (120928)
Lucky Limeade Baker’s Twine (125572)
Brights Designer Buttons (119747)
SNAIL Adhesive (104332)
Multipurpose Liquid Glue (110755)
Mini Glue Dots (103683)
Stampin’ Dimensionals (104430)
TOOLS:
Tabletop Paper Cutter (106959)
Simply Scored Scoring Tool (122334)
Bone Folder (102300)
Paper Snips (103579)
Craft Scissors (108360)
Stamp-a-ma-jig (101049)
Blossom Punch (125603)
1″ Circle Punch (119868)
Grid Paper (102787)
Stampin’ Scrub (102642)
Stampin’ Mist (102394)
Pencil
Quick Tip Tuesday #6: Ric Rac Using the Scallop Edge Punch
Today I have a video with a fun technique that you can use to accent any project. It uses Stampin’ Up!’s Scallop Edge Border Punch (#119882) to make an awesome, whimsical, little ric rac accent! I will show picture of the card in the video tomorrow.
As I mention in the video use a 1″ width strip with the old style (black) body and 5/8″ width strip with the new style (gray) body. Try it today and leave a comment below to let me know how it went!
Hi guys! Late again…YouTube took longer than normal to upload my video. Was planning on bringing it to you earlier today (yes, I know it is Wednesday anyway). Hope you enjoy this tip on a super popular trend in paper crafting right now!
Check back tomorrow for a Tool Time Thursday about sponging!
Supply List (mentioned in video only):
1″ Square Punch #124094
Well Worn Designer Series Paper #122359
Extreme Elements Stamp Set (Wood-Mount Only) #115181
Hi! Here’s the Tool Time Thursday from last week! I LOVE the Stamp-a-ma-jig – it totally revolutionized my stamping to have sentiments straight instead of having to re-stamp the card! The supply list from the video is below the video! See you tomorrow with a brand new Quick Tip Tuesday!!! 🙂
Supply List
Stamp-a-ma-jig #101049
Vellum Card Stock #101856
StazOn Jet Black Ink Pad #101406
Dotto Repositionable Adhesive #103305
Hi! I’m finally here with this week’s video on Heat Embossing! Heat Embossing is one of those easy ways to add some real impact and wow to a project!!! I hope you enjoy the video below and let me know if you have questions. I have listed all the embossing powders, as well as all 4 collections of Craft Stampin’ Spots and the rest of the supplies for your convenience below the video. I still owe you the Tool Time Thursday video so check back later this weekend for that! I plan on bringing you card samples using the embossed flowers I make in this video next week so don’t miss them! Leave a comment below letting me know what you think of this technique!!!
Regular Embossing Powders ($4.75 each)
Cherry Cobbler #122949
Tempting Turquoise #122950
Tangerine Tango #123106
Wild Wasabi #123224
Melon Mambo #123223
Black #109133
White #109132
Gold #109129
Silver #109131
Pewter #124114
Clear #109130
Iridescent Ice #101930
Scented Embossing Powders- available until April 30, 2012 ($5.95 each)
Vanilla #125590
Melon #127034
Cherry #127035
Other Products
Embossing Buddy #103083
Heat Tool #100005
Mixed Bunch Stamp Set (Wood-Mount #125535, Clear-Mount #125537)
VersaMark #102283
Craft Stampin’ Spots (10 spots in each collection for $21.95)
Subtles #119716
Regals #119717
Brights #119718
Neutrals #119719
Hi stampers! Today I’m bringing you a video with a GREAT way to use up all those scraps of designer series paper you have laying around! I recently learned the herringbone technique and have enjoyed using it on a couple of cards since then. I’ll show you another one next week that uses product from the Occasions Mini Catalog – today’s uses Sale-A-Bration products (SAB ends in just 2 days!!!) The video is pretty long so I’ll let you get straight to it! I’ll post a photo of the project as well as the full supply list below the video! I’ve turned comments back onto my blog so please comment! Have a wonderful day!!!
Today’s Tool Time Thursday features the Color Spritzer Tool – a quick and easy way to add some dimension to your cards! All you need is a marker (only $3.50 per marker) and the Color Spritzer Tool (107066 – only $12.95)! Also remember that you can buy the markers by collection or the entire marker set as well – I’ll list the prices and item numbers below the video with links to my Online Store! I know it is pricey to buy all the markers at once, but if you can swing it now, you can get 2 FREE SAB items with it until March 31, 2012. I bought mine when I joined Stampin’ Up! over 4 years ago now and they are still working GREAT!!! 🙂
Many Marvelous Markers (38 markers – $109.95 – 119806) – save $23.05, like getting 6 markers FREE!!!
2010 – 2012 In Color Stampin’ Write Markers (5 markers – $14.95 – 119801) – save $2.55
2011 – 2013 In Color Stampin’ Write Markers (5 markers – $14.95 – 123002) – save $2.55
Hi! I’m sorry about the unplanned hiatus! I’m back with this week’s Quick Tip Tuesday on how using a piece of ribbon and brad together can make a super easy bow for your projects!!! I hope you enjoy it!!! I’m turning my comments back on so feel free to leave a comment and let me know what you think and if there is anything you’d like to see me make a video of!
Do you have a hard time getting those pesky rhinestones exactly where you want them? Watch the video below for the fastest tip ever!!! 🙂 (Seriously shortest video I’ve ever made.) I apologize that I’m a day late on the Quick Tip Tuesday for this week! It is a super fast one where I show you how to use our Paper Snips (103579) to place our Basic Rhinestones (119246) or Basic Pearls (119247) on any project in the right spot! Please head over to YouTube and comment on the video there! Let me know if there is anything you would like to see in a future Quick Tip Tuesday!
Hello stampers! I am starting another new weekly feature to the blog TODAY! Tool Time Thursday will feature a different Stampin’ Up! tool every week. What better way to begin than with my favorite Stampin’ Up! tool of all? I LOVE this paper cutter more than any paper cutter I’ve ever had. Watch the video below to see why! Then, if you don’t have it – get yourself over to my Online Store and pick one up! Add a roll of ribbon or some other small item and get a free Sale-A-Bration item until March 31st!!! 🙂 Here’s a link to this item in my store. Hope you enjoy Tool Time Thursday! Let me know if there is a tool you would like to see reviewed/featured on my blog soon!!!
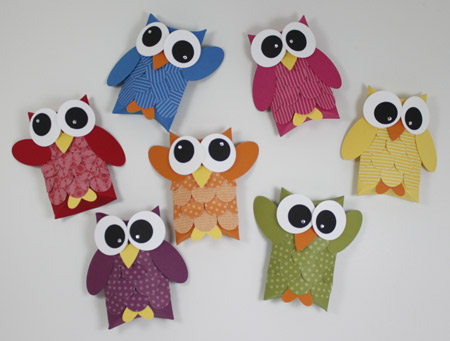
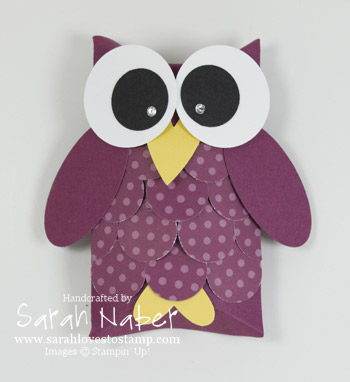
Hello again! In an attempt to make up for my absence last week, I’m bringing you a bonus video today! I’m also including a few photos of the project in this post so that you can refer back to it when you are making your own Owl Pillow Box Treat Holders! Hope you enjoy it!
Supply List
STAMPS: None
PAPER:
8-1/2″ x 11″ Daffodil Delight Card Stock (119683)
8-1/2″ x 11″ Rich Razzleberry Card Stock (115316)
8-1/2″ x 11″ Basic Black Card Stock (121045)
8-1/2″ x 11″ Whisper White Card Stock (100730)
Brights Collection Patterns Designer Series Paper Stack (117155)
*Note: You can also purchase the 8-1/2″ x 11″ Brights Smooth Card Stock (119706) – which includes 2 sheets of each of the 10 colors in the Brights Collection if you’d rather make the multi-colored owls that I showed in the picture above. You can get 2 pillow box die cuts out of one piece of card stock. If you choose to do that the Daffodil Delight and Rich Razzleberry will be in that pack, so you don’t have to purchase them individually. (Although you do get 24 sheets in the single color packs and 20 in the collection packs for the same price. Up to you…)
INK: None
ACCESSORIES:
Basic Rhinestone Jewels (119246)
White Baker’s Twine (124262)
Stampin’ Dimensionals (104430)
Sticky Strip (104294)
Multipurpose Liquid Glue (110755)
Mini Glue Dots (103683)
TOOLS:
3/4″ Circle Punch (119873)
1-1/4″ Circle Punch (119861)
Large Oval Punch (119855)
Heart to Heart Punch (119881)
1/16″ Handheld Circle Punch (101227)
Big Shot Die-Cutting Machine (113439)
Standard Premium Crease Pad (113476)
Pillow Box Bigz Die (113466)
Bone Folder (102300)
I’m starting a new feature here on the blog – Quick Tip Tuesday! Just what it sounds like, every Tuesday I will bring you a blog post or video with a quick tip that will help you with creating and stamping! Today I have a video for you on How to Mount Clear-Mount stamps, as well as a couple of basic stamping tips. I found this way of mounting them (not the way SU! tells you to mount them) from another demonstrator and LOVE it! I have much better success with my clear stamps clinging to the acrylic blocks for a longer period of time with this method! Hope it helps you too!
Please let me know if you have any questions or have any other how-to video ideas you’d like to see me make!
Connect with Me!
Categories
Archives
Copyright Info
Copyright Info All Images © Stampin' Up! 2011 Sarah Naber, Independent Stampin' Up! Demonstrator The content of this blog is my sole responsibility as an independent Stampin' Up! demonstrator and the use of, and content of, the classes, services, or products offered on this blog is not endorsed by Stampin' Up!


