Vintage Papillon Potpourri Card
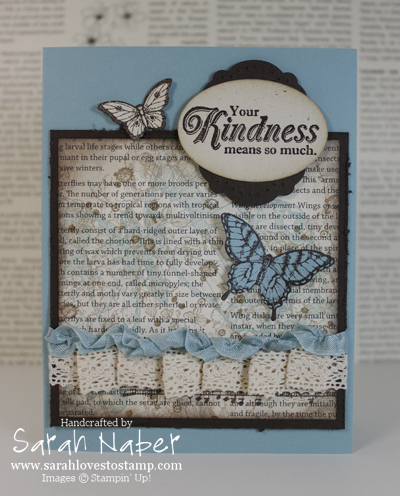
Hello! I hope today’s card reminds you that spring is just around the corner. I’ve layered tons of images onto the First Edition Designer Series Paper by stamping in different colors. It may be hard to see in the photo, but in real life, it looks really, really cool. One other thing I LOVE about this card is the butterflies from Papillon Potpourri – they were probably the simplest thing I did on this page because of their matching punches!!! I was beyond excited when I saw that the smaller butterfly had a matching punch in the new Spring Catalog! (FYI: The Bitty Butterfly Punch also matches the butterfly in the FREE Sale-A-Bration offering, Bloomin’ Marvelous.) YAY!!! Anyway, I love the vintage style and don’t typically gravitate to making cards of that style myself so I signed up for a Vintage Swap at Leadership Conference for a bit of a challenge! 🙂 I love the final result and it makes me want to try vintage more often!
You may be thinking that this card looks familiar! That’s because I showed you a few of the pieces of how I made it in two of my recent videos HERE and HERE! If you haven’t watched those yet, I hope you do! A few other details – the Label Framelit layered behind the Oval Punch is turned 90 degrees from how you typically see it. It is also pierced with its matching template from the Festive Paper-Piercing Pack and then flipped over to the other side so you see the rough sides of the holes instead of the clean ones. Again, a little vintage touch! I also really like to do that to masculine cards to give them more of a rough feel.
You may have been thinking, wait, I thought that paper-piercing pack was in the Holiday Catalog? You’d be right! It did debut there but it is in the Spring Catalog on page 36 with the other selection of items that were in the Holiday Catalog and are still available for order. The stamp sets are listed on the side (please let me know if you don’t have a Holiday Catalog if you’d like to see the images) and then the rest of the goodies are pictured on that page. One item that is still available but missed making it onto the page is the Champagne Glimmer Paper! I LOVE all of the Glimmer Papers so I was pretty excited about this! If you want to order it, just punch in item 127885!
Ok, finally, I’ll give you a rundown of what those “tons of images” that are stamped on the First Edition DSP so you can recreate this card! 🙂 It doesn’t really matter the order you do these things in – although I normally go from your lightest ink to darkest so you can best see what and where you’re stamping. I stamped the large floral image from Elements of Style several times in Crumb Cake ink over the entire piece to cover it. The Swallowtail butterfly is stamped in Baja Breeze ink. Then I stamped the paint splatter image (LOVE IT! This is a must-have stamp for me!) several times in Soft Suede ink. Finally I stamped my Music Notes wheel in Early Espresso ink towards the bottom. I unmount my wheels (see a video of that HERE) and I didn’t want to have a harsh edge so I used a torn post it note to mask off the left side of the wheel so it would look gradual with the torn edge instead of harsh with a straight edge. If I had it to do over again, I would either stamp my Music Notes wheel all the way to the bottom or move my ribbon up a bit. In the video showing you how to gather your ribbon like I did on this swap, you see why this happened to me as my ribbon hung down much farther than where I originally applied my sticky strip. (I knew this would happen but didn’t compensate for it as much as I should’ve to show the music notes a bit more.) I layered this piece onto my distressed Espresso piece (see that video HERE), and then applied the ribbon treatment on top of that so I could tape the ends onto the back. The butterflies were added with glue dots and the sentiment and Espresso pierced framelit were layered together with Multipurpose Liquid Adhesive and then added onto the card with Stampin’ Dimensionals!
I hope you enjoyed this project! It’s one of my favorites that I’ve made in a long, long time! If you don’t want to miss out on a single post, please subscribe to my blog! 🙂
Supplies
STAMPS:
Papillon Potpourri (Wood-Mount 123757, Clear-Mount 123759)
From My Heart (Wood-Mount 126555, Clear-Mount 126557)
Swallowtail (Wood-Mount 129213, Clear-Mount 129216) – Spring Catalog pg. 18
French Foliage (Wood-Mount 120845, Clear-Mount 121166)
Elements of Style (Wood-Mount 118611, Clear-Mount 120045)
Music Notes Wheel (120327)
PAPER:
8-1/2″ x 11″ Naturals Ivory Card Stock (101849)
8-1/2″ x 11″ Baja Breeze Card Stock (111352)
8-1/2″ x 11″ Early Espresso Card Stock (119686)
First Edition Specialty Designer Paper (121878)
INK:
Baja Breeze Classic Stampin’ Pad (126960)
Crumb Cake Classic Stampin’ Pad (126975)
Early Espresso Classic Stampin’ Pad (126974)
Soft Suede Classic Stampin’ Pad (126978)
ACCESSORIES:
5/8″ Victoria Crochet Trim (118481)
Baja Breeze 1/2″ Seam Binding Ribbon (122331)
SNAIL Adhesive (104332)
Multipurpose Liquid Glue (110755)
Mini Glue Dots (103683)
Stampin’ Dimensionals (104430)
Anywhere Glue Sticks (104045)
Sticky Strip (104294)
TOOLS:
Tabletop Paper Cutter (106959)
Simply Scored Scoring Tool (122334)
Bone Folder (102300)
Craft Scissors (108360)
Stampin’ Distress Tool (127562) – Spring Catalog pg. 14
Paper Piercing Tool (126189)
Stampin’ Pierce Mat (126199)
Festive Paper-Piercing Pack (127857) – Spring Catalog pg. 36
Extra-Large Oval Punch (119859)
Elegant Butterfly Punch (127526)
Bitty Butterfly Punch (129406)
Big Shot Die-Cutting Machine (113439)
Labels Collection Framelits Dies (125598)
Grid Paper (102787)
Stampin’ Scrub (126200)
Stampin’ Mist (102394)
Connect with Me!
Categories
Archives
Copyright Info
Copyright Info All Images © Stampin' Up! 2011 Sarah Naber, Independent Stampin' Up! Demonstrator The content of this blog is my sole responsibility as an independent Stampin' Up! demonstrator and the use of, and content of, the classes, services, or products offered on this blog is not endorsed by Stampin' Up!


