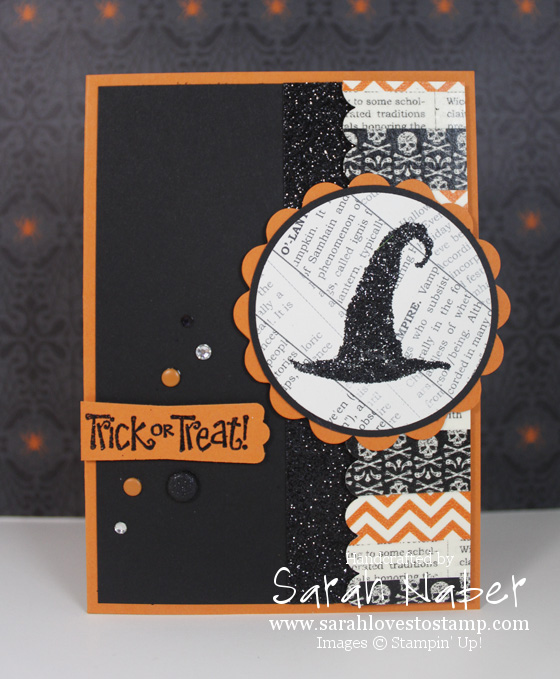
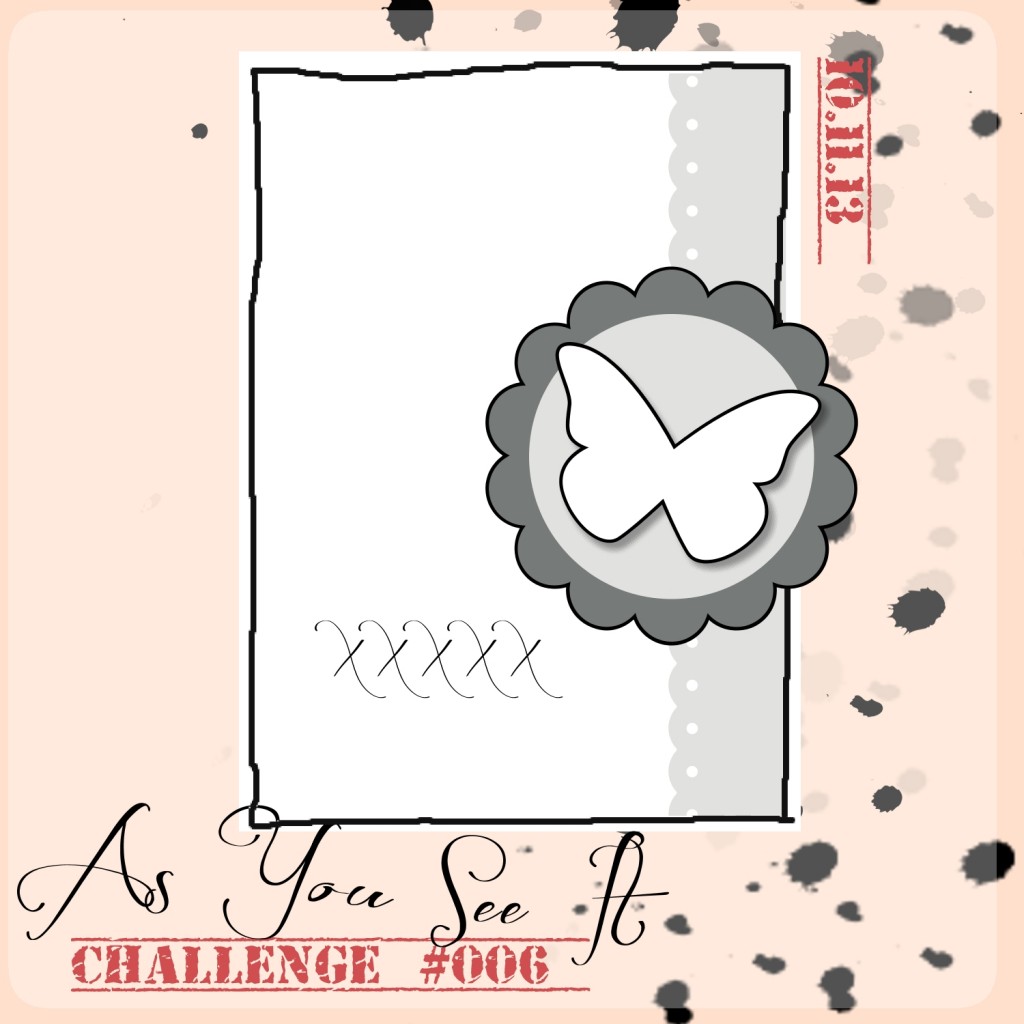
I’m back again today with a GREAT sketch challenge from the As You See It Challenge Blog! This one featured a scalloped element that hung off the edge of the card so I made the card base a tad bit smaller at 4″ x 5-1/2″ so it would still fit in a standard A2 envelope. I used lots of the new Black & Orange Stampin’ Glitter (I only used the black) with Heat and Stick powder. Stay tuned for a video on that!
The patterned part on the right is the Witches Brew washi tape on top of Very Vanilla cardstock. I used the Scallop Edge Punch to make the fun edge. The witch’s hat and sentiment are from the Best of Halloween set! These are only available until March 2014, so make sure not to miss out! LOVE this set! The witch’s hat was stamped onto the Witches Brew Designer Series paper and cropped out with one of the circles from the Circles Collection Framelits dies. I then layered it onto a 2-1/2″ circle punched out of Basic Black cardstock. Those were layered onto the 2-3/8″ Scallop Circle Punch and popped up on dimensionals. *TIP: Since the edge of the circle hangs over the edge, make sure not to put adhesive on the very right side of it as it doesn’t have anything to adhere to, so the adhesive will be sticky and exposed. I made the black glittery strip with by pressing my VersaMark pad directly onto Basic Black cardstock, covering it in Heat and Stick Powder, heating it, covering it in the black glitter, and then heating it to set it. Honestly, it’s faster to do it than it is to type it! 🙂
I finished it off by stamping the sentiment in VersaMark and embossing it with Black Stampin’ Emboss Powder. I punched it out with the Modern Label Punch, chopped off the very edge and popped it up on Stampin’ Dimensionals! I wanted a little more pizzazz so I added a few fun embellishments to draw the eye to the sentiment! I used Pumpkin Pie Candy Dots (from the Brights Candy Dots), Basic Rhinestone Jewels, and a Glimmer Brad. One of the tiny rhinestones is colored with a black Sharpie marker to color it to match the project.
I hope you love it as much as I do! The only change I would make is to have a narrower black glittery strip. I had already glued it down to the card so I couldn’t fix it without redoing the whole card! (Hate it when that happens!)
Please head on over to the As You See It Challenge Blog and play along with us!!! You have from each Friday until the next Thursday to enter. I’m LOVING being on this Design Team and all of the creativity! 🙂
This card was entered into challenges at: Oldie But a Goodie (Old items: Pumpkin Pie cardstock and Heat & Stick Powder, Bingo: embossing, die cuts, glitter), Papertake Weekly (2 stamps), Simon Says Stamp, Moving Along with the Times, Stamp-n-doodle, Paper Pretties, Creative Craft Challenges 2, Sister Act Card Challenge, Simply Create Too, Polkadoodles, and Crafty Catz.
Supply List
STAMPS:
Best of Halloween (Clear-Mount Only 134381)
PAPER:
8-1/2″ x 11″ Very Vanilla Cardstock (101650)
8-1/2″ x 11″ Basic Black Cardstock (121045)
8-1/2″ x 11″ Pumpkin Pie Cardstock (105117)
Witches’ Brew Designer Series Paper (132185)
INK:
VersaMark (102283)
ACCESSORIES:
Basic Rhinestone Jewels (119246)
Brights Candy Dots (130931)
Basics Glimmer Brads (121003)
Heat & Stick Powder (100625)
Black Stampin’ Emboss Powder (109133)
Black & Orange Stampin’ Glitter (132206)
Witches’ Brew Designer Washi Tape (132156)
SNAIL Adhesive (104332)
Multipurpose Liquid Glue (110755)
Stampin’ Dimensionals (104430)
TOOLS:
Stampin’ Trimmer (126889)
Simply Scored Scoring Tool (122334)
Bone Folder (102300)
Paper Snips (103579)
Embossing Buddy (103083)
Modern Label Punch (119849)
2-1/2″ Circle Punch (120906)
2-3/8″ Scallop Circle Punch (118874)
Scallop Edge Border Punch (119882)
Big Shot Die-Cutting Machine (113439)
Magnetic Platform (130658)
Circles Collection Framelits Dies (130911)
Grid Paper (102787)
Stampin’ Scrub (126200)
Stampin’ Mist (102394)
Hi there! Just a quick little post today to remind you to follow all of the Sarah Loves to Stamp online family, so you don’t miss out on a bit of what I have to offer: projects, tips, tricks, information, etc. 🙂
It’s super easy, just click the link to the right for whichever online sources you aren’t yet following and click on “like”, “follow”, “subscribe”, etc.!
Thanks so much!!!
Q: How do you make card bases?
A: This is a GREAT question. In the US, the typical finished size of the cards we make (called A2 cards) is 4-1/4″ x 5-1/2″. This is super easy to accomplish by cutting a piece of 8-1/2″ x 11″ cardstock in half either way and folding those pieces in half. One option is to cut it in half to make two 8-1/2″ x 5-1/2″ pieces and score and fold them at 4-1/4″. I do this the most often as your actual fold is longer (5-1/2″) and thus the card seems to be a little more sturdy – especially if you want to stand them up somewhere or know you’re mailing it to someone who likes to stand their cards up. 🙂 The other way is to cut the paper to 4-1/4″ x 11″ and scoring each piece and folding at 5-1/2″.
Send me YOUR Questions and you may see them here at my Q&A feature or in a Q&A video which I hope to start soon! 🙂
The 12 Weeks of Christmas begins in just 48 hours, on WEDNESDAY, October 2nd and is a free gift from me to you every year. Every week, you will receive an email with a FREE Holiday Project – either a card, bag, tag, wrap, or gift you can make!
You can ONLY see these projects if you are on my mailing list! I won’t be posting them to the blog, Facebook or pinning them to Pinterest!
In order to receive this gift, you MUST be on my mailing list by Wednesday, October 3 at 1 pm Central time.
To sign up for my list, simply put your details in the box at the top of the sidebar. It’s the box that says “Subscribe to the Sarah Loves to Stamp Mailing List and Receive…” or it may be popping up on your screen right now! 🙂 Type in your full name and your best email and hit the “Submit” button…but, wait, you’re not done…almost…but not yet!
THEN, check your inbox for an email. This email will contain a link. You MUST click this link to activate your subscription.
I hope you’ll love each project you’ll be getting for the next 12 weeks!
Hi there!!! Hope you enjoy this video of a product I’m over the moon about!!! It shows you how to use a simple, easy tool to make your own envelopes out of any paper you want!!! Cardstock, Vellum, Designer Series Paper, Patterned Paper, Newspaper, etc. – the sky is the limit with Stampin’ Up!’s Envelope Punch Board! It makes 66 different sized envelopes, including normal A2 cards, gift cards, as well as custom envelope sizes for square cards and TONS of others as well! This is also a quick and easy way to create pockets for hidden journaling or extra photos on a scrapbook page. As a little bonus, this tool also features a GREAT corner rounder too! Click over to YouTube while you’re at it and Subscribe to my channel so you don’t miss out on a single video!!!
Would you believe me if I told you that Christmas is in just 13 weeks? WOW!
This will be my second year of doing the 12 Weeks of Christmas at Sarah Loves to Stamp! The 12 Weeks of Christmas is a free series of tutorials that, beginning next Wednesday, will send you a Holiday Project for the next 12 weeks. The Holiday Project may be a card, gift, bag, tag, or wrap designed to make your holiday gift giving that much easier!
In the busy holiday season that is approaching, I am so so thankful for you, my awesome customers, and LOVE to provide free special gifts just for you!
In order to receive this gift, you MUST be on my mailing list by Wednesday, October 2 at 1 pm central time.
To sign up for my list, simply put your details in the box at the top of the sidebar. Then be sure to check you inbox for an e-mail. This e-mail will contain a link. You must click this link to activate your subscription.
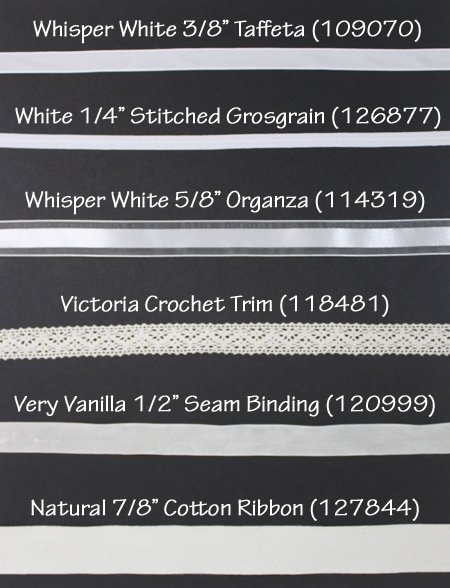
I hope you enjoyed the video today! Here’s the picture that I talked about and showed in the video. These are excellent options (besides the Whisper White Baker’s Twine #124262) for custom dye-to-match ribbons. I plan to do more videos with other techniques, but the one in the video remains my favorite for Baker’s Twine. Enjoy!!!
Q: How can you upcycle your old Blender Pens (102845) when they dry up?
A: First of all, I’ve had the same set of Blender Pens since I signed up for Stampin’ Up! over 5 years ago and they have yet to dry up! If you use them super often, I’m sure it would happen before 5 years has passed. I do have one (they come in a package of 3) that was starting to dry out a bit and the tip was looking especially worn. So…I used it for the Dazzling Watercolor technique (I think it was invented by Julie Davison) where you mix any Stampin’ Up! Classic Ink Refill and the regular, clear Dazzling Details glitter adhesive (124117) to make a sparkly, colored glitter glue that you can paint into an line art image that’s been embossed. *Tip: I mix my ink refill and the glitter together with the Blender Pen on one of our clear blocks. When you’re done, just use a baby wipe to clean the block.* The sample here shows that technique, although several items have been retired. The great thing about Blender Pens is that they have 2 tips so I was able to use one end for Melon Mambo and the other for Old Olive for this sample. Hopefully, in the first picture, you can see how sparkly and beautiful it is!
Another great use is for painting bleach onto your projects. You can flick it on (BE CAREFUL!) to create bleached splatters or paint it into a line art image too! This is a great use for the old Blender Pens because you don’t want to use bleach with your other paintbrushes, as it could eat away the bristles.
I hope you enjoyed this new feature to my blog! I plan on doing one every week! Stay tuned for other new blog features! PLEASE LEAVE A COMMENT with a question you’d like me to answer! Thanks for checking out my blog today!!!
With the BRAND NEW 2013-2014 Annual Catalog, came the introduction of the Big Shot Magnetic Platform (130658). I knew it was supposed to be great for positioning framelits, but had no idea how awesome it was until I saw this video from Stampin’ Up! After I saw this video, the Magnetic Platform soared to the top of my must haves wish list and is now on it’s way from Riverton, Utah to my house!!! I cannot wait to get this amazing product!!! YAY!!! Check it out:
I’ll be back soon with my Top 10 from the BRAND NEW 2013-2014 Annual Catalog! Remember, you can browse it online and/or download it by clicking on my Catalogs tab at the top of the page! 🙂
Hi there! Stampin’ Up!’s 2013-2014 Annual Catalog went live just yesterday! Have you placed your first order from it? Whether you have or haven’t, leave a comment with your favorite NEW product!!! Mine is the fabulous Candy Dots!!!
For the first time EVER, our catalogs have a crossover period so they didn’t end and begin during the weekend when SU!’s Home Office isn’t open. 🙂 So you can order from BOTH catalogs until June 3, 2013!!!
CLICK HERE to check out my Catalog Page to view either catalog online or download them.
Please contact me at 816.341.0208 or Sarah@SarahLovesToStamp.com if you have any questions.
I can’t wait to show you some of the new things I’ve been working on! I’m excited to bring you new blog posts and videos VERY soon! If you haven’t already, sign up for my mailing list as my June newsletter will go out this Tuesday, June 4th at noon Central time. (*It’s easy to do, just put your name and email in the box to the right, click the button and then check your email for a link to click to verify that you want to sign up.) I LOVE sending my newsletter subscribers project ideas each month, as well as information about current promotions and exclusive deals! 🙂
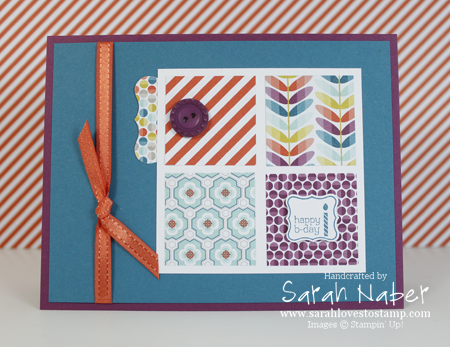
Hi there! Long time no post, right? Sorry about that – I’ll be better in the future! 🙂 So, today’s card uses some of my favorite things from Sale-A-Bration 2013. This is the time of year that with every $50 you spend, you get to choose a FREE item!!! The Sycamore Street Designer Series Paper (featured on this project) has been probably the favorite choice!!! I also feature the Pretty Petites Stamp Set, Petite Curly Label Punch, as well as the Sycamore Street Ribbon & Button Pack. Remember you only have until March 22nd to get these Sale-A-Bration exclusive items. (*Note: One exception is the Petite Curly Label Punch. It will be in the 2013-2014 Annual Catalog, however, then you’d have to pay for it!  ) One of my favorite things about this patterned paper is the color combination. So fresh and fun! I never would’ve thought to put these colors together and it is making me use my much neglected Tangerine Tango! I love that!
I fell in love with a card of Lyssa Zwolenak’s that used this teeny tiny stamp set. I changed out all of the colors and the paper but copied her layout exactly! I used the 1-3/8″ square punch to punch out 4 squares of the Sycamore Street DSP. I then used the regular Curly Label Punch (in the 2012-2013 Annual Catalog) to punch out another piece of the paper. I cut it in half since less than half of it would be showing anyway! I glued the squares to a 3-1/8″ x 3-1/8″ piece of Whisper White Card Stock, then glued the half Curly Label on the back. The 5-1/4″ x 4″ piece of Island Indigo has a knot tied around it with the Tangerine Tango ribbon from the Sycamore Street Ribbon & Button Pack (I LOVE this ribbon! It ties super nicely and feels satiny smooth!). That piece was adhered to a 5-1/2″ x 8-1/2″ of Rich Razzleberry Card Stock that is scored at 4-1/4″, and then the main image piece that we assembled earlier is glued on the right half of the card. I attached a Rich Razzleberry button from that same Sycamore Street Ribbon & Button Pack with a Glue Dot. Finally, I used the cute Pretty Petites Stamp Set and stamped the birthday image on a scrap of Whisper White Card Stock with the Island Indigo Classic Stampin’ Pad. Then flip your punch over, line it up with the image and punch it out! Adhere it onto your project with a Stampin’ Dimensional! YAY! You’re done!
The great thing about this stamp set is that you could literally make 8 or 12 of these in a short amount of time and just pop a different stamped image on the different cards so you’re ready for anything! Super fast and easy! Have I mentioned how much I LOVE our coordinating stamps and punches?!?
Check out the items in the supply list below and pay special attention to those you can EARN FOR FREE with every $50 you spend! (*Note: I marked them SAB below in the list and colored them red too!) Remember, time is drawing to a close on our best sale of the year so make sure you get your order in on time!!! I will be putting in an order on March 22nd at 10 PM Central Time if you want to combine orders. 🙂
Supply List
STAMPS:
SAB Pretty Petites (Wood-Mount 129639, Clear-Mount 129642)
PAPER:
8-1/2″ x 11″ Whisper White Card Stock (100730)
8-1/2″ x 11″ Island Indigo Card Stock (122923)
8-1/2″ x 11″ Rich Razzleberry Card Stock (115316)
SAB Sycamore Street Designer Series Paper (127540)
INK:
Island Indigo Classic Stampin’ Pad (126986)
ACCESSORIES:
SAB Sycamore Street Ribbon & Button Pack (130812)
SNAIL Adhesive (104332)
Multipurpose Liquid Glue (110755)
Mini Glue Dots (103683)
Stampin’ Dimensionals (104430)
TOOLS:
Tabletop Paper Cutter (106959)
Simply Scored Scoring Tool (122334)
Bone Folder (102300)
Paper Snips (103579)
Craft Scissors (108360)
SAB Petite Curly Label Punch (129405)
Curly Label Punch (119851)
1-3/8 Square Punch (119877)
Grid Paper (102787)
Stampin’ Scrub (126200)
Stampin’ Mist (102394)
If you aren’t signed up for my mailing list yet, you want to be! Why? Well, here are several reasons:
1) Be the first to know the new news!!! My Newsletter subscribers are the first ones to hear about new promotions and sales from Stampin’ Up!, the first ones to hear about any special programs, sales, or classes I personally offer, as well as lots of other fun things that never make it to my blog, Facebook page, or twitter. *SPOILER ALERT: How would you like to earn just one of the benefits of having a party, without having one and only having to spend $75? (Don’t worry, you still get SAB freebies too.) On Monday, my Newsletter subscribers will be the first to hear about this exciting offer!!!*
2) Get exclusive project ideas, including scrapbook pages, cards, treat holders, decor items, digital projects, as well as tool tips, techniques, and common customer questions (as well as the answers, of course). All of this, delivered to your inbox once a month, completely for FREE!
3) Exclusive offers made ONLY to my Newsletter subscribers!!! You’ll see more of these this year than ever before!
4) Did I mention the fabulous free video? It features one of my very favorite (and inexpensive) Stampin’ Up! products, Shimmer Paint and 5 amazing things you can do with it!!!
So, I know after all of that you’re thinking where and how do I sign up? It is so, so simple! See that box to the right (yeah, go ahead and look)…well just put your full name and best email in the appropriate boxes and click “Send Me My Video!” BUT, you’re not done yet! Go ahead and go to your email and click the link in the email from me to activate your subscription! Now, you’re done and should receive the last newsletter I sent out right away!!! Then just wait for more fun messages from me! 🙂
If you have any questions, please feel free, as always, to contact me at Sarah@SarahLovesToStamp.com or 816.341.0208! Now what are you waiting for? Sign up for my mailing list…GO! 🙂
TONIGHT is the biggest night in football and I hope you’ll join me to in celebration of Super Bowl XLVII!!!
Simply place an order by phone or email DURING the game tonight, Sunday, February 3, 2013 and receive a discount! You’ll get between 1-10% off depending on the score. Please call me at 816.341.0208 or email me at Sarah@SarahLovesToStamp.com to place your order!!!
Your discount will be equal to the last digit of the winning team’s score! If the Ravens win 33 to 28, you will get 3% off your order. If the 49ers win 20 to 12, you will get 10% off your order. *NOTE: I didn’t really think that 0% was a very fun discount for anyone, so that’s why if the second digit is a 0, you’ll get 10% off instead!!! 🙂
Please make sure to provide me with your credit card info (name, billing address and phone, card number, card type, & expiration date) as I will process all orders on Sunday night after the game.
*Remember: For every $50 increment you spend (before tax, shipping, and the discount), you will get to choose a FREE Sale-A-Bration item, as well as a spot on my Sarah Loves to Stamp 50/50 Board.
CLICK HERE to view your choices for your FREE Sale-A-Bration item.
***Please remember that if you place your order online, you are not eligible for the savings as I am not able to apply a discount after you complete your order. You must phone in or email the order to receive the discount!!!
Hi there stampers! Today’s video is on a really cool new tool that came out in Stampin’ Up!’s Spring Catalog: the Stampin’ Distress Tool! I LOVE it! It is an inexpensive, easy, and fun way to add some texture and dimension to your projects. This tool is especially GREAT for masculine or vintage card styles. I hope you enjoy the video!
Please let me know if I can help you order this or any other of our Stampin’ Up! products or CLICK HERE to order online in my Stampin’ Up! Store.
Connect with Me!
Categories
Archives
Copyright Info
Copyright Info All Images © Stampin' Up! 2011 Sarah Naber, Independent Stampin' Up! Demonstrator The content of this blog is my sole responsibility as an independent Stampin' Up! demonstrator and the use of, and content of, the classes, services, or products offered on this blog is not endorsed by Stampin' Up!

