
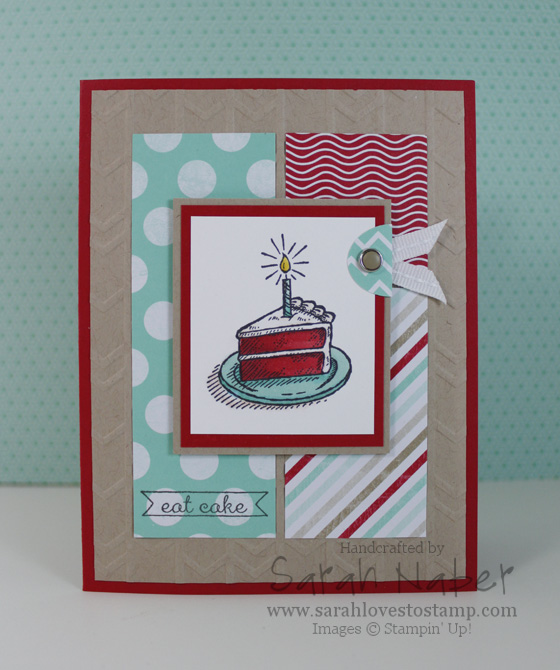
I’m so excited to show you my very first creation with Stampin’ Up!’s brand new alcohol-based markers, Blendabilities! They’re beyond fantastic and I’m loving that they come in SU!’s exclusive colors and are totally fool proof as they come in sets of 3 with a light, medium and dark of the same hue! I thought…if I’m using the piece of cake image from Sketched Birthday, why not make it Red Velvet? YUM!
What else do I love? THIS SKETCH! It’s out of this world! Won’t you please play along with us at the As You See It Challenge? Head over there by clicking the link and check out what the other Design Team members have to share today! I can’t wait to see what you’ll create!
I also used some favorites that will be gone after May 31st as they are in the Occasions Catalog. The Fresh Prints Designer Series Paper Stack is so darn cute! I’m obsessed with this color combo! I used the Cherry Cobbler Blendabilities and used a tiny amount of the darkest color to add the shading without using too much so that it would retain the brightness it needed to in order to look good with the Real Red in the Fresh Prints Designer Series Paper Stack.
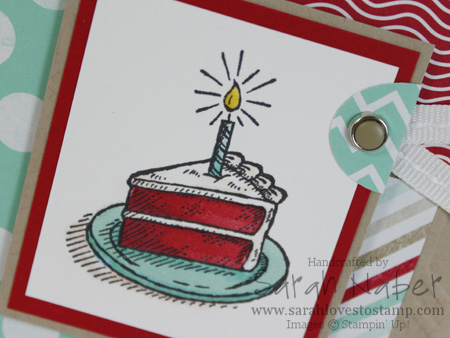
Here’s a closeup of the focal image. 🙂 Again, it isn’t perfect coloring but I was still pretty happy with the end result.
 How To
1. Cut Real Red Cardstock to 5-1/2″ x 8-1/2″. Score and fold at 4-1/4″
2. Cut Crumb Cake Cardstock to 4″ x 5-1/4″. Run through the Big Shot Die-Cutting Machine with the Arrows Textured Impressions Embossing Folder. Adhere to card base with Multipurpose Liquid Adhesive. *TIP: Anytime you want to adhere a textured piece of cardstock to another piece of cardstock, Multipurpose Liquid Adhesive is the best way to do it! The liquid glue is able to seep into the nooks and crannies and provide an excellent bond between the two paper layers.
3. Cut Fresh Prints Designer Series Paper (retiring May 31st) patterns to 1-1/2″ x 4-1/4″, 1-1/2″ x 2-5/8″ and 1-1/2″ x 1-1/2″. Stamp the greeting from Sketched Birthday on the bottom of the largest DSP piece with Memento Tuxedo Black Ink*. *TIP: I used my Stamp-a-ma-jig to get perfect positioning of the sentiment on the DSP. LOVE that Stamp-a-ma-jig!!!
4. Cut Crumb Cake Cardstock layer to 2-1/4″ x 2-5/8″, Real Red Cardstock to 2-1/8″ x 2-1/2″, and Whisper White Cardstock to 1-7/8″ x 2-1/4″.
5. Stamp the birthday cake image from Sketched Birthday onto the Whisper White piece from Step 4.
6. Color with Cherry Cobbler, Coastal Cabana and Daffodil Delight Blendabilities* trios. Add a bit of the lightest color from the Blendabilities Skin Tone Assortment* to the frosting and underneath the plate to add some extra dimension and realism (frosting isn’t truly white). *TIP: To better match my Real Red in the color combination (from the DSP), I used a LOT more of the light and medium markers in the Cherry Cobbler trio than the darkest. I used a tiny bit of the darkest color to add the shading I needed.
7. Attach the 3 cardstock focal-point layers from Step 4 together. *Tip: I use SNAIL to adhere Whisper White to other cardstock. Although Multipurpose Liquid Glue is my favorite adhesive, I find that it shows slight glue lines on top unless I apply it in a very thin and smooth layer, so I use SNAIL just to be safe. I know this is pretty picky as it is hard usually to even see the glue lines, but I’d rather be safe than sorry. (One exception to this is if the Whisper White layer is textured with an embossing folder and the Big Shot…then I still use Multipurpose Liquid Glue.)
8. Punch a Small Oval from the DSP. Fold it around the layered focal point. Punch a hole with the 1/16″ Circle Punch* and put a Candy Dot Brad Base through it. Bend the prongs outward and attach a Crumb Cake Candy Dot from the Neutrals Candy Dots to the center of it.
9. Cut two small pieces of 1/4″ Whisper White Stitched Grosgrain (while supplies last only) and attach with Glue Dots.
10. Finally attach the main focal point with Stampin’ Dimensionals! You’re done!
If you enjoyed this article, please consider sharing it!


2 Responses to Sketched Birthday with Blendabilities
Leave a Reply
Connect with Me!


Super cute, Sarah!! I’d like mine: red velvet/gluten free cake, OK??!
Lori – You’re so sweet! 🙂 Red Velvet is a fav of mine although I’ve never had it gluten free. There’s a first time for everything, right? These days with so many GF options, GF stuff tastes just like the real thing! My sister-in-law is celiac so I’m well acquainted with GF. 🙂