
Here I am to share my projects for my application to be an OnStage 2016 Display Stamper for the OnStage Local event in Kansas City in November! I was beyond excited when I found out OnStage local is coming so close to me! With only 5 US cities chosen, I feel so lucky that it’s only an hour away! After being a display stamper for Convention 2014, I was so bummed to miss out on trying for it in April for OnStage Live, so I’m excited for this opportunity! One exciting thing that’s changed since then is that I’ve become a mama – finally a cutie of my own to feature in my scrapbook pages!!!
*Warning: Picture heavy post ahead! 🙂
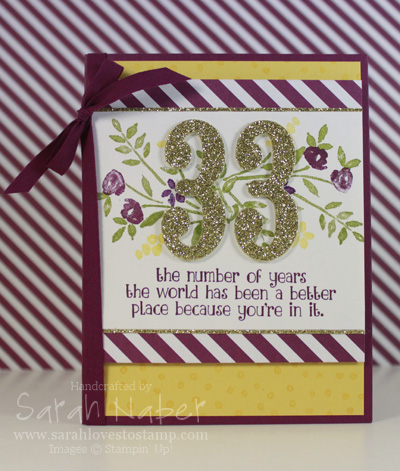
Number of Years Card – The first one features a few favorites – Gold Glimmer Paper, Brights Designer Series Paper Stack, Number of Years stamp set and Large Numbers Framelits dies. I can’t get enough of Rich Razzleberry and Daffodil Delight paired together. I love it! The background is stamped with the tiny dots stamp (in Daffodil Delight ink) from the Number of Years stamp set for a tad bit of texture. Tiny strips of Gold Glimmer Paper peek out from the edge of the main panel. This sentiment may be one of my favorites ever!!!
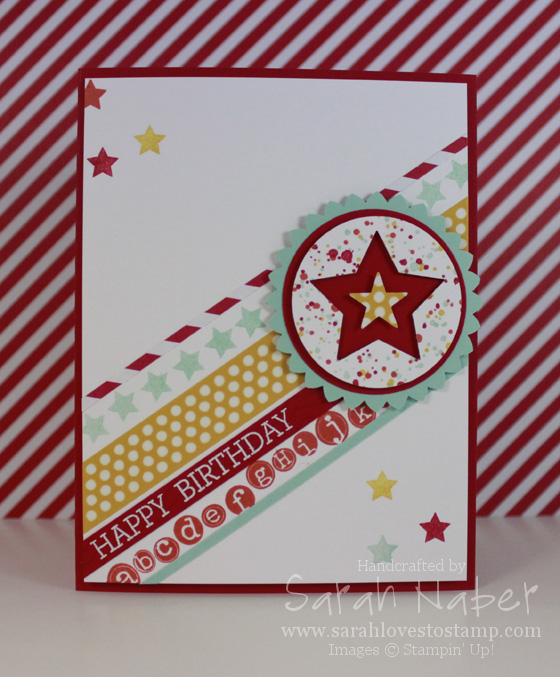
Starry Bright Birthday – This one is a fun one. I love the color combo on this one and did a few fun things. The alphabet stamp was two lines so I masked it off to make it one line, the sentiment is white embossed (heat embossing is one of my favorite ever things to do), and the washi tape was put onto a piece of white paper and punched out to make the small star! Gorgeous Grunge was used for the fun splatters on the main star. Both the main negative image star, as well as the little washi star were popped up for some depth with Stampin’ Dimensionals (I think I need an auto-ship subscription on those with the way I go through them)!
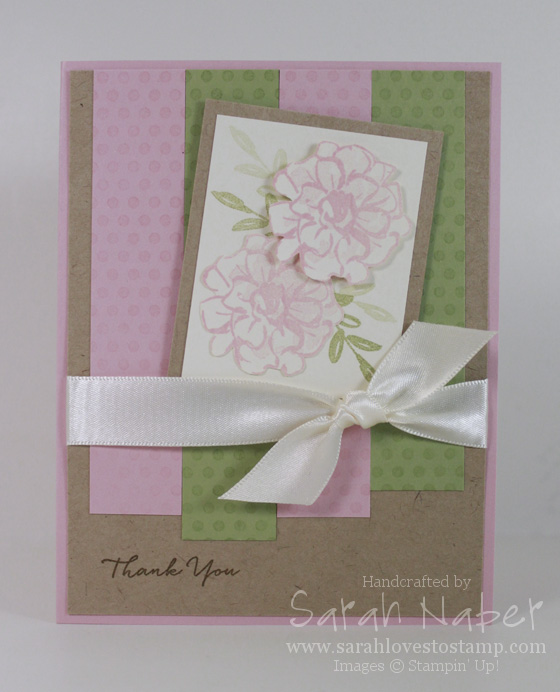
Soft Floral Thank You – When you have beautiful stamps, it’s really easy to make them shine! That’s why I stamped the images, cut them out and layered them over some first and second generation stamped leaves. My favorite detail of this card is that the pieces in the back were temporarily adhered to a separate sheet of paper so I could stamp the background onto all of the pieces at once, yielding a continuous background. I cannot get enough of this kraft paper. It’s really perfection…the perfect neutral to use with ANYTHING! 🙂
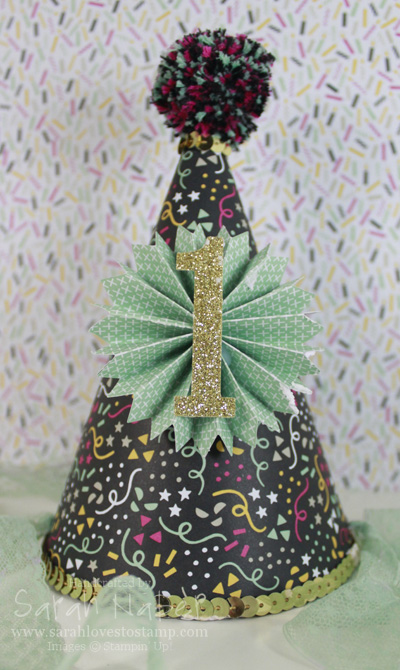
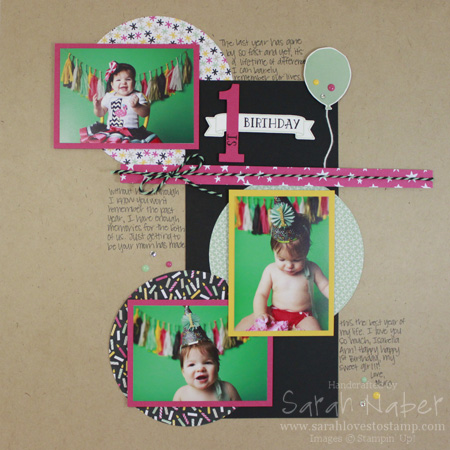
Izzy’s Party Hat – Ok, so this one may make you laugh. Remember how I said I’m a mama now? Well my sweetie turned one in January and of course, I had to use awesome Stampin’ Up! products for her party! So the night before we were to go to the photographer for her one year pics, I decided I’d make a party hat. It took me much longer than anticipated so I was up into the wee hours of the night crafting this beauty. As a result, it didn’t get photographed by me until after both the photographer’s pics and her actual party. Both times eating cake…so, you may see bits of frosting here and there. I figured this is an authentic 3D item…one that was used and loved! You’ll see pictures of her wearing it below on the scrapbook page.
The hat is two layers of Designer Series Paper to make it sturdy. I found a pattern on the internet that I traced onto the DSP and cut it out. The pom pom was made out of both the Mint Macaron/Basic Black and Melon Mambo/Basic Black Baker’s Twines. I threaded the string (that I tied around the bundle of twine) into the hole at the top of the hat and taped it inside to secure it. It’s definitely essential to find a way to secure the hat onto the party girl’s head so I poked holes on either side of the hat, threaded Mint Macaron lace trim through the holes, and both tied a knot and taped it to the inside. Hot glue was my best friend, both for gluing the sequin trim onto the edge of the hat and right under the pom pom, as well as to create the rosette. The “1” is my fav Large Number Framelits Dies (I just ordered the BRAND NEW letters yesterday! Yippee!), simply cut out of Gold Glimmer Paper.
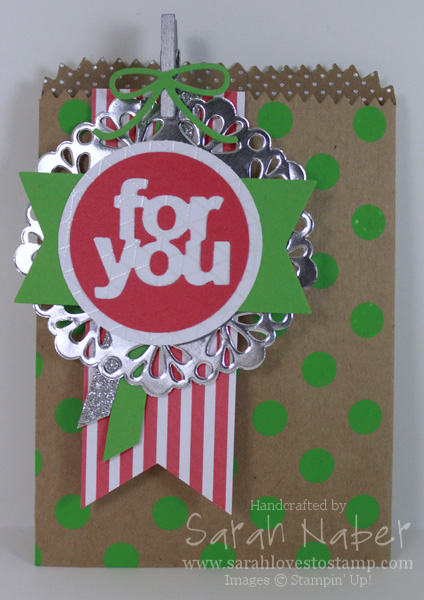
In Color Treat Bag – I had a friend convince me to get this die a few years ago. I haven’t regretted it since! So many options for great treats that fit inside. This bag actually has – SURPRISE – no stamping on it! It’s rare that happens to me as I love my stamps and ink, but the star of this bag are the dies included in the set (here the banner, sentiment, and bow). I made this one to show a technique at a local upline meeting where you place the positive image back into the negative image to place the little pieces back in (like the centers of the “o”s). I used circle punches to crop out the negative image and the layer behind it. The silver doily and Silver Glimmer Paper give a touch of shine! The largest banner in the back was punched with that genius Banner Triple Punch. Watermelon Wonder and Cucumber Crush together just make me happy!!!
1st Birthday Scrapbook Page – I bet you can’t tell who inspired this cute little scrapbook page. I once again turned to the same suite of products that I’d used for her party and relied on Stampin’ Up!’s expert coordinating products to make my page extra special. So this features not only the paper, but also the coordinating Baker’s Twine and Enamel Dots. I love the sweet little single balloon from the Balloon Celebration stamp set (and matching punch). The number, banner and word stamps are from the Large Number Framelits Dies and Number of Years stamp set (these and the balloon set/punch may be my favorite things I’ve purchased EVER). The base of the page is that fabulous Kraft cardstock, and the matching solid layers help ground the page, as well as the photos. There’s a lot of dimension here that is impossible to appreciate from pictures on a screen.
I hope you enjoyed the projects I shared with you today!
If you enjoyed this article, please consider sharing it!


Connect with Me!


